More Stuff

Thursday, January 29, 2015

A Change of Pace - Prepping Amazon Archers from Crocodile Games

I needed a break from working on the "Steady Lads" diorama last night so I dipped into the box I received from the Crocodile Games Wargods of Olympus Kickstarter. I usual need something else to work on when I'm painting competition pieces, the distraction from not having to be perfect is usually quite relaxing. I have quite the horde of Amazons at this point but I didn't want to start with one of the core phalanx units so I pulled out the archers. Like 90% of the Croc line these are sculpted by Chris Fitzpatrick and they are beautiful minis. 

There are three poses plus a command miniature. All of these have very light mold lines and the castings are near perfect which makes them very easy to work on. However, because of the pose itself that mold line goes right across the face of the minis (through the right eye, no less, on two and down the middle on the third). These are the types of mold lines that I really hate and in this case its worse because I'm dealing with a beautifully sculpted face.

I went in with one of my lighter edged files so I would leave as few scratches as possible. I followed that up by trying to buff it smooth with steel wool but I found it hard to get it into some of the crevices on these because of the poses. I pulled out one of my blue sanding sticks instead and I was able to buff out any scratches with this tool without a problem.

I'm definitely looking forward to painting these but progress is likely to be slow. I'm going to take some time and see if I can find some 20mm square resin bases for them that will push the Greek motif a bit more (I know Amazons, while part of Greek Mythology, are not themselves from Greece). There is some archaeological evidence that there may be a kernel of truth to the Amazon myth from graves found near Pokrovka, Russia (near the Kazakhstan border). While certainly not the Amazons of the Greek Myths it lends some credence to the concept of warrior women. I'm going to paint based around colors that might have been used by the Sarmations and Scythians. There is an Amazon Cavalry unit coming in the second wave but they still need to deliver the Athenians and Corinthians before the second wave gets started.

Here is what I managed last night:


11 Amazon Archers and an Amazon unit leader


Monday, January 26, 2015

Miniature Rules - A Little Reading Material

I acquired an Amazon gift certificate over the holidays so I used it and with my free two day shipping it was here last Friday. Unfortunately I was not, having left before the package arrived. That means when I arrived back at home at 6am this morning before going into the office I had to wake up my youngest son to figure out where he had put said package. Apparently under his bed was a good place for it rather than say, my desk. I think he deserved the early morning wake up call.

In the package was: Land of the Free for the AWI (my first rule set for this period), On the Seven Seas (time to finish my two frigates and pull out the pirate miniatures) and Lion Rampant, simply because everyone seems to be playing it lately.

I haven't had a chance to peruse them yet except to look at the pretty pictures.


I have some FIW minis that should give me enough minis to play with and see if I like these rules


Everyone seems to be playing them and maybe I'll get my Normans finished.


Time to get my frigates finished, rigged and ready for some boarding actions

Sunday, January 25, 2015

Diorama - Overall progress

I'm finally at the point where its difficult to show progress on certain pieces without showing the whole. The base itself is closing in on being finished. I need to finish the roof cap piece, which I cut down to get a closer fit, so now it needs a little more work instead of being done. The building shell is done as is are the cobblestones. There is still paintwork to be done on it but that needs to wait till the miniatures are finished enough to actually be mounted in place. There is some OSL that can't be done till everything else is pretty much in place.

I finished the two rats, one of which is coming out of the wall and the other will be somewhere on the street. Haven't quite decided where but he will create a line leading into the scene. I have a Reaper villager on order to go in the window, she is perfect. Its almost to bad that she is a decidedly secondary element.

The Aliens are started and I made good progress on them today. There is still plenty of work to do but its nice to finally get them started. They should come together quicker than the soldiers which still need some attention.

Overall good progress was made this weekend.

Here are the aliens, I have stripped and re-did my prepping on these. But quite frankly the sculpts leave a little to be desired.

Total loss for how to paint them so I decided to lay out my colors on a grid to get a since of what I should be mixing together

The skintones I was considering on the top two lines the final colors on the 3rd.

Did the same with the oranges.

Final colors on the last row although I'm not sure I'm happy with the highlights

Skintones in place, a little washed out in this shot

Orange uniforms in progress, still a ways to go here. I want to introduce some trim colors. The orange suit really makes the skintones pop though.

One of the rats. This one will be on the street somewhere. Got the reflective dot in the eyes on the first try!

Checking out the street scene

The adjusted cap in place. There is gap between it and the corner brickwork that will need to be fixed. I didn't bring the light post with me so I wouldn't damage it.


Wednesday, January 21, 2015

Diorama - The Supporting Cast II

Well progress continues on the base. The bricks have been neaten up a bit and the cobblestones are basically done. I also took the time to paint the interior and the windows in black. At this point I'm really happen with the way this is coming together now. I need to get heads down on the minis now; finish up the Riflemen and get started on the Aliens.

Let's get some color on those cobblestones

Pigment washes and black lining

Where I was at last night, still drying

Closer to finished now. I might let it sit for a couple of days at this point

Those are going together quite nicely now

Building is now black on the interior, lamp post temporarily stuck in place. Yea, its definitely coming together now


Tuesday, January 20, 2015

Terrain Book Sale at Dampf's Modelling


I noticed this sale before but I ignored since I have both of Tony's books already. Then I thought that was very selfish of me and I should continue to promote Tony's books otherwise he might not do another one and that would be a shame. So if you don't own these already, and you should, now is a good time to buy them before he runs out.

dampfpanzerwagon


Monday, January 19, 2015

Diorama - The Supporting Cast I

With the basic construction completed on the diorama base its time to get some painting going on that as well. In this instance I'm actually using pigments as paint. Mixed is Isopropyl alcohol to make a sludge which I brushed on to the brick walls. I picked one primary color for the brick, in this case MiG Pigment old rust, which I thought had a nice brick color. I applied a lighter rust color to break up the pattern a bit and one called cargo dust to pick out some more weathered looking bricks. I sealed this with a fixative designed to seal chalk and pencil drawings as opposed to a regular matte finish. In many cases applying a straight sealer like dullcoat literally makes pigments disappear (the base is literally dissolving our pigments). The thing to keep in mind is that the alcohol will penetrate this fixative something to keep in mind for the next step.

I let the fixative dry for an hour and applied the mortar lines. Again using MiG Pigments I created a wash with the concrete pigment and dabbed it on so that it flowed between the bricks and into the mortar lines. If you try to brush it the alcohol will penetrate the fixative and smear the layer of pigment already on the brick. Let the capillary action do the work for you.

I'm not sure if I'm happy with the result at the moment. I think my mortar lines are to "white" even though they are actually light grey. I'll let it sit for a day or two and contemplate the result before I decide to try again.

I haven't done the cobblestones yet but the lamp post is pretty close to being finished, although the "light" still needs some work. To much orange I think, I'll start adding some yellow glazes to it, to brighten it up. I also added the first rat coming out of the wall in the alley. That really started to make the whole thing come to life for me.

Everything is starting to come together and I'm confident this one will be ready for Genghis Con coming up in February. I'm not so sure if the single miniature will make it or not, but time will tell.

On to the pictures!
MiG Pigments at the ready

Bricks "colored" and fixative sprayed on and dried. It really darken everything. I wasn't expecting that.


The Lamp post. Still needs some work.

Mortar lines applied, they may be to "white"


Adding the supporting elements to build the scene


This is the basic scene, just waiting to be finished. Obviously the cobblestones still need to be painted. That will help define the light and shadow of the piece.

A Rifleman to provide a little scale

The Alley side, now complete with a rat


And here we go, five more miniatures for another diorama. This one will be for Reaper Con so there is still time to figure everything out. At least the miniatures are ready to go!

Saturday, January 17, 2015

On the Go Paint Storage

I travel quite a bit in the local area with my paints. I'm always on the look out for an easier way to both transport and keep it organized. I have four paint cases from Reaper that have a foam interior that is cut out for paint bottles. These are apparently small pistol cases and I find them very handy, I use four of them. Three are used to carry the standard Reaper MSPs that I like to have with me when I go painting and the other is for the paints that I'm using on my current project. That way I'm not digging for or trying to remember what paint I was using from one session to the next. Each of these cases will hold 36 bottles. I like them but I need to figure out a way to label them since I'm constantly opening the wrong case looking for the color I want.  These cases will hold Vallejo and Scale Color (from Scale 75) bottles as well but those bottles are little taller and you have to force the cases shut when they are in there.

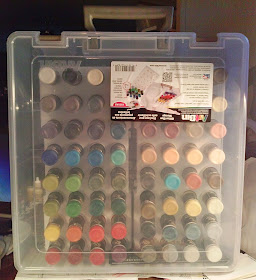
I was on TMP today and some one had find some cases at Joanne's for "Glitter Glue" that are just about perfect for my purposes. Each case comes with two trays to hold the bottles by their caps (in other words upside down). They are just the right height for Vallejo and Scale Color and each case will hold 64 paints. And since they are clear cases I can see what colors are inside them at a glance. It has a nice latch system and a handle so they will be easy to carry as well. These are a tad on the expensive side but they were 50% off today at Joanne's so I picked up two. I had first heard of these over on the Reaper Forums but had completely forgot about them till I saw the post on TMP today.

When I head over to the conventions I usually put everything in my roller bag. Since these look like they are re-purposed scrapbooking paper cases they should fit inside that quite nicely. I have heard some concerns that paint would leak when its stored like this. As long as your lids are on tight that shouldn't be an issue. I used to store my enamel and lacquer paints upside down so they wouldn't evaporate out of the jar. If you have some kind of shaker inside your bottles that's like to be up in the tip though so keep a sharp pointy object nearby to clear the tip.

The specifics in case you decide to give them a look: ArtBin, Glitter Glue Storage, 6959AB

And of course pictures are better than anything I can describe:
Here is the case, not quite empty. I started to fill it before I thought that maybe some pictures were in order. Clear case, with two trays inside each holding 21 bottles of paint, caps down.

Here is the first one that I filled with my Scale Color paints (which also took up a portion of the second case). I will at least fill the second tray in the second case with Vallejos. While I still own a lot of Vallejo paint I find I don't use it as much as I used to.

Here is the lid open. I actually wish the lid just came completely off, so I could leave the lid off while I'm painting.

Each of the trays also has a little "kickstand" as well. The trays are completely removable, so now that I think about it I can just take them out of the case completely while I paint.

Here is the case standing upright on the table. Two latches to hold the lid shut and a nice handle to carry it with.

Thursday, January 15, 2015

World War I USMC Picture References

A recent post on TMP pointed me to a USMC site that provided uniform "packages" to Marine Corps bases for their anniversary celebration. I went ahead and grabbed the photos for some additional reference. Obviously several of these uniforms are complete reproductions but a few of them I believe may well be original uniforms.


I'm pretty sure this is a reproduction. Notice the difference in color in the putees between this photo and the rifleman photo
And an action pose. Now, look at how the change in light affected the color of the uniform its greener in this picture, he is standing in more shade than in the first shot.

Based on the color I'm seeing this one may well be an original uniform

The putees are "greener" on this rifleman. Note the difference in color between the pants and the jackets. Quality control leaved much to be desired at this time. The same specs to two different manufacturers could easily result in different colors.


Again, see how the sunlight affects the colors