More Stuff

Monday, September 18, 2017

For Sale or Rent - Dinosaur $85,000

We have been working so hard on the remodel I decided to indulge my wife in one of her pastimes and headed out to the Gem and Mineral show that was at the Coliseum in Denver. This is one of the smaller arena facilities in the area now and its where I used to go to watch hockey and the circus. This show was enormous. Massive tents out side and every level inside was packed with gems, minerals, fossils and meteorites. I wasn't going to take any pictures until we walked by this little display:


A sweet T-Rex skeleton, yours for only $85,000


But Wait! If you can't buy it, just rent it for a while and put it in the living room!

Wednesday, September 13, 2017

World War II Project - Trenchworx M4A1 76mm Sherman

As Reaper Con continues to loom larger in the sites I decided that I would like to have at least two armor entries. I was going to bring the MadBob German armor that I finished some time ago but I think I can do better. For this effort I'm going to paint up the Trenchworx M4A1 76mm Sherman and the M18 Hellcat. I figured I could do these at the same time without much of a problem. While I know I just received a Company B M4A3 Sherman, I decided I should opt for a Trenchworx kit as I think its a better casting.

The resin casting on the Trenchworx kit is really superb, although I can still see the 3D printing bands from the master model. They are pretty fine though so I'm confident that the primer and subsequent paint work will make them disappear. The casting lines on these are pretty much non-existent and the method used to cast the tracks means there are no mold lines going right down the middle of the tracks. There is one channel mark and it was easily dealt with.

The white metal parts are, for the most part, very crisp and well cast. I did have issues with the .30 cal MG, which looks like it slipped in the mold. I cleaned it up but I really should contact Trenchworx about a replacement, I'm just not sure there is time for that so I'm going with what I got. Also the driver side front fender didn't cast well, it almost looked like it cracked while it cooled. I'm going to go ahead and break it off before I prime as damage to these fenders was pretty common. Since this part of the fender is pewter you could easily thin it out and bend it if you like.

During the assembly I found that the driver's hatch might be a little small and the radio operator's hatch is a little big, that one took a little work to get a nice fit. Other than that it went together quite easily. At this point it is by far the best resin tank kit I have assembled. 

So here is where today's work progressed:
The parts straight from the bag, look pretty darn good at this point. Just a little flash on the inside of the tracks, easily dealt with using a nice sharp knife.

Dry fitting, always dry fit first!


Some really nice detail on the back of the hull

The white metal parts all cleaned up

Starting the assembly. You have to glue on the front fenders before you glue the tracks in place. You can get them in there after gluing the tracks in but I found a needed to make a couple of small adjustments for a good fit so this was much easier to do before the tracks were attached.

Here you can make out the crack in the fender casting

Turret all assembled. I have a Company B commander to go in the open hatch


Rare earth magnets to help hold the turret in place. Got the polarity right the first time!


All ready for some primer. I'll build up the M18 before I do that though.


Tuesday, September 12, 2017

Kickstarter Rewards Received - Disposable Heroes Miniatures

Brigade Games ran a Kickstarter to start a line of WWII miniatures to support their Disposable Heroes Miniatures Rules. This one closed in May and was supposed to deliver in July. They were only a couple of months late on this one which is not to bad but the communication really needed to be better.

I think the miniatures look quite good and the M4A3 is a new release from Company B. I haven't built a Company B tank so I'm looking forward to that. I'm not sure when I'm getting to these but I would like to move them up in the queue since I'm trying to actively work on the World War II project while filling in gaps with the other projects.

Here are a few pictures. 


What came in the box. I bought a platoon of US, a platoon of Germans, along with some support weapons and a few extras. In this case American and German NCOs, and extra German LMGs so I could field the German squads as Panzer Grenadiers.

Packs of the German Platoon, 35 figures, including the platoon HQ figures.


US NCOs, yes all the heads are separate so you have a few options to make the minis look a little different.

German LMG crews

M4A3 from Company B

Not thrilled with the casting lines on the tracks, fortunately most of that is hidden

The turret and all the white metal detail parts. Definitely more than a simple kit with cast on details. Looking forward to making this one.

Monday, September 11, 2017

A morning on the Loop - Georgetown Loop RR

I finally managed to work in a bit of a vacation last week. A good chunk of it was still spent working on the on going house remodel but we still earmarked a couple of days to get away from that as well. On the house front the garage is finally cleaned out and all the tree limb debris has been removed. We also took the opportunity to start the demolition of the master bathroom which ended up including the removal of the old tub. Fortunately it was fiberglass and my son and I were able to carry it out pretty easily. The new tub will have to sit in the garage for a bit before I'm ready for it.

On our day off we had tickets to ride the Georgetown Loop Railroad up in Georgetown CO. Its been a couple of years since I have ridden this train and I'm always impressed by the constant improvement of the facilities every time I go.  The train was handled by the #9 Class C Shay that day. I think that it has been converted to an oil burner from a coal burner since the last time I rode behind it. Probably for the best considering how dry the summers can be here. 

A Shay locomotive is a geared engine rather than your more standard rod engine. The Class C is the biggest of this type and features three trucks and three pistons. With this type of locomotive you can see the big gears on the wheels which means that all the wheels are providing traction on the rails so they can pull heavy loads up very steep grades (as high as 14 percent) but at slow speeds. Its just about perfect for the Loop.

The line runs between Georgetown and Silver Plume. The distance between the two is pretty short and the change in elevation is significant enough that in a straight line an engine wouldn't be able to climb the mountain. Instead they built the loop, letting the track loop back on itself in order to gain enough distance to lower the grade to a mere 4%. It increased the run from 3 miles to 7 miles which makes for a very nice little ride for the tourists!

I first road this train in the '75 or '76. At that time the track had been finished to the abutments of the High Bridge and finished to Silver Plume. We crossed the river on a small wooden bridge and climbed the embankment up to the tracks. At that time they didn't think they would ever be able to afford to rebuild the High Bridge estimated to cost 1.5 million back in the 70s. In '83 or '84 the Boettcher Foundation came through and funded building the bridge and you can enjoy a complete ride over the loop today.

A few pictures of the day:

Watching #9 (an ex-Westside lumber company Shay) bringing down the first load of passengers from Silver Plume (you can choose which end of the line you want to start from), over the High Bridge.

The center span of the High Bridge, which crosses Clear Creek, is known as the Devil's Gate Viaduct.

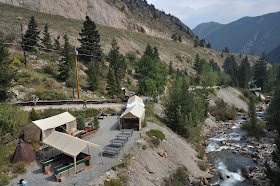
Clear Creek right by the station

A better look at #9

Going under the High Bridge


Going over the High Bridge! Looking to the east towards Georgetown

Looking west towards Silver Plume

The Lebanon Gold Mine. You can stop and take a mine tour and even pan for gold here.

Looking back to the east, you can tell the engine is working hard upgrade with the black smoke.

Clear Creek, dropping fast as we approach Silver Plume. Silver Plume itself is on the other side of the highway.

Some more parlor cars

The logo

The engine house. They seemed to have acquired a large number of diesel engines that are in various states of assembly at this point. I didn't have time to get out and see if #12, the rod engine, was in the engine house for service.

Looking north towards Silver Plume. If you look you can still see the mine tailings from at least 7 silver mines in the area.


Silver Plume station, this is the original station built by the Colorado Central, the original builder of the line. Eventually the Colorado Central would become part of the Colorado & Southern RR.

Leaving the station to go back to Georgetown

Houses on the hill. They look they have seen a number of addition over the years.


We have stopped at the Lebanon mine to let the tour group off. The car I was riding in was right on the bridge. This is Clear Creek looking to the west.

This is Clear Creek passing under my feet

And Clear Creek looking to the east.

The turns are sharp enough that sometimes I could catch the engine swinging out in front of the train. I should have been sitting farther back this time.


Arriving back at the bottom, with the High Bridge in the distance.

Spotted by red Jeep ('98 TJ) in the parking lot.