More Stuff

Friday, October 26, 2018

Farewell Hobbes


This has been a tough one, we had to put Hobbes, "Big Dog" down last Monday (10/15). He had reached the point where he could no longer stand up on his own, along with the resulting lack of dignity. I had been preparing for this moment for almost a year and he certainly held out a lot longer than I expected. He came to me through the Great Pyrenees rescue group, at that time near Monument CO, having been found wandering around the Colorado Mountains near Glenwood Springs.

He was the gentlest dog I have ever had, gentle even for a Pyrenees. Just an amazing dog, he would just silently show up at your side for attention and then move on when he had enough. Based on his behaviors he was a Live Stock Guard dog in his early life, and had a deep booming bark and a earthquake rumbling growl, all mostly for show in his time with us. He was affectionately known as the "hobstacle"  for his ability to always being laying where you need to be, usually in front of the stove or the refrigerator (a #110 dog is an obstacle no matter what but he brought it to an art form). He was a great companion and I'm honored to have given him is "forever" home. I figure he was right around 13 years old (old even for a Pyrenees) when he passed on.


This is my rawhide, I'm saving it for later

Thursday, October 25, 2018

Sledgehammer Project; Preparation Pt VII - Collecting More Materials

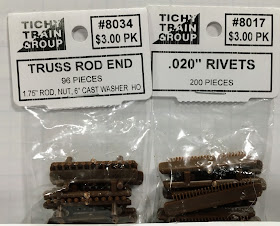
A couple of more packages arrived yesterday that bring me closer to the point where I feel like I'm really getting started on this project. The first is a picture that I found on eBay, which is a fantastic reference shot and is pretty much the scene that I want to recreate. The rest was just some mundane detail items, specifically Nut/Bolt/Washer and rivet castings. These are in plastic from Tichy Train Group. I prefer the ones from Grandt Line but the sale of that company as resulted in a lot of empty pegs in hobby shops while the new owners get organized. Still a couple of steps closer than before.


This a photo taken sometime in WWII on the Eastern front of the artillery crew for a B4 Howitzer loading the gun. It has a lot of fascinating details and I find the fact that they had to load this with a ramrod I find particularly fascinating. I also learned why I wasn't see shell cases in any of the other "action" photographs of this beast. It uses separate powder charges as can be seen in the cradle used to help hoist the 203mm round into place. This is a 6"x4" BW photo that is going to get used a lot. There are a lot of little details that can be gleaned from it.

Wednesday, October 24, 2018

Sledgehammer Project; Preparation Pt VI - Collecting Materials

I woke up at 2:30am the other day and couldn't get back to sleep. During that time I managed to think my way through the process of creating masters for defensive fortifications that I need for the diorama. I did take a look around for some of the resin pieces that Forge World made a long time ago and I actually found some, however, I was definitely not going to pay the price that people were asking for them. Hence I decided to make my own and there are to many pieces needed to build them individually. I need to make 6, or so, masters and have those cast in resin (I'm going to lean on a friend for the molds and casting) to get the requisite number (I don't even know what that number is yet).

Since I need to have pretty sharp edges I'm electing to the really critical pieces of the masters out of brass (although probably with glue rather than solder). For the floor pieces I wanted a diamond pattern and I was just running through all kinds of time intensive ways to create those till my early morning wake up call. Instead of actually building the diamond pattern up all I needed to do was find a square grid about the right size and when just turn it 45 degrees to the edge, instant diamond! While it won't have the elongated diamond shape it will give the right look when I put it all together.

A quick run to the local hobby shop came up with these materials and combined with some sheet styrene should get me to the right place.

A square grid, a piece of brass sheet and brass angles in two different sizes. 

The grid

And a quick look at how the diamond pattern might look next to the brass angle that will form the edge.
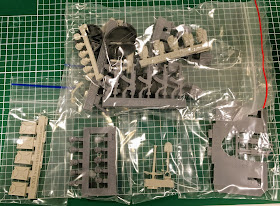
In addition to this I have a number of brass, plastic and pewter model railroad parts to start detailing the Sledgehammer itself.

Tuesday, October 23, 2018

Clue - Silver Line

We were wandering down the Christmas aisle (yes Christmas aisle) at Costco when I spotted a new Clue. It seems to be a tradition now Hasbro to take four of their traditional boardgames and packaged them for the Christmas season. This year they are known as the Silver Line and of course is contained a new rendition of Clue.

The price was right so I picked it up to add to the collection. Other than presentation this is pretty much a standard edition of Clue. It does have 7 weapons, so the bottle of poison is back in and it also includes the event deck.  You draw from it if you roll the magnifying glass on one, or both,  of the two black dice. I like the event deck and going with 7 weapons adds a bit more to the game. I have a few more comments in the captions for the pictures.

I do like the film noir look to the box. 

The box is a departure from the normal, the top and bottom are the same size but the body of the box itself is narrower.

The back of the box

The rules are right there when you open it up.

After removing the board this is what you see

This is new, these are invitations for the characters. You can use these to randomize which character you will be using for the game if you like.

The back of the deck and the confidential file sleeve

The six characters, I still lament the loss of Mrs White, the Maid.

Six of the weapons, the wrench is missing because I just counted out the six cards and took the picture. Again I like the B&W film look here

The rooms cards

The Event cards

The nice bag along with the game pieces

The weapons, I think the weapons just keep looking better every year.

The character pawns, the dice and some fancy clips. The clips are used to attache your sheet to the invitation. Probably won't bother with that. I think the clips would start to tear up the invitations cards after a while.

And the board. Its hard to see the in the photograph but there is a silvered look to the board. Again a nice nod to the film noir look. I think they could have gone a step further and done everything in black and white.

Monday, October 22, 2018

Acquisitions - Metal Bending Tools

With the some of the modifications I want to make with to the Sledgehammer I found it easy to justify some new tools. I'm expecting to do a bit more metal work on that kit plus I could really use these for some model railroad projects as well. These are metal bending pliers which should make it much easier to do some of the bending I'm anticipating will be coming up. The Micro Mark website is very dangerous place.


Friday, October 19, 2018

Sledgehammer Project; Preparation Pt V - Continued Prep

Again a little work on the Sledgehammer. I know its coming in bits and pieces at this point but I'm really biding my team with the simple stuff while I consider conversions and additional details. The arrival of the care package from Victoria Miniatures helped quite a bit since the crawler tracks and gun shield were in the order. I'm definitely going to use the crawler tracks but I'm up in the air on the gun shield. Its a neat addition but I'm not quite sure of the effect it will have on lines of sight on the diorama, I'll have to play around with it a bit. In the meantime I'm limiting myself to getting the pieces ready for assembly. I found a few more pieces that needed filling this time around too, one of which is in a highly visible position so better to find it now than later!.


Here are the pieces I focused on, along with the tools I used. Squadron Green really gums up the files, all of those will have to be cleaned before I can use them effectively again.


Thursday, October 18, 2018

Sledgehammer Project; Preparation Pt IV - Crew Comparison

As the diorama concept comes together for the Sledgehammer, my thoughts have turned to the crew. I know that I will need to do quite a bit of modification on some of them, especially the ones from the infantry squads, to fit them in. I decided that a comparison between the Reaper Bones crew and the Victoria Miniatures Resin crew was in order. 

A couple of things really stood out here. The Bones plastic crew has nearly the same sharpness of detail as the Resin crew. I was certainly not expecting that and my original thoughts were to have the Bones crew in supporting positions. Since the level of detail is nearly the same I don't need to be nearly as concerned as I was prepared to be. That being said it is a lot easier to modify and convert the Bones crew so any modifications I need between these will definitely be worked on them. At this point I'm wishing that the old Reaper Boneyard existed for the Bones miniatures, I would likely get another whole set of them just for conversions.

The other detail that stands out is that almost all the Bones crew are taller than the Resin crew. That will help differentiate between the miniatures with a little less effort. Which is something else I was already thinking about when I made the order. A set of male and female militia heads to swap out with the squad heads to add more visual interest. Hopefully it will all come together, I can see the scene in my head, its the translation that is difficult.


The resin artillery crew from Victoria Miniatures. They are in the same poses as the Bones artillery crew from Reaper. Unfortunately it looks like I'm missing a hand for the gentleman on the far right in the photo.


The gentleman on the left is slight different with his right hand cast separately. He is a single casting in Bones.


There is quite a difference in height between these two.

These pair is much closer in height but will be on opposite sides of the gun so it won't be a problem

These two are also pretty close in height, but I'm likely to only use one of them unmodified.

I didn't line this one up quite right, the man on the right is actually significantly taller than his compatriot.

It was hard to line this pair up, I think the Bones version is still a bit taller.

And here we actually see the resin officer is taller than the Bones officer.

Wednesday, October 17, 2018

Acquisitions - Expanding the PzKfw III Library, Panzer Tracts 3-3

The last copy of Panzer Tracts finally arrived yesterday, coming all the way from Japan. I really paid to much for this but its amazing how quickly the prices jump on the out of print Panzer Tracts. While I had to gulp on the price it was still the cheapest copy out there. It arrived very pristine in a heat sealed bag. Of course the first thing I managed to do was bend a corner on the front cover. This particular book covers the PzKfw III ausf J, L, M and N, of which the L is probably my favorite variant. Its real transition model so there is a lot of different things you can model with it. Loaded with pictures including templates for the spaced armor plates and blow up drawings of a lot of the details. Fabulous book and after paging through it I'm certainly not begrudging the money I spent on it. Looking forward to doing some super detailing on some Plastic Soldier kits!


Tuesday, October 16, 2018

Sledgehammer Project; Preparation Pt III - Work & Acquisitions

I managed to slip in a bit of time on the Sledgehammer (very little time actually). I spent that time filling a few of the injector marks, from the mold, that might be seen by a judge. I basically went on the premise that when in doubt fill it. I still need to go back with the file on those pieces. I also spotted a few pieces that still have the remains of mold lines, in particular the shells. They are  particularly obnoxious to clean up. I think they are going to need some filling after all.

A nice package arrived in the mail yesterday as well. My order from Victoria Miniatures arrived. The sledgehammer will be the centerpiece of a diorama. This will definitely be the biggest one I have done which leads to the inevitable need to fill some very empty space. I have a couple of nice reference photos for the Soviet B4 Howitzer in firing positions during WWII as well as some links to some really nice artillery dioramas on the web. The key to the bigger base will be creating vignettes that will add interest and yet keep the focus on the Sledgehammer. A lot of the order from Victoria Miniatures were purchased with that idea in mind.

The Sledgehammer comes with a crew of five plus a commander, but they are in the softer slightly bendy BONES plastic. The casting is really pretty good on these and they will  serve as the basis for some of the needed conversions. In addition I purchased the resin version of the crew along with the officer to supplement the ones in the box. To go with that I a purchased a 5 man Rausenburg Siege Corps squad as well as a 5 woman Rausenburg Siege Corps squad most of which will also end up as artillery crew. For the Sledgehammer itself I picked up the blast shield (which I may or may not use) along with the crawler tracks which I will definitely be using. The rest is just extra bits to use for the vignettes; backpacks, bread bags, weapons, etc.

I'm still looking for additional parts for the Sledgehammer itself as well. Right now it looks like most of those will be coming from model railroad manufacturers but its been a bit frustrating researching the parts. I have decided that the model railroad manufacturers are years behind everyone else in getting their products on the web or when they do they don't have a site even remotely resembling a modern web site. I know what I need I just need to find a place to buy it! I might make a trip out to Caboose hobbies and see what they have on the walls. I have checked their website (which keeps improving) and didn't really see what I wanted though and its a long haul for nothing then. Be assured though that the gun itself is going to get a lot of dressing up!

The gun supports, these marks will be on the inside, but can be quite visible unless I do some serious work on the "interior" of the Sledgehammer.

This is the bottom of the "wooden" walkways over the wheels (I don't think I can use them with the tracks). I'm waffling on if I want to use these or not. I'm think of replacing them with some etched brass walkways instead. I'll carve out the supports if I go that route since they already fit in the slots on the gun carriage.

The last few pieces that I found with potentially visible injection marks. I didn't bother with the ones in the wheels, those will be completely hidden once the wheels are assembled. I am unlikely to even use the wheels since I have the tracks.

Four bubble wrapped packets from Victoria Miniatures

On the top the 5 "man" squad. Left to right; jerry cans, male militia heads, entrenching tools, and the blast shield.

From left to right (more or less); Crawler tracks, BFG shells, grenades, ammo boxes, biker stowage, and breadbags.

Resin Gun Captain

From left to right (more or less); Kneeling legs with greatcoat, backpacks, female militia heads, and the resin version of the crew. 
From left to right (more or less); "Bren" guns, Sniper rifles (I think I ordered the wrong thing, oh well), 5 "woman" squad and two of the three Svargan Snipers


Sniper closeup. I have no idea what I will do with these. You received on free for every $50 and I really have no use for them. I delayed my order a day to avoid getting the even more useless Highlands Moss Piper. They are great figures but since I don't play 40K so they will get stuck in one of my many boxes of random figures.