More Stuff

Friday, May 29, 2020

Life Intervenes - Raised garden beds

We came across some plans for, essentially, no-bend raised garden beds, raisedurbangardens.com. Definitely well worth the $10 investment and if anyone decides to build these, please purchase them from the website, $10 is a small price to pay for such a great design. A quick trip to the DIY and we came away with pressure treated redwood 2x4s (because that's all they had), deck screws and concrete mixing tubs. We cut the pieces for two of these beds. When I had a couple of spare hours, a couple of days later, and managed to knock out both of the raised garden beds for my wife. Then we moved them to the "outback", an additional fenced off area in our backyard that is left in a semi-wild state, dirt was flung and planting was completed.


Back out comes the compound miter saw and the rollers stands

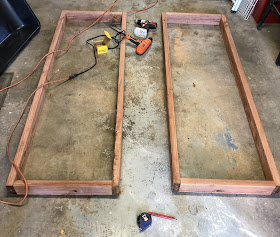
All the components for two raised beds, 6' long, 2' wide

Legs complete

Lower framing attached to the legs.

Squaring up the top frame

Top frames ready to go

All the woodwork is done, these suckers are heavy. I thought the redwood would be lighter but I was wrong. I have never really worked with it before.

Concrete mixing tubs in place, drill some drainage holes and we are set.

These hold more dirt and compost than I thought possible

Planting done, trying out the square garden technique this year. Gardening is certainly more attractive when you don't have to bend over to plant and weed. In fact very little weeding should be necessary with these beds. Again the beds are located in the "Outback" the semi-wild area where the dogs are not allowed.

Thursday, May 28, 2020

Life Intervenes - A little woodworking - Painting

The doors are finished and painting has started. Still contemplating about how to get them into place but we are a couple of steps closer to getting rid of the current beat hayloft doors.


I didn't get the angle quite right on one of the crossbucks so that one will go in the back or its going to drive me crazy for years to come.

Thursday, May 21, 2020

World War II Project - Return to Normandy - Terrace House Progress

I haven't been able to find a lot of painting time right now. Between work and "life intervenes" moments about all I can fit in is during the day. Working on the Terrace house lets me work for 15 minutes and get called away for something else and not need to shut down and clean brushes and the like.

Progress at this point is kind of all over the place but mostly I have been working on the "backyards". Oddly enough there is no backdoor and the more I think about the more I think I might have made a mistake by making the small out building from "wood" rather than the stone. Oh well, I doubt that to many people will complain about it.

All the pieces wrapped and ready to go, if only it had been as easy as that sounds.


First thing to remember. The width of paper can really make things difficult, especially this bumpy paper. Every place were the garden walls came into contact with the building required me to cut away the paper from the building and around the tabs to make things fit. As it is I did quite a bit of "forcing' in the end. There is not a lot of glue holding things together in the back.


Monday, May 18, 2020

World War II Project - Return to Normandy - Terrace House Prep Work

In order to fill in those odd spaces of time that aren't quite long enough to paint in I have been slowly working my way through one of the Sally 4th Normandy buildings that I picked up quite a while ago. Like the Charlie Foxtrot building I'm going to use a paper product for the exterior of the building to see if I can speed things up a bit. I'm going to avoid adding corners to hide seams this time, that was just to much effort on the Charlie Foxtrot building. This time I'm using some "bumpy" paper with a natural stone pattern on it. I discovered this stuff from a Stalingrad build in the Lead Adventure Forum and thought I would give it a try.

As always, I get deep into the weeds pretty fast. I start missing around with the chimneys as a proof of concept. 


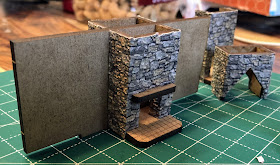
Pretty simple, build the fireplace and fold the paper around it.


Trimmed up with the hearth opening cut out and folded back along the interior edges. You can pick out the chimney in the background,


I would have called this a final shot except I forgot two of the mantle pieces.


This picture is a lot closer to the actual color of the paper I used. You can see the "bumpy" surface and how it helps the stonework pattern look a bit more "real"

There are a few ugly edges in there but the paper folded quite nicely with a little score on the back. Trimmed them up and glued on the mantles (which still need to be painted).


Since these came out pretty well I went ahead and worked the exterior walls with the same paper and added a wooden floor pattern to the first and second floors. Then I primed and painted the interior side of the building. I'm sure I missed something but hopefully this was most of it.


A little dry fitting to make sure it will really all still fit together.


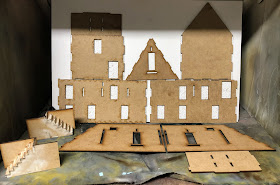
Ready for priming, mostly large sections that would be on the interior of the building.

Started with the Ebony Brown Stynylrez primer from Badger

Followed that with a coat of  "Neutral" Stynylrez primer. I considered highlighting this but decided that this was "good enough".
The "bumpy" paper was applied before I primed the walls. I used wood glue for this and weighed it down with my steel machinist blocks.

Same walls with the doors and windows cut out. I did one small slice from the back to locate each window and then did the rest of the cutting from the front. This helped to avoid tearing the paper. 


Friday, May 15, 2020

Life Intervenes - A little woodworking

I occasionally dabble in the workshop. Last year (2019) was a particularly bad year for hail out here. Unfortunately our time was gobbled up trying to deal with my father-in-law's estate of which my wife was a co-executor of the will, which really meant that she did all the work while her brother sat back and just griped about how long it was taking. Needless a lot of stuff was left undone because of the time that soaked up.

So the project is to replace the two "hay" doors on our detached garage. As you can guess our garage has a barn style roof and the two existing "hay" doors were replaced about five years ago by someone, not me, that didn't know what they were doing. While the plywood back was fine, it appears that he used framing made from some type of MDF which was definitely not a good idea for a couple of exterior doors. The 2019 hail was the final straw for these doors and they have to be replaced.

The plywood was easy to find but there is not a even remotely straight piece of 1x4 to be found in a 20 mile radius of our house. I ended up buying 1x6s (only slightly warped) that I ripped down to 1x3s on the table saw (an ancient craftsman table saw that has to be at least 30 years old at this point).


MDF, outdoors and hail, a recipe for failure. This is the west door, the east door is actually in worse shape.

Framing boards ripped down on the left side, plywood cut and ready for framing in the middle.

My 10" compound miter saw, ready to cut some angles.


Thursday, May 14, 2020

Life Intervenes; Kitchen Remodel Finished.

I have been remiss, the kitchen was finished in about mid-April. I'm happy to report that my wife loves it and we haven't even been able to fill all the new storage space. We will endeavor not to even try! It also features some serious counter space with the redesign, no more awkward corners either.


From the entrance to the dining room, basically looking east.


I may have to bury my wife with this gas range, she loves it that much.

The second (electric) oven and microwave/convection oven, and the fridge relocated to a much better spot.

Basically looking west. The two windows are on the south wall. They open the space up although the view is of the garage on onside and the side of our neighbors house on the other, but Light!

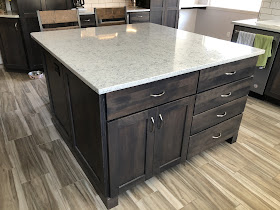
The very useful island, no sink (which tended to get used to keep items away from the dogs rather than its intended purpose of providing water), cabinets and drawers on this side, cabinets with pull out drawers on the other. And plenty of space to work without bothering the person sitting on the other side.

The "butler's" pantry on the north side. Coffee, tea and adult beverages in the middle, fermenting equipment in the cabinet on the right, appliances in the cabinet on the left.

Must not forget the wine cooler!

Tuesday, May 12, 2020

World War II Project - Return to Normandy - P107/U304(f) Halftrack - Decals

A spot of detail painting and some decals and these are ready for some weathering. For the most part the markings used on the 21st Panzer Division vehicles was pretty light, I decided to flaunt historical accuracy at this point and add the markings that I wanted which includes divisional symbols and numbers. Location of the division symbols is pure conjecture as are the numbers on the rear of the vehicle. License plate markings on the front round the whole thing out. There doesn't appear to be a spot for the license plate on the back.


Monday, May 11, 2020

World War II Project - Return to Normandy - P107/U304(f) Halftrack - Basic Camo

I know we are all on lock down but sometimes finding time to paint between all the things my wife can find for me to do is quite difficult! A little basic camo work on the U304s. I like this "leopard" pattern a lot so I decided to do these 21st Panzer vehicles in the same scheme as the others. I'm seeing a little bit of spitting from the airbrush with the brown paint, I'll have to be a little more careful in thinning the paint down a bit more.


That brings these up to about the same level as the other 21st Panzer Division vehicles I have been working on. I'll add the decals and then start the weathering work on all 7 of them. Good practice before I move back to the StuG IIIs.