The Town of Calamity, The D&RGW RR Warehouse Row and Historical Miniature Gaming
More Stuff
Wednesday, January 27, 2021
Wednesday, January 20, 2021
Friday, January 15, 2021
Lani & Phoebe Musings - Selecting and Airbrush
 |
| Lani speaks |
 |
| Phoebe disagrees |
This is a long one, get your favorite beverage and put your feet up.
Before I get to far there is an Airbrush Compendium thread in the Reaper Miniataure Forums: https://forum.reapermini.com/index.php?/topic/62981-airbrushing-the-compendium/
It is pinned and updated on a regular basis. There are a ton of links to airbrush threads in the forum as well as links to other forums, websites and videos.
Major Airbrush Components - The parts that make the difference
For our purposes we are only concerned with two types of airbrushes; single action and double action.
Triggers
Single action airbrushes are the simplest of the two, you press the trigger and you get paint. The better single action airbrushes will have an adjustment screw at the end which allows you some control over how much paint is flowing through the airbrush.
Double action airbrushes are more complicated, but they allow you a lot more control. With a double action you get air when you depress the trigger and as you pull it back it allows paint to flow through. The further you pull it back the more paint you will get. This allows you to adjust how fine a line you paint and as you pull back the trigger farther you can widen the line. In other words, if you want to paint a large area you would pull the trigger back all the way, for a smaller area just pull the trigger back as far as you need. Since you control the trigger you can vary how much paint comes through “on the fly”. Some double action versions have an adjustment screw on the end. Like a single action this allows you to set the maximum amount of paint you want to spray. If you were painting a lot of very fine lines you could set the adjustment screw to only allow you to pull the trigger back enough to get just the amount of paint you need.
Paint Supply
There are two primary ways to get paint into the airflow; siphon and gravity feed. You can get single and double action airbrushes with the method of your choice and there are a few types out there that will allow you to switch from one to the other. You will find that the higher end airbrushes are usually dedicated to one or the other.
Siphon Feed
With a siphon feed the paint goes into a jar and the jar is mounted to the front of the airbrush. A hose feeds down into the paint jar and paint is drawn up through the hose into the airbrush when the trigger is depressed. This type tends to be a bit nose heavy with the weight of the jar and the paint. This type of feed is great when you need a lot of paint for large areas (like terrain). Not as useful for smaller work as the jar typically needs to hold quite a bit of paint for the siphon to work correctly and the jar sometimes is in the way if you are trying to do close in work.
Gravity Feed
This is a paint cup that either sits directly on top of the airbrush or on the side (the top mount is the most common). The paint cup size can vary in size quite a bit, if there is a choice, I would recommend getting the largest cup available to avoid constantly reloading paint for larger projects. The gravity feed works by gravity! Paint is dropping down, internally from the paint cup to mix with the airstream. I have played with a couple of airbrushes that have side mounted paint cups but I find the side mounts are a little heavier on the side they are mounted on and I tend to spill paint out of the cup (primarily because I don’t always put the cap on the paint cup, but that’s my personal problem).
Internal or External Mix
An external mix airbrush introduces paint into one side of the air stream. An external mix is very difficult to clog so it is much more forgiving of paint viscosity. They also tend to be much easier to clean; a supply of pipe cleaners will do the trick most of the time. Because of the way the paint is introduced into the air stream you get uneven atomization. In other words, if you paint a line one edge will have more coverage than the other edge. Its hard to paint fine details because of this. I would only use an external mix for large areas where details are not an issue.
An internal mix airbrush introduces paint directly into the middle of the air stream. This allows for very fine atomization and a more even distribution of the paint. This allows you to paint very fine details as the paint is guided by the needle. This does require thin paint, thick paint or any kind of debris (dried paint from the rim of a paint bottle is a good example) introduced through the paint will clog the airbrush. Sometimes trying to figure out why your internal mix is clogging can be a real challenge!
Needle Size
Needle size is the key attribute for an airbrush. Without the needle you just have an expensive spray can. The needle acts as the flow limiter and directs the atomized paint down the taper. This taper determines how finely you can paint. For example, a general purpose needle, 0.7, will cover a much larger area when fully open, than a super detail 0.3 will. Conversely the 0.3 will paint a much finer line than the 0.7 can.
An important note about the needle. Depending on the size the tip can be bent relatively easily (super detail needles in particular) so you need to take care when you are breaking it down or re-assembling it. A bent tip is not the end of the world though and can still be used its just not going to spray straight so you can’t use if for detail painting but you can still paint large areas or prime minis or apply basecoats with it.
It is possible to straighten a needle with a little care. Take two smooth edged coins (in the USA pennies and nickels are good quarters are not) and place them on either side of the needle. I apply a pressure to the coins to hold them in place and then push them towards each other as I pull the needle between them. Just make sure that the direction of the bent tip is facing one of the coins, if the bend is straight up or down it will not come in to contact with the coins and will not have a chance to straighten. I usually have one or two spare needles on hand, but I never throw a bent one away, like a brush with a curved tip it still has its uses.
Selecting your airbrush
Now that you have an idea of what makes up an airbrush we can move on to the big question. What do you really want to do with your airbrush? If you only have one thing you intend to use it for it’s a pretty easy question. For most us there are multiple answers to this question, and it may be that it will take multiple airbrushes to achieve radically different goals. If all you intend to do is paint terrain or to prime miniatures then a single action, siphon feed, 0.7 needle airbrush is all you need. If you intend to have an air brush as part of your painting tool kit then a double action, gravity feed, 0.5 needle airbrush would be a good place to start. One important thing to keep in mind is while most airbrushes are dedicated to a single needle size some of them are capable of using multiple sizes of needles like the Harder-Steinbeck Infinity or the brand new Reaper Miniatures Vex.
Example :
Define the painting goal(s):
I am, primarily, an army painter mostly painting both 15mm and 1/56th scale vehicles along with large batches of minis both 15mm and 28mm. Along with priming I tend to do initial painting and shading of the 28mm miniatures with the airbrush. None of those goals seem to be radically different. Can I do this with a single airbrush?
The basic answer is yes, I could, but it makes achieving some of my goals a bit more difficult. On the other hand, my list of goals is a lot more all encompassing then when I first started looking for an airbrush. At that time my army painting was almost exclusively 15mm. Based on that I decided that I would need a dual action airbrush for the flexibility it offered while painting, a gravity feed because I didn’t need to have a lot of paint in the paint cup due to the size of the minis (and I remembered absolutely hating the siphon feed on my very first airbrush) and a detail needle, again, due to size.
Based on my needs and some recommendations I went with an Iwata Eclipse (Dual Action, 0.35mm needle, 1/3 oz paint cup). This is an excellent brush and it got the job done, but priming was a pain in the butt it took forever because the coverage area of the detail needle was so small. I also found that I couldn’t really paint for long sessions, 30 minutes was about the limit because my hand would begin to cramp.
A couple of years later I bought a Harder-Steinbeck Infinity Two in One (Dual Action, 0.15 needle and a 0.4 needle, 2ml and 5ml paint cup) specifically thinking that I could replace the Iwata with it. In the end I kept using both. The Iwata for detail and the HS for more general painting with the larger .04 needle. It was just a pain to swap out the needles in the HS since there was a specific tip for each needle. While the 0.15 can paint incredibly small things it clogs at the hint of the paint being too thick. Again, I found my sessions to be limited with my hand cramping up after an hour or so, although longer than the Iwata allowed.
At some point in time I managed to break (well lose when cleaning) some parts in both the Iwata and the HS and replacing those parts was difficult (parts replacement is a lot easier now, I really should get both of those airbrushes up and running again) so I decided that I would try something else. This time I went with the (then new) Badger Renegade Velocity. The Velocity is a dual action airbrush with a 0.21 needle, and 1/3oz paint cup. When compared to the Iwata and the HS it is heavy and I didn’t know that till I pulled it out of the case. I was already sacrificing the larger coverage of the HS and I was concerned that my hand would cramp even faster with the Velocity. Fortunately, I was wrong the design fits much better in my hand and I have used this brush for 2-3 hours without my hand cramping.
I’m now considering adding another airbrush to take care of priming large batches of figures and that initial uniform work (because that is still a pain point with the Velocity). I’m contemplating the Badger Patriot 105 or the Reaper Vex. Pricing might end up making the decision for me as the Vex is definitely on the higher end of airbrush prices. I have handled a Vex prototype at a ReaperCon and it is about the same weight as the Velocity, so I know it fits nicely in my hands (and swapping out the needles in the Vex is very easy) while the Patriot is a bit of an unknown.
Airbrush Brands
Which brand to pick? This is one of those personal preference things. First pick out the type of airbrush you want; i.e. single action or double action and either a siphon feed or gravity feed. Then you can go looking for airbrushes. The most frequently talked about airbrush brands are: Badger, Grex, Harder-Steinbeck, Iwata, Master and Passche. If you know someone that owns an airbrush, try theirs out or go into a store and see if they will let you handle them. Otherwise take a shot and just order one and give it a go. I will say that I’m not a fan of Master, while the price is right the quality is not. It is kind of like the difference between using cheap brushes and Kolinsky Sables.
Other Required Equipment
Compressors
The other crucial item that you will need is a compressor (there are other options like canned compressed air or actual oxygen bottles). There are a whole lot of compressors out there to pick from. Stay away from the big pancake style compressor/tank combinations. While they hold a lot of air they are incredibly noisy when they are running. I was in an airbrush class one time with about ten people and one of them brought a big pancake style compressor, it was so loud that we made him put it out on the dock about 25’ away and on the other side of a wall and you could still hear it when it was running. The basic features we are looking for are relatively quiet, a tank, a regulator (which allows you to control the PSI) and a moisture trap (which is often a part of the regulator). Having a tank means that the compressor won’t be running all the time, it will run when the PSI level in the tank is to low and turns on when the tank is to low.
Regulator
Without a regulator a compressor is pretty much useless for our purposes. Fortunately most compressors come with one, but check before you buy I have seen a few that don’t come with a regulator. If you can’t control the airflow you are at the mercy of whatever PSI level the compressor can push through your hose which is likely to be way to high to work with (great for filling the tires on your car though). A lot of regulators have a moisture trap built into them, this trap keeps water out of the hose, you don’t want to be adding additional water into your airbrush after you have carefully thinned your paint! If you live in a low humidity area you can get by without one. In Colorado I have seldom seen water in the water trap in my regulator.
A quiet compressor will allow you to run your airbrush without disturbing everyone in the house or in the apartments around you. While the compressor from Harbor Freight is really tempting, I would avoid it. It is a bit noisy and it has a tendency to overheat and shutdown, typically in the middle of painting session.
You may have heard talk about the airflow pulsing if you don’t have a tank. This is mostly a true statement its just how compressors work. A tank will take care of the pulsing by storing the air and only releasing it when the trigger on the airbrush is depressed allowing an even flow of air, however, if you have a hose from the tank to the airbrush that’s 4’ or longer that will take care of the pulsing too. I ran a compressor without a tank for years without seeing the effects of “pulsing” air. A better benefit of having a tank is not having the compressor running the entire time you’re painting.
What the heck is PSI and why do you care? PSI stands for “pounds per square inch” which seems like an odd measurement for air but its all about pressure. The higher the PSI the more forcefully the air flows through the brush. You need to know at least the maximum PSI number for a compressor. Something in the 30+ range is what you are looking for. The regulator is what actually determines the pressure of the air coming through to the brush so it is important that the regulator have a good range with the top end being at least 30 PSI and the bottom in a 0-5 range. The regulator on my compressor goes from 0-100 PSI. The higher you set the PSI on the regulator the farther away you need to hold the airbrush from the model or mini. Distance affects how fine a line or how small an area you can paint. You cannot create a pencil thin line from 8” away. In fact, if you are to far away the paint may even dry before it hits the surface, this will result in a rough, pebbly texture on the surface of your mini or model. The lower the PSI the closer you can be to the mini. Lower PSI requires thinner paint which is why there is no magic ratio for thinning paint it, depends on what you are doing. You can happily run at 20+ PSI when you are priming or painting large areas, but you can’t run at that same level if you are painting details or small areas. I usually try to do the bulk of my painting, even priming, in the 10-12 PSI range and will step down as low as 8 PSI for really fine lines.
Hoses
You can’t get the air from the compressor to the airbrush without a hose. If the compressor doesn’t have a moisture trap you can get an inline one for the hose to take care of it. Most compressors have ¼ fittings at the regulator and you may need an adaptor to make it fit at the airbrush end. A lot of airbrushes will come with the correct adaptor but double check. There is nothing more frustrating than not having all the pieces to make your new toy work. Even if you buy a complete “kit” double check for hose adaptors or if it even comes with a hose!
Painting booths (Optional, kind of)
The very nature of how the airbrush works means that there will be overspray. You can get an airbrush booth to help contain it or just a cardboard box. When painting in a confined area its quite possible that you will be breathing in the overspray that’s not all that good for your lungs. Painting in a large open area (outside or perhaps a garage space) can alleviate the need for a booth/box setup. To protect yourself there are a couple of options. Wear a mask, a full mask not just a little sanding mask, you need something that will filter the air you are breathing. Better yet a spraybooth with a fan that can vent out a window or in a pinch into a box that you can close up. There are a lot of DIY solutions to this problem as well just be aware that it is something you need to deal with.
Thinning your paint
Airbrushes don’t work very well with paint straight from the jar or bottle. Quite frankly I thin all the paint that I run through my airbrush including paints designed specifically for it. Thin your paint with thinners designed for it, for acrylic paint tap water is fine (distilled water if you are in an area with hard water). I personally do not recommend Windex, the chemicals (ammonia in particular) in Windex can break down the seals in an airbrush. There are folks that use Isopropyl Alcohol, while it works well I’m not a fan of it after a little research, unless you are wearing a mask. In an atomized state this stuff is really, really bad for you. I personally like Vallejo’s airbrush thinner but there are a lot of similar products out there.
Thinning paint is more art than science. The thing to remember is that the finer a needle you are using the thinner the paint needs to be. The closer you want to be to the mini the thinner the paint needs to be. For more general work start at about a 1:1 ratio of paint to your favorite thinner and be prepared to adjust from there.
Cleaning
I’m not going to get to heavy into this subject as it’s a bit off topic. I bring it up because people in forums will say that they can paint something faster than it takes to setup an airbrush and clean it when you are done. It is either because they don’t use their airbrush regularly or they don’t take proper care of it and it clogs as soon as they pull the trigger. Keeping an airbrush clean and ready to go doesn’t take any longer than getting ready to paint with a brush. Its like any tool, if you use it regularly you know what to do, if you use it infrequently then it feels like you are relearning every time you sit down with it. If you are using it infrequently why did you buy it in the first place?
If you are swapping out colors you usually don’t need to do more than run a capful of water (or whatever is used to thin the paint) through the airbrush until the spray is clear before moving to the next color (if you are shading sometimes you don’t even need to do that). At the end of a painting session I run a cup full of cleaner through the airbrush (Vallejo makes an airbrush cleaner, and I’m sure there are others), then break it down. Smaller components go into a small jar that has just enough cleaner to cover them. I pull out the needle and wipe it clean (be careful of the tip you don’t want to bend it) and set it aside in the tube it came in or in a protected spot. Then I run a micro cleaning needle through the main airway to remove anything that has built up, you can do this with a cleaning brush (or even a pipe cleaner depending on the brush) as well. Do pay attention to the warranty on your airbrush, there are tools that you can use to clean it that might void the warranty. The Velocity has a spot right between the paint chamber and the nose where that tends to build up with dried paint and clog the airbrush. The other bad spot is the small tip where the needle comes through. I run a very fine wire through this and then put it in the jar to soak and clean it again before I start my next session. If you aren’t using a super detail needle ( 0.15 – 0.31 or so) you probably don’t need to do this. You will quickly identify areas in your airbrush that must be really clean in order to work properly especially the detail airbrushes.
That’s about it. If you have questions feel free to ask or see if your question has already been asked and answered in the Reaper Miniature Forum Airbrush Compendium thread.
Thursday, January 14, 2021
Acquisitions - Badger Patriot 105 Airbrush
Wednesday, January 13, 2021
Monday, January 11, 2021
World War II Project - Jagdpanther - basic camo
Since I had the airbrush out for the STuGs and there was some extra time I went ahead and added the basic camo job to the Jagdpanthers. I'm pretty pleased with them, although I didn't get the green quite right to suit me. I'm not going to go back and fix it. Next time I won't try using Nato Green as a base, I think I picked it up by mistake and didn't check the color before I started. These still need to be sealed before they are ready for decals. I'll just work on them as its convienent at this point.
World War II Project - STuG III Decals
Found a little time to get the decals on the STuGs and the STuH. I used the decals from the Rubicon Jagdpanther kit as those seemed to be a better match for the unit STuG battalion I'm modeling. I ended up having to splice some of the numbers together but I think they came out okay.
I did prep by applying a satin finish to the full body of the STuGs and the skirts. After I had the decals on I hit them up with another layer of the satin finish to seal the decals. I can finally move on to the fun part!
Friday, January 8, 2021
State of the Blog
What a strange year 2020 was. I think my production went up a bit at least in terms of vehicles and I acquired and refined some new skills on the modeling front. I also was able to stay gainfully and quite busily employed. As an IT Consultant for a major healthcare provider to say I was busy would be an understatement.
We were in the midst of a major kitchen renovation just before the virus really hit and we were able to get that project finished. Fortunately isolation from the workers was already in place because of the dogs. We did make extensive use of our Jeep Gladiator (This is a pickup truck based on the frame of a 4 Door Wrangler and in fact from the front looks exactly like the new JL series Jeep, I have seen it referred to as a JLG in forums), hauling tile from the stores to home. Between two bathrooms and the kitchen I figure we moved about 3,000 pounds of tile, the Gladiator handled it all. I love that truck!
Like many of us I spent a great deal of time at home so the wood workshop say a lot more use and most of my major acquisitions for the year were tools. A new table saw, router, planer and drill press all took up residence in the workshop portion of the garage and all of them were used on various DIY projects that my wife was able to come up with.
In addition we removed the soft top from our 2 door Jeep Wrangler and replaced it with a hardtop. I have never seen a worse set of instructions written for such a complicated project. I know a new top sounds pretty simple but we went all out and bought one with a rear defroster, rear window wiper and washer. All of which required running another wiring harness, hooking up the electrical connections (correctly!) in the engine compartment and the dashboard and replacing various switches. I had no idea what I was getting into, you can count on a post for that little project.
I also delved back into Calamity a bit as the tools acquired for our DIY projects also give me the capabilities to build the basic sub-structure for the Calamity boards. Hoping to move on that front in 2021 as well.
On the model railroad front, that may stay behind the radar for a while as well. I have a solid design for the D&RGW warehouse row in Denver, now its just finding the time to put it into action, not to mention that I still want to model the C&NW narrow gauge line running up into the Rocky Mountains from Boulder, I'm still trying to get my hands on at least one Bachman On30 2-8-0 for that project.
I still don't see a lot of wargaming opportunities for the coming year or conventions for that matter. Maybe ReaperCon will be live this year, Labor day could be viable from a vaccination standpoint.
I think I can continue keeping the blog going through 2021 without a problem. Should be plenty of things to do! Oh and I did manage to finish the Christmas cards for 2020, we were just so rushed that I never managed to get a picture of them finished with the black ink.
Thursday, January 7, 2021
Acquisitions: Rubicon Kits
At the end of 2020 Rubicon was finally able to release their second wave of kits which included their new King Tiger kits with a full interior. Now I never really intended to purchase these tanks as they just don't fit in with my gaming style, but full interiors! So I bit and ordered one of each of the two Tiger II kits and another PzKfw III H/J/L/M/N kit and the PzKfw III Befehlswagen E/H/J/L kit.
The first of the Tiger II kits comes with the zimmerit and both the "Porsche" and "Henschel"(apparently what I thought I knew for years was incorrect and what I would have called the Porsche turret is in fact the first prototype turret made by Henschel) turrets. The Tiger II without zimmerit comes with just the production Henschel turret.
Here is a look in the box:
 |
| The boxes for the Tigers are huge! |
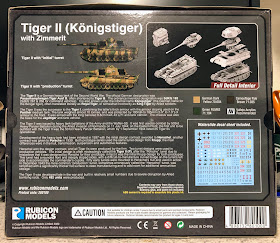 |
| This is the one with zimmerit and the extra turret |
 |
| So much plastic! |
Wednesday, January 6, 2021
Tuesday, January 5, 2021
Citizens of Calamity - Knuckleduster Iconic Faction
I have been messing around with the town of Calamity again. Revising old thoughts and such, nothing worth writing about at this point. I have decided I need to do some painting though and I pulled out the Iconic Faction from Knuckleduster's Gunfighters Ball Kickstarter. I have cleaned them up and primed them and hopefully they will see some paint before the end of January. Rubicon Armor kits keep distracting me from painting minis it seems.
I cleaned these up and overall I'm pretty impressed. Of course there were a couple of figures with mold lines across their faces and in some really hard to reach spots as well. Some of the details are a bit soft but I think that's just related to the 3D sculpting and printing process rather than a mold flaw. They looked considerably better after I primed them with the gray primer (Badger Stynylrez).
Nothing identifies these minis as specific characters but if I had to put some names to faces I would go with: Rooster Cogburn (the John Wayne version), Maverick, Shane, Marshal Dillon (Gunsmoke), the Rifleman and maybe William Munny.
Monday, January 4, 2021
World War II Project - Jagdpanthers - dunkelgelb
Back from the holidays. Just setting up a few posts to get 2021 off to a fresh start.
Here are the Jagdpanthers in their base coat of dunkelgelb. They will probably sit like this for a while till the STuGs are done.
 |
| In progress, starting off with the darkest shade of Dunkelgelb that I have. |
 |
| Blending in the mid-tone to get the contrasts going. |
