More Stuff

Friday, September 30, 2022

Review - Sarissa Precision - Stencil Set 1

Reviews are not something I usually do but Jon Russel from Warlord Games shoved this set of templates into my hands at Reaper Con 2022 and asked me to let him know what I thought about them. This is for you Jon! Just to be clear, I did not pay for these I was just asked to say what I think of them.

I have a fondness for Sarissa Precision (https://sarissa-precision.com/) products and I have built a fair number of their MDF buildings, I still have some of their buildings in the que to be built (part of the never ending World War II project), but I haven't purchased anything from them for about 4 years or so, so it was off to visit their website to see what Jon had really handed me. 

This is Stencil Set 1 part of the Sarissa Stencil System. You get a ziplock style plastic bag with stencils and instructions. inside are 8 Mylar stencils and instructions labeled "Stencils and Paste" written by Gary Faulkner of March Attack, who also helped design the stencils (http://www.marchattack.co.uk/index.htm).

The stencils are; Slate/Tile Small, Herring Bone Brick, Red Brick, Block Stone, Rough Stone, Tiles, Slate/Tile Large and Edging/Pillar Detail. There are two ways to use these, first as a standard stencil for paint and second as a stencil to apply texture with. They are thick enough to be used for texturing and I would say are actually more useful this way.

The instructions are nice, well written and include full color pictures to help you through the process. They are very short! But really there isn't a lot to say. At this point I would say you have a pretty high quality product in your hands. The question really is how do they perform.

Mr. Faulkner uses a pre-colored wood filler along with some PVA glue to create a more or less peanut butter like mixture. I didn't have any wood filler on hand and I'm far more likely to use stuff that modelers are going to have on hand. I have a large jar of Liquitex Matte Gel, a medium jar of Liquitex Natural Sand and a jar of Ammo's Acrylic Mud (A.MIG-2103 Turned Earth Ground). The Ammo product is very similar to the Liquitex Natural Sand but pre-colored. I used these products straight from the jars and applied that to some MDF that I had left over from some project or another.

Pictures tell the story best:

This little package, marked at $34.95 US when Jon handed it to me at Reaper Con. About $4.37 per template. You can buy them individually on the Sarissa website, certainly more expensive than buying them in the set.

8 Mylar templates. Each template measures 2 7/8" x 4 1/8"  (73mm x 105mm approximately) 

Instructions - Front

Instructions - Back

The materials I'm using for the test run. This is stuff I typically have on hand. The only thing missing is the Liquitex Modeling Paste, mine had dried up.

After the initial spreading with a palette knife. Tried to keep it thick enough to cover the Mylar.

Then I scrapped off the excess so the material was just where it should be and you could see the template and the pattern.


I let it dry for a few minutes to harden up a bit, but I didn't want it to harden completely and perhaps trap the Mylar in place. It pulled up quite easily and left a nice 3D imprint behind. You do need to be careful pulling it up so that the Mylar doesn't slide and mess up the pattern.

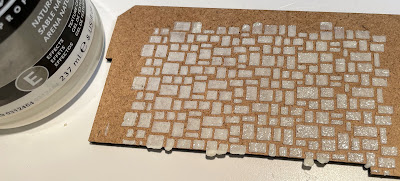
The rough stone template, a small issue at the top where I managed to get some matte gel underneath the template.

The rough stone template with the Natural Sand

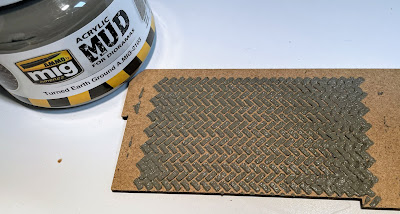
The Herring Bone Brick template with the mud. You can see what happens when you let the template slide a bit when you pull it off on the right. I smudged up a good chunk of the Herring Bone pattern there.

I have to say that I was quite pleased with the results. The instructions say that the templates were designed so you can continue to repeat the pattern. That I didn't try, from my brief experience I would say that you really need to let the first part harden up completely before you add to it otherwise you might smudge your work. I can see a lot of uses for these templates as I work on different projects. While the initial price tag feels a little steep I think they are worth the price.

That being said I do think the choice of templates could have been better (that old personal opinion coming to the fore). I would like to see a couple of different brick patterns and less tile patterns. While the Edging/Pillar Detail is quite nice, another one featuring brick arches for doorways and windows would not be amiss (although likely to be difficult to actually create). The Red Brick template is very nice but this type of pattern is typically used when the wall is hollow and likely has some fill. I would definitely keep it, but I would like to see a Flemish Bond and an English Bond pattern (oddly enough Flemish Bond is very common in Britain while the English Bond is common in the US).

From the top then:

Slate/Tile Small - keep
Herring Bone Brick - keep (very useful for all kinds of places)
Red Brick (or running course) - keep
Block Stone - Keep (again very useful)
Rough Stone - Keep (love this one)
Tiles - keep (although I'm 50/50 on it. I don't think I would miss it)
Slate/Tile Large - drop
Edging/Pillar Detail - keep (useful but could be better)

I would like to see
Flemish Bond Brick - Common in Britain usable just about anywhere 
English Bond Brick - Common in the US, again usable anywhere
Arch detail - Independent of the type of brick pattern being used could feature both brick and stone arches along with door and window sills.
Cobblestone - A useful addition for roads.

In the end I think this product is worth the price if you are working on any kind of laser cut building kit or scratch building something. These templates are useful on walls, sidewalks and some streets (that herring bone brick pattern is going to get used a lot!).


Thursday, September 29, 2022

Sophie's Revenge - The Conundrum in the Captain's Cabin

I definitely like to think somethings all the way through before I start cutting things up. As I have mentioned previously I'm starting the rebuild of Sophie's Revenge with the Captain's Cabin. Ultimately I'm envisioning this as being broken up into two compartments; the Captain's Cabin itself and officer's quarters (or what ever the pirate equivalent would be). I need to add quite a bit of detail in both areas which has brought up a couple of things.

1) The ceiling on the Captain's cabin. I'm going to go higher than I originally intended which will increase the overall height of the poop deck and the map room. This deck will probably get shortened because of that, but it will solve the "skylight" problem. 

2) The Captain's cabin should be pretty extravagant (its a fantasy pirate ship after all), while I can work with it as is, I could take it apart. I stopped short of complete disassembly but the reality is that this section is really five pieces, of which the Captain's Cabin is three of those. It won't be easy to separate these pieces, they are glued together very well.

So just some more decisions to make and decisions are easier to make if there are pictures!

First order of business. Make this into a single deck. It has to support the cabin and the mizzen mast in addition to the Captain's Cabin and officers' quarters.

Should I or shouldn't I? The Captain's cabin can be broken into five pieces. The circles show where the seams are. These are well glued together, I'm not even sure it will be possible to disassemble them, it might take some knife work although this plastic cuts pretty easy.

As it stands. This is how much of the ceiling of the Captain's Cabin would be shortened by just extending the existing quarterdeck back to the stern.

This is a look at where the deck I was originally planning to use would intersect with the Captain's Cabin. I would still be losing a good portion of the existing windows, hence why I was thinking of some kind of "skylight"

If I increase the height of the poop deck, the gap is going to be really large. That, in turn, would lengthen the run of stairs on either side, which I could compensate for by reducing the length of the poop deck. However, that would impinge on the ceiling below and require stairs to get to the map room.

Lot's to think about before I start building things. Although I could just start with the Captain's Cabin and finish it out and build everything else around it. Some seat of the pants work for sure.

Wednesday, September 28, 2022

Friday, September 23, 2022

Wynkoop Street Sidings - A Correction and more information


I'm going to go back to this picture that I blogged about a couple of weeks ago. This is the bridge at the end of Wynkoop street that crosses over Cherry Creek. I commented then that this led to the C&S Rice Street yard, which also confused me because the area is switched by the D&RGW which can only access these sidings by crossing this bridge.  The reality is that this bridge pretty much leads directly into the D&RGW's 7th street yard. The Rice Street yard is farther to the west.

I took someone's comment in a forum at face value without checking, even though my mind flagged it as "you should check this before you say something". A quick look at my collection of Sanborn maps would have indicated that the yard south of Cherry Creek did belong to the D&RGW.

Just reminded me to "Trust but Verify". Ultimately in the design it doesn't really matter. It is nice to know that the area was worked out of the 7th Street yard which should make figuring out the potential motive power a bit easier and potentially more varied.


Photograph by John Hill. A picture that I had not seen before. Its sometime after the 15th Street viaduct was put in and you can see some interesting trackwork right underneath it. This is the kind of information that can be found when you ask a question in the right forum!


Thursday, September 22, 2022

Scale 75 - Alice & Johnny (Charing Cross 1940) - A closer look

While I contemplate how to approach rebuilding the Captain's Cabin on Sophie's Revenge, I decided to take a closer look the "Charing Cross 1940" vignette from Scale 75.

This vignette is built in 1/35th scale and while I haven't run a ruler across the parts (and probably won't) everything at least feels proportionately right. My goal was to dry fit everything and get a feel for how its going to go together and how I can approach the painting. This will be the first vignette that I have worked on were I didn't have to figure out the story, its pretty self evident in this case. I am contemplating adding one or two more figures to add a little more context but I can put that off for now.

I have broken it down into sub-assemblies and I should be able to paint each sub-assembly completely before the final assembly.

1st Sub-Assembly: Tracks and under carriage. All of this lies below the level of the platform and is definitely going to need all of the painting done or almost done before I can even put this assembly together. The gap between the passenger truck and the platform wall is to thin to get a paintbrush in there, so that base platform piece and most of the rest of the pieces will need to be painted before this can go together. There are a fair number of fiddly bits that go down into this and some of them have curved and will need to be straightened.

These are three major pieces for this sub assembly. the platform, the passenger truck and a single wheel. The platform could use a couple of more ties, there is only one and you should be able to see at least two more and maybe even a third. I don't think it would be to difficult to add those and it would give a little more to look at.
The passenger truck has a locating pin to attach it to the side of the platform. The clearance is tight.

Then the wheel attaches to the truck with another locater pin. The odd extension on the top of the wheel is the locator pin for the base of the passenger compartment. It all fits really tight. There are a couple of more detail pieces that go here and the backside of the passenger truck could do with some more detailing.

Here is a look from the platform side. Looks pretty good, almost all the painting will need to be finished on the passenger truck and the bottom of the platform before I can actually put them together.

2nd Sub-Assembly: Passenger Compartment. This bit is more straight forward and I should be able to build the entire piece before needing to paint any of it.

Here are the four major pieces of the passenger compartment

A quick dry fitting, there are going to be a couple of gaps that will need filling and there is definitely a bit of clean up work required. Again there are some extra fiddly bits to go in here as well.
A look with the roof in place. The edges of the bottom of the passenger compartment definitely need some cleanup, but I should be able to assemble and then paint the whole thing. I might leave off the roof and attach it last.

3rd Sub-Assembly: Alice & Johnny. This one is pretty straight forward as well. Both figures can be completely assembled and painted and then added to the compartment.
Alice only needs to have one leg and her head attached. Johnny needs a bit more work with a torso and two arms to put together.

4th Sub-Assembly: Misc Pieces. The two extra bits that come along are a rifle and an odd bag. The rifle is pretty straight forward, however, the bag will probably be discarded. It looks a lot more like a bag to hold knitting in than a soldiers hold-all. I'll peruse the 1/35th scale aftermarket scene to see what kind of extras bits I can come up with. Otherwise its going to look pretty barren on the inside of the compartment. The same is true for the scene outside the compartment, one or two more figures would not be amiss to give a sense of urgency to the scene.

After a little dry fitting and closer examination I'm still quite impressed with the quality of this kit. It should be pretty easy to clean up and assembly. The only thing that seems to be missing is a spot for the lamp that goes on the end of the under carriage. Getting it into position shouldn't be a problem and quite frankly I'm not sure it should be there. A little research on WWII Era British passenger coaches is now in order!

Trains and miniatures how can you go wrong?

Wednesday, September 21, 2022

Friday, September 16, 2022

Sophie's Revenge - The rebuild begins - Quarterdeck & Poop Deck

Okay, there is nothing like a dull conference call to get you motivated to do something else...anything else.

I decided that I would start closer to the top of the ship and work my way down to the gundeck. There is a lot of detail that I would like to include in the captain's cabin and I need to figure out how things might go or might not go together. I also want to add the navigation cabin, which sits above the captain's cabin. Its floor will form the ceiling of the captain's cabin and because of that it will also need to be removable.

So I kind of stuck the whole section back together and got out a couple of steel rulers to see what I was really looking at needing to do. I think the pictures can probably explain it better.


I'm using the rulers to extend the quarterdeck all the way to the back of the ship. This will create a ceiling for the Captain's Cabin and the floor for the Navigation Room.

One problem becomes immediately apparent. The new floor is going to cut off the top portions of the rear windows as well for the back side windows on either side.

Here I'm trying to elevate the blue ruler to the correct height. It looks good initially but its a very rough look.

To get an idea of how high the back deck needs to go to incorporate a door, I used popsicle sticks (jumbos) to raise the whole thing up the necessary height. This would match the height of the deck below (where there is a door). That's just over a 1/2".

Stairs would need to be added to and extended a door would be added and the trim would have to be redone. Its almost a complete rebuild. That's okay, I was expecting that.

Here is the poop deck. I needed to make a template and since everything will be moved I cut off the edges that would slot into the ship's sides.

The template, traced off the deck with the edges removed

A successful cutting attempt. It rarely goes this well the first time through. This piece is just a tad bit thinner than the deck and will work fine as a guide. Eventually it will be replaced so I'm not going to lose any sleep over it.

Here its temporarily glue to the quarterdeck. Its to long, but I expected that, so I trimmed it down to fit the length.

This is what I will be dealing with. I built a little piece to go under the template to make sure it stays the same height as the rest of the deck. Here you can clearly see where the deck will intersect the windows.

My initial thought is to create benches that would go over the window areas (maybe cabinetry since its the navigation room) and create skylights (if you are a car buff check out the old 4 door Land Rover Defender, the one in Death in Paradise is the model I'm thinking of,  and you will get an idea of what I'm thinking about doing).

Raising the back deck up again this time with the floor template in place. I'm really going to need to increase the height of the ship sides and stern.

Its hard to see but there is a blue line marking out where I need to cut the deck off to make it removable. The stairs and the bulkhead will help keep the whole thing together and mostly in the right shape. There needs to be quite a bit of detail added under this deck, its going to represent the "officer" cabins. Although calling them cabins is pretty generous.

14 pictures, that's like 14,000 words that I didn't have to type. I need to work out the interior details and how all that will go together. There are three main things that need to be taken into account here. There are two cannons housed in this section, along with the mizzen mast and the ropes for the steering.

Thursday, September 15, 2022

Sophie's Revenge - Getting it back together - Goals

Its been a while since I have even looked at the Sophie's Revenge, in fact I actually put everything back in the box to get it out of the way. Its so large it just takes up a lot of modeling room. There was an off hand comment that a ordinance entry could never win a Sophie Trophy at Reaper Con. For what ever reason I took that as a challenge, albeit an inadvertent challenge. Nonetheless my main goal will now to be win at least a bronze Sophie with this kit.

Before I even get started on what I want to accomplish let's look at what its going to take to even get into the running for a Sophie. While the MSP Competition at Reaper Con is an "Open" competition the running for the Sophie's is standard trophy style competition that only Reaper Miniatures are eligible for. There are three categories for Sophies; Painter, Open and Diorama. The Painter category is for straight up stock models with perhaps minor conversions, the Open category is for scratch sculpts or heavy conversions (those entering scratch sculpts and are eligible for the Sophie are going to be sculptors) and  Diorama is all about a scene and is judged heavily on the story (in this case the primary miniatures would have to be Reaper Miniatures although supporting cast could be from other manufacturers). There is no ordinance category for Sophies anymore, Reaper just doesn't make enough miniatures to really justify its own category. Based on what I intend to do with this ship its going to end up in Open category, it potentially could be in Painter if the Judges decide that's where they want it.

Getting at least Bronze Sophie is going to be tough, its going to add an additional level of precision that I really need to stay aware of through the whole process.

This is what I want to achieve:

1) Disassemble the entire model (Woohoo! Check this one off the list!

2) Keep the gundeck accessible while keeping the cannons lashed appropriately in place.

3) Add details to the gundeck, including bringing the masts all the way down and through into the cargo deck (which is not modeled). This would include removing cast in details that could be improved with scratch built details.

4) Correctly lash all the cannons into place and add details to the gun ports. I may decide to have the guns run out on one side.

5) Main deck is removable without disturbing details on the gun deck.

6) Main deck will be treated much the same as the gundeck, add details and because of the aft cabin there will be additional work around the mizzen mast which is coming up through part of the aft deck. Cannon will be lashed to the deck appropriately.

7) Aft deck and cabin. There is going to be a lot of work here. I need to figure out how to pull off the two back decks and detail the cabin. I would love to have added a map room under the poop deck but its not quite tall enough especially because of Reaper's heroic scale proportions. It would add a lot of interest and would avoid an incredibly tall captains' cabin. Not to mention changing the location of steering from the poop deck to the main deck.

8) Rigging, I really want to add at least some rigging to this. At a minimum it needs ratlines after that anything I can add that won't make things to difficult keeping in mind that the main deck is going to be removable which means any rigging needs to come away with the main deck. I have thought about extending the masts to "full" height but I think I'm going to avoid that and just extend them up high enough to make any rigging that is done look somewhat reasonable.

9) Everything I haven't thought of. A little vague but it covers everything else!


Gundeck, the lowest accessible deck on the Sophie's Revenge. First thing to do here will be to remove the grating and stairs and replace them with a new components.

I had removed the very flexible sides. These will need to be glued to the gundeck itself and then cross pieces run from side to side and the cannons put into place, I'll need to figure out where the masts come down from the main deck as well.

A little closer look. The deck is closer to regular styrene plastic the 

Quarterdeck and poop deck. There are three main pieces here. The sides for the cabins and two sets of stairs.
And to make things a bit more difficult it crosses two of the three sections of the main deck.

The quarterdeck in place. Will have to add a (or more) cabins plus a cannon on either side. The mizzen mast comes through this section as well. I may have to split the quarterdeck into two pieces one on either side of the mast so I can still remove them.

And then there is the poop deck. It looks like there would be room for the map room but its a bit short. I may work out how to raise it up a 1/4" or so and make that room. Otherwise it will become the ceiling of the Captain's cabin.

All I can say at this point is that I have really set quite the task for myself. I expect this project to really stretch out. It would be nice if it was ready for Reaper Con next year (2023) but I'm not going to push for that date unless everything is really coming together.