The Town of Calamity, The D&RGW RR Warehouse Row and Historical Miniature Gaming
More Stuff
Wednesday, December 28, 2022
Thursday, December 22, 2022
Returning to Denver's Warehouse Row - Another Look
Our thoughts have turned to what room we will be renovating next. I'm pushing for the "library" room, a small bedroom that has a bunch of bookshelves plus our large craft cabinet in it. This would involve getting rid of the existing bookshelves (or at least moving them somewhere else in the house) and then painting the walls and probably the ceiling. Once that's done then we can start putting up new shelving.
There are couple of requirements for the renovation. First it has to provide some desk space, probably under the window. This is important as we both work at home now and while we prefer to be in the same room, however, when we are both on conference calls one of us has to move. Right now I'm moving into my workshop room in the basement which means I'm constantly putting away model projects because I need the desk space. Which further delays my model projects!
Second is to replace the bookcases with bookshelves. What do I mean by that? We need something that's more flexible than a standard bookcase. My intent is to line the walls with french cleats which will allow let us arrange the shelves as we need. While we would still be restricted by the location of the cleats we would not be restricted by height (other than the ceiling) or the width of a bookcase. In turn this would allow me to use the cleats to attach a layout to (the secret reason for using french cleats) directly to the walls without a lot of extra effort.
The third requirement is non-negotiable at this time, the craft cabinet must stay. While it is fairly compact when closed when fully open it occupies a 7' width. However, it would be closed the majority of the time and it doesn't have to be fully opened to use. I will capitalize on that aspect. Since the cabinet doesn't have to be tied to the wall I can leave a gap behind it to provide a limited amount of staging which would, again, be suspended on french cleats to a spot behind the door where cassettes for staging would reside. This would keep these hidden except when the layout is in operation.
I have been studying Warehouse Row on Wynkoop street for sometime now. Recently I asked a question on the D&RGW forum about what local or job switched Wynkoop street. A fair amount of information tumbled out (and may result in an article for "The Prospector" the Rio Grande Modeling and Historical Society's quarterly publication) in a fairly active discussion.
This is the discussion that unearthed a photo that showed a diamond crossing directly under the 15th street viaduct on the east side. This crossing doesn't show up on any Sanborn map that I have access to and it would be crucial to switching the area efficiently. In fact I had added such a crossing on the last plan that I had drawn but centered between 15th and 16th street.
I have been dithering about the year and I think it will be 1958. This would be before the postal annex was built so the long siding serving those businesses would be present and it would have been possible for the 15th street viaduct to have been built (based on when it was first proposed, I think it was actually constructed in the early 60s). I'll have to decide if a couple of the businesses will be back dated to earlier occupants or not.Wednesday, December 21, 2022
Wednesday, December 14, 2022
Tuesday, December 13, 2022
Acquisitions - Railroad Book (another one); Rio Grande in Color Vol 1: Colorado
I continue to build up my collection of D&RGW reference books. This one is out of print and missing the dust jacket but the price was pretty good compared to what I have been seeing so far. This one was written by Ross Grenard and it is a 1st printing.
I have thumbed through is a little bit and the pictures are great and its pretty much confirmed that I could use Alco RS3s to switch the Warehouse district. There are other options as well, but I think I'll concentrate on trying to acquire and RS3 in Rio Grande colors.
Monday, December 12, 2022
Christmas Productions - Complete
Thursday, December 8, 2022
Wednesday, December 7, 2022
Saturday, December 3, 2022
An Early Christmas Gift - Railroad Books!
Friday, December 2, 2022
Christmas Productions - Progress on the Roscoe Puzzle
 |
| I had finished the edge previously and this is my second time around as I work to the inside. If you look close you can see that a couple of whimsies have already been cut out. |
 |
| This is probably my third or fourth pass, I think all the whimsies have been cut out at this point. |
 |
| Here is the part that still needs to be cut out after that last round of cutting. |
 |
| Down to the last bit here. |
 |
| The three important pieces I want to be sure to cut; eyes as a single piece, nose and mouth as a single piece and his dog tag as a single piece. |
 |
| The most fun a person can have, counting puzzle pieces. I do stacks of five and just line them up till there are no more to stack! 163 pieces for this one. |
Thursday, December 1, 2022
Christmas Productions - Puzzles and Cards
 |
| Again, I use a frame to keep it all together and place each piece as I cut it. Here the edge is all cut out. |
 |
| That leaves a a large middle piece to keep moving forward with. |
Wednesday, November 30, 2022
Tuesday, November 29, 2022
Christmas Productions- Puzzle Progress
I think I have made pretty good progress to this point on cutting out the puzzles on the scroll saw. Overall I'm pretty pleased with them. I still have some difficulty with cutting the "whimsies" but that's really to be expected at this stage of the game. Like anything else it takes practice to get really good at this kind of thing.
Here are some pictures to of the current progress
 |
| Here is the next puzzle up. This shows the "templates" I make for the whimsies. I trace the design on to the white tape and then cut them out as I get to them. |
I don't cut in the traditional grid pattern you would find in a stock puzzle. Its more random and tricky than that. Its what you would find in most wood puzzles whether they are cut by hand or laser.
Wednesday, November 23, 2022
Saturday, November 19, 2022
New Carousel Project - The Hippo
As some of you may remember my dad carved carousel animals, mostly horses. At one point he had decided that doing the full size ones was not as fun and they took up a lot of space. So he tried a couple of smaller ones just to see how he liked doing those. There ended up being two; an Ostrich and a Hippo. My sister will eventually get the Ostrich, just another one on the painting list.
I painted the Hippo following my dad's directions and with the paints he specified. The titanium white was old was actually pretty lumpy and it really affected everything I used it in, which was mostly the blue skin color that he insisted on (I have no idea why, it doesn't match the Hippo pictures he had on his workbench). The neat part of the Hippo is that the mouth is actually hinged.
At one point it was sitting on a furniture mover which was a simple frame with four wheels just to make him easier to move around. Someone let a rambunctious 5 year old ride while it was on this frame and the whole thing tipped over, smashing the Hippo's mouth and breaking the hinge. About six months ago my mom found someone interested in fixing him and it just came to me a couple of days ago. We have decided to completely repaint it in a more appropriate color and get rid of the weird surface texture from that titanium white paint that I used.
I still need to finish Chester the Rooster so this one will probably be sitting in the shop for at least a couple of months before I can sit down with him.
Friday, November 18, 2022
Holiday Work - Christmas Gifts
With the new shop, more or less, up and running we will be able to turn some gifts again. So pens, keychains and the like and something new. Technically the biggest wood gift this year is not turned wood but at least it is mounted on wood.
After working on a number of Liberty Puzzles (Liberty Puzzles) and watching a ton of YouTube videos I decided to try my hand at cutting my own puzzles. Far more involved than you might think. In some ways the trickiest bit was attaching the picture to the wood blank (1/4" Basswood Plywood, couldn't find Baltic Birch in the right size for a reasonable price).
I have cut two prototypes and I'm confident that I won't completely screw up a Christmas present at this point so I hope to start cutting the real thing this week. Each puzzle will be numbered and include the piece count on the back. The traditional method of custom puzzle cutters.
While this is fun to do it is time consuming so I'll be turning to the laser cutter to see I can make a go of it that way for the next time around.
Thursday, November 17, 2022
Holiday Work - Christmas Cards
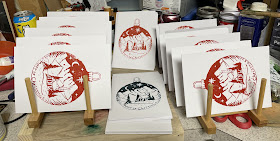
It always seems to happen at this time of the year as my posts start to drop off quite a bit (not that this has been a stellar year for posting to the blog). The holidays increase our hobby workload tremendously as we like to hand make our Christmas cards and at least one or two of the Christmas gifts we hand out.
In light of that the first side of the Christmas cards has been started. I managed to rattle out the front of 24 cards. I need to probably need to do two more runs like that, likely in different colors (most like a red and possibly prussian blue)
The fly in the ointment is that this year we would like to do a print on the back as well. That means the fronts have to be completely dry before we do that and that we need to allow drying time for the back print as well. Nothing like adding a little more time to everything!
 |
| Here is the first run of cards with the dark green. Overall pretty happy with them. They are stacked in back to back pairs in the drying rack plus a couple of spares just hanging out in the back. |
 |
| And this is how I get there. It starts with the jig which gives me a square corner that I can rest the printing block which is also tall enough to make sure the cardstock is square to the block. I use a piece of plastic to spread the ink on, pick it up the brayer and ink the block. Then the cardstock and I run an old wooden spoon on the back of the cardstock to apply enough pressure to transfer the image. Nothing to it! |
 |
| This is the negative image of the back print. I'll either cut it by hand or get a least a helping hand with the laser. Never forget to reverse the image when you are cutting your printing block! |
Wednesday, November 16, 2022
Thursday, November 10, 2022
Introducing Roxy
Its been over a year since we lost Lani and in the last couple of months we have been looking for an older dog to give a home to. We have been turned down a number of times because we have dogs already and they want these older dogs to be the only one. That lead my wife down a dangerous path that ended up with us adopting this sweet little girl.
 |
| Here is Roxy sporting her new collar and seeing how well it matches the roses in the background. She is already a little ham. Note that both ears only go up half way at this point. |
Roxy is an Australian Cattle Dog, the Blue Heeler variety. She was just 8 weeks old in this picture and she is now 11 weeks. Smart as a little whip and more than happy to jump into the dog free for alls that happen everyday in our backyard.
 |
| Not sure about this whole new home business. |
 |
| Having my own bed is nice, but its warmer snuggling with Morgan (1/2 German Shepherd, 1/2 Great Pyr) |
 |
| Its nice sharing the big bed with Daisy (classic mutt, black and tan) |
 |
| One ear is up, one is still half mast |
 |
| Both ears up at 10 weeks. She looks like a bat now. |
Wednesday, November 9, 2022
Wednesday, November 2, 2022
Thursday, October 20, 2022
Solar Power in the Greenhouse
Power was a requirement (need to charge those batteries for electric tools), however, its just to far away to hook it up to the house, at least not without some significant trenching and laying of conduit. Since we get a lot of sun all year round we decided to go solar. Definitely an easier said than done statement. But as of this afternoon we are fully hooked up and running off of solar energy in the greenhouse.
We started off with a kit from Grape Solar, although calling it a kit is being very generous. It basically came with the solar panels, the battery controller and some (but not all) cabling. There were not enough brackets to mount the panels to the roof and the website doesn't really help if you want to expand the system like we did (from 400 watts to 600 watts). I probably could have gotten everything if I had actually talked to someone at Grape Solar, so chalk some of that up to my own stubbornness.
Oh and one of the key components that you must have if you want to run anything that needs AC current is not included; the (now) infamous power inverter. This is purchased separately and without it you are only running on DC current through the battery controller. The whole thing was a bit of an exercise in how many ways I could be frustrated, it doesn't seem to matter how much research I did something was always missing at the end of the day. I would think that a "kit" would contain literally everything you would need to set things up, nothing else to buy, well except the batteries. It doesn't come with the batteries, which I totally understand.
That brings us to the batteries. I opted for 12V 100A Lithium batteries and they cost a pretty penny. Two of these cost more than the whole solar system itself and we are using three (which may be overkill but its hard to say how much power we are going to need to keep things warm in the winter out there). These are, basically, what you might find in an electric golf cart. They should be good for 10+ years so hopefully we won't be replacing them anytime soon.
As of yesterday, the fan and the heater were both running from power being collected through the panels. We only anticipate needing the heater in the winter to maintain a somewhat even 60 to 70 degrees and the fan runs when the temp is above 78 and we need to cool things off a bit. I was quite excited to have everything running as expected today.
