More Stuff

Tuesday, February 28, 2017

Reaper Miniatures - Shipping Container - Break on Through to the Other Side

I'm still frustrated with the dog on the Lani side, so I decided it was time to get some work done on the other side. I spent far less time on the refining at this point and concentrated on getting all the major elements in place. Ran into a problem with the red in the letters right off, started off with a shade that was way to dark and had to lighten it up. I'm happy with the end result but I spent more time on that than I had anticipated. I'm still up in the air on what to put on the ends, I need to think of something relatively quickly though.

Here is the progress so far:

The first outline

Edging the yellow with black

On goes the first way to dark shade of red

The final shade of red which ended up being Republique Red (OOP) with some Saffron yellow to lighten it.

Black outline for the skull

Interior white outline

Filled with Vampiric shadow. very close to the colors of the actual logo

The evenings players

Monday, February 27, 2017

Reaper Miniatures - Shipping Container - Refining the Graffiti

I didn't get much time to work on the container during the week or during the weekend. I think the lettering on this side is done, but the dog underneath is still very rough and will need some serious refinement. I still need to get the other side started and think about what I want to put on the ends. I need to put something on the ends or its not going to look right.

Jazzing up the letters a bit. The dog needs serious work.

The palette for this session. Forgot the white I use; Golden Liquid Acrylics, Titanium White

Thursday, February 23, 2017

Reaper Miniatures - Shipping Container - Starting the Graffiti

I found a little spare time to get started on the graffiti on the shipping container. I have only done this once before on my Hasslefree Diorama; "Shopping II" and the graffiti was not particularly extensive on that. I will be doing both sides but I'm going to do them one at a time. I'll be as neat as possible but I quickly found out that trying to paint a straight line on a corrugated surface is not easy! This first side will feature the name of LANI and underneath it will be a dog. I started laying out the name, not sure this was the best way to do it, but sometimes its all about just getting paint on the mini.

The first thing I did was find a computer program on the web that could generate graffiti. Its amazing what's out there for this kind of thing. I printed off the name in full color, cut it out and traced around it to get the outline started. After that its all free hand work.

I'll continue to refine the name before I start work on the dog that will be underneath.
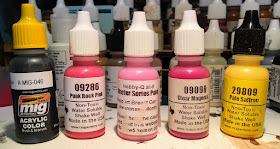
The yellow outline using Reaper HD Saffron Yellow.

Added the black lining, a bit rough at this stage, using the AMMO Matte Black

A bit of Punk Rock Pink and Magenta for the inside.

Refining the black lines and the pink interior.

The paints from this session.

Wednesday, February 22, 2017

Caboose Hobbies Re-opening February 25th

The re-opening of Caboose Hobbies, now known as Caboose Ltd is going to happen this coming weekend, February 25th at: 
10800 W Alameda, Lakewood CO 80226
The website is up although there is no content on it at this point in time. The new website is: mycaboose.


Looking forward to a full fledged website and seeing what they have done with the new location. Hopefully it will be very similar to the old Caboose Hobbies we knew and loved. It is a much longer trek for me now as its way out on the west side of town.

Tuesday, February 21, 2017

Reaper Miniatures - Shipping Container - Fading and Rusting

I had a bit of an extended weekend and managed to work in some time on the Reaper Miniatures Shipping Container. The first thing to do was to start the chipping process. The chipping fluid had been applied between my base coat of reddish brown and the red layer. I think I waited much to long. You should do this as soon as the top layer drys. Since I waited to long it was hard to create the chipping effect, and when I did it went all the way down to the primer coat and in some cases down to the plastic. Not quite what I was hoping for but not a tragedy either.

This is where my last session ended

Using water and an old brush to start scrubbing the sides.

Here you can see some of the effects. The top layer has pulled away but so did my red brown layer, you are seeing the brown liner I used as a primer and in some places the bare plastic (lower right hand side).


Once I had that effect more or less completed it was time to fad the paint job. It was a pretty bright red coming out of the bottle and I need to tone that down a bit. For this I used some Golden Fluid Acrylic paint, Titanium White, and thinned it way down to a wash. I think I applied this over the red and it served to "fade" it down to a more sun exposed red. Worked out very nice, of course I forgot to take pictures of that part of the process. I didn't get any shots in until I had applied my first couple of rust washes.

I start with a dark rust wash from AMMO, and followed that on with a light rust wash, also from AMMO. At that point I had to pack up for the evening. So the next series of pictures show both the fading and the rust coats.

You can really see the difference in the red here. These containers can really be exposed to the sun for long periods of time when they are onboard ships or sitting in the dockyards.


While normally February in Colorado is in the mid 40s or so, with 50 degree temperatures not being uncommon, this year has been unusually warm. I think we hit a high of 80 one day. I took advantage of the warm weather and worked outside. Especially nice since I was working with primarily with enamel paints and pigments with mineral spirits. Oh and don't worry I'm sure we will be paying for this warm weather shortly with a big snow fall.

In the next step I really combined working with the enamel rusting washes and the pigments. I used the washes as a base and then streaked the pigments down over the top of the washes. With the warm weather everything dried pretty quickly. I usually work with a combination of the pigments and mineral spirits which allows me to vary the consistency from a wash to a paste or apply it dry and add the mineral spirits with a brush. The nice thing about working with the pigments is that I can go back and adjust them even after they have dried. I also discovered that its hard to take pictures outside of this kind of thing, the winter light is very harsh at this altitude.

Adding layers, you an see areas on the top that haven't dried yet.

This is after all the washes and the rust orange pigment from Secret Weapon has been applied.


Here you can see the lighter "fresher" rust being worked in.


My primary "paints" for this stage. From AMMO are the streaking dark and light rust washes. I applied these first. I followed that with the Secret Weapon orange rust and then the MIG new rust. You can make out the can of mineral spirits in the back.


Of course it looks like I managed to go overboard a bit and there is very little left of the red container. Sometimes playing with the rust is just to much fun! I may go back and rub off some of the rust on the sides and ends to see if I can restore at least a few patches of the red. I'm working out the designs I want to use on the sides for the graffiti now as well. I'm going to do both sides with some more mural like graffiti and just some tags on the end panels I think.

Thursday, February 16, 2017

Reaper Miniatures - Shipping Container - First Layers

I had a few minutes and managed to get a couple of coats on the shipping container. I started with the worn chipping effect from AK Interactive. This will allow me to gently work away the next layer and expose the rusted layer that I started with.

I decided on a red shipping container so I pulled out a nice red from the Scale 75 Fantasy Line - SFG-04 Baal Crimson. I thinned this down with some of my Vallejo Airbrush Thinner. This came out of the airbrush nice and smooth. Again I wasn't to concerned with getting an even coat of paint on the container. There is a lot of weathering to come and the uneven color will actually be a benefit to this.


This is the AMMO color that I used as my rust base; A.MIG-912  Red Brown Shadow

Once the rust layer was dry I applied this Worn Effects from AK Interactive. This is a clear coat that basically provides an unstable surface for the next coat of paint so it can be rubbed away and exposes the layer beneath.

And the SFG-04 Baal Crimson from Scale 75. Very close to some of the container colors from pictures I found on the net.


Wednesday, February 15, 2017

Clue - Cluedo Sherlock Holmes Edition

This will probably be the only version of Cluedo that ends up in the collection. Cluedo is the original title given to the game in the UK. There aren't quite as many variations as there are of the American Clue but they are growing. I have to have this particular edition because its based on the Sherlock Holmes television series that appeared as part of Masterpiece Theater. I think this is one of the best modern version of Sherlock Holmes that has been done (It features Benefict Cumberbatch as Sherlock Holmes and Martin Freeman as Dr Watson). Unfortunately the run is quite short, there are only 4 seasons (or series in the UK) and there are 3 two hour episodes each season. If you haven't seen it I highly recommend it. If you watch the series keep an eye out as a Cluedo board makes several appearances in the series and they even briefly talk about the game at one point.

This is a classic Clue game based in the modern world of Sherlock Holmes.


Tuesday, February 14, 2017

Reaper Miniatues - Shipping Container - Prep

I know, I'm in the midst of a lot of other projects but there is a little contest on the Reaper forums that caught my eye. With the last container on the water (hopefully) that contains the rest of the BONES 3 Kickstarter the forumites thought it would be fun to have a little unofficial contest. By early March paint up and post on the forum your version of the shipping container that was part of the BONES 2 release. So I acquired the Reaper shipping container and managed to get started on this little side project last night.

I cleaned the plastic, scrubbed it down with a toothbrush and dishsoap to make sure there wasn't any residue left on the two pieces before I started to work on it.

I glued that bottom to the rest of the model and that pretty much finished up the assembly portion of the evening. I then pulled out the airbrush and applied a coat of Reaper's Brown Liner from their Master Series Paint Line. For whatever reason the Liners seem to work very well as a primer for the BONES line of miniatures. I'm not sure it was necessary in this case as this seems to be a different kind of plastic from the regular BONES line. But I needed to prime it and I had it on hand.

Thinking ahead to the weathering steps I decided to apply a rust color as the base coat. This will allow me to really go to town on the rust effects as I move forward with the project. I'm going to do some rust work before the graffiti portion since very often the surfaces chosen by the graffiti artist are already worn and rusted by the elements.


It looks like styrene plastic but it doesn't feel like it. So it got a bath so I wouldn't have problems later.


Brown Liner applied as a primer. Not the best job, my airbrush was in the process of clogging up on the paint. I have already grown accustomed to using the AMMO paints in my airbrush!


AMMO Red Brown Shadow applied as a base coat for the weathering steps that will come a bit later.