More Stuff

Monday, June 15, 2020

World War II Project - Return to Normandy - Railroad Station

Long time readers may have vague recollections of the Sarissa Precision Railroad Station that I started work on. After I built the Mid-Terrace House from Sally 4th as far as I could (ran out of roofing materials) I decided to pull this building out and see what I could do with it.

While I do like Sarissa kits, in general, I still have a few issues with them. In some cases the laser cut are just to precise and tabs and slots need to be filed a bit in order to get a good fit without breaking anything. This is definitely the case with this kit. I have broken off several key components while trying to get things to fit together. Remember, MDF is fragile and to much pressure is more than likely to break something than to actually get it to fit together.

I added wood floor paper to the main floor, removed the old brickwork on the platform and basically fixed things up so I could move on to the next phase. The same phase that stopped me before, brickwork. I want the brick to stand out more from the building, otherwise the plastered surface and the brick are on the same level which is not what I want for this particular building. I need to cut some pieces to be able to wrap the brick sheet around and give it a little bit more depth. The only "bumpy" brick I have is on contact paper which makes it a little thicker and the contact paper is really not sticky enough for this type of work. After doing two terrace buildings with "bumpy" paper I want to keep that theme going I think it really improves the look. I'm actually considering redoing the outside of the Charlie Foxtrot dormer house with it I like it so much.

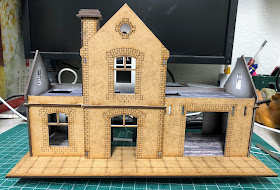
This is the state of the building when I finally managed to dig everything out.

I managed to get the floor piece in place. This is a large piece consisting of the platform, the floors and long cuts to slide it the building. Argh, thought I was going to break the darn thing and I did break one of the edge pieces off. Here you can see that I managed to get the wood floor paper in place. A real chore, but if I had glued down first then tried to slide it into place I would have torn it, the fit is that tight. Remember to keep your files and sandpaper handy to smooth down trouble spots!

Attic floors in place and papered up. They are removable (thank goodness). I added some extra ledges for them to rest on. There is some exterior trim with long tabs that should serve that purpose but I'm not using them in a couple places and in others I just didn't just the length of the tab sticking through the wall to be strong enough to support miniatures in the attics. If this was a rural American RR Station the spaces upstairs would be the living quarters for the station agent and his family. The only access should be through the small room on the right and there shouldn't be an attic floor at all in the baggage room on the left. The attics are really small too and because of the roof design the windows on either end are actually block off from seeing inside.

Got the fireplace/chimney assembly into place. That one was a very tight fit trying to slide it down the wall. Again keep the files handy. For the time being it is not glued into place (and probably doesn't need to be). This will be my first brick wrapping project for the station.

And a look from track side. A lot of work still to go on this one.

No comments:

Post a Comment