The UNIC P107, U304(f) in German nomenclature, is another one of the vehicles needed for the Kampfgruppe Von Luck Pint Sized Campaign from Two Fat Lardies. Warlord Games is the only manufacturer of the regular P107, they also have a command version. There is also a command version available from Mad Bob Miniatures and I really wish he had the standard version. I have been putting off assembling these for a long time at this point. There are a couple of major things wrong with the resin and metal castings that I just haven't had the patience to sit down and figure out how to fix it without making it in to a long term project.
Here are the issues with this kit:
1) The resin body definitely didn't come out of the mold cleanly and there is a lot of filing required between the upper and lower body panels on the passenger compartment. I have two different castings; one in light grey resin which really wasn't to bad and two in a lighter almost yellow grey resin which required a lot of knife and file work to make it look vaguely acceptable. Fortunately these will be tabletop miniatures so its unlikely that anyone will be talking a close look.
2) The metal windshield isn't quite big enough to fit into the opening in the body. I have contemplated rebuilding it out of sheet styrene but I'm not sure I want to go to that much work. I'm thinking of maybe adding a styrene plastic edge to it and then cutting and filing to fit. Still brooding on this one.
3) Axles; there are two long and two short axles all cast in pewter. Just trying to test fit them was a chore and the possibility of damage during a game is pretty good. I'm going to replace these with brass rod to give it some extra strength.
Once those issues are dealt with I think I can make them look pretty good on the table. I apparently need to replace all my super glue at this point, its not working on pewter to plastic or pewter to pewter. I need to see if I have some epoxy hiding someplace.
The Town of Calamity, The D&RGW RR Warehouse Row and Historical Miniature Gaming
Quotes
Life is short, break the rules. Forgive quickly, kiss slowly. Love truly, laugh uncontrollably and never regret anything that makes you smile. - Samuel Longhorne Clemens (Mark Twain)
Thursday, April 30, 2020
Wednesday, April 29, 2020
Tuesday, April 28, 2020
World War II Project - AFV basing
Basing vehicles is something I have gone back and forth on for a very long time. My 15mm Afrika Korps army has all the vehicles based. What I don't like about this are that some of the AFVs just don't fit well on bases or just plain don't look good on them.
I have never based vehicles for my 28mm forces (such as they are). However, as I keep leaning towards more detailed "kits" for these vehicles they are inherently more fragile. Even some of the resin vehicles are a bit fragile depending on the type of resin used. There is also the issue of transport. A base would allow for a combination of magnets and sheet metal which at least help keep breakage down to a minimum.
The other issue I have is all the space that a base takes up and those bare patches in the corners that need just a little extra detail to make look nice. Not a good situation for those of us that love to add those little details. While I was contemplating this the other night I thought that maybe curving the corners would be a good solution and of course that lead to why bother with just the corners maybe a pill shape would be a better option by reducing the amount of space in front of and behind the AFV.
Another issue is that straight fall of edge between the top of the base and the tabletop. For this I'm going to file down the edges to get a smoother transition. The concern here would be having a fragile edge but I think by using foamed PVC for the base will take care of that. We shall see!
I'm going to do a little experimenting at this point using some resin vehicles from Mad Bob Miniatures since those are currently being worked on.
 |
| Used a compass to draw half circles on either end, just have to figure out how best to cut these out now. |
 |
| And a quick check with one of the three S307(f)s. Concept looks good to my eyes at this point. |
 |
| The next step will to be to cut out the shapes and file down the edges to, I hope, about a 30 degree slope. |
Monday, April 27, 2020
World War II Project - Return to Normandy - Decals
A quick update from the weekend. I sealed the vehicles with Vallejo Gloss Varnish and added the decals for the 21st Panzer. Of course when I went looking for the markings that I had seen online on couldn't find them, so I relied on my poor memory to get me through it. These vehicles didn't seem to have a lot of markings on them so I took a minimalist approach.
Just need to seal the decals and I can start the weathering.
Just need to seal the decals and I can start the weathering.
 |
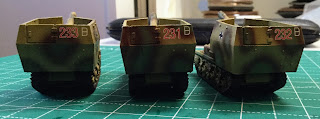
| The trio of 15cm sFH Lorraine Schleppers. Interestingly enough the 21st Panzer used this same vehicle in North Africa. |
 |
| I felt the need to put numbers on something so I opted for a rear hull spot. Not common but not completely unusual either. |
 |
| The last of the S307(f)s. I got the camouflage pretty close but after the weathering its likely to stand out a bit from its brethren. Such is life. |
 |
| Just crosses, division emblem and the license plate on this one. |
Friday, April 24, 2020
World War II Project - Return to Normandy - Browns & Greens
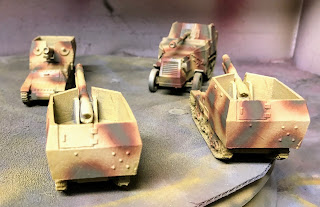
I had the opportunity to get some more paint on the Pak 40 auf S307(f) and the 15cm Lorraine Schlepper. The S307 received more of a "standard" striped version of the camouflage pattern so it would fit in better with the other two finished ones. Won't be a perfect match but it should be close. The Lorraine Schleppers received the "leopard spot" camo pattern. I like the pattern, the brown needs to be tighten up a bit though, the brown edge is way to soft. The brown is from the Scale 75 German Vehicle Camo set (. It came out really thick from the bottle and I probably thinned it at least 50% to get it airbrush ready. I will probably shift back to the Ammo brown, its ready to use in my airbrush straight from the bottle or maybe with just a little thinning. A little extra work in the next airbrush session and these should be ready for decals.
Thursday, April 23, 2020
World War II Project - Return to Normandy - Dunkelgelb
Here are the Becker french conversions for the 21st Panzer Division in Normandy with their first coats of dunkelgelb. I am attempting to apply modulating color techniques on these. I do feel that I was at least partially successful on these with the color changes. Looking forward to getting the camo on these, hopefully in the next week or so.
Wednesday, April 22, 2020
Tuesday, April 21, 2020
Age of Sail, Black Seas - USS (USF) United States
The USS United States is one of the two "Super" frigates included with the US Navy starter pack. The hull is a very nicely cast piece of resin. Sharp details and almost no clean up required. Everything else is cast in pewter and to be be honest the castings are a bit rough. At this point all I have done is getting everything ready for assembling. I wish these extras had been cast from plastic, I think the metal masks are going to be more fragile than I would like.
 |
| My parts were packed by Omar (unlikely that is was Omar Bradley though). Everything is there and there is definitely some clean up required. |
 |
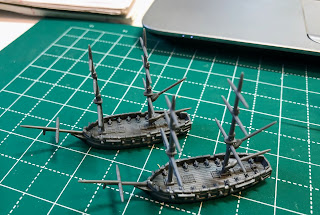
| Mostly ready for assembly, although I notice that at least one yardarm on the main mast is still not straight. |
Monday, April 20, 2020
Age of Sail, Black Seas - Plastic Frigates
The three smaller frigates are the Constellation, the Congress and the Chesapeake, these are the other three frigates that make up the original six (as a side note the Constellation in Boston harbor is not the original Constellation as originally thought). These have the first metal bits and I can say I'm not impressed with the metal bits. You have unique sterns for each of these frigates and quite frankly they are way over sized. I suspect the black hull paint will help but on the models before priming and painting they look huge. They also don't fit well at all. They each have their own bow carving as well, these are much better. They fit decently and seem to be in scale with the rest of the ship.
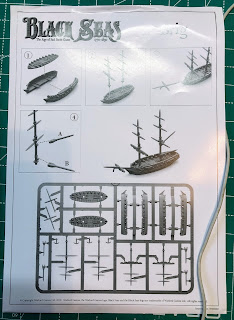
The instructions for the Frigates on the back side of the Brig instructions. Again pretty basic and it leaves off any mention of small details like anchors and ship's boats and the mast sequence is out of order again (at least in my opinion).
The instructions for the Frigates on the back side of the Brig instructions. Again pretty basic and it leaves off any mention of small details like anchors and ship's boats and the mast sequence is out of order again (at least in my opinion).
 |
| The hull is a bit trickier. I found it was easier to assemble the sides and while the glue was still wet drop in the deck and kind of slide things around till they are in place. |
 |
| Oh yea, small details like the boats and anchors got added here. Would be easier to attach these before you glue the masts in place. |
 |
| More like this! Note that there is an extra boat per sprue, I would definitely save those extras! There are lots of extra anchors too. I basically saved everything. |
 |
| I should be gluing these metal bits on at this point, but my super glue failed me completely. |
Thursday, April 16, 2020
Age of Sail, Black Seas - The Brigs
Another acquisition earlier in the year was the starter US Navy fleet from Warlord Games for Black Seas. I have always had an interest in the period but this was the first time I saw something that grabbed my interest enough to get into it. The starter box for the US Navy gets you almost the whole damn Navy that served in the Atlantic. I think a campaign on the Great Lakes would be fun but the ships there tend to be quite a bit smaller. In the box are two of the big frigates; the President and the United States, three smaller frigates; the Constellation, the Congress and the Chesapeake. That gives you five of the original six frigates. The only one missing is the Constitution which was included in the bundle that I bought (which also included terrain!).
I opted to start with the brigs of which there are six.
I opted to start with the brigs of which there are six.
 |
| Two brigs per sprue, three sprues in the starter box |
 |
| Instructions, not bad but they could be better. They left off talking about the anchors as an example or that the assembly sequence on the masts is really reversed |
 |
| Three part hulls, pretty easy, no problems |
 |
| Masts in place |
 |
| Bow sprits added |
 |
| After I worked my way through the first two the rest went together really fast. I think the hardest part was scrapping the mold lines off the masts. |
Wednesday, April 15, 2020
Monday, April 13, 2020
WWII Project - Back to Normandy - More Priming
Another day of grey priming. Much like the Stugs, these 21st Panzer Division vehicles now have grey primer on all of the upper surfaces. Again, I will be stopping here with the priming and doing the rest when I paint the camo. Found a nice source for some of the markings that the 21st used on these vehicles in Normandy so I'll try to see what I can do with that. One thing about the Mad Bob Miniatures is that the castings are pretty rough. While they don't have a lot of bubbles to be dealt with they are not smooth castings. In some cases this isn't a problem especially vehicles with sand cast turrets and the like. However, these vehicles are all made from rolled steel plates. Since they are intended for gaming I didn't make any efforts this time to smooth out the surfaces. I think the biggest challenge will be trying to match them up with the first batch of vehicles I painted for this although in the end it really doesn't matter to much so I'm not going to lose any sleep over it.
 |
| Now with a nice shade of grey on the top and just across the top of the tracks and suspension. |
Friday, April 10, 2020
WWII Project - Back to Normandy 21st Panzer Vehicles - Priming
Another part of the World War II project and really the main impetus is to play the Kampfgruppe Von Luck Pint Sized Campaign from Two Fat Lardies using their Chain of Command rules. It provides an opportunity to play with some of the more unusual vehicles used by the Germans based on French vehicle chassis.
I had assembled the last the Pak40 aug S307(f) (Somua MCG) for a total of three. To go along with that are 3 15cm sFH 135/1 (Sf) auf Geschutzwagon (also known as the Lorraine Schlepper (f)). The last vehicles for this project are three of the French halftracks (P107) used by the Germans in Normandy. I have three of these kits from Warlord Games but I have had issues getting them assembled, the track and suspension system are not good fits! In frustration I set them aside and will work on them another day (not like we don't seem to have plenty of times for hobbies right now).
I had assembled the last the Pak40 aug S307(f) (Somua MCG) for a total of three. To go along with that are 3 15cm sFH 135/1 (Sf) auf Geschutzwagon (also known as the Lorraine Schlepper (f)). The last vehicles for this project are three of the French halftracks (P107) used by the Germans in Normandy. I have three of these kits from Warlord Games but I have had issues getting them assembled, the track and suspension system are not good fits! In frustration I set them aside and will work on them another day (not like we don't seem to have plenty of times for hobbies right now).
 |
| Black on the lower hull and suspension. |
Thursday, April 9, 2020
WWII Project - Return to the Stugs - Priming Grey
Moving on, another day and I was able to get the grey primer on. This is the second part of trying to do modulation priming...again. I'm going to skip the next priming step though and try and do the rest of the modulation with the camo painting.
These time you get to the see the tracks and all the skirt pieces.
These time you get to the see the tracks and all the skirt pieces.
 |
| I tried to keep the grey off the suspension and lower hulls. Blending just a bit on the front and back ends. |
 |
| Lots of little skirt pieces. I cut the skirts up into their individual sections. Priming them was a pain since I didn't fasten them to anything. I know better, put did it anyway. |
Wednesday, April 8, 2020
Tuesday, April 7, 2020
WWII Project - Return to the Stugs - Priming
I finished building these four Stug variations from Rubicon sometime ago. I have managed to free up a little time to at least get the priming started. At this point they have been primed black on the lower hulls and suspension system. In effect another attempt at starting color modulation at the priming stage which I have had little success with but keep on trying.
 |
| Black on the lower hulls. I forgot to take a picture of the tracks and wheels. |
Wednesday, April 1, 2020
Cartoon Wednesday
Subscribe to:
Comments (Atom)


