I ordered one Khurasan M113 to take a look at it when I ordered my mech infantry for Team Yankee (which reminds me that I need to get some stands for them). I was happy enough with that model to go ahead and order three more for my mech infantry platoon instead of using the ones from Battle Front.
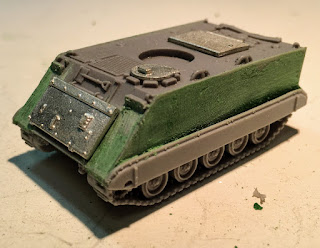
I started to build the original M113 that I had received. If you remember I had some issues with this one off the bat that I was able to fix with the hot water trick. What I didn't notice at the time though was the seam along the side. I think this particular vehicle must have slipped in the mold somehow, however, all the other three M113s have it, just to a much, much lesser degree.
Rather than wait to try and get a replacement I decided to just fix it with Squadron Green. I completely covered both sides and part of the front glacis and then filed it down after it had dried. I don't think you will be able to tell the difference after a bit more filling and filing. I checked the other three out and they don't seem to have any issues, so it really is just a fluke that I received a bad one.
I compared these to the M106 from Battle Front. They are almost identical but the Battle Front versions stand taller. Noticeably so when they are next to each other. During a game I don't think anyone will notice.
 |
| M113s on parade well sort of. The Khurasan kit comes with a couple of options, like metal or resin tracks, along with three options for the vane in front. |
 |
| I tried a partial application first |
 |
| Then decided it would just be easier to do the whole side |
 |
| The front, you can see the seam here. Again this is not a seam from the mold, just a casting that went wrong. Most of the front will be covered by the vane. |
 |
| Still a little rough after using the file, but getting closer. I would follow this up with a quick rub down with a piece of fine steel wool. that really smoothed out the surfaces. |
After I had finished this first M113 I went ahead and started work on the remaining three.
 |
| Putting together the TCs hatch |
 |
| All finished and ready to go. |
I also spent some time finishing up the M1 Abrams models with some extra stowage both from the kit sprue and with the stowage metal stowage sprue from Khurasan. I'm still looking for some really good stowage for cold war vehicles at this scale but I'm not having much luck.
 |
| These are ready for primer now too! All of this may have paint by the end of the week, don't hold your breath on that. |


Excellent recovery job on that miscast M113. i think most people would have demanded a replacement, or turned it into a wreck.
ReplyDeleteI think battlefront tends to make their tanks "tall" so as to look right against based infantry. Which of course does not help the modeler, nor the gamer that puts their tanks on bases.
Thanks, it just seemed like more effort to ask for a replacement and wait for it than it would take to fix it.
DeleteI tend to agree with you on the Battlefront stuff. I was looking at pictures of M113s in the field and they just don't seem to have that same hulking appearance that the Battle Front model has. Unfortunately I still need another box of them to have a full battery of M106s!
The waiting is the key part!
DeleteDo you have Terrain for 15mm Europe? I would love to see what you did for some German town terrain.
I don't right now. I hadn't even thought about terrain yet! Most is pretty basic anyway but your right those German towns and villages are going to require some extra attention. I had some nice stuff for micro armor but I'm going to have to rebuild a bit for 15s now.
DeleteI was just thinking about the issue of rebuilding terrain for multiple scales this morning on the way into work... does it make any kind of sense to replicate the same terrain in three (or even two) different scales? Truly wargamers are mad.
Delete