Quotes

Life is short, break the rules. Forgive quickly, kiss slowly. Love truly, laugh uncontrollably and never regret anything that makes you smile. - Samuel Longhorne Clemens (Mark Twain)
Showing posts with label Carousel Animals. Show all posts

Tuesday, January 30, 2024

Hippo Distraction - Day 7 Finished

 This morning I touched up some of the black lines as well as adding a couple more. I tried to even out the yellow on the tassels. I would probably fuss with these some more but I have to consider drying time at this point. What that means is I’ll have to depend on my brother to apply the gloss coat in a couple of weeks in California. Now I just need to arrange delivery to Louisville before they leave next Monday.


Monday, January 29, 2024

Hippo Distraction - Day 6

More details and beginning the touchups at this point. The yellow tassels are driving me a bit crazy, I forgot how difficult yellow is to work with. Harry is basically finished at this point so about an hour for the next session should wrap him up. The saddle has a lot more fade to it, much like the original but the light is really killing that for some reason. I may revisit that and lighten the upper surface of the saddle even further.


Sunday, January 28, 2024

Hippo Distraction - Day 4 & 5

Moving on to the details. The tongue and the saddle blanket in this case. Since I needed some of the paint to dry before I could paint other things this took a couple of days. This is the stage when I start mixing enamel and oil paints together. The base for the red is magenta enamel while the red itself is cadmium red. The blue base is a mix of Prussian Blue and White enamel with both full strength Prussian Blue enamel and Pthalo Blue oil mixed in. The process gives a very rich vibrant color. In between the red and the blue will be white and I was thinking of free handing some stars into the blue but we will see how that goes.


Friday, January 26, 2024

Hippo Distraction Day 3

The hippo has been named, he is now Hieronymus "Harry" Hippopotamus or just Harry Hippo for short.

Progress continues, the blue shadows have been blended into the base gray. Its not perfect but its good.


Thursday, January 25, 2024

Hippo Distraction - Day 2

Day 2 saw the Hippo (whom my wife is now calling Hieronymus or Harry for short) receiving the initial base coat of paint. This work is done with a combination of oils and enamel paint (yes, I know those are both technically oils). Major work is done with enamel paints and then I add oil paint for additional color and detail work. By combining these two types of oils I can the ability to blend colors because of the lengthened drying time but that drying time is also shortened. Basically it will take days to dry rather than weeks to dry.

This initial coat is just gray, about 5/8ths black and 3/8ths white. Initially applied with a 1 1/2" house brush and then stippled, with a weird triangular brush I found at the store, to remove the brush marks.


Tuesday, January 23, 2024

Hippo Distraction - Day 1

I was the recipient of a recent curve ball from my brother. He and his wife have accepted new jobs in southern California. They sold their house but don't have a place to actually move to yet. In the long run it means that he can't take the Patriot carousel horse with him (they are decidedly difficult to move in perfect conditions and this one was damaged the last time it was moved. There is enough damage that I'm still trying to figure out how I'm going to fix it). He is insisting that he "needs" to have one of my dad's carvings and it "needs" to be the hippo and he is going to be quite upset if he doesn't get to take it, right now. Nothing like a little family drama. It had occurred to me that I could ship him to California but he weighs about 70# and probably needs a crate to insure a safe delivery and as I said all carousel animals still are bit fragile (typically legs that are extended, in this case its the extended nose). I fairly certain that I could pack him well enough to survive but in the end its probably easier to make my brother pack him up with everything else.

Much to my wife's dismay I have elected to get moving on the hippo and let him take it. I needed to paint it anyway so I figured this at the very least gets me moving on it and it gets it out of the workshop. Its a nice piece and has the added bonus that its relatively small and not as detailed as the rooster (which is still staring at me, belligerently, demanding to be finished as well). Its to cold in the workshop to paint it there so he has been brought indoors and is sitting in the dining room to be painted. And it has to be done by next Tuesday. That's kind of a longshot from a dry paint standpoint but we will see.

The hippo is quite nose heavy and someone but a 5 year old on its back who promptly rocked on it which caused it to fall forward and take quite the hit on its nose. Only the hippo was damaged in the accident, fortunately. This is after the repairs were finished. Anything in white was fixed. What you can't see is all the repair work in the mouth. The mouth is actually hinged and moves and that entire assembly took the brunt of the tip. The problem with that is the lower jaw moves on a metal rod that is embedded inside and can't be removed. Fixing it was not fun. I didn't do that work. When I started looking at it over the weekend though I saw that the back of the mouth was not glued properly and was loose so I figured out how to get some clamps in there and re-glued it. Still it was a pretty darn good repair job in the end.

One of the issues with the hippo was that I had a bad tube (well old and expired) of titanium white which I went ahead and used anyway (another story there). The skin ended up with a pebbly texture when it was done. Since he was going to be repainted and needed sanding anyway I went ahead and sanded away that texture.


Then it was on to the priming. I didn't need to prime the while thing since I was going over old paint but I seemed to have gotten carried away with it and did more than I really needed to.


Here is the Patriot horse which my brother currently has. Any horse with a flag is called a patriot and white is the traditional color. This particular pose is a "stander" she has three legs on the ground (some will have all four legs down. And yes, this is a she. Most carousel horses are and there is a way to tell, its not what you think).


Saturday, November 19, 2022

New Carousel Project - The Hippo

As some of you may remember my dad carved carousel animals, mostly horses. At one point he had decided that doing the full size ones was not as fun and they took up a lot of space. So he tried a couple of smaller ones just to see how he liked doing those. There ended up being two; an Ostrich and a Hippo. My sister will eventually get the Ostrich, just another one on the painting list.

I painted the Hippo following my dad's directions and with the paints he specified. The titanium white was old was actually pretty lumpy and it really affected everything I used it in, which was mostly the blue skin color that he insisted on (I have no idea why, it doesn't match the Hippo pictures he had on his workbench). The neat part of the Hippo is that the mouth is actually hinged.

At one point it was sitting on a furniture mover which was a simple frame with four wheels just to make him easier to move around. Someone let a rambunctious 5 year old ride while it was on this frame and the whole thing tipped over, smashing the Hippo's mouth and breaking the hinge. About six months ago my mom found someone interested in fixing him and it just came to me a couple of days ago. We have decided to completely repaint it in a more appropriate color and get rid of the weird surface texture from that titanium white paint that I used.  

I still need to finish Chester the Rooster so this one will probably be sitting in the shop for at least a couple of months before I can sit down with him.

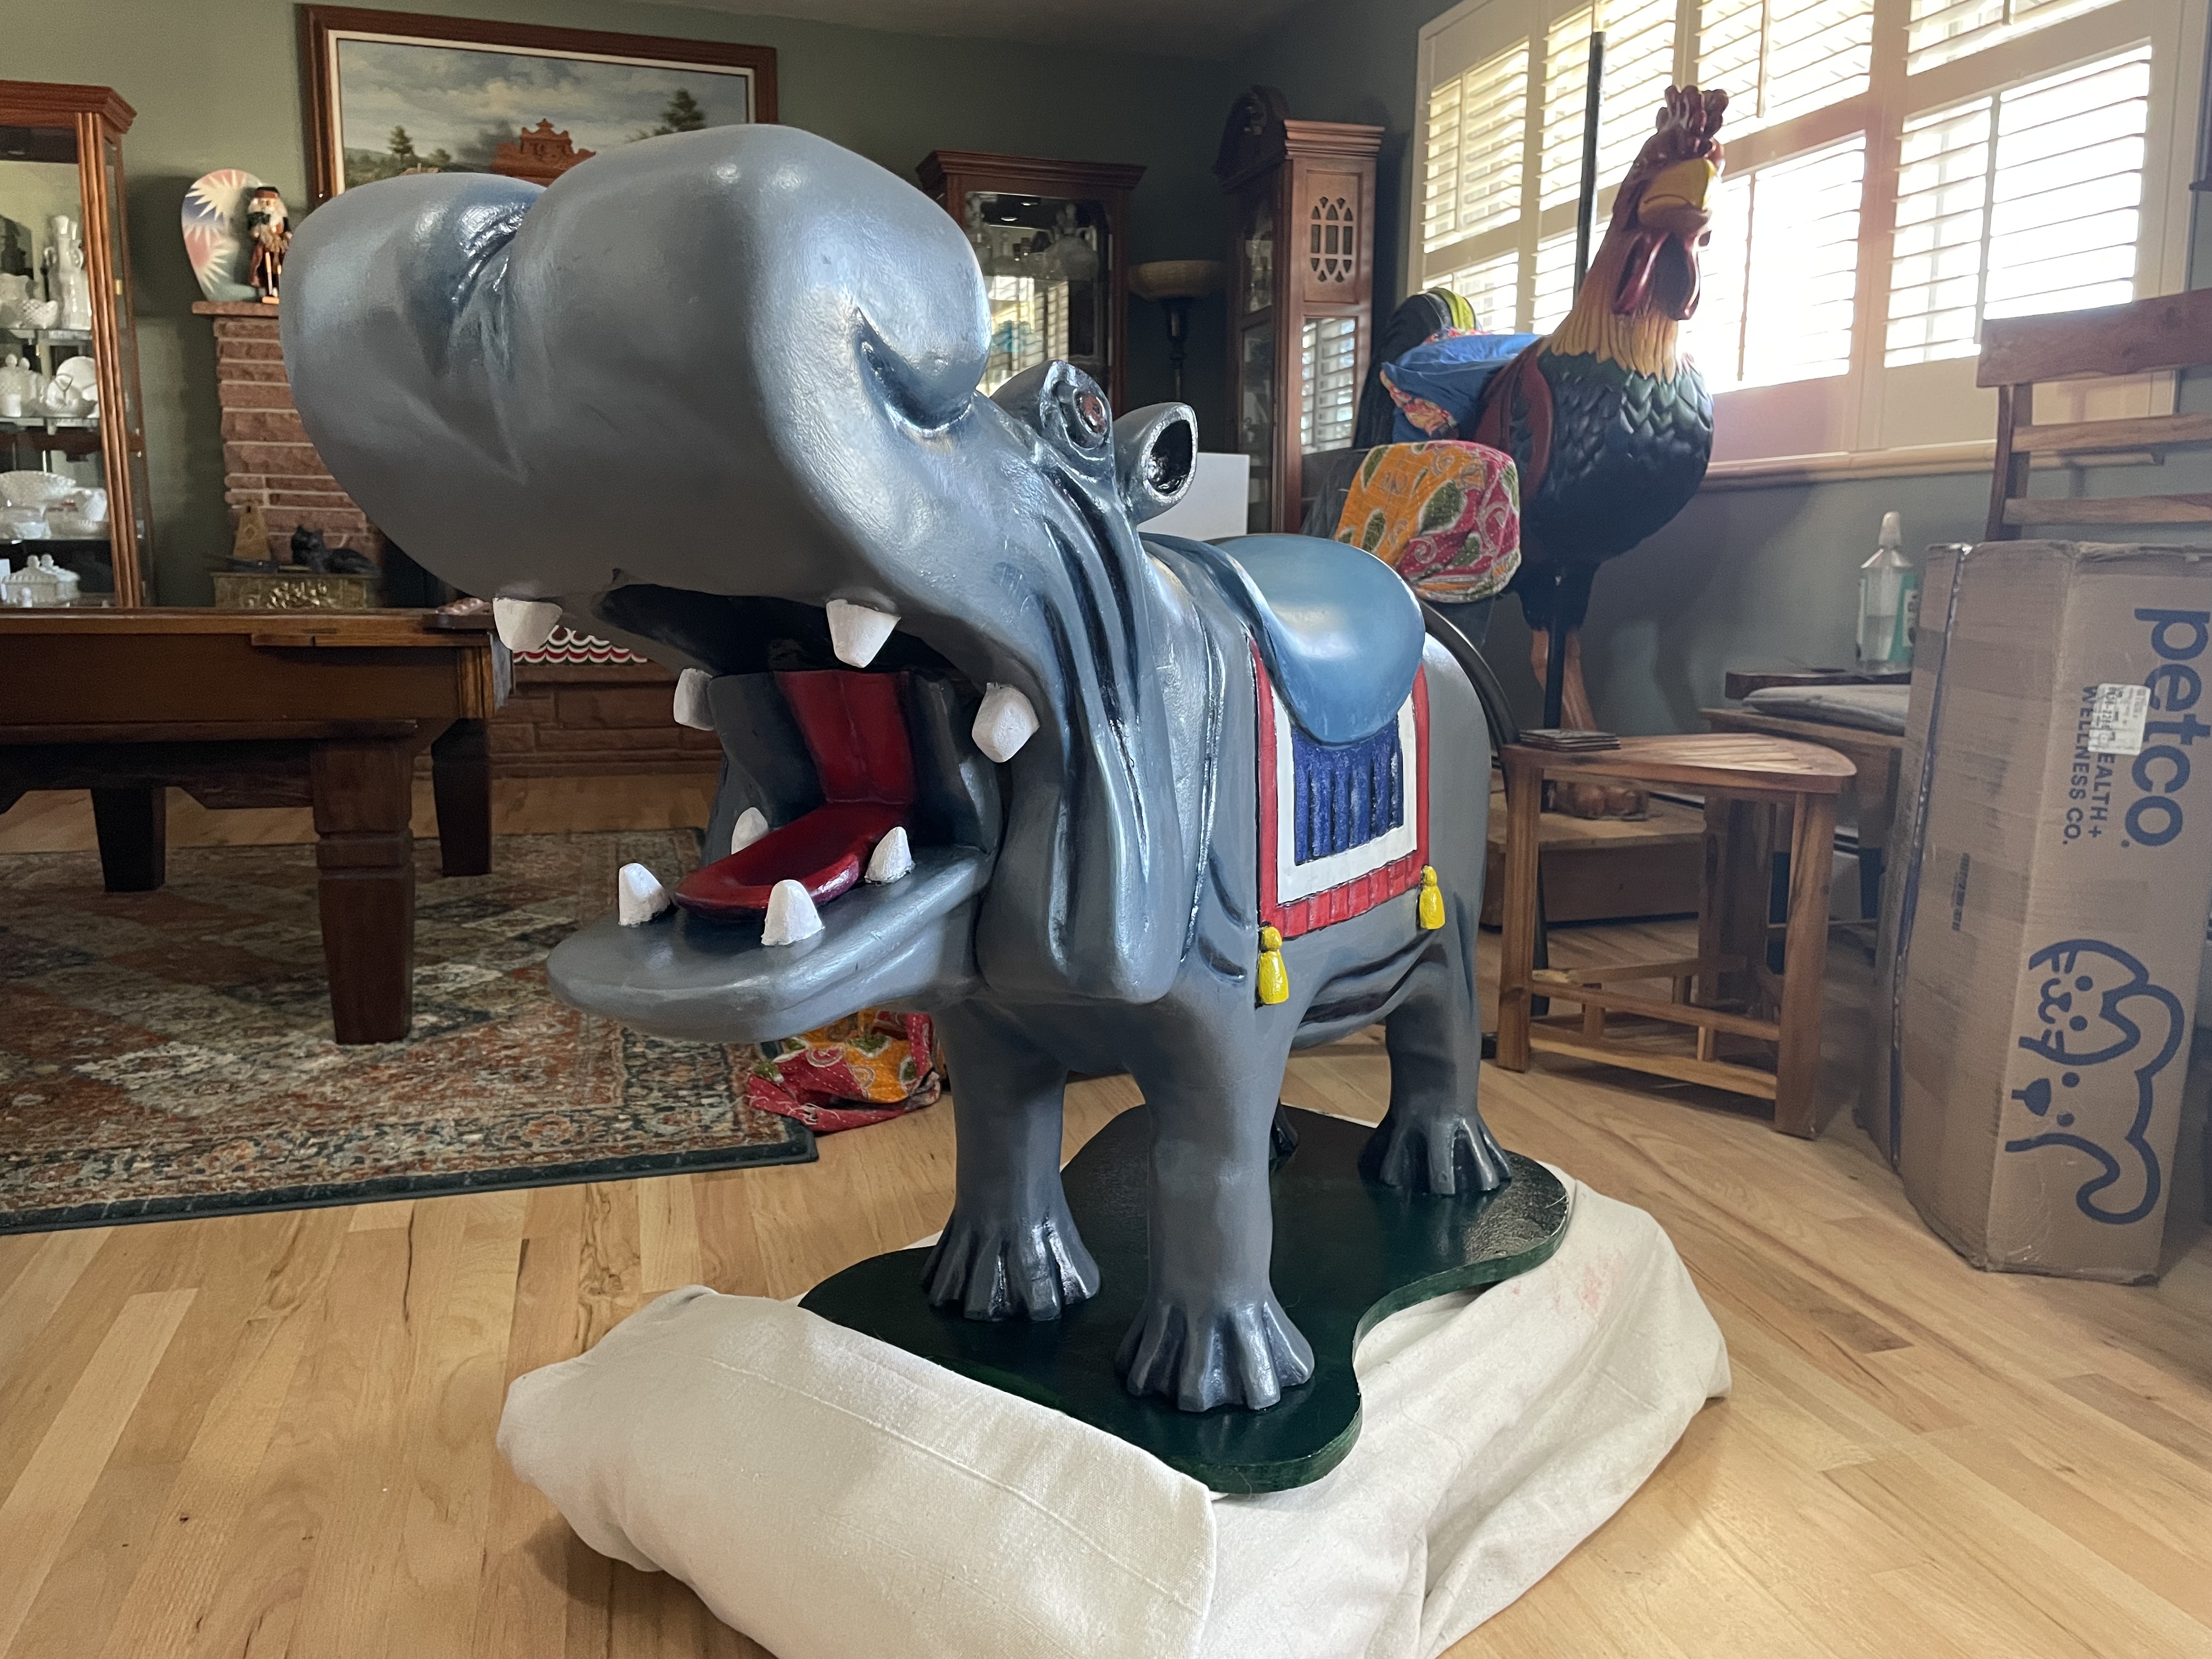
The Hippo after repairs. If it wasn't for the fresh primer I wouldn't have been able to tell he had any work done on him. In the background you can see the box with my new Bosch 12" miter saw. It was on sale. I don't really have room for it right now but it was to good a deal to pass up.


Tuesday, November 19, 2019

Chester the Rooster - Pt 8 - And Still More Feathers

The more feathers I paint the more there seem to be. Over the course of the last couple of days I have pretty much completed the head, neck and chest feathers. I was quite pleased with myself till I looked back along the body and its seemingly endless supply of feathers.

These were the colors I was anticipating using during this round of painting. I ended up adding Prussian Blue, Cobalt Blue and Pthalo Green to the mix as well.

Here I feel like I have finished up the head and neck on the romance side. I'm contemplating bringing the yellow down farther though. Will mull that over.

Here I have worked on the wing, and the body feathers. the first layer is green and then blue under that,

A closer look. The wing feathers need some highlight yet.

In the front I brought the green a bit further down.

And the same level of progress on the money side.

Friday, November 15, 2019

Chester the Rooster - Pt 7 - More Feathers

Still working slowly on the head at this point. The money side of Chester's head is pretty much done, maybe some touch ups but that's about it. I worked on the front (below the peak) and on the romance side last night. Pretty rough at this point but it should only take another hour or so to get it to the "finished" point.

The money side

From the front, which also shows some of the difficulty created by the lighting conditions in the living room.

The romance side, roughed in.


Thursday, November 7, 2019

Chester the Rooster - Pt 6 - Starting on the Feathers

Now the real hard part begins on Chester working on the feathers. I spent an hour working the colors down the feathers on the money side, which is the side you can get away with a few mistakes. The color change isn't to bad but it needs some more work before I shift over to the romance side. Still not bad work.

There should be four fairly distinct changes of colors in the feathers when its done. Looking at the "model" those changes occur in bands of color that can cut right through the middle of a feather which I find rather intriguing.

Monday, November 4, 2019

Chester the Rooster - Pt 5 - A little Red a little Yellow...

A little more work on Chester over the weekend. With the body finally blocked in I started the finish work on the head. Essentially finished all the red work and the beak. The beak probably needs a little touch up yet, but overall I'm pleased with the results thus far. At this stage I worked with a combination of tube oils and enamel paints. To make the enamels a little easier to handle I transferred them into jam jars. That essentially means that when I spill I will spill less paint at once. And yes I did manage to spare part of the jar full of Raw Sienna paint. The spill was definitely minimized by the smaller jar!

This is where I started the day. Again just blocked in colors with a bit of blending,

The reds about mid way to being finished, the blending is pretty rough at this point.

Blended reds and a yellow beak now. The beak still needs a bit of work.

Jam jars filled with enamels and tubes of oil paints

The brushes. I opted for craft brushes at this point. This type of painting is incredibly hard on brushes, especially the stippling brushes. Once you have a stippling brush broken in so its not shedding so much its just about ready to give up the ghost.

Thursday, October 31, 2019

Chester the Rooster - Pt 4 - Body Base Colors Complete

Finally was able to finish off the rest of the Prussian Blue feathers on the romance side and managed to get a base coat of Raw Sienna on the legs. At this point all the body colors are blocked in (including those spots on the wings that started in Raw Sienna instead of Prussian Blue). Chester is ready to move on to shading and highlighting. At this point the oil colors will start to come into play so I need to find something to use as a palette and I will probably shift some of the enamels into small jars. I'll be using multiple colors at the same time and working on smaller areas. This is the point where Chester will become a real time sink. Right now I'm about 10 hours into the process, in some ways Chester has a lot more surface area to deal with because of the feathers than a carousel horse does and the horses took any where from 40 - 80 hours to complete. We will find out where Chester fits into the hourly wage scale now!

The light is just inadequate for good pictures and a flash blows out the colors. This is the romance side with the Prussian Blue finally finished.

This shot was a bit earlier in the day so I still have some west facing sun coming in. The legs now have a coat of Raw Sienna.

And a quick shot of the money side. The "horse" furniture won't be started on till the body is done. It will be a reddish leather saddle and belts with a red saddle blanket with the USMC EGA emblem in the back corners.

Monday, October 21, 2019

Chester the Rooster - Pt 3 - Base Colors - Prussian Blue

A little more work on Chester. Not particularly good pictures this time around, I'll try and correct that next time I have him turned around.

I'm very pleased at how well things are going, still a long way to go though. There is a lot of surface area to cover and with the detail in the feathers really makes for slow going, much slower than a horse.


The tail is painted on both sides, but the body feathers are only started on money side.
The spot of wing feathers in the Raw Sienna should be Prussian Blue as well, I'll fix that next time I have the opportunity to work on him.

Tuesday, October 15, 2019

Chester the Rooster - Pt 2 - Base Colors

Finding time to start work on the Carousel Rooster can be difficult. We took some extra time off this past weekend and I was able to get some of the base colors on Chester. Earlier in the week I was able to start the red and the base for the yellow. Over the weekend I worked in the base colors for the head, body and wings. Most of this work is done with a 1" house brush. I'm probably going to go through two of these before I'm done. Enamel paints are hard on brushes.


I started with the head. This is Primary Magenta and here you can see all the brushstrokes. Don't worry, I'll deal with those.

One of the benefits to working with enamels is that they dry slow, this allows me to go back over the entire area with a stippling brush and remove the brushstrokes. Tedious but that's how its done.

Same process with the beak, this time with Raw Sienna.

And after stippling

Next some work on the feathers, this is burnt sienna

Followed by raw sienna with some initial blending work as well. I made a slight mistake here the feathers in front of the saddle should be burnt sienna (as pictured) surround a grouping of blue feathers. Easy to fix, the blue is quite dark to start with.

Some of the paints, those are oil paints and will be used more for highlighting and shadowing so I haven't really touched those yet.

The main paints, quart sized cans of enamel paints stacked up in the back.
Color list at this point is: Primary Magenta, Raw Sienna, Burnt Sienna, Pthalo Green, Prussian Blue, Ivory Black, Indian Red, Naples Yellow, Primary Yellow and White. Anything else that is need will be mixed from these.