Quotes

Life is short, break the rules. Forgive quickly, kiss slowly. Love truly, laugh uncontrollably and never regret anything that makes you smile. - Samuel Longhorne Clemens (Mark Twain)

Tuesday, August 27, 2013

WWI Kickstarter Book - The Walter Koessler Project

I think this is a pretty exciting project. This gentleman is going to produce a book  with the images his great-grandfather took as a German officer during WWI. His family has taken care of the pictures and the negatives for almost a 100 years now and he has decided to scan the images and create a WWI pictorial with over 1000 images. You can see the images he scans here on his tumblr site: Walter Koessler Project

This is a fascinating record of the war from the German side, just priceless photographs. If you have any interest in WWI then I think this is an excellent kickstarter to jump into. There are still a few pledge levels available at $75 (add $30 for shipping outside the US) and then the next level is $89. There is even a 3D steroscopic viewmaster pledge level. Very cool stuff. He has blown way past his goal with 9 days left.

Please keep in mind that unlike many gaming and miniature projects there are no stretch goals or add-ons. Various pledge levels will provide extras, but you can only participate through the pledge levels, no extras. 

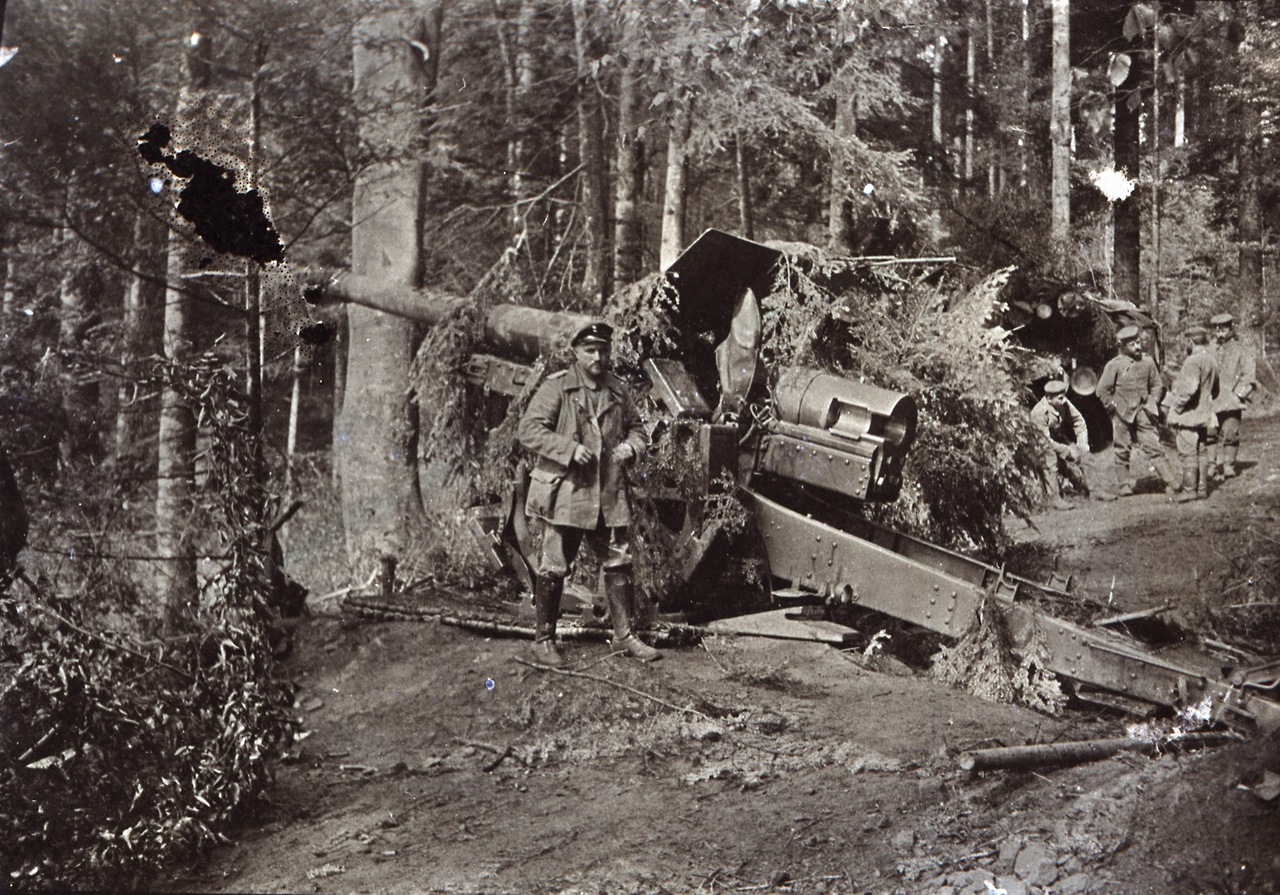
I have pulled one picture from the Kickstarter page and a couple from his tumblr site just to give you an idea of a very small portion of this book. I think this is a must have book for those with a serious interest in WWI.

Walter Koessler Kickstarter Project


Sunday, August 25, 2013

Building 4Ground's General Purpose and Ox Wagons

When I made my order to Great Escape Games for the Dead Man's Hand buildings by 4Ground I added on a couple of 4Ground wagons. Every western town needs a few wagons, mostly to provide cover from the constant gun fights! I purchased the General Purpose Wagon and the Ox Wagon. The General Purpose Wagon has a nice western feel to it and the Ox Wagon looks okay (the model is great). I found out later that the Ox Wagon was based on the one present at Rourke's Drift so that's a bit far afield from my mythical western town of Calamity. The General Purpose Wagon is more generic.  I probably won't get anymore of the Ox Wagon but I can definitely see a few more General Purpose Wagons gracing the streets of Calamity. Now the General Purpose Wagon is a freight wagon, it is not a "Prairie Schooner" or Conestoga wagon. It would, however, make a good tinker's or traveling salesman's wagon as well as a freight wagon. The Ox Wagon will make a good freight wagon was well, so it will be seen on the streets of Calamity as well.

Each of these kits only comes with one "sheet" of parts although there are plenty of little parts on that sheet. The instructions are good, although there is a misplaced line on the GPW's instructions that looks like it is a cut and paste error from the Ox Wagon. I took a few pictures of the build that would help supplement the instructions if you are having problems.

On to the build!

I started off with the General Purpose Wagon, which can be built with or without the canvas cover supports. For game purposes I'll probably go without the supports, it will be easier to get minis in the wagon that way. I think I will have least one with a canvas cover as soon as I figure out a way to do it.


Gluing the ribs to the bottom of the wagon

Ribs in place ready to glue the sides on.

Clamping the ribs to the wagon sides


A clamp forest! Because of the slant on the front of the wagon its hard to wrap a rubber band around 

Here is the basic wagon carcass ready to go

On the far left, the tail gate. 4Ground recommends you not glue this in. I probably will glue it in in the up position. The top three pieces form the bench and the piece on the right is the footrest.


Bench assembled and in place with the foot rest being glued in.


The front axle has to be able to turn. This is the piece the axle will rest in.


Glued in place on the bottom front of the wagon.

Gluing on the back axle and wheels. The wheels do not turn, which is fine with me.

The front axle sub assembly on the left and the pieces need to add that long piece that holds the horses (I have no idea what that's called). This piece has to be able to go up and down.

The front axle sub-assembly completed


The front axle is not glue in place it rests in the post that was add to the bottom of the wagon allowing it to turn left and right.


The uncovered version of the wagon with the edge rails in place. These can just rest in place and left removable.


And now with the edge rails replace with the ribs to support the canvas cover. Again this assembly can just rest in place and does not have to be glued so you can change back and forth. The original convertible!
Then I dove straight into the Ox Wagon build.
Full color instruction sheet!

Gluing on the wagon sides, the ribs are to small to actually clamp to, although I tried.

The cleats that form the base for the "fenders


I have no idea what these things are so I'm going to refer to them as fenders. Two on each side and new real room to get a clamp in there.


Gluing on the back axle. I guess the fenders should keep the passengers from falling into the back wheels.

Front axle sub assemblies. The center sub assembly will rest in the hole in the sub assembly on the left. I'm sure there are terms for these things but I have no idea what they are.

The center assembly from the previous picture glued to the axle.

The axle finished complete with trail.

I built mine for horses. For Oxen the hitch goes in the front and is curved.

Gluing on the pieces that will hold allows the front axle to turn.

The finished Ox Wagon


These wagon builds were pretty straight forward and it was nice to build something that wasn't a building. Both of these will get the same weathering treatment I use on my buildings. Wagons were typically, but not always, left unpainted.


Saturday, August 24, 2013

28mm Laser Cut Western Buildings Side by Side Comparison Photos

Its hard to describe exactly how the buildings from one manufacturer compare in size and "feel" to those from another manufacturer. You can give all the measurements in the world, but seeing is truly believing. Since I had just completed the six 4Ground buildings for Dead Man's Hand I decided to do some comparison photos with similar buildings from my collection of Battle Flag, Gamecraft Miniatures, Sarissa Precision, Aetherworks and Tri City Laser (Knuckleduster). Each photo shows a 4Ground building next to another similar style building. In this case I'm only going with two comparisons; 1 story buildings and 2 story buildings. Where possible I have removed porch roofs and awnings to get better pictures of the buildings themselves.

The pictures of the Tri City Laser (Knuckleduster) buildings are the old models, I haven't ordered the re-designed buildings yet, but I will get a few as soon as funds are available. Keep that in mind when looking at the comparison pictures and my comments. 


First up are the 1 Story Buildings. Please note that I left the 4Ground Side Street Building #3 off its foundation base which would increase the height another 1/2" or so. I also didn't include the staircase to the second floor on the backside of Main Street Building #3
Aetherworks Brick Building and 4Grounds Side Street Building #3


These buildings are very similar in size. The Aetherworks building is shorter but has a much taller false front giving the impression of a much larger building. Which is pretty much exactly the purpose of the false fronts to begin with.


Battle Flag Saloon and 4Ground Side Street Building #3


If the 4Ground building was on its foundation, these two buildings would be almost the same height. The Battle Flag building is  a little wider and a little shorter.


Gamecraft Miniatures and 4Ground's Side Street Building #3


The 4Ground building is much deeper than the Gamecraft. Again, the Gamecraft building looks much bigger from the front because of the huge false front and high peaked roof. Overall its a considerably smaller building.


Sarissa Precision Medium Building, 4Ground Side Street Building #3


The Sarissa Precision building is narrower and much deeper than the 4Ground building. It is much more typical of the shotgun style of building that was popular in the west at the time. I didn't measure but the Sarissa building is probably close to the proportion, popular at the time, where the front of the building would be 1/3 of the total length.
Sarissa Precision Small +, 4Ground Side Street Building #3


This is the Sarissa Precission Small + series. Its as wide and tall as the 4Ground building but is considerable shorter.


Sarissa Precision Small Building, 4Ground Side Street Building #3


Sarrisa Precision Small building, both narrower and shorter than the 4Ground building. Note the open hatch to the roof in this picture.


Tri City Laser (Knuckleduster) Small Building, 4Ground Side Street Building #3


The Tri City Laser (Knuckleduster) building just has odd proportions. Its wider and the false front is taller, and its considerably shorter and it has a very squat look to it. Now this is the old version. Tri City has re-designed all of their buildings so these pictures are not an accurate reflection of what they look like now.


Tri City Laser (Knuckleduster) Larger Store, 4Ground Side Street Building #3


The larger Tri City 1 story building. Again wider than the 4Ground building, but about the same height (especially if you put the foundation on the 4Ground Side Street building), and longer. Closer to the shotgun style building but a bit wide and again has a very squat look to it.


Battle Flag Photographer's Studio, 4Ground Main Street Building #3


Battle Flag's 2 story building is just a bit wider than the 4Ground building. Otherwise they are nearly identical in size. I did leave off the back stairs of the 4Ground building which would make it longer overall, but these two buildings are almost identical in size.


Gamecraft Miniatures 2 Story, 4Ground Main Street Building #3


The Gamecraft building is a bit wider and a bit longer than the 4Ground building. The Gamecraft building has some odd looking proportions because of the 2nd Floor window placement.

Sarissa Precision Large Building (I have misplaced the roof at the moment which is flat, the pitched roof is not an option for their Large Buildings), 4Ground Main Street Building #3


The Sarrisa building is narrower and longer than the 4Gound building. Again it has that shotgun style that I like.


Tri City Laser (Knuckleduster) Hotel (old design), 4Ground Main Street Building #3


The Tri City Laser Hotel is both wider and longer but a bit shorter than the 4Gound building. The Tri City kit doesn't have quite that same squat look as the 1 story buildings but it still has something of an odd feel to it.
So there is a quick photographic guide showing how these buildings might look on the table together.