Quotes

Life is short, break the rules. Forgive quickly, kiss slowly. Love truly, laugh uncontrollably and never regret anything that makes you smile. - Samuel Longhorne Clemens (Mark Twain)

Sunday, August 31, 2014

Trenchworx Kickstarter - Final Push - WWI Resin Tanks in 28mm (1/56th Scale)

The Trenchworx Kickstarter will be ending at 11:59PM today (8/31/2014). I'm still in for the French Squadron of FT-17s and I'm figuring out what else I want to add before it comes to a close. They have hit the $15,000 mark to produce the CA-1 Schneider and have lowered the goal for the British Mk IV to $20,000. I tempted to buy into the a couple of the British Mk Vs but my Marines were only supported (rarely) by the FT-17. Maybe a truck or two would be interesting.

Find their Kickstarter here: Trenchworx


Saturday, August 30, 2014

Game Auction Tacticon 2014

One of my favorite parts of any game convention is the auction. My philosophy is to keep it moving as fast as possible to keep everyone's attention focused on the auction itself. Its not easy and it requires that Mark and I stay on our toes and keep things moving right along, once you have the momentum going you don't want to lose it. While the audience certainly wants to get stuff as cheap as possible I have always felt that its my job to get as much as possible for the seller and that's really what I focus on. That requires that the auctioneers be invested in the auction, we don't sit down while selling and we don't stand behind a podium or a table, we are right out there in the middle of it. I'm pretty sure that our approach to the auction is fairly unique and I know there are some auctions that have "borrowed" some of the things we do for their own auctions. Everything is manual, while computerizing it would be a good thing we have never come up with a way that is faster than our manual intake. We also don't have to pause for computer glitches or errors, the slips may pile up but my crew will catch up and we just keep selling without pause.

I think that's why I'm pretty critical of other game auctions. I despise the massive auction at GenCon, in general it is far to slow and lacks energy and I don't think that the majority of the sellers really take away what they should. The lack of energy is certainly a disadvantage but running 12 hours a day for four days means that there are times when the auction hall is almost empty of people and stuff is going way to cheap. I have found this true when I worked the Origins auction as well and I find both of these auctions very frustrating because of that. The LA auctions where a lot of fun when I was helping with those, the auction crews have styles closer to mine. We go fast, we work in jokes and we engage the audience and when you engage the audience that's when the money really starts to flow and the energy from the crowd helps keep you going.

I just finished up the Tacticon 2014 auction this evening. We spent 4 hours selling stuff and had everyone checked out by 11pm. That's our earliest finish in years. I have been told that there is no way that we can sell as much as we do in the period of time we have. I tracked the number of lots sold through the first hour of the auction tonight and at the end of 60 minutes we had sold 72 different "lots". By the end of the four hours we should have sold 288 lots so we were selling a lot every 50 seconds or so. I'll see if I can get an exact count on the lots tomorrow. Fifty seconds seems to long to me, but then there is quite a bit of difference speed wise between Mark and I. While Mark is really good, he's not as fast as I am, while I'm certainly not a professional I have a pretty good cadence and it doesn't take me long to finish off an item an get a good price for it.

So here are a few pictures from tonight's affair


The check-in begins

The tables and floor is starting to fill up as sellers' bring their stuff in to be "recycled"

And a shot from the other side. Those big boxes under the tables are 3d boards for Space Hulk.

A better shot with no one in the way. To the left of the picture you can see the edge of another table that is full of games

The back table is filling up as well 

The money side of the operation

Mark in full auctioneering mode


The paperwork processing begins. First stage is taking money for cash sales during the auction (which we encourage, saves time later). The blue sheets are buyer sheets, for those running a tab. The white sheets are the seller sheets. Both sheets need information from the yellow tag that comes off each item as its sold. The white tag stays with the item and is stored on tables at the back of the room.

Friday, August 29, 2014

Freight Cars for Calamity - Step by Step Weathering - Wrapping it Up

Up to this point all the previous steps have really just been prep to get to the fun part. Especially in the case of the gondola since I had to cut apart my decals to get them to fit between the stake pockets. The reality is that the weathering process itself doesn't take very long, it gets stretched out trying to take pictures (or remembering to take pictures).

The next step for the gondola is to get some paint on the boards on the interior sides and floor. What I want to do here is show paint worn away by heavy use. The normal load for these gondolas was probably coal since the C&N had its own fleet of drop bottom hoppers for ore. However, I'm sure that they were pressed into service to carry various ores as needed. Boulder County is mostly mined for gold ore and tungsten although there were silver mines as well but none that were actually served by the railroad. I drybrushed some of the upper edges of the outside with a greyish brown paint and gave a heavy coating on the inside, leaving more of the original red in the corners and edges where the sides come together with the floor.


I then followed up with a burnt umber wash made from Liquitex Ink and distilled water. Colorado water is a little on the hard side and I try to keep the minerals out of my paints as much as I can by using distilled water.


Now all of that ink needs to dry before I can start applying pigments to it. Otherwise you can create quite a mess when dry pigment meets wet ink. Its not pretty, but it can be cleaned up when it happens.
With the gondola drying its time to turn to the boxcar. I want to try a different technique on this one involving Isopropyl Alcohol (rubbing alcohol you can get it at the grocery store or your local drugstore. I buy the 99% pure stuff) and dry pigments. I'll create a wash with this and see how that goes. Remember weathering is all about experimenting and thinking outside the lines a bit. Although its probably smarter to try something new on a cheap test car first!

For this one I used MiG pigments, their Cargo Dust and Black Smoke. The Black Smoke is to strong by itself so I tried to lighten up a bit with the Cargo Dust.


To this mixture I added the Isopropyl Alcohol. You want a wash so keep adding till you get something that just rolls right back to the bottom when you swipe your brush against the side. Keep in mind you are using alcohol and it evaporates fast (especially if you are in a high dry climate like mine)! I started on one side and proceeded to work my way around the boxcar.


Still much darker than I anticipated


I loaded up a brush with clean alcohol and proceeded to swab down the sides again. Wiping off the brush every few strokes to get rid of the excess.

That looks better

Roof is a bit uneven at this point but some additional steps latter on will help smooth it out.


In a couple of spots the alcohol started to penetrate the layer of dullcote and wiped away some of the lettering, mostly on the capacity and wt numbers on the left. It actually looks good so I didn't worry about but be aware that this can happen and go slowly least you wipe away all your decal or dry transfer work.
The problem with this particular technique is I really lost the faded look that I had started with. Maybe a thinner more directed wash would have helped maintain that effect or the two techniques just shouldn't be used on the same car. This also has to dry but you can come back with more alcohol later and continue to clean it up if you feel the need to. This is one way to set pigments, the resulting finish won't rub off without some serious effort.

Now its time to apply some straight up dry pigments. I'm using my Pan Pastels along with one another one from MiG (because, once again I put my Bragdon pigments in a safe place). While the best way to apply MiG pigments is still with a brush the best way to apply the Pan Pastels is with a very sponge. When I bought my set from Stoney Creek he included a couple of handles and variety of sponges to fit on the ends along with a couple of the big sponges for large areas. While you can brush the Pan Pastels on I have found that the sponges are definitely more effective. I was quite happy to find the Caboose Hobbies had a full kit of the brushes for the handles so I have a bunch. They come in different shapes so you can adjust to the surface you are working on.


Much like painting I like to start with the darkest pigment at the bottom edges of the car in this case I decided to use Burnt Sienna Extra Dark. On the gondola I kept it on the bottom frame, on the boxcar I went up a little bit on the sides (and its not easy to see in the pictures).


This really doesn't take very long and you don't have to wait for it to set so you can go straight to the next pigment. Next up was straight Raw Umber. I applied it starting at the top edge of the previous color to soften that line a bit and took it up a bit higher on the side.


The last application was with a brush using the MiG Pigment Gulf War Sand, which is a nice dusty color


Now the roof of the boxcar needs a little attention. It needs a lighter layer of soot which should even out the surface a bit. For this I'm using Neutral Grey Extra Dark.


Its really hard to see in the photos but I followed all of this up with a Burnt Sienna Prismacolor pencil run across the top of all the metal components to rust them up a bit. And that about wraps it up. I put the trucks back on and these are ready to hit the rails.


The gondola could probably use a bit more work, there is a lot of grain visible in the side boards and I really didn't bring them out very well and I'm not completely happy with the interior drybrushing or the final coat of dust on the outside. On the other hand sometimes they just have to look good enough and this one definitely falls into that category.

I'm quite pleased with the boxcar although I'm disappointed that my grimy wash really killed the faded look I wanted. I'm not going to go back and do anything about it but I will keep it in mind for future projects and there are certainly a number of those coming up. 

I'm happy enough with my custom decals that I'll go ahead and bring out the passenger cars and get started on those which should be a pretty quick job. I'm still working on trying to perfect the Switzerland Trail of America logo for the C&N boxcars though. The C&N boxcars are going to get a little extra work as well. I thought that the ladder on the right side was molded on it looked like to much work to just try and shave off. However, I discovered that its actually a separate piece and can be pulled off without to much effort. I have some new grab irons ordered and I'll be installing those on C&N boxcars as the next step there.

So more work on those and of course there is a railroad station to get finished up as well. September should be another productive month as I continue work on the different parts of Calamity.

Wednesday, August 27, 2014

Freight Cars for Calamity - Step by Step Weathering - Part 1

I decided that it might be worthwhile to really string together my weathering process into a single post. It will make it easier to reference for everyone that might be interested. For this particular step by step I'll be working with two "new" freight cars for the C&N RY that provides service to Calamity. The first is a boxcar (a goods car for my UK readers) which will be getting D&RGW dry transfers from Clover House. This is another in the series of what I would call fantasy transfers. They use company logos used in publications and advertising but didn't appear on the railroad's freight cars.  Its the same series that I used for the Colorado Central and DSP&P boxcars. The second is a high side gondola that will be getting my home made C&N decals.

I have skipped the first couple of steps which involve dis-assembly, airbrushing the bodies and weathering the trucks. Both of these cars received a coat of Tru-Scale TCP-139 MOPAC Boxcar Red. Probably not the right color for either line but in the end it looks good and will give a little sense of continuity and I can probably get away with it since I'm proto-freelancing anyway.


Step 1 - Time to dull down the bodies and give a little tooth to the next steps. Both bodies and the underframe were given a coat of Testors Dullcote.  The Tru-Scale paint gives a nice glossy finish that you could apply decals to directly but that glossy surface will make step 2 harder than it needs to be.

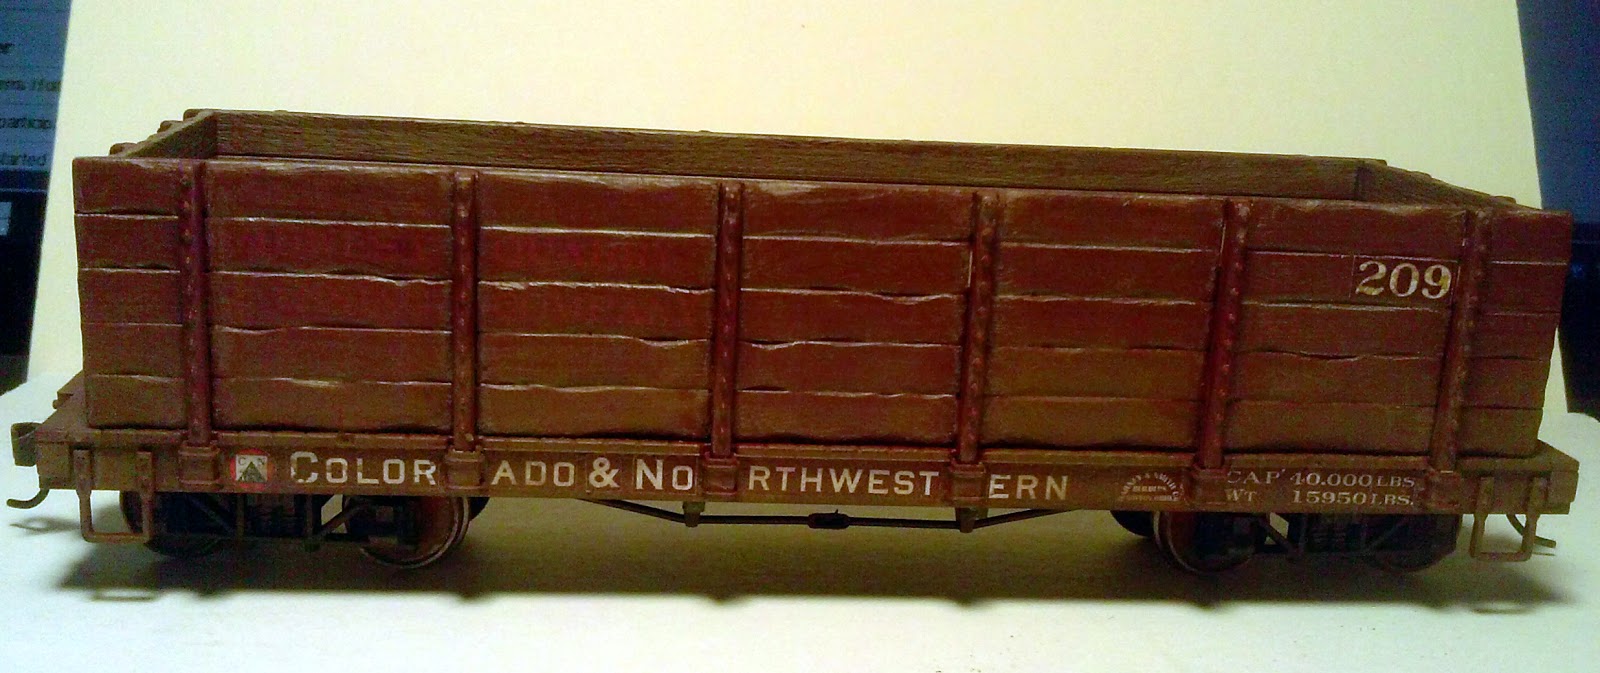
Here is our starting point. Airbrushed body with a Dullcote finish applied


Step 2 - The Fade. I have used this technique on my modern boxcars but at the time I was using titanium white oil paint and wiping it off, it was kind of a struggle. I read a new article in the Model Railroad Hobbyist (by the guy that originally used the oil paint I believe) that uses acrylic ivory instead so I'm going to give that a try and see how it goes. The idea here is to fade the basic paintwork to make it look like its been out in the elements rather than brand new. I would have liked to have tried this on the CC and DSP&P cars but I wasn't thinking about it at the time. This should give a nice variation in how my trains look on the table. I'm using Ceramcoat Ivory  (#02036) for this, aiming for a paint consistency that's not quite a wash. Here are some in progress shots of this.


Not enough Dullcote on the roof and the paint beaded up. Not really and issue since I then wipe it down with a paper towel.

The roof after the first coat of ivory has been applied and wiped off. I need to be more consistent and always wipe in the same direction. A lot of this will end up hidden by the soot that will be applied to the roof later.

Car side ready to be wiped down

Smoothed out with the paper towel. Since the application was still heavy in a couple of spots I followed up with a brush loaded with water

I added more water to the paint to get this consistency.
I felt like it didn't leave enough paint behind so I did a second application

Looks better, but time to go back in with a brush of water.

You can see it beading up on the roof, that means I didn't get enough dullcote on that surface and its beading up because of the glossiness of the Tru-Scale paint. I followed up the application of the ivory by wiping it down with a paper towel. Its not a bad way to wipe it down and it gave a better effect than using paint brushes. As you  see the effect is vary uneven and I think it looks pretty good. Definitely one of those techniques that you will get better at you do more and more cars. 
The Ivory fade coat

The first wipe off with a paper towel. I felt like there was to much paint left behind so I followed this up with a wet brush to tone it down some more.


Since this is going to serve as our basecoat I gave it another layer of Dullcote to protect it from what is to come.


Step 3A - Which could also be step 2. At this point I'm applying the decals and dry transfers. I forgot just how bright the C&N Logo is and its really standing out at this point. If these had been black decals (yes, I know the D&RGW one has black) I would have definitely applied and sealed the decals and transfers first. I should probably do that anyway. Again I didn't think things through because the freight cars I had done before were all RTR so the everything was in place when I did the fade. This time I'll just have to hope that upcoming weathering steps will dirty everything up enough to blend them in. I'll start with the dry transfers for the boxcar first.


My main "burnishing" tools, a couple of my sculpting tools that have rounded spoon like ends

Here we go! I have already done two cars with these you would think I could get things right. I left the backing on when I started to rub the transfer down.

You can see how the D&RGW letters looked a little chipped because of my mistake. Actually this whole side is a little rougher than I would like. Weathering should hide most of this and damaged paint isn't unusual anyway. The logo is a three part affair. The base is black which you can see above

Lined up the white and rub it down over the black. No registration marks to work from, you do it by eye and you are further handicapped by trying to stare through the paper.

And one more layer of black in place. I managed to miss one of the black lines at the bottom

Repeating the process on the other side. Much better at this point.

And back to the logo

Lined up the white, looking good

But when I put on the second layer of black it pulled up some of the white at the bottom and along the upper edge of the inner circle. Was looking really good to this point. Overall the effect is good.

Sealed and ready for the next step.


Step 3B - Decals. You may or may not have read previous posts about making my own decals, this will be the first car to receive the new decals printed on white decal paper. The gondola provides some additional challenges because the letter has to be broken up to fit between the stakes. This time I get to use my decal set solutions instead of lighter fluid, they should snug down much tighter.


I get somewhat obsessive about research at times, not always, but sometimes. I spent a good portion of this week working on some revisions to the decals. I discovered a new source for pictures and I found some photos that I hadn't seen before. Realizing that what I had wasn't quite right I had to redo some of them. Still calling in some proto-freelancing leeway as these freight cars are a little short or my graphics were a little big so I made a couple of compromises. I changed the placement of the number and left of the RY. from the end of the name. Essentially all the flatcars and gondolas had all of the lettering on the frame rather than on the sides except for the drop bottom ore cars (which I think I found a source for). What it amounts to is that there is only one photo showing off the new decals.


So far I like this paper a lot better and it snugged down quite nicely on their own.
Once the decals had dried I gave both cars another light coat of Dullcote.

I'm going to break this into two pieces at this point so look for Part 2 later this week or early next week.


TCP-139 MOPAC Boxcar Red