Quotes

Life is short, break the rules. Forgive quickly, kiss slowly. Love truly, laugh uncontrollably and never regret anything that makes you smile. - Samuel Longhorne Clemens (Mark Twain)
Showing posts with label WWI Tanks. Show all posts

Saturday, June 6, 2015

Review - The Weathering Special; WWI

My interest in WWI has been growing and after completing the Trenchworx Rolls Royce Armored Car I have been looking at taking another swing at my WWI troops. With three Trenchworx FTs on the workbench I decided that I needed a little more research material. Yes, I have plenty but can another "how to" book really hurt? One of my friends directed me
to a special edition of the weathering magazine specific to WWI.

This is a product of Ammo of Mig Jimenez. And yes that is the same Mig Jimenez that started both MiG and AK Interactive. Ammo sells essentially the same products as the other two companies the difference being they have MJ now! Whatever his failngs may be as a business man his modelling and painting skills are fantastic.

The Weathering Magazine is a regular publication and this is their first special issue. The issue starts off with a brief history if the development of the tank and the approaches taken by each of the major combatants. I found this both useful and informative. Definitely take the time to read it. The bulk of the issue focuses on the builds of a French FT, a French St. Chamond and a Britsh Mk IV in German service. Each build features a plenty of step by step pictures and text and explores a variety of techniques. I enjoyed all three builds and I'm itching to get back to the work bench and start work on my FTs. My only really criticism is that the pictures tend to be a bit on the small side and some if the descriptions could have been more detailed.

I would recommend this issue to any tank modeller. The techniques are appropriate to any period. The issue also comes with a small pamphlet titled "The Great War; The First Tanks 1914-1918". This is a camouflage guide featuring the vehicles in British, French and German service. It includes color swatches as well. It is a handy little guide to have on the workbench.

And yes, I realize the pictures are side ways. But I wrote this entire post from my phone. I'll correct them when I have computer access again.

Tuesday, October 28, 2014

Prepping the Trenchworx Royals Royce Armored Car

There are three Trenchworx FT-17s in my box that could see almost immediate use so, of course, I decided to assembly the armored car first. I think because I find it to be a fascinating vehicle and I think I'm going to use it as my vehicle entry for Genghis Con in February. There are a fair number of parts to this resin kit so I thought it might be useful to explore the does and don'ts of this particular kit.

If you have been a regular reader of my blog then you know that I prefer some kind of instruction with almost any kit regardless of how simple it should be to put together. What is intuitive to the kit designer is not always immediately apparent to the builder. While there are some excellent photos on the Trenchworx website there are still a few question marks on how things really should fit together.

Let's go through the initial pictures of prepping the vehicle for assembly and I'll try and point out some of my mis-steps in building this kit. While getting ready to put this together you will really appreciate the detail on this armored car. I went out and found a lot of pictures on the web for reference (watch your dates though, this vehicle saw service up through the opening days of WWII) and Trenchworx did a great job capturing it in miniature. The only thing I could really wish for right now is real spoked wheels. I'll have to keep my eyes out for likely substitutes. Oh and if anyone actually finds a picture that shows the floor in the back bed I would appreciate a link to it. Anyway on to the pictures.

Laying out the parts in an "exploded" format. Turrent and MG at the top. Wheels on the outside then the fender/running boards and the chassis. In the back are the storage boxes and the components that make up the rear bed. Finally what I thought initially were antennas of some kind are actually the headlights and should be up at the top.


The parts from a slightly different angle, showing off the detail better.


A wheel sprue, looks like the mold slipped a little on this, that's not flash on the edges. Nothing a file won't fix but you may have to score the tread pattern back into place.


Here are the fender/running boards.


And while it was fine to clip the sprue bits off, I also removed what I thought was sprue off the locator pins. I should have dry fitted first then clipped. While I have enough pin to hold it into place its going to be a weak point on my model. Fortunately since this will be a contest entry its not going to get handled that much.


The side bits for the bed in the back. Two bits of sprue here.


And easy enough to clip off. There are two of these pieces.


This are big!


I went in with my clippers, a razor saw would have been a better choice. I though this might get hidden but after looking at various pictures on the Trenchworx site and on the web this is a pretty visible area. I'll have to do some filling to make it look nice again.


I found some resin bubbles underneath the chassis while I was filing off  a mold line. This is very much out of sight and you don't need to worry about it for a gaming piece. I'm going to remove them since its a contest entry and I'm not sure right now if the extra stowage is going to hide it or not.


And more on the other side.


Sprues on the storage boxes need to be removed.

As do the sprues on the headlights and MG

The turret has three big sprue channels on it. I used my clippers to remove most of the material, a final filing is required to get it smooth.

The axles are a little long. Rather than clip them shorter I decided to deepen the holes with a drills instead. The axles on the rear could stand to be thicker.

And the same gap appears on the front wheels. Same deal, drill the holes in the wheels deeper. You will need to do this for the spare tires as well.

Dry fitting the back. The tabs are taller than the floor. I filed the tops down so that the floor will be level.

I decided to use a piece of heavy paper as the floor. Mostly because I didn't have any thin plastic at hand.

The locator tabs filed down flush with the bed.

The sides for the rear bed all assembled


And gluing down the new "floor"

Getting the running boards in place was painful since I cut to much off the pins. Remember dry fit the components first before cutting!

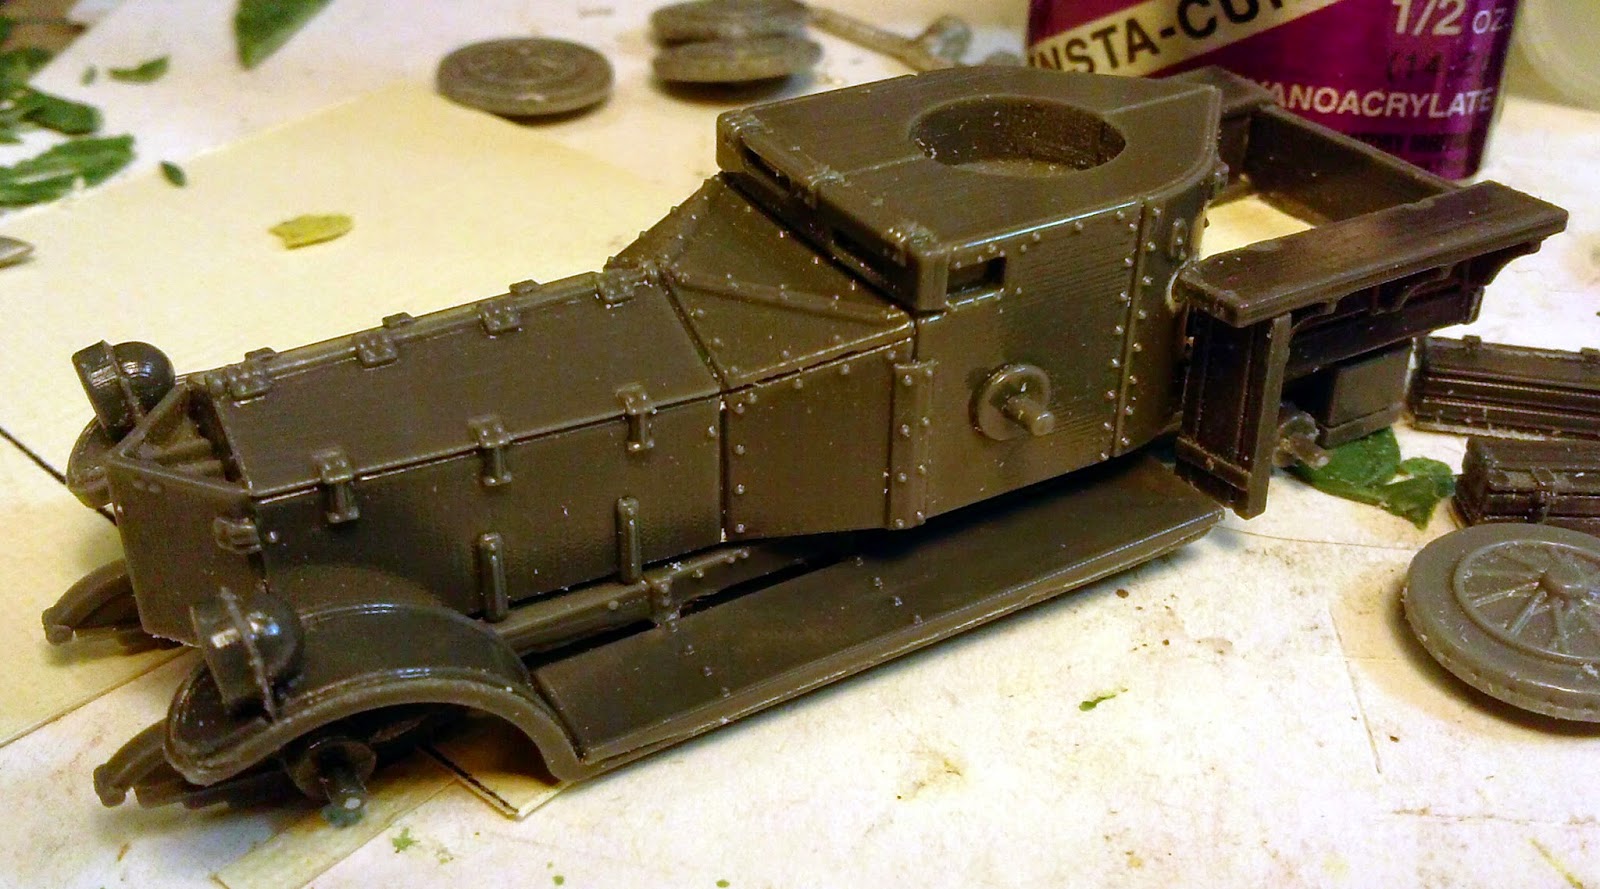
Really starting to come together now. 


Here I have "dry" assembled the Rolls. I won't glue the wheels or the storage boxes into place until after priming. The wheels may not be glued on till the paintwork is finished completely so I don't miss anything.


And here we are after a quick priming session in the airbrush booth. I used Vallejo Grey Primer (28011) straight through the airbrush without thinning

And a quick look with the turret in place. Looking good! If you were concerned about the 3D printer marks that can be seen on some of the components don't be. I had not problem covering them with the primer. The parts really do have a very nice smooth finish to them.


I will let the primer dry at least until tomorrow. I need to decide if I want to paint this up as a desert vehicle (Lawrence used these to great effect in his campaign) or western front vehicle during the early mobile phase of the war in 1914. I found a really nice three tone camouflage scheme that was used. Maybe I should just buy a second one and do both.

I do recommend going out and doing some quick research on the net on this armored car. There are some fascinating variations that could be done. What I would really like to find are some replacement wheels that are actually spoked. I'm heading to Colpar Hobbies tomorrow I'll have to check to see what they have that might work.

Thursday, October 23, 2014

Another Kickstarter Arrives - Trenchworx WWI Tanks

With the Kickstarters I have supported I figure its on time if it delivers within 2-3 months after the estimated delivery date. This one from Trenchworx arrived today, weeks early! It was scheduled for a November delivery (end of November I believe). Granted my order was pretty simply just 3 FT-17 and a Rolls Royce Armored Car, but I'm still very impressed.

The quality is top notch too, I don't think my pictures really do it justice. The mold release agent was pretty heavy on these so I have already given these a soapy, warm water bath and done a little dry fitting. These are top notch kits, flash is light, the sprue attachment points look like they be well hidden after assembly. Some of the mold lines on the smaller pieces are going to take some work to clean up, but overall its just a great kit. I wish I had enough funds to have picked up some of the British tanks along with a German A7V but maybe I'll pick those up later. Check them out at Trenchworx

UPDATE: I received an email from Dave at Trenchworx this morning. He asked about my release agent comment because they don't use any! They have been able to prime and paint their models straight from the molds. I went back to where I had layed out the pieces to dry and they still feel quite slick to me. But now I believe that its because their mold process produces such a smooth surface that it feels "slick". I'm hoping to get some primer on these today but after emailing with Dave I'm not anticipating any problems.


These are going to do a great job supporting my WWI US Marines.


Small Box, well packed

Somewhere in all this are three tanks and an armored car. They sent along some coasters as well.

Each vehicle bagged up in ziplock. There is a smaller ziplock inside that holds

There are a few more parts to the FT-17 than I expected. There are also rare earth magnets so I can switch out the weapon  between an MG or a 37mm Cannon.

Nice detail on the treads

Turret looks top notch 
The armored hull
The Rolls Royce armored hull

There are few pieces for this one too

Just dry fitting the turret here.

Sunday, August 31, 2014

Trenchworx Kickstarter - Final Push - WWI Resin Tanks in 28mm (1/56th Scale)

The Trenchworx Kickstarter will be ending at 11:59PM today (8/31/2014). I'm still in for the French Squadron of FT-17s and I'm figuring out what else I want to add before it comes to a close. They have hit the $15,000 mark to produce the CA-1 Schneider and have lowered the goal for the British Mk IV to $20,000. I tempted to buy into the a couple of the British Mk Vs but my Marines were only supported (rarely) by the FT-17. Maybe a truck or two would be interesting.

Find their Kickstarter here: Trenchworx