Quotes

Life is short, break the rules. Forgive quickly, kiss slowly. Love truly, laugh uncontrollably and never regret anything that makes you smile. - Samuel Longhorne Clemens (Mark Twain)
Showing posts with label Horsa Glider. Show all posts

Sunday, July 9, 2017

World War II Project - Horsa Glider - Part VII

With the sanding, more or less, complete its time to get some paint going. The Horsa has a pretty straightforward scheme, 2/3rds of the fuselage and the undersides of the wings and tailplane is black. The upper 1/3 of the fuselage and the upper surfaces of the wings and tailplane is done in camouflage using greens and browns. The rudder itself is also black. I'm not quite sure how I'm going to do the various markings at this point. The invasion stripes are easy but I would like to find decals for the rest of it if at all possible.

Since this is a pretty big object I pulled out the airbrush. I started with Badger Stynylrez grey primer. This has become my go to primer at this point. The black was done with a black from AMMO.

The Wing

The fuselage

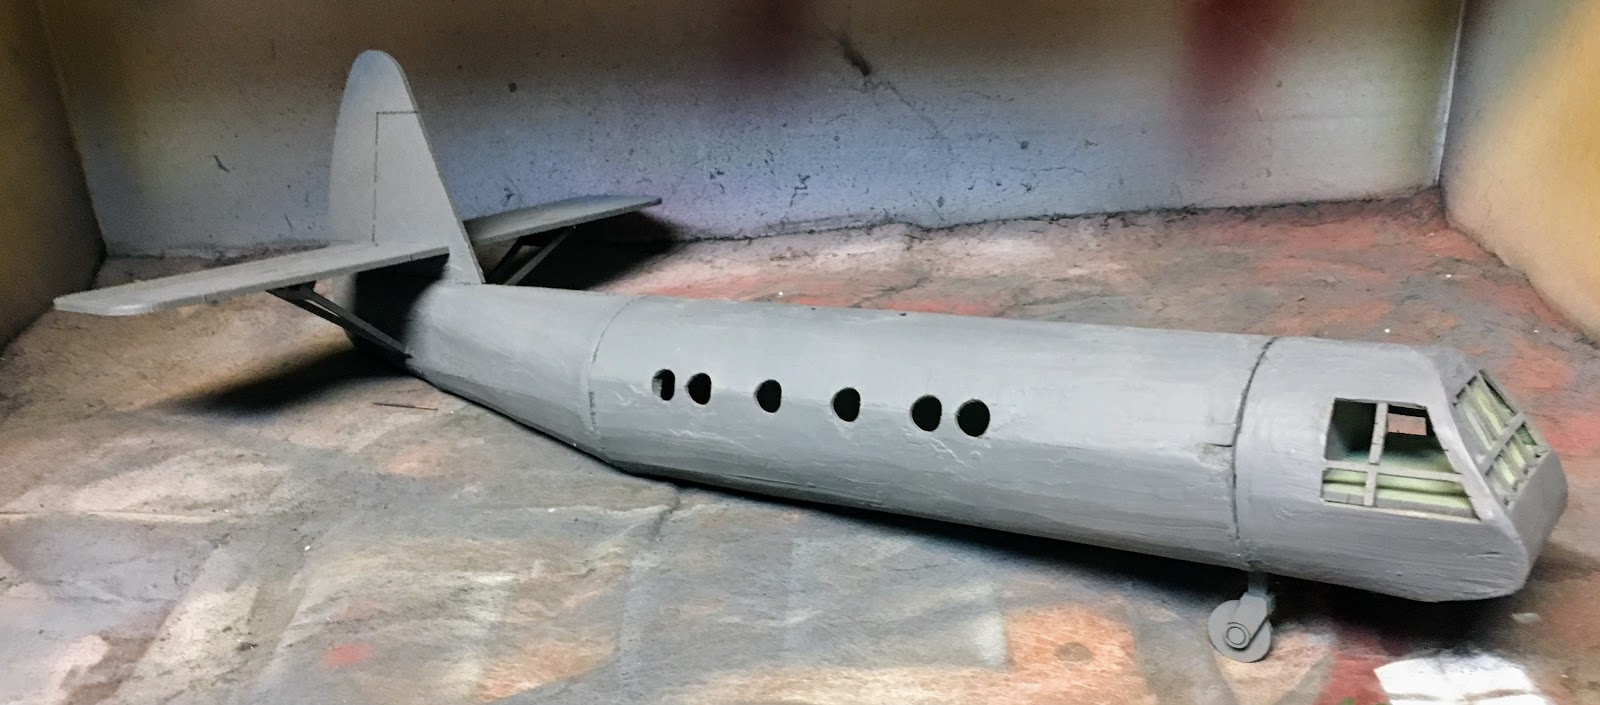
And we are off, starting with the grey primer


And here we are with the black. I didn't bother to tape at this point. When I move on to the camouflage on the upper surfaces then I'll tape off the lower and give a nice sharp line between the two areas.


Saturday, July 8, 2017

World War II Project - Horsa Glider - Part VI

This is my attempt to try and do away with the very evident scoring on the cardboard pieces. I'm not sure how successful it really was. I'm not going to go back at this point though, in the end this is just a piece of terrain and I think the average gamer is not going to notice the flaws. I decided to "skin" the aircraft skin as it were using Liquitex modeling paste. A choice made mostly because its what I had on hand. What I discovered is that this stuff drys very hard and its hard to sand down to a smooth finish. This was exacerbated by the fact that I was using a very fine sandpaper as I didn't want to introduce scratches (800 grit).

You must be very careful when you are sanding this as the cardboard doesn't like to be sanded and will fuzz up and/or layers will peel off. I'm still not happy with Sarissa's choice on the cardboard, something even thinner and more flexible would have been better in my estimation. I'm also of the opinion that more ribs would have been nice in the tail section.

The extra effort is certainly worth it though and if I do another one I think I would use a wall filler of some kind, something that is designed to be sanded down quickly and easily. Tragically there are three tubs of the stuff at the other house where all the remodeling is taking place.

Here is where things ended up:
The idea; fill the score lines in the cardboard with the modeling paste and try and feather everything else so its a gradual transition and not an abrupt 90 degree change.

The sanding was tougher than I expected it to be the modeling paste formed a tougher shell than I had anticipated it would. I suspect a higher grit sandpaper would have worked better but then I would probably have really ripped up the cardboard, the same thing would probably occur if you used files on it.

To get rid of those obvious gaps in the fuselage I took scrap cardboard and wrapped it around the tail section (as seen here) and the cockpit section. I then trimmed off the overhanging cardboard from the main fuselage which for some reason was not actually long enough to cover the gap which was Sarissa's intention. Make sure you use a very sharp knife blade for this, I would recommend a new one. I thought mine was sharp enough and I still ended up with a bad edge on the ends of the main cabin. 

Here she is ready to be "skinned".

Cockpit section, "skinned" and ready for sanding.

The tail, "skinned" and ready for sanding. This was the easiest of the three sections to do and I just didn't bother to try and feather in between the cardboard and the MDF.

"Skinning" the main body


Everything sanded and ready to paint at this point. Its not nearly as smooth as I want it to be.

Sunday, June 18, 2017

World War II Project - Horsa Glider - Part II

I fired up the airbrush and did a quick application of paint to what will be the inside of the glider skin. I also painted the cockpit and the interior floor, door ramp and bulkheads with the same color. Most of the pictures I saw actually had a two tone scheme on the inside but I just didn't want to go that far with this one. I'm actually questioning why I even bought this one, it may never even end up on the table. It certainly doesn't appear in any of the Kampfgruppe Von Lucke scenarios from the Two Fat Lardies Pint Sized Campaign. Still its been kind of a fun build up to this point.


Here I painted the "inside" of the cardboard used for the glider skin using AMMO US APC Interior Green thinned down with a bit of white. I'll have to watch for overspray around all those open windows though. Masking is going to be a bit tricky, or I may just have to brush paint the fuselage.


Here are the finished glider components with their coating of interior green. There are a lot of variations on the interior color so, much like camouflage colors, its hard to be wrong.


I decided that I would leave off the skin and do that at the very end just so I could be more methodical with it. I don't see anything in the assembly sequence that would cause a problem by doing that and right now it just makes everything easier to handle. 


After the airbrush work I started in on the next sequence; the tail. I had some issues with this assembly. First off on my kit the fit on all the parts was incredibly tight, to tight to make it easy to assemble. To make it easier I would highly recommend filing the slots a bit before trying to assemble the ribs to the tail core (S) and tail assembly (U). You will be much happier at the end.


While I followed the assembly sequence as written I would recommend that you don't. The tail core piece (S) is easier to get properly placed by using the ribs (V, W & X) than by using the end bulkhead (U) as stated in the sequence.

Watch for the point where the rudder attaches to the rest of the tail piece (T). I didn't even realize that I had snapped it off while I struggled getting the end bulkhead (U) into place (the fit is much to tight). Also the end bulkhead (U) actually has a top! On the tail piece (T) the upper tab and lower tab that the bulkhead attaches to are different sizes and correspond to different sized slots on the bulkhead. I had it upside down the first time and snapped it in half trying to take it off, which is about the same time the rudder snapped off.

Also attach the tailplane brackets (Z) to the tailplane before you attach it to the rudder. The fit is incredibly tight and at first I thoughyt they might not actually be the right size to fit into the slot on the tailplane. If you haven't broken off the rudder yet, you could well do it trying to get these in place.

I won't try and attach the rudder back into position until after I have put on the cardboard skin. I suspect the skin will be easier to put with it out of the way and I won't risk breaking it a second time. In the end it might need to be pinned in place.

Here is the action sequence:
Here are the components for the tail assembly

By trying to follow the sequence I broke off the rudder and snapped the end bulkhead in half. A little judicious filing of the tabs and slots would have kept this from happening

Plan B, attach the ribs first which gets the tail core into the proper position

You can see the tabs on the tail core sticking through the final rib assembly (the ribs are all two pieces). Those tabs are different sizes.

Since I had conveniently snapped the bulkhead in half, I lined them up so you can see that, indeed, the slos are actually different sizes and not by very much. There is no indication of direction in the instructions.

Now I have everything in place.

This should be a single assembly at this point but for me it has become two. All the parts for the tail have incrediably tight fits including the wing support brackets on the tailplane. I would attach those brackets before attaching the tailplane tot the rudder, especially if you haven't already broken the rudder off.

Wednesday, June 7, 2017

World War II Project - More British Airborne Arrive

The pre-order bundle
I'm not quite sure why I did this as I pretty much have everything I need to finish off my platoon of British Paras but apparently I pre-ordered the new plastic box which came along with the Horsa Glider kit from Sarissa Precision. Oddly enough it also came along with Lt Speirs from Band of Brothers, I'm pretty certain he is an American paratrooper but I'm sure he will be a nice add to the box of American Paratroopers that I have sitting on the shelf.

I have only had a chance to take a quick look at this bunch. The Sarissa kit looks like its up to their excellent standards and is constructed from both laser cut card and MDF. Should be pretty sturdy when its built up. I have seen some less than flattering comments about the kit on LAF but for gaming purposes I think its going to be just great. I don't need a perfect scale model for the gaming table and I applaud those that are willing to scratch build that perfect scale model.

I have already seen some built and painted versions of the plastic Red Devils and this box looks like its going to be a winner. Warlord seems to be applying lessons learned to just about every kit like this that they decide to produce.


The sheet with the list of what is what on the sprue. I see sten guns, rifles, mills bombs, scoped rifle, hand grenades, piat, piat ammunition case, Bren gun pretty much everything you need except for the small mortar. And there are 18 heads available so there will be plenty of variety on the five miniatures that come on each sprue.


There is a lot of stuff packed on these sprues. Five sprues in the box enough for the listed 30 miniatures which will leave you a bit short of a full platoon with command I think.

The somewhat random selection of an American Paratrooper Officer
Now the big kit from Sarissa

Nice instructions with this one, hopefully they will make sense!


Plenty of MDF and cardboard in the kit. Should be fun to put together, hopefully it will be sturdy as well.