Quotes

Life is short, break the rules. Forgive quickly, kiss slowly. Love truly, laugh uncontrollably and never regret anything that makes you smile. - Samuel Longhorne Clemens (Mark Twain)
Showing posts with label 28mm Horsa Glider. Show all posts

Thursday, July 13, 2017

World War II Project - Horsa Glider - Part VIII

Since I had everything out to prime the AWI troops I just moved right on over and primed the Horsa as well. I occasionally manage to operate efficiently, it doesn't happen often so I try not to get use to it.

You definitely have to prime anything built from MDF. MDF sucks up paint like nobody's business and I would rather have it suck up primer than paint. I basically did two coats of the Badger Stynylrez grey primer, my go to primer at this point. 

I followed that up with a black from AMMO by Mig. I have really come to like the airbrush paints out of this line. I can consistently just open the bottle and pour it into the cup and be ready to shoot paint. It certainly makes the whole airbrushing process much easier.

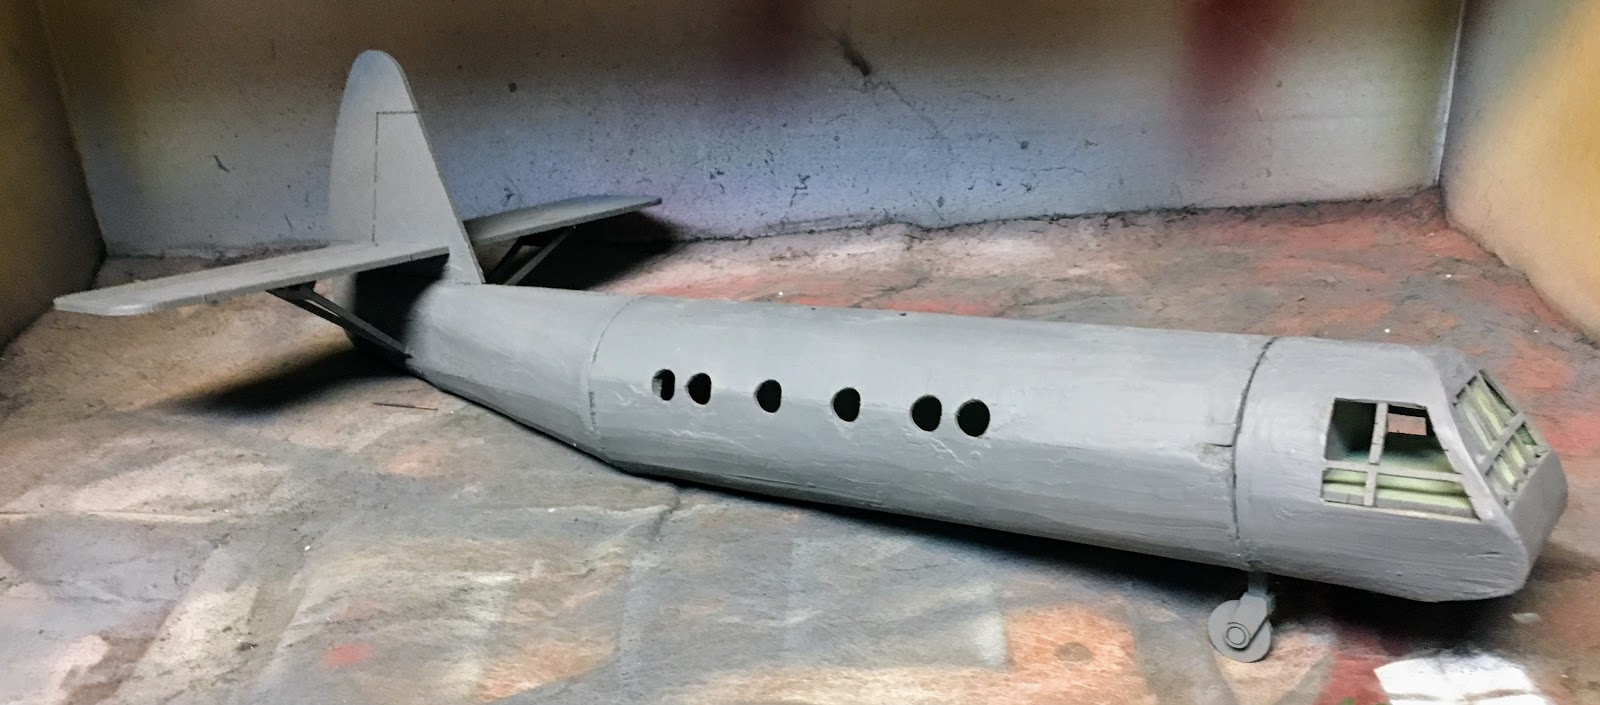
So here is the Horsa as she stands right now, black under surfaces and primer upper surfaces. I will be pulling out the tape to define the edges for the camouflage work on the upper surfaces when I have time to work on it again.


Now that it has dried its definitely looking a little splotchy. A second coat is probably in order this time.


Sunday, July 9, 2017

World War II Project - Horsa Glider - Part VII

With the sanding, more or less, complete its time to get some paint going. The Horsa has a pretty straightforward scheme, 2/3rds of the fuselage and the undersides of the wings and tailplane is black. The upper 1/3 of the fuselage and the upper surfaces of the wings and tailplane is done in camouflage using greens and browns. The rudder itself is also black. I'm not quite sure how I'm going to do the various markings at this point. The invasion stripes are easy but I would like to find decals for the rest of it if at all possible.

Since this is a pretty big object I pulled out the airbrush. I started with Badger Stynylrez grey primer. This has become my go to primer at this point. The black was done with a black from AMMO.

The Wing

The fuselage

And we are off, starting with the grey primer


And here we are with the black. I didn't bother to tape at this point. When I move on to the camouflage on the upper surfaces then I'll tape off the lower and give a nice sharp line between the two areas.


Saturday, July 8, 2017

World War II Project - Horsa Glider - Part VI

This is my attempt to try and do away with the very evident scoring on the cardboard pieces. I'm not sure how successful it really was. I'm not going to go back at this point though, in the end this is just a piece of terrain and I think the average gamer is not going to notice the flaws. I decided to "skin" the aircraft skin as it were using Liquitex modeling paste. A choice made mostly because its what I had on hand. What I discovered is that this stuff drys very hard and its hard to sand down to a smooth finish. This was exacerbated by the fact that I was using a very fine sandpaper as I didn't want to introduce scratches (800 grit).

You must be very careful when you are sanding this as the cardboard doesn't like to be sanded and will fuzz up and/or layers will peel off. I'm still not happy with Sarissa's choice on the cardboard, something even thinner and more flexible would have been better in my estimation. I'm also of the opinion that more ribs would have been nice in the tail section.

The extra effort is certainly worth it though and if I do another one I think I would use a wall filler of some kind, something that is designed to be sanded down quickly and easily. Tragically there are three tubs of the stuff at the other house where all the remodeling is taking place.

Here is where things ended up:
The idea; fill the score lines in the cardboard with the modeling paste and try and feather everything else so its a gradual transition and not an abrupt 90 degree change.

The sanding was tougher than I expected it to be the modeling paste formed a tougher shell than I had anticipated it would. I suspect a higher grit sandpaper would have worked better but then I would probably have really ripped up the cardboard, the same thing would probably occur if you used files on it.

To get rid of those obvious gaps in the fuselage I took scrap cardboard and wrapped it around the tail section (as seen here) and the cockpit section. I then trimmed off the overhanging cardboard from the main fuselage which for some reason was not actually long enough to cover the gap which was Sarissa's intention. Make sure you use a very sharp knife blade for this, I would recommend a new one. I thought mine was sharp enough and I still ended up with a bad edge on the ends of the main cabin. 

Here she is ready to be "skinned".

Cockpit section, "skinned" and ready for sanding.

The tail, "skinned" and ready for sanding. This was the easiest of the three sections to do and I just didn't bother to try and feather in between the cardboard and the MDF.

"Skinning" the main body


Everything sanded and ready to paint at this point. Its not nearly as smooth as I want it to be.

Tuesday, June 27, 2017

World War II Project - Horsa Glider - Part V

I'm finally worked through the final part of this build. I'm not quite sure when I'm going to pull this into the paint booth so I'll call it done for now. This post is a bit long winded. In part IV I skinned the wings. I did the whole fuselage over the course of two days, just because of the time I had available.

I started with the cockpit. This is two pieces and it has its own quirks (every section does). First you need to flex the cardboard along the scored lines, but be careful with this. There are some fragile sections and its easy to put to much "bend" into it and it will kink on you and be difficult to keep flat against the ribs (this applies every time you need to bend the cardboard).

Second, remember that the very back edge of the cockpit is not covered by the cardboard, it will be covered like a sleeve by the main fuselage (at least in theory). I did the wrap around the side first. Be careful here as window framing is quite fragile. I'm not convinced cardboard was the right medium for this, something thinner and with less internal layers may have been better. Rubber bands are your friend here because of the circular nature of the fuselage. I didn't have any with me at this juncture and my build is a little rough because of it. I think paint will hide a multitude of sins here. I then followed that up with the front of the cockpit which I had trouble getting to lay flat. There are some serious compound curves here. I finally managed to weight it down with my steel weights. I'm not happy with the end result as there is a flat part on the lower front of the fuselage that is not lining up with the front, I lost the curve there somehow. Again, probably won't be noticed once she is painted. I feel like I managed to get glue an everything.

The "side" skin for the cockpit. Be careful of those window frames, they are fragile!


I did not have any rubber bands at this point and I did not get a nice round look when I attached the skin here. Note that the skin does not (nor should it!) go all the way to the back edge of the cockpit bulkhead.

I need some weight here. That's three pounds of steel weights. Definitely overkill. But be aware that you will need something to hold the skin to the three front ribs of the cockpit.

Here you can see that the side windows are not quite conforming to the front, that I can fix. What I cannot fix is the flat spot where the lower fuselage meets the front. Will probably disappear with a little paint work.

A very definite kink in the side skin right below the window. This is a tricky spot.

Here I have managed to at least get the side windows to conform to the front edge, still nothing on the bottom though.

Adding a fillet of glue and then I'll hold it till it dries to get this side to conform to that nasty compound curve.
I then moved on to the tail (which I broke at one point, which made this much easier!). This is an interesting section as its wider at the front than the back. However with the whole tailplane/rudder assembly now a second piece it went wasn't to difficult. I had the rubber bands this time and they did short work of the whole thing.

Here I'm prepping the skin by gently wrapping it around the tail first before applying any glue to it.


Fixing the rudder and tailplane assembly that I broke early on.

This is not an easy attachment with everything loose. I did one side first which stabilized everything and then the other side was much easier to get in place.

The tailplane struts did a nice job of helping me get everything straight here. Quite happy with this repair.

From here I moved on to the final piece the main fuselage. I wasn't looking forward to this part at all. First I went ahead and attached the skin for the door. Its hard to get wrong, there is a tab that will guide you to the right placement. Be careful when applying glue you don't want to glue it shut (well maybe you do, I did not).  Having the door in place helps guide you in getting the rest of the skin on and keeping it straight. I then applied glue along the spine and clamped it in place and let the glue dry. This way you aren't constantly fighting trying to keep the cardboard in place on the two tabs on the top of the fuselage.


I then applied glue to all the ribs and any point where the skin would come into contact with a piece of MDF. I wrapped it around quickly, added the rubber bands and then adjusted it making sure all the lines were straight and that the skin was as tight to the ribs (without kinks) as I could. There is a cardboard score line right down the middle of the windows that wanted to kink quite badly (and you can see it in the pictures). I found that with the main fuselage and the tail that gently pre-wrapping (or dry wrapping or dry fitting) the cardboard around the ribs was more effective than trying to do it "freeform". Again be careful when you are getting the cardboard into shape. I think I managed to get it all quite smooth in the end. Now the issue I have is that the cardboard skin should stick out beyond the ends of the fuselage, and when I was finished it certainly did. However its not long enough to fully cover the gaps between the cockpit and tail assemblies. I'm not sure if I did something wrong or not. Near as I can tell everything is fitting exactly where it should be but there is an obvious gap. I think painting it will go along way to hiding it and in the end its a piece of very cool scenery and the players are unlikely to notice.


Make sure you have removed an excess glue from the ends or the tail and cockpit assemblies won't fit or you may accidentally glue them together!


A quick look at how the fuselage looks. Note the gaps between sections. Those shouldn't be there but I'm not convinced that I didn't do anything wrong, yet everything lines up with the various tabs.


From a build standpoint this model definitely has its challenges. MDF is not the best structural material and there are a couple places where the connection points are pretty small and easily broken. I found the skin tricky, but not terribly difficult as long as I went slowly. I think this kit would be better if it was cut from thin plywood rather than MDF. I'm not sure about the cost but some of those small junction points on the rudder/tailplane, the main wheel carriage and the spars on the wings would certainly benefit from a stronger material. Oh! And I found the last two pieces for the main wheels, They are cardboard so they were on the cardboard sprue with the cockpit and fuselage skin.

Which brings up another point. The instructions need to be gone over again and edited. There are numerous errors in part numbers and if you are going to use part numbers on the instructions you should be putting them on the sprues as well for quick identification. While the sprues conform pretty closely to the instructions some of the parts are definitely in odd spots. I also need to make a decision about how I'm going to use this on the table. What you don't see is the main wheel carriage. Without doing any research, I assume that this would be jettisoned after takeoff but what I'm not sure of is if the front wheel is jettisoned as well. I have left it on for the moment just to make sure I can change my mind.

Its a bit to big to fit into my combination airbrush/photo booth.

I'll need to do something about that gap in the front of the wing. A little filler should take care of it. Again the gap occurred because I managed to break both the spars while transporting it and didn't get it quite straight. I probably could have used the skin itself as a guide towards fixing the damage I did.