Quotes

Life is short, break the rules. Forgive quickly, kiss slowly. Love truly, laugh uncontrollably and never regret anything that makes you smile. - Samuel Longhorne Clemens (Mark Twain)
Showing posts with label Sophie's Revenge. Show all posts

Thursday, September 29, 2022

Sophie's Revenge - The Conundrum in the Captain's Cabin

I definitely like to think somethings all the way through before I start cutting things up. As I have mentioned previously I'm starting the rebuild of Sophie's Revenge with the Captain's Cabin. Ultimately I'm envisioning this as being broken up into two compartments; the Captain's Cabin itself and officer's quarters (or what ever the pirate equivalent would be). I need to add quite a bit of detail in both areas which has brought up a couple of things.

1) The ceiling on the Captain's cabin. I'm going to go higher than I originally intended which will increase the overall height of the poop deck and the map room. This deck will probably get shortened because of that, but it will solve the "skylight" problem. 

2) The Captain's cabin should be pretty extravagant (its a fantasy pirate ship after all), while I can work with it as is, I could take it apart. I stopped short of complete disassembly but the reality is that this section is really five pieces, of which the Captain's Cabin is three of those. It won't be easy to separate these pieces, they are glued together very well.

So just some more decisions to make and decisions are easier to make if there are pictures!

First order of business. Make this into a single deck. It has to support the cabin and the mizzen mast in addition to the Captain's Cabin and officers' quarters.

Should I or shouldn't I? The Captain's cabin can be broken into five pieces. The circles show where the seams are. These are well glued together, I'm not even sure it will be possible to disassemble them, it might take some knife work although this plastic cuts pretty easy.

As it stands. This is how much of the ceiling of the Captain's Cabin would be shortened by just extending the existing quarterdeck back to the stern.

This is a look at where the deck I was originally planning to use would intersect with the Captain's Cabin. I would still be losing a good portion of the existing windows, hence why I was thinking of some kind of "skylight"

If I increase the height of the poop deck, the gap is going to be really large. That, in turn, would lengthen the run of stairs on either side, which I could compensate for by reducing the length of the poop deck. However, that would impinge on the ceiling below and require stairs to get to the map room.

Lot's to think about before I start building things. Although I could just start with the Captain's Cabin and finish it out and build everything else around it. Some seat of the pants work for sure.

Friday, September 16, 2022

Sophie's Revenge - The rebuild begins - Quarterdeck & Poop Deck

Okay, there is nothing like a dull conference call to get you motivated to do something else...anything else.

I decided that I would start closer to the top of the ship and work my way down to the gundeck. There is a lot of detail that I would like to include in the captain's cabin and I need to figure out how things might go or might not go together. I also want to add the navigation cabin, which sits above the captain's cabin. Its floor will form the ceiling of the captain's cabin and because of that it will also need to be removable.

So I kind of stuck the whole section back together and got out a couple of steel rulers to see what I was really looking at needing to do. I think the pictures can probably explain it better.


I'm using the rulers to extend the quarterdeck all the way to the back of the ship. This will create a ceiling for the Captain's Cabin and the floor for the Navigation Room.

One problem becomes immediately apparent. The new floor is going to cut off the top portions of the rear windows as well for the back side windows on either side.

Here I'm trying to elevate the blue ruler to the correct height. It looks good initially but its a very rough look.

To get an idea of how high the back deck needs to go to incorporate a door, I used popsicle sticks (jumbos) to raise the whole thing up the necessary height. This would match the height of the deck below (where there is a door). That's just over a 1/2".

Stairs would need to be added to and extended a door would be added and the trim would have to be redone. Its almost a complete rebuild. That's okay, I was expecting that.

Here is the poop deck. I needed to make a template and since everything will be moved I cut off the edges that would slot into the ship's sides.

The template, traced off the deck with the edges removed

A successful cutting attempt. It rarely goes this well the first time through. This piece is just a tad bit thinner than the deck and will work fine as a guide. Eventually it will be replaced so I'm not going to lose any sleep over it.

Here its temporarily glue to the quarterdeck. Its to long, but I expected that, so I trimmed it down to fit the length.

This is what I will be dealing with. I built a little piece to go under the template to make sure it stays the same height as the rest of the deck. Here you can clearly see where the deck will intersect the windows.

My initial thought is to create benches that would go over the window areas (maybe cabinetry since its the navigation room) and create skylights (if you are a car buff check out the old 4 door Land Rover Defender, the one in Death in Paradise is the model I'm thinking of,  and you will get an idea of what I'm thinking about doing).

Raising the back deck up again this time with the floor template in place. I'm really going to need to increase the height of the ship sides and stern.

Its hard to see but there is a blue line marking out where I need to cut the deck off to make it removable. The stairs and the bulkhead will help keep the whole thing together and mostly in the right shape. There needs to be quite a bit of detail added under this deck, its going to represent the "officer" cabins. Although calling them cabins is pretty generous.

14 pictures, that's like 14,000 words that I didn't have to type. I need to work out the interior details and how all that will go together. There are three main things that need to be taken into account here. There are two cannons housed in this section, along with the mizzen mast and the ropes for the steering.

Thursday, September 15, 2022

Sophie's Revenge - Getting it back together - Goals

Its been a while since I have even looked at the Sophie's Revenge, in fact I actually put everything back in the box to get it out of the way. Its so large it just takes up a lot of modeling room. There was an off hand comment that a ordinance entry could never win a Sophie Trophy at Reaper Con. For what ever reason I took that as a challenge, albeit an inadvertent challenge. Nonetheless my main goal will now to be win at least a bronze Sophie with this kit.

Before I even get started on what I want to accomplish let's look at what its going to take to even get into the running for a Sophie. While the MSP Competition at Reaper Con is an "Open" competition the running for the Sophie's is standard trophy style competition that only Reaper Miniatures are eligible for. There are three categories for Sophies; Painter, Open and Diorama. The Painter category is for straight up stock models with perhaps minor conversions, the Open category is for scratch sculpts or heavy conversions (those entering scratch sculpts and are eligible for the Sophie are going to be sculptors) and  Diorama is all about a scene and is judged heavily on the story (in this case the primary miniatures would have to be Reaper Miniatures although supporting cast could be from other manufacturers). There is no ordinance category for Sophies anymore, Reaper just doesn't make enough miniatures to really justify its own category. Based on what I intend to do with this ship its going to end up in Open category, it potentially could be in Painter if the Judges decide that's where they want it.

Getting at least Bronze Sophie is going to be tough, its going to add an additional level of precision that I really need to stay aware of through the whole process.

This is what I want to achieve:

1) Disassemble the entire model (Woohoo! Check this one off the list!

2) Keep the gundeck accessible while keeping the cannons lashed appropriately in place.

3) Add details to the gundeck, including bringing the masts all the way down and through into the cargo deck (which is not modeled). This would include removing cast in details that could be improved with scratch built details.

4) Correctly lash all the cannons into place and add details to the gun ports. I may decide to have the guns run out on one side.

5) Main deck is removable without disturbing details on the gun deck.

6) Main deck will be treated much the same as the gundeck, add details and because of the aft cabin there will be additional work around the mizzen mast which is coming up through part of the aft deck. Cannon will be lashed to the deck appropriately.

7) Aft deck and cabin. There is going to be a lot of work here. I need to figure out how to pull off the two back decks and detail the cabin. I would love to have added a map room under the poop deck but its not quite tall enough especially because of Reaper's heroic scale proportions. It would add a lot of interest and would avoid an incredibly tall captains' cabin. Not to mention changing the location of steering from the poop deck to the main deck.

8) Rigging, I really want to add at least some rigging to this. At a minimum it needs ratlines after that anything I can add that won't make things to difficult keeping in mind that the main deck is going to be removable which means any rigging needs to come away with the main deck. I have thought about extending the masts to "full" height but I think I'm going to avoid that and just extend them up high enough to make any rigging that is done look somewhat reasonable.

9) Everything I haven't thought of. A little vague but it covers everything else!


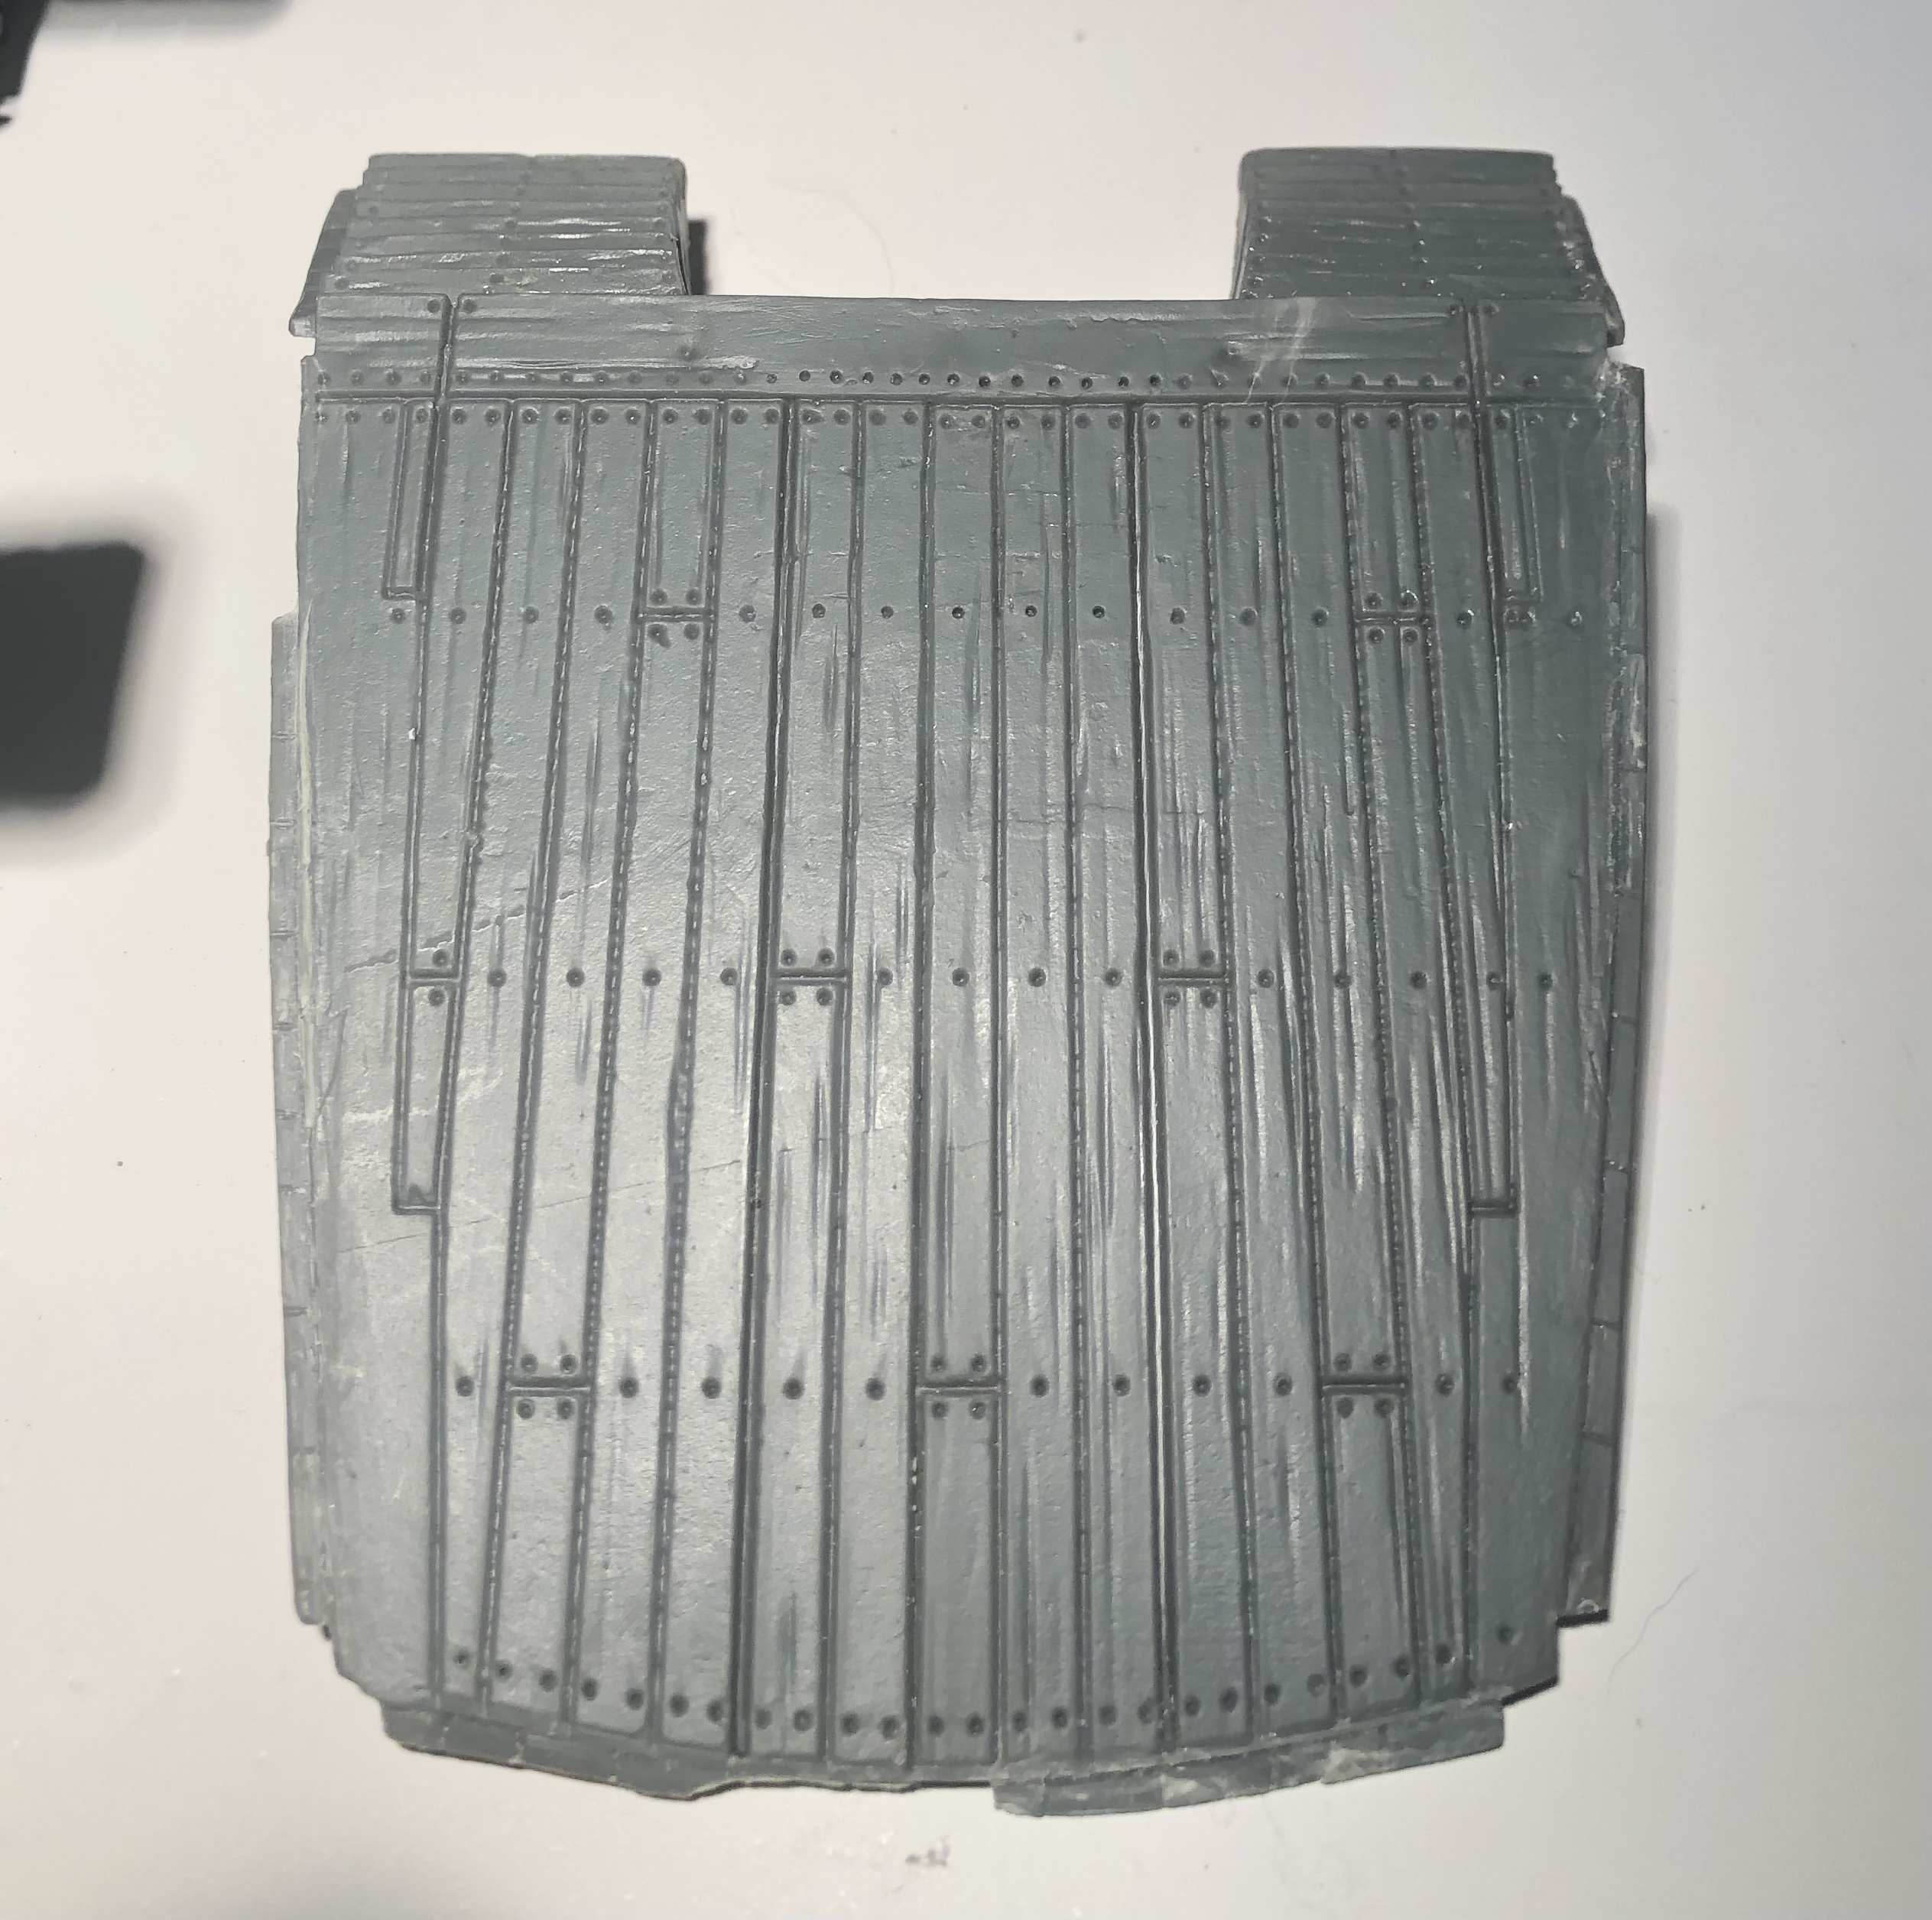
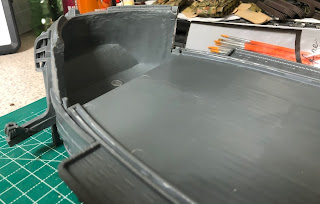
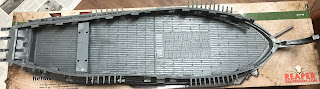
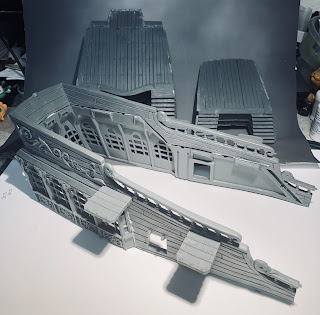
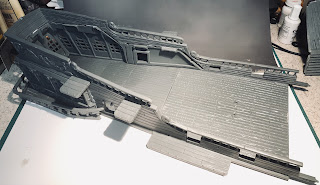
Gundeck, the lowest accessible deck on the Sophie's Revenge. First thing to do here will be to remove the grating and stairs and replace them with a new components.

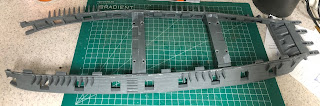
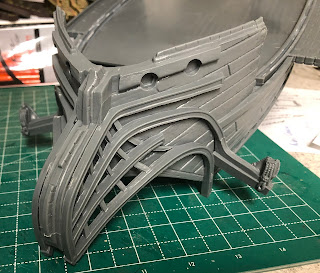
I had removed the very flexible sides. These will need to be glued to the gundeck itself and then cross pieces run from side to side and the cannons put into place, I'll need to figure out where the masts come down from the main deck as well.

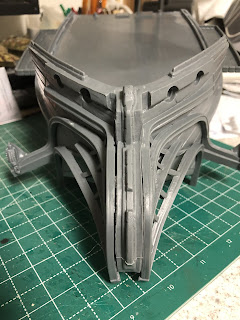
A little closer look. The deck is closer to regular styrene plastic the 

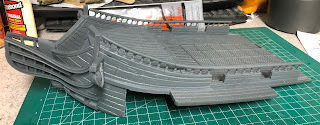
Quarterdeck and poop deck. There are three main pieces here. The sides for the cabins and two sets of stairs.
And to make things a bit more difficult it crosses two of the three sections of the main deck.

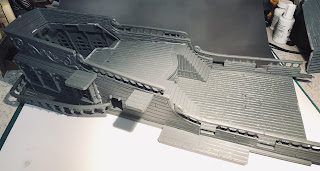
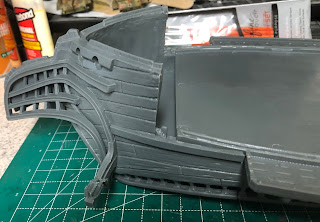
The quarterdeck in place. Will have to add a (or more) cabins plus a cannon on either side. The mizzen mast comes through this section as well. I may have to split the quarterdeck into two pieces one on either side of the mast so I can still remove them.

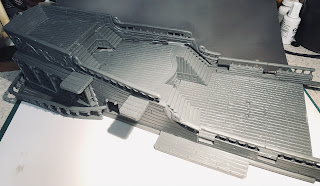
And then there is the poop deck. It looks like there would be room for the map room but its a bit short. I may work out how to raise it up a 1/4" or so and make that room. Otherwise it will become the ceiling of the Captain's cabin.

All I can say at this point is that I have really set quite the task for myself. I expect this project to really stretch out. It would be nice if it was ready for Reaper Con next year (2023) but I'm not going to push for that date unless everything is really coming together.


Friday, December 3, 2021

Pirate Project - Disassembly Complete! - Part 4

I finished making that last separation and I think I have finished disassembly the ship. Its at least down to a workable level. It looks like the most difficult part is right here at the bow. The bowsprit needs to come off with the rest of the deck since a good chunk of the standing rigging starts here. That means figuring out to make that whole front of the deck lift off. I'll have to deal with the figure head since it is an integral part of this whole assembly, unless I leave the whole section as a single piece.

This is what the hull looks like with all the decks, finally, removed.

The bow and forecastle are the same casting with the deck sliding in underneath the forecastle.

You can get an idea how these go together here. Its going to be almost impossible to remove them without cutting something up.

I'm going to leave these pieces intact at this point. This section incorporates both the forward mast and the bowsprit so there is a lot going on here from a rigging standpoint. The straight edge from the bow piece also forms one side of the two forward cannon ports. I think I'm going to fill these ports in and reduce the number of cannons on the gun deck.

Here's a look at how the bowsprit support goes together. Three pieces come together here and the joint is not particularly good. Since I'm not going to take it apart I'm going to have to fill the gaps.

From the head on view you can see that the left side has a pretty big gap, the right side joint is much better. Leaving all of this intact also resolves the issue with the figurehead. That can just be glued in place without a problem now.

Now that its in pieces, its time to figure out how to get it back together!

Thursday, December 2, 2021

Pirate Project - The disassembly continues Part 3

I managed to steal a bit of time and continued the disassembly of Sophie's Revenge. This time I focused on trying to separate the upper deck from the hull walls. It wasn't quite as bad as I was expecting but there were definitely a few areas that presented some difficulties.

The main hull and top deck come assembled from the factory. The deck is actually made from two different types of plastic. The hull walls and the front and back of the upper deck are made from the traditional bendy bones material (very bendy in this case). The two center sections of the deck and the two main supports are from a much harder plastic, similar to what you find in a regular model kit (but yet not quite, much like the tea served on the Heart of Gold from the Nutrimatic Drink Dispenser "almost, but not quite, entirely unlike tea" from the Hitchhiker's Guide to the Galaxy by Douglas Adams).

For the most part the glue was pretty light except in a couple of areas and I managed to only  break one small piece of the deck. I did elect to make a couple of cuts rather than try and break a couple of particularly well glued joints at the front of the hull.

So the hull is almost apart, another 30 minutes should do the trick. Then because of the way the bow is shaped I'll have to figure out where I will actually need to cut things apart to allow the top deck to come off.

Here is how things went today:


I started at the bow because that was the first place I was able to see some separation between the pieces.

However, as I worked my way down the stern ended up being the first section I could work all the way around on and separate from the hull. This is the top of the deck, this is where the quarter and poop deck assemblies will go.


A look at the bottom of the deck. Again all the white are stress fractures and the area with the heaviest glue where the four support beams.

Here is a look at the exposed portion of the hull. The stern piece is actually a separate piece that I won't try and take apart.

And a look at the hull from underneath. The big support beam on the left is made from an entirely different kind of plastic as is the deck section that is still attached to it.
 
Here you can see how much glue was used on those aft support beams. I didn't think I was going to get this to separate without cutting them apart.
Grabbed the rear superstructure just to see how it lines up. It fills the rear deck and overlaps on to the next. The mizzen mast also goes through here. Another piece to figure out.


I also managed to separate part of the railing. I'll be glue that back on! Didn't mean for it to come off.

Here is the next section of deck that I managed to separate, the one just forward of the stern.
This is the section I managed to break. Not bad as far as breaks go and I saved the piece. I should be able to glue that back into place without a problem.


The bottom of the deck. A fair amount of stress fractures here as well. Notice how the railing overlap the decks to help hold things together.


And another look at the hull minus two sections of deck. I will definitely have to add crossbeams to help hold support the decks. Not sure if I will leave or remove those big support cross members or not. I will have to mull that over.


Tuesday, November 23, 2021

Pirate Project - The disassembly continues Part 2

I have been pressed for time, typically really, and this particular de-construction is tedious. However, if I want things to go back together in any kind of reasonable fashion I must proceed a bit slower than I would like.

In my last session at this I separated the top (poop) deck from the quarterdeck. It took about 30 minutes of applying acetone, then prying or flexing the parts (rinse and repeat) until I was able to actually see some of the glue joints separate. There was a lot more glue here than there was along the edges.

In the end I was successful separating it into two sections. At this point I think I can begin to consider how things will need to come apart. Again the biggest issue I'm facing if that if I'm going to have the main deck come off so you can see the gun deck then the rigging and masts have to come away, intact, with it.


Here's what it looked like after I finally pried it all apart

All of the white discoloration you see are stress fractures in the plastic from bending it. Its thick enough that I'm not concerned with it at this point. A little more texturing and paint should cover it right up.


I'm going to leave the stairs attached. Its one of the better gluing jobs that I have run into so far and I don't think I can get them apart. It should work out just fine that way.

Here you are seeing the underside of the deck. You can see how much glue was used in the center section
Here I was just doing a test fit to make sure that this section still fitted correctly to the sides. Looking good so far.


Tuesday, November 16, 2021

Pirate Project - Sophie's Revenge - The disassembly part 1

As is pretty normal for me I have been distracted by yet another project that is likely to never be finished but its the thought that counts! I have been thinking a lot about what to do with this massive kit, which means its likely going to be displayed in the main part of the house which will require more than a game level paint job and build. We have plenty of guests that would appreciate it as a ship but would not understand what gaming terrain means.

I know that Talon did the design concept and Chris Lewis was the sculptor I see a lot of the Black Pearl and Queen Anne's Revenge in this ship and I'll use one of those two for the rigging. Yes, rigging. I know that its likely to be in the way as a game piece but I like the thought that players would have to maneuver around all the components that you might find on a ship and that means ropes, lots of ropes. 

Based on what I have been researching I think I can get away without the running rigging and just go with the standing rigging, except for perhaps the on the mizzen mast. What I'm thinking is adding a lateen sail as part of the mizzen and I think a sail there wouldn't be in the way to much, or maybe do all three lateen sails. The key to all that though is that the decks have to come away as a single piece to keep the rigging intact. I'm not sure I can even pull that off at this point, but I'll give it a try.

To even get to that point I need to figure out how to disassemble the ship and rebuild it so that any interior detail can be seen and appreciated. With that in mind I worked up my nerve and took a knife, a sculpting tool and acetone to the quarter and poop deck structure. I'm was fairly certain that they used super glue to assemble this at the factory hence the acetone which would serve to soften the CA joint. So using a brush I started running beads of acetone into the joints and gently trying to pry it apart.

I managed to separate the deck from the bulwarks and I think I'm in business. I broke the deck in a couple of places in the slots but it wasn't awful and I'm going to leave those "breaks" in place it will help make sure everything fits back into the right place. I want to be able to remove the decks, including the mast, and leave the bulwark in place so that I can detail the cabins in this area. Still not quite sure where I'll be making those cut lines but now that its in a couple of pieces it will certainly be easier to figure out.

Painting will probably be an ongoing process rather than something done at the end of the project. Will just wing it as I move along.

Let's take a look at the damage I managed to do!

And this is where it starts. If you really take the time to examine this its made up of 7 or 8 pieces.


Under the gentle ministrations of a hobby knife, a sculpting tool and a lot of acetone. I managed to separate the deck from the bulwarks

You can see a couple of the rough edges on this side. I actually broke the plastic here instead of it neatly separating. I'm going to leave the broken pieces in place, it gives a nice reference to glue everything back to.


Here is a look at the underneath of the deck. The circular bit is were the magnets for the mizzen mast are located. I'll need to run some deck  beams across the "ceiling" to make sure the deck remains stiff and not flexible when I take the deck off (if I can pull that off). Techincally I think there should be another cabin underneath that top deck, but there isn't a door and I'm not sure I want to go to that much work.

You can see the edge of the deck that I broke off. I was more careful after this and did much better after this. Just below this is the point where I need to start cutting the deck and top edge of the bulwarks away. Although I'm having some second thoughts on this because of the way the rest of the ship goes together. I'll avoid rushing in with a knife at this point.

And a look at the inside of the stern. This is another spot where I broke a portion of the deck that fits into the slot.

When I start to reassemble this I'll glue the gun deck down to a base that should help keep everything aligned. But the afterdeck cabin sits on the main deck which is the biggest issue for adding the standing rigging, if I try and make the quarter and poop decks removable.