Quotes

Life is short, break the rules. Forgive quickly, kiss slowly. Love truly, laugh uncontrollably and never regret anything that makes you smile. - Samuel Longhorne Clemens (Mark Twain)
Showing posts with label Basing. Show all posts

Wednesday, November 1, 2017

World War II Project - Basing the Germans

With the expectation of the Badger primers arriving this week I went ahead and started preparing the Germans for painting. I have been going back and forth on what bases to use for this. My British Airborne are already mounted on 25mm rounds which settles that part of the equation. I don't like the look of tall bases on the table so I want something that's a lower profile. I have some 1.5mm plywood bases from Litko that were going to be my first choice, but I would need a lot of filler to hide the base of the figure and I had no intention of cutting all those troops off their bases. I started rummaging through my base box and I found a bag of 25mm round bases from Proxie Models. These are low profile with a slight lip which I think are ideal for this. I kept digging and found two unopened bags and about half of another. These are the bases I use for Calamity but I haven't worked on any minis for that for a while and I forgot I had them.

That takes care of the regular standing troops, but I need larger bases for the teams. I pulled out some 60mm Litko bases to get an idea and arrange the teams on them to see how they look. 60mm is good for the deployed two man LMG teams and the sniper team. I need something a bit bigger for the HMG  and mortar teams. Fortunately Proxie Models is still in business so I ordered 25mm, 60mm, 75mm and 90mm rounds. Hopefully those will arrive shortly, they have been pretty quick in the past.

In the mean time I have based and added the fill to the regular German troops.


Standing troops mounted on the Proxie Models 25mm bases.

Here is the 60mm Litko base (1.5mm plywood) for a two man team. I suppose I might be able to fit this on a 40mm round

The deployed LMG on the 60mm base looks pretty good though with room for some scenery


The mortar team looks a little tight, especially if I want to include some scenic elements on the base.

The HMG team looks really tight though.

I have two jars of stuff from Liquitex, Resin Sand and Natural Sand and I can never remember which one I like the best.
This gunner's base is filled with the Resin Sand

The ammo carrier's base is filled with the Natural Sand

The first batch of Germans with the Resin Sand, which has a nice rougher texture

The whole group sans the team

Friday, October 27, 2017

AWI Project - Basing a First Look

With a few painted AWI Continentals under my belt I felt like it was time to see if the base sizes I had figured out were really going to work or not. Since my current idea is to use Regimental Fire and Fury I wanted to use the base sizes from those rules for the AWI. That means converting the base sizes from 15mm to 28mm. I put it all in a spreadsheet and let it do the calculations. What I arrived at was a base with a frontage of 40mm and a depth of 30mm (which were rounded up from the actual calculated number to get to a base size that would be commercially available, in this case from Litko). Since I fully intend to provide both sides of the conflict I decided that these seemed like a reasonable size for the infantry bases.

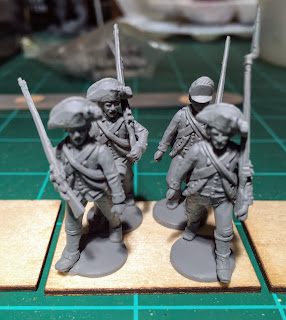
Now the moment of truth. Here are the Perry plastic AWI miniatures on the 40x30 bases. Its pretty tight but certainly workable, although there will not be a lot of room for the "diorama" style basing that seems to be so popular these days. It does, however, suggest a pretty good massed formation and I'm happy with that.


Five bases ready for some miniatures


Not a whole lot of wiggle room there, but I think there is enough to make sure that everything can square up against bases on either side.
Two stands ready to move out. I'm liking the look here.


And a look with a command base taking up the center position. I have a couple of other ideas for this so I'm not sure this will be the final look for a command base or not.
Now confident that the Perry Miniatures would look pretty good on these bases I pulled out some Fife and Drum miniatures to see how those would look.


The slightly smaller Fife and Drum miniatures are going to look just fine on these bases.
There are a number of markers that are used in the FnF rules. Here's a look at the base size I'll be using for those. They should stand out nicely on the table without over powering everything around them.
The stand for a Exceptional Brigade Commander


An out of ammo marker.


Tuesday, October 21, 2014

Another Night of Basing

Tried to pick up where I left off last night. I pulled out the dead wood pieces from the swamp accent stamp and the mortar bombs from the trench accent stamp. Not to bad. The green stuff definitely did a better job capturing detail. I mixed a bit more blue in with the yellow so that while the green stuff hardened it remained a bit flexible. I cut out the various roots with an x-acto knife and glued them to the mud and snow bases I did last night. 

I then used more milliput to try and blend them into the bases a bit better. Probably could have done a better job but once they are painted and some more basing materials added you shouldn't be able to see the transitions. I then used the left over milliput that I had mixed up and tried out the plank stamp on the bases I use for Calamity. This is really a nice stamp and left some terrific detail. Oh and Bert's Lip Beeswax really helps keeping things from sticking to your fingers and to the stamps!

I tried to hit the snow and mud bases with a wash to pull out the details but you still can't see it to well, its just not deep enough and really its not suppose to be terribly detailed just enough to add some dips and folds to the ground.

The milliput did a fair job of capturing the detail. The mortar bombs are going to need some extra work to make look good. I'm not really sure what the tin can thing is suppose to be. 

Here I pressed green stuff into the swamp accent mold. These came out really nice, the green stuff really captured the detail.

Starting to cut up the roots to place on the bases. Here the detail is being applied to a base from Secret Weapon Miniatures

Blending the detail in with milliput

One of the mud and snow bases with a wash to try and show off the detail.

Wash on one of the 50mm bases

Adding some detail to a mud and snow base

I think this is everything

Tried to capture some of the small crater detail with the leftover milliput

Really nice wood detail on the wood plank stamp


Monday, October 20, 2014

Basing with Stamps

I pointed out the Basius 2 Kickstarter in an earlier post this month. These look great but they don't deliver till early next year and I need something similar now to finish up my Marines. I was aware of Happy Seppuku from a Kickstarter they ran back in July of 2013 and one another that funded earlier this month. They use a hard latex as opposed to the resin used by Wargame Bakery. I decided to give them a try and I ordered their mud and snow stamp along with their scenic trench accent stamp. These are much smaller than Basius but are a bit more flexible so using them as press molds may actually work better. Time will tell.

So I gave it try tonight (yea, pretty much from the mailbox to the workbench). I did some 30 and 50mm lipped bases and a couple of pressings in the trench accent. I think the bases came out pretty good but after I ruined one of my "casts" I elected to let the other castings harden up a bit longer.

Here's what I achieved this evening:

Got my materials out. Milliput is my go to putty for stuff like this. Its easier to mix and work with than green stuff and its significantly cheaper! I get mine at Hobby Lobby. It won't hold as fine a detail as green stuff but for what I need that's fine.

Its hard to photograph the stamp, but this is the mud and snow stamp (or pad).

This is the wood plank one. This will be quite useful for my Calamity project

Covered up the slots with masking tape. The grey ones are resin bases from Secret Weapon Miniatures

Milliput mixed up and ready to go.

Applied a blob to the base, spread it out and then pushed it into the pad. Here are the results. Not bad I need to be neater on the application, these will need some clean up.

Tried a close up to try and show the pattern. Its hard to see in the yellow.

Maybe from the side you can see the detail better

A couple of 50mm bases
Here is a pressing from green stuff. I pulled this to soon and it stretched on me. But you can see the detail that the green stuff captured. Hopefully I'll be more patient with the next batch.


Friday, February 3, 2012

Review - Masterclass Scenics: Mud & Water Bundle - Secret Weapon Miniatures

I think, like many modelers, I have a tendency to buy something, get it, oh and ah over it and then stick it in a drawer and forget about it. Well as I finished up my WWI US Marines I was thinking about how to base them and I remembered that I had ordered the Masterclass: Mud and Water Bundle from Secret Weapon Miniatures. It comes with three jars of pigments; Dark Earth, Terracotta Earth and Clay Brown, a bottle of Woodland Scenics Realistic Water, a small ziplock of plaster and a small ziplock of finely ground sand. I compared the pigments to my selection of MIG Pigments and quite frankly they look about the same to me. Its just hard to tell what brand is more finely ground. Everything you can do with MIG and AK Interactive pigments you should be able to do with the Secret Weapon pigments. So there is another tool for your arsenal and they are $1 cheaper and come in the same 20ml quantity. The instructions were pretty brief however if you have made mud before for modeling then the process is the same, you are just adding volume with the plaster instead of acrylic resin. The addition of the Woodland Scenics Realistic Water to the mixture though adds a nice touch to the dry mud and it can be used to fill those small hollows in the base where water may have collected. The instructions do refer you to his tutorial on the website which is quite well done and comes with pictures and a step by step guide on how to make and apply the mud to achieve the best affect. I'm pretty pleased with my bases although they came out a bit redder than I anticipated. What you are really getting is everything you need to make mud in one package and an alternative source of weathering pigments. I think its a pretty darn good deal. Justin has a number of other kits on the Secret Weapon Miniatures site along with various tutorials so its pretty hard to go wrong. You can find these at some stores like Total Escape Games here in Colorado and of course on his website (although he does encourage you to support your local retailer). I have his site listed in my links but here is the link again; Secret Weapon Miniatures
Here is a picture I swiped from the Secret Weapon site showing a base created with the Mud and Water bundle.