Quotes

Life is short, break the rules. Forgive quickly, kiss slowly. Love truly, laugh uncontrollably and never regret anything that makes you smile. - Samuel Longhorne Clemens (Mark Twain)
Showing posts with label Reaper Competition Entries. Show all posts

Thursday, November 15, 2018

Sledgehammer Project; Preparation Pt XI - First Mockup

Its been a really busy around here but I have managed to work on a mock up of the basic diorama during spare moments this week. This mockup serves a couple of different purposes. The first one is to make sure that I don't have to make to many masters for the various components of the trench system. From the looks of it I can get away with two wall sections (long and short) and two floor sections (straight and angled). I'll do two masters of each of the wall sections to include a bit of decoration and maybe a third type of floor piece (bridge like perhaps?). Overall I like how things are going together with the pieces. I still need to do the caps for the top of the wall, which will make them look more trench like and some kind of firing step as well.

Before I start any construction on the masters I'll snap together the Sledgehammer and see how it fits in the position and adjust things accordingly. I have also decided that the French tractor from MadBob Miniatures is just to small. I found a 1/48th scale version of it and I'm hoping that will arrive shortly and that it will be a better fit, otherwise it will be back to the drawing board for that and I may just drop it from the scene altogether. There are a couple of other possibilities out there but they may be big enough to dominate the scene and I don't want that. Finding the right vehicle will allow me to get a much better idea of how big the base for the diorama will need to be. In concept its the largest diorama I have worked on and I'm struggling with some aspects of it. There will have to be enough vignettes to keep the viewer engaged and yet not distract from the Sledgehammer itself.

It starts here with scribbles in my little black sketch book. Here are the initial thoughts

How do I deal with corners? Here is the first attempt, far to complicated and to many masters to build.

This is better, keep it simple

Lets layout the concept on graph paper and see how it might go together. This is the outline, but I would like a little more detail.

Adding in the "tread" basically a square mesh turned 45 degrees to add interest.

Inking it in.

Adding the walls at the bottom of the sheet.

Cut out the walls, I added tabs to each end to help put things together.

And the result.


I think this looks pretty good, the walls will have more detail built into them to add further visual interest. Things like the tower emblem from the sketchbook and nut/bolt/washer castings in the corners and along the sides.

Tuesday, October 16, 2018

Sledgehammer Project; Preparation Pt III - Work & Acquisitions

I managed to slip in a bit of time on the Sledgehammer (very little time actually). I spent that time filling a few of the injector marks, from the mold, that might be seen by a judge. I basically went on the premise that when in doubt fill it. I still need to go back with the file on those pieces. I also spotted a few pieces that still have the remains of mold lines, in particular the shells. They are  particularly obnoxious to clean up. I think they are going to need some filling after all.

A nice package arrived in the mail yesterday as well. My order from Victoria Miniatures arrived. The sledgehammer will be the centerpiece of a diorama. This will definitely be the biggest one I have done which leads to the inevitable need to fill some very empty space. I have a couple of nice reference photos for the Soviet B4 Howitzer in firing positions during WWII as well as some links to some really nice artillery dioramas on the web. The key to the bigger base will be creating vignettes that will add interest and yet keep the focus on the Sledgehammer. A lot of the order from Victoria Miniatures were purchased with that idea in mind.

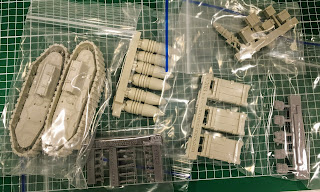
The Sledgehammer comes with a crew of five plus a commander, but they are in the softer slightly bendy BONES plastic. The casting is really pretty good on these and they will  serve as the basis for some of the needed conversions. In addition I purchased the resin version of the crew along with the officer to supplement the ones in the box. To go with that I a purchased a 5 man Rausenburg Siege Corps squad as well as a 5 woman Rausenburg Siege Corps squad most of which will also end up as artillery crew. For the Sledgehammer itself I picked up the blast shield (which I may or may not use) along with the crawler tracks which I will definitely be using. The rest is just extra bits to use for the vignettes; backpacks, bread bags, weapons, etc.

I'm still looking for additional parts for the Sledgehammer itself as well. Right now it looks like most of those will be coming from model railroad manufacturers but its been a bit frustrating researching the parts. I have decided that the model railroad manufacturers are years behind everyone else in getting their products on the web or when they do they don't have a site even remotely resembling a modern web site. I know what I need I just need to find a place to buy it! I might make a trip out to Caboose hobbies and see what they have on the walls. I have checked their website (which keeps improving) and didn't really see what I wanted though and its a long haul for nothing then. Be assured though that the gun itself is going to get a lot of dressing up!

The gun supports, these marks will be on the inside, but can be quite visible unless I do some serious work on the "interior" of the Sledgehammer.

This is the bottom of the "wooden" walkways over the wheels (I don't think I can use them with the tracks). I'm waffling on if I want to use these or not. I'm think of replacing them with some etched brass walkways instead. I'll carve out the supports if I go that route since they already fit in the slots on the gun carriage.

The last few pieces that I found with potentially visible injection marks. I didn't bother with the ones in the wheels, those will be completely hidden once the wheels are assembled. I am unlikely to even use the wheels since I have the tracks.

Four bubble wrapped packets from Victoria Miniatures

On the top the 5 "man" squad. Left to right; jerry cans, male militia heads, entrenching tools, and the blast shield.

From left to right (more or less); Crawler tracks, BFG shells, grenades, ammo boxes, biker stowage, and breadbags.

Resin Gun Captain

From left to right (more or less); Kneeling legs with greatcoat, backpacks, female militia heads, and the resin version of the crew. 
From left to right (more or less); "Bren" guns, Sniper rifles (I think I ordered the wrong thing, oh well), 5 "woman" squad and two of the three Svargan Snipers


Sniper closeup. I have no idea what I will do with these. You received on free for every $50 and I really have no use for them. I delayed my order a day to avoid getting the even more useless Highlands Moss Piper. They are great figures but since I don't play 40K so they will get stuck in one of my many boxes of random figures.

Monday, August 27, 2018

ReaperCon Projects - The Sherman Part IV

Sometimes life just conspires against you. While work has progressed on the competition Sherman, I'm not sure its going to make it. I have a couple of fall back pieces but this is the one I really wanted to enter. We shall see. The good news is that the Rubicon decals are much better than Company B and will definitely hold up through the weathering process. Its a bit farther along in the process now which you won't see in the few photographs I managed to take.


Wednesday, August 1, 2018

ReaperCon Projects - Small Steps II

I had the opportunity to get a little more work in on the M4A1 last night. I started with the oil process to add more tones to the vehicle. This is simply add spots of oil colors and streaking them down the sides of the vehicle. If the streaks are to evident you simple keep streaking them down with the mineral spirits. Its an interesting process but I made a huge mistake on the right side, and this shows the quality difference between the I-94 decals and the Company B decals. I accidentally drag a brush full of mineral spirits across the Company B star and it started to disintegrate, you can see the effects in the picture. The I-94 decal held up just fine, no ill effects.

Now I have some things to fix, as something is cockeyed with the paint on the left side. Not quite sure what I'm going to do about that but at this point I just need to continue forward.

The evening's paint selection


The initial streaking and the disintegrating Company B decal

To many green dots and to concentrated on the center and the driver's side

Ruined the star on the turret as well, both sides, but you can see how the streaking adds different tones to the surface


The palete at the end of the evening

Wednesday, November 5, 2014

Competition Prototypes

With the prototype display bases completed I thought I would take a look at how some of my entries might go together. I had the miniatures hand for the Trophy Hunter and Terror From Outer Space. So with a little "blue" tack I wanted to see how these might look.

Trophy Hunter is an all Reaper display featuring the Female Andromedan and three trophies consisting of various Bathalians. For this display the high backdrop is perfect.


The heads tacked into place

And the Hunter pointing out some interesting point on her latest trophy.
Right now the whole background just screams old English trophy room, Green walls, dark wood wainscotting, hardwood floor and maybe a rug and a little table. Should be fun.

The second one The Terror From Outer Space is much simpler but the background is going to be a bit more complex. I'll have to work out how to do build the interior of a spaceship.
So imagine an airlock door on the left side where the tentacles are coming from. I might add a little robot to the scene on the right side to help balance it out.

Looking at the display bases and the minis sort of in place, I definitely happy with how things are coming along. I will just have to sit down and start painting now!