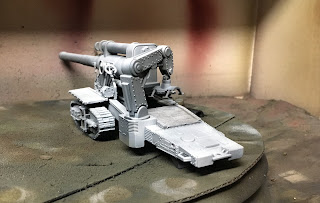
I know I need to dig up some of the missing parts but I'm moving forward with what I have. I have applied the pin wash, still needs to be cleaned up but that big step is done. After that I'll follow up with some chipping in a couple of different colors.
The Town of Calamity, The D&RGW RR Warehouse Row and Historical Miniature Gaming
Quotes
Friday, March 26, 2021
Tuesday, March 23, 2021
Sledgehammer BFG - Back to the bench
This bad boy has been sitting for at least 18 months on the back burner. Since it looks like ReaperCon 2021 might really happen I figured I better pull it out and get started so it has a chance of being ready for Labor Day weekend (Sep 2-5).
While I was fairly happy with the initial airbrush work at the time I am decidedly unhappy with it now. So back to the airbrush for some camo work. I essentially change the color of green I used and widen all the green and brown stripes so the dark yellow wasn't so glaring. I also cleaned up all the bad spots from the previous airbrush work. Which goes back to do it right the first time and you won't have to come back to it.
After looking at the pictures I realized that the crane is missing. I need to find out it and do a little work on that as well especially since I switched out the green!
 |
| The camo that was completed 18 months ago (or there about). The bright light over the airbrush booth tends to wash the colors out a bit. |
 |
| A new shade of green |
 |
| Widening the brown stripes |
 |
| At the end of the airbrush session. Note the missing crane which seems to have wandered off on its own. |
 |
| This session's colors. I may need to put in a paint order soon. |
Monday, October 7, 2019
Sledgehammer XXXIII - Tricolor achieved
Tuesday, October 1, 2019
Sledgehammer XXXII - And then the green
Thursday, September 26, 2019
Sledgehammer XXXI - Next Color
Tuesday, September 24, 2019
Sledgehammer XXX - Reboot
I have not been very happy with the colors I selected for the Sledgehammer and the support vehicles. I decided to try something a bit different so I have started over on the Sledgehammer itself. First job was to re-prime it. So now its ready for some real color
Friday, July 19, 2019
Sledgehammer Project; Pt XXIX - Priming the Sledgehammer
Wednesday, July 17, 2019
Sledgehammer Project; Pt XXVII - The Sledgehammer BFG final details
 |
| And the finished control rod and wheel. Need one for each side. |
 |
| I cut this side, of course, a little to short so the fit is tighter than I wanted it to be, but it still looks pretty good. |


