Quotes

Life is short, break the rules. Forgive quickly, kiss slowly. Love truly, laugh uncontrollably and never regret anything that makes you smile. - Samuel Longhorne Clemens (Mark Twain)
Showing posts with label Wynkoop Street. Show all posts

Tuesday, August 13, 2024

Modeling a Model Railroad - To Complex?

I know that one of the potential issues when working on a track plan is will what you draw actually fit. I more faith for this design since I'm modifying an existing design that has been built; the Ness Street Yard by Jack "Shortliner" Trollope. There is also a shorter version of this titled Attleboro which is 6' long.

On the left side is an area of somewhat complex trackwork and while it looked like it would work just fine on my drawing I thought it would a good idea to see if it would work "full size". From the Peco website I downloaded the templates for their code 100 medium radius turnouts and 45 degree crossings. I wanted to use code 83 but there doesn't seem to be a 45 degree crossing in that line.

A little time with the printer and I put together the area in question, well minus actual straight sections but I'm not concerned with that. I laid it out "exactly" as pictured in the original plan while my drawing shows it spread out a bit more. As laid out with the templates a 50' car will not clear the two turnouts on back so I think increasing the length between turnout #1 and #2 is a good idea. The issue is that now its crossing 4' mark for the module. My initial thought is to make one module 5' long and the other 3'. This would make storage a bit of an issue but its solvable.

The other changes I made was to add turnouts #7 and #8. I'm not convinced this will add a lot of operation or not. I also added another crossing on the right side which will is necessary as I extended the back track to run the full length of the layout. I think that last siding will run into a building or perhaps a bit of vacant lot for a team track. The other possibility I'm considering is to add a turnout between #7 and #8 and run a siding to the right, front edge. That turnout could also go on the left end of #7 instead. 

Those kind of questions are what convinced me to make a "scale" model before I actually started cutting real wood or foam.

This is the plan so far. It shows where I extended the distance between turnouts 1 and 2. Where I added turnouts and crossings and where one additional turnout could be added.

A look with a few of the buildings in place. there is nothing set in stone with the buildings at this point. These are to just get an idea of what things could look like. Its missing the viaduct. I was originally thinking the viaduct should go on the left but I'm leaning towards the right side now because of the complexity of the trackage on the left.

Throwing on a few of the freight cars and the CF7 just to give a better idea of the buildings will interact with the trains.


This is the section in question, basically turnouts 1, 2, 3, 4, 5 and 6. Note this is laid out as shown in the original design. This mimics the track plan as designed as opposed to the drawn version with the extra length between turnouts 1 and 2.

Throwing a mix of 40' and 50' cars along with a CF7 for the actual sanity check. As designed anything 50' or longer will foul the switchpoints between turnouts 1 and 2.

Same scene but with an SW1200 doing the "work".


Thursday, August 8, 2024

Modeling a Model Railroad - Moving Along

I have been messing around with the track plan a bit and things got kind of messy on that original plan. I laid out things a bit neater on a new piece of graph paper and I think I'm about ready to show it off in some of the railroad forums.

Along with the adjustments to the plan I have been building up some nice warehousey looking buildings to work with. There seems to be more space to fill than I anticipated. By keeping the street a scale width it keep the tracks contained and very straight, which makes it feel like I have a lot more space to fill up. 

This is where things are at, for the moment:

Working from the left to the right. Not gluing anything down at this point, everything is in flux. I really like the idea of a viaduct but it may be to much visually in such a small space.

A lower view, which doesn't look to bad.

Here it is with the updated track plan underneath. Still shifting buildings back and forth and I'm going to need to make some buildings.


Monday, August 5, 2024

Modeling a Model Railroad - A step to far?

While I was working on the track plan and the buildings I figured it would be a reasonable idea to add some freight cars and locomotives to the project. In hand I own a Rock Island SW9/1200 and 2 Santa Fe CF7s. In the near future they will be joined by 2 DRGW RS3s so I need to represent one of each of those three plus an assortment of 40' and 50' boxcars/reefers.

I initially hemmed and hawed about doing this but in the end since I was going to build the model an extra bit of visualization wasn't going to hurt and I might be able to see problems that I hadn't anticipated pushing these little blocks around.

So I took some measurements and built a bunch of blocks to represent the freight cars and engines out of styrene. I was going to leave them white and then decided that was just to plain and a little color was going really help me see things better (basically the whole thing is just white with a few black and blue lines).

Since I was painting anyway I went ahead and tried to a little bit of flair to everything trying not to go to overboard on the whole thing. Which means I did resist cutting down the locomotive hoods, at least right now.

I was to busy painting to take in progress pictures so here is the finished bunch (still on the sticks).

Row 1: Rock Island SW9/1200, Santa Fe CF7, DRGW RS3
Row 2: 3 40' Generic Boxcars and 3 50' Generic Boxcars
Row 3: 3 40' DRGW Boxcars, 3 50' Generic Boxcars
Row 4: 1 40' DRGW Boxcar, 3 50' DRGW Boxcars and 1 50' Generic Boxcar
Row 5: 7 40' Generic Boxcars
3 Locomotives and 24 Boxcars. From an operational standpoint the 50' boxcars won't get used very often, 40' is going to be the common size. Figure the time period as late 1950s early 1960s.


Friday, August 2, 2024

Modeling a Model Railroad - Introducing Warehouse Row

As was mentioned in "What's Going On - 5" I'm working on a couple of planning models for two model railroads that I'm considering. At the moment I'm moving forward with the switching layout. I'm viewing this as a testbed for the eventual Wynkoop Street layout and I'm calling it Warehouse Row (although the resemblance will be pretty superficial).

Within an area of 18"x8' (Wynkoop Street will be almost 14' long) I want to represent a street running switching area. I want to include a vehicle overpass (like the 16th Street Viaduct) as well as a street level crossing (like 15th Street and Wynkoop before the overpass was built). Fairly tall buildings in the back (at least three stories and going up to 5). Buildings on the opposite will just be represented by loading docks, at least that's the thought at the moment.

I showed off building the frame for this in the WGO -5 posting. I haven't taken nearly enough pictures but at this point. The frame has been completed with a top and holes drilled in the connecting ends and are currently held together with toothpicks. Being able to split it into two pieces for storage is pretty critical for this layout since it can't remain setup indefinitely. The track plan is based on Jack Trollope's Ness Street Yard modified to represent the in the street running that I envision. Since I want the street running aspect the width of the streets is really important. According to the Sanborn Insurance maps of Wynkoop street its 80' between buildings and the road width itself is 60'. There are three streets; "main" street runs the length of the layout and the rails must fit in that 60' width (at least for the most part), the viaduct will fit in that 80' between the buildings (crossing at 90 degrees to the main street), the crossing street will keep the 80' between buildings with the street taking up 60' of that (leaving 10' on each side for sidewalk and street parking).

I'm toying with building the benchwork for this one out of foam core. There are some fascinating discussions in the MRH forum about it. While the main proponent says any foam core will work he does use a fairly high end foam core by 3M called FoamCor. Jury is out on this right now on that and its not like I'm in a hurry to get to that point.

Here are some in progress shots:


Gluing the top of the benchwork on to the frame

A copy of the Ness Street Yard has been blown up to fit (scale is 1/8 = 1").

Marking up for changes and getting a feel for how much room I have to work with.

Starting to layout out centerlines, the blue pencil marks

Going to need a few buildings. A took a copy of the Woodland Scenics templates for their modular walls and adjusted the scale to match  the 1.5 inch equals 12". My fingers got really tired clipping all of these out.

The first building; foamed PVC sheet and the photocopies.


Thursday, February 29, 2024

Planning the next RR project

After posting about the 4 projects currently sitting on the desk I decided the best way to break out of the creative doldrums is to start an entirely different project! These days my thoughts run more towards trains than gaming. I haven't really been able to do more than think about scenes for the model railroads lately. Lot's of doodling going on. It kind of hit more over the weekend that I don't need to wait for space for the layout comes available I can build a photography scene now.

This definitely requires some thought. I have two layouts that I want to build. There is the Wynkoop Street Warehouse Row the 20" by 14' switching layout in HO that will reside in the library room (former bedroom). That's very much an urban layout. The second is the Colorado & Northwestern in On30 which is really going to be a very freelanced mountain railroad. There are a couple of designs floating around for that one and I'm leaning towards the looping figure 8 so I can let the trains run as opposed the very linier Warehouse row. The C&N is definitely the farthest out on the timeline. Not to mention that Calamity is still in the works, I'm not giving up on the particularly endeavor either.

A scenic photo "module" would help me really scratch the building itch and let me explore techniques that will come in handy later. With that in mind though I need a G&D (Givens and Druthers) list otherwise it will get out of hand and it will also deliberately extend the planning process so I don't go rushing into the build phase. This scene will be heavily influenced by a couple of different harbor scenes I have been following in the MRH forum. Let's get to the G&D list.

1. Non-operating - It is not the intent to make this an operating module. Trackwork, obviously still needs to "work" but it doesn't need to be wired up or require a track plan.

2. Water. Enough that suggests that the scene is a water front area, not just a stream or a river.

3. Car float. I won't be building one of these for the layouts so this would stretch my modeling skills a bit and is, likely, to be the only car float I would ever build. Plus Research!

4. Transfer bridge. If there is a car float then there needs to be a transfer bridge and apron for it to dock to. More Research!

5.Tugboat. I'm on the fence with this one. A tugboat is necessary to move the car float. I would like to build one but space is a consideration and this might be that step to far.

6. Seawall, pilings and other bits of scenery necessary to reflect the harbor scene.

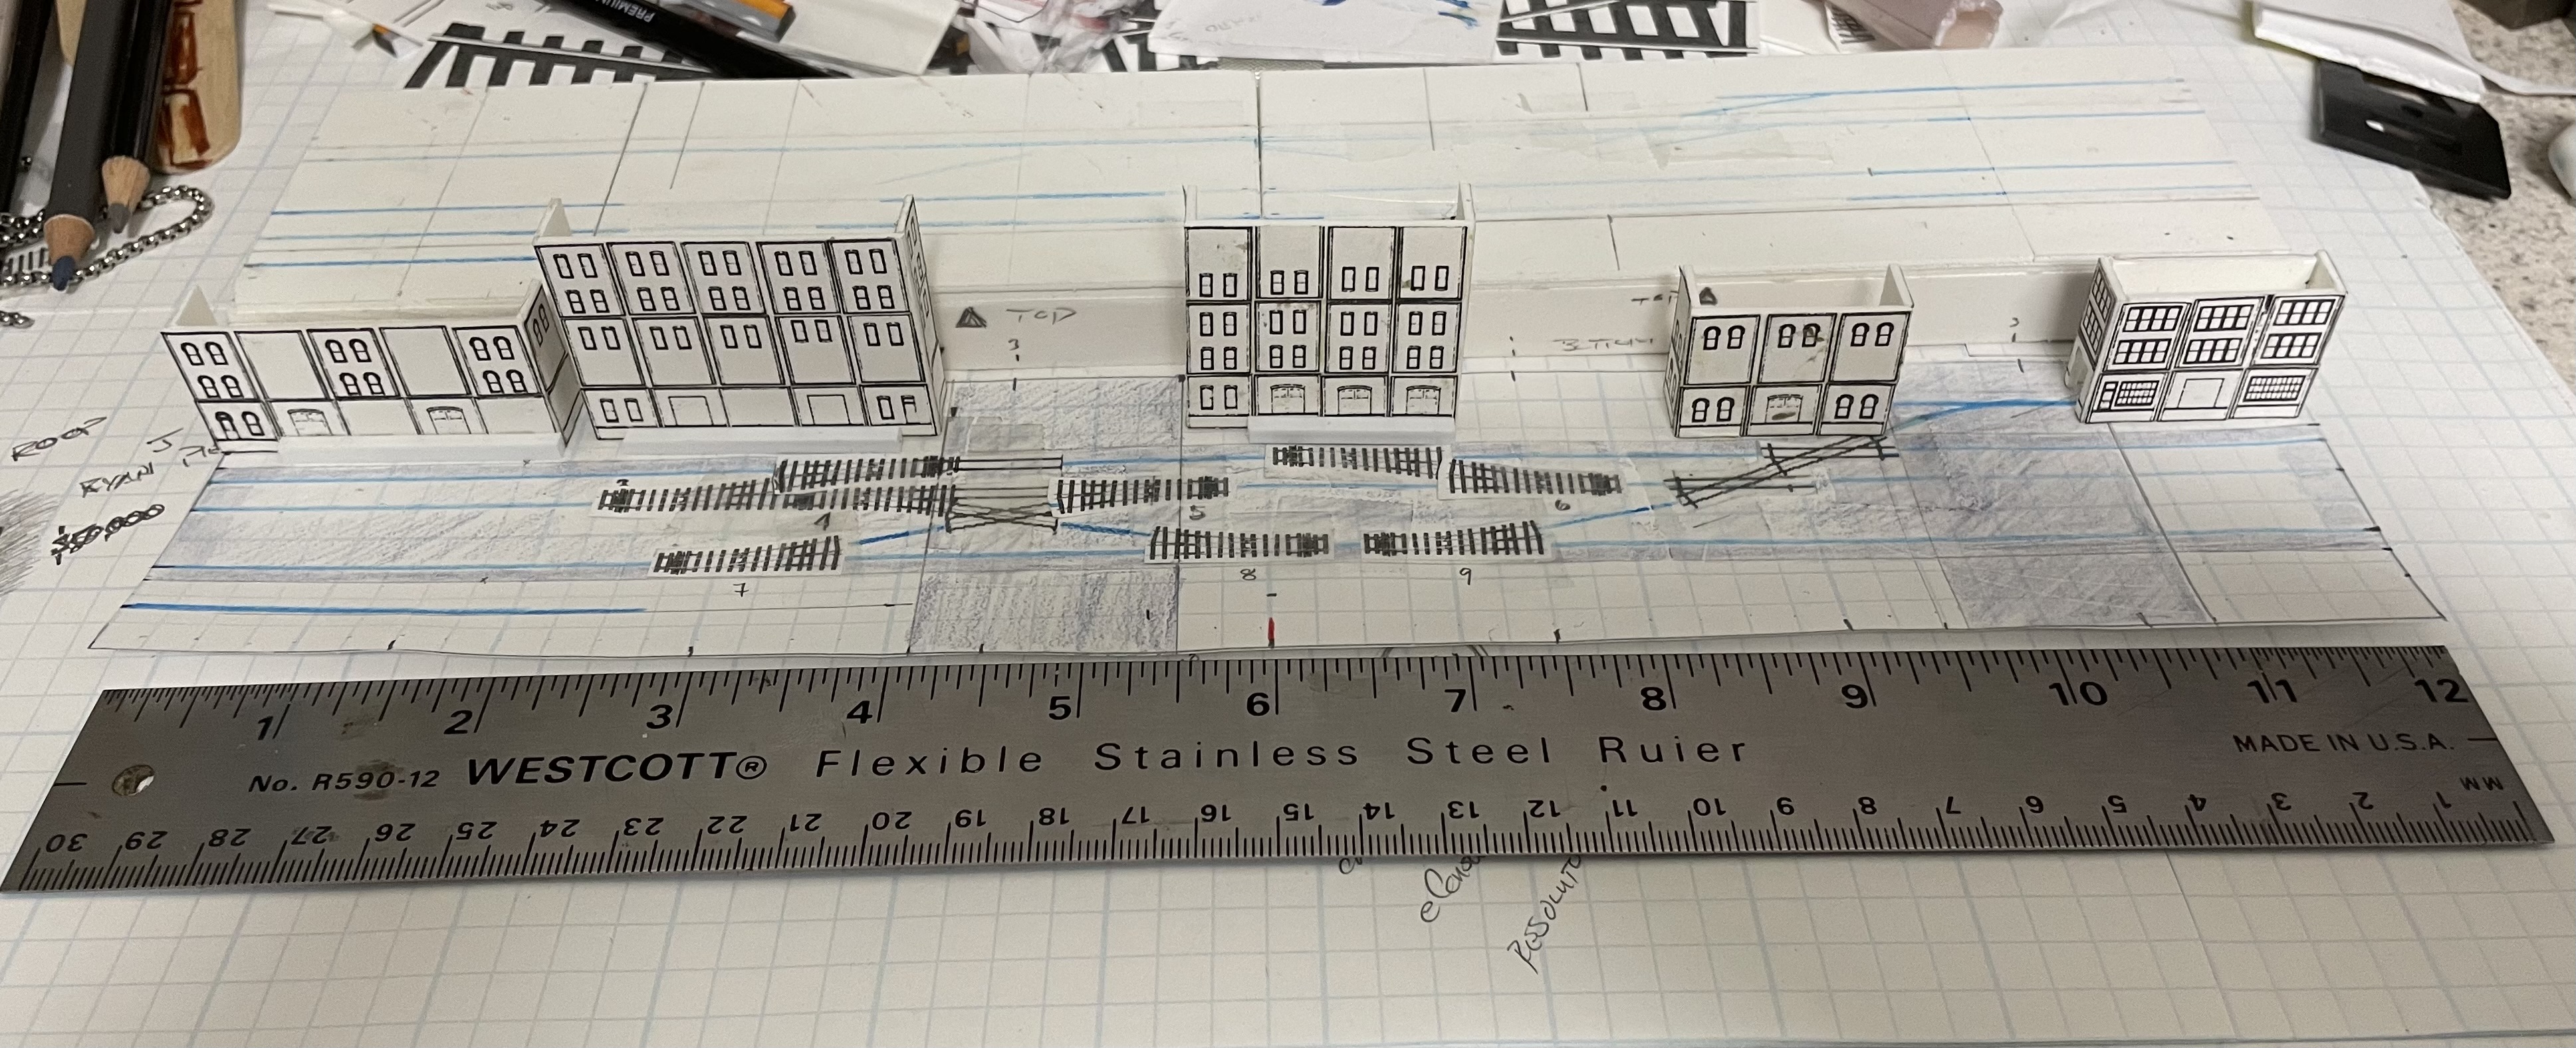
7. Background buildings. Not quite sure if there will be an actual backdrop (perhaps one that is removable) or not but shallow background buildings will be a must to create the idea of bustling harbor scene. This would be something I could use to experiment with lighting. Both shallow buildings and lighting are going to be important for Warehouse Row. These should also be removable so I can swap things out.

8. Foreground buildings. There should be room for a few foreground buildings. Again another chance to experiment with wiring. Like the background buildings these should be removable so I can swap them out.

9. Pier with railroad tracks. I don't know if something like this existed or not, but it shows up on a number of track plans by Iain Rice and I think it would look pretty cool, so if there is space I'll do it.

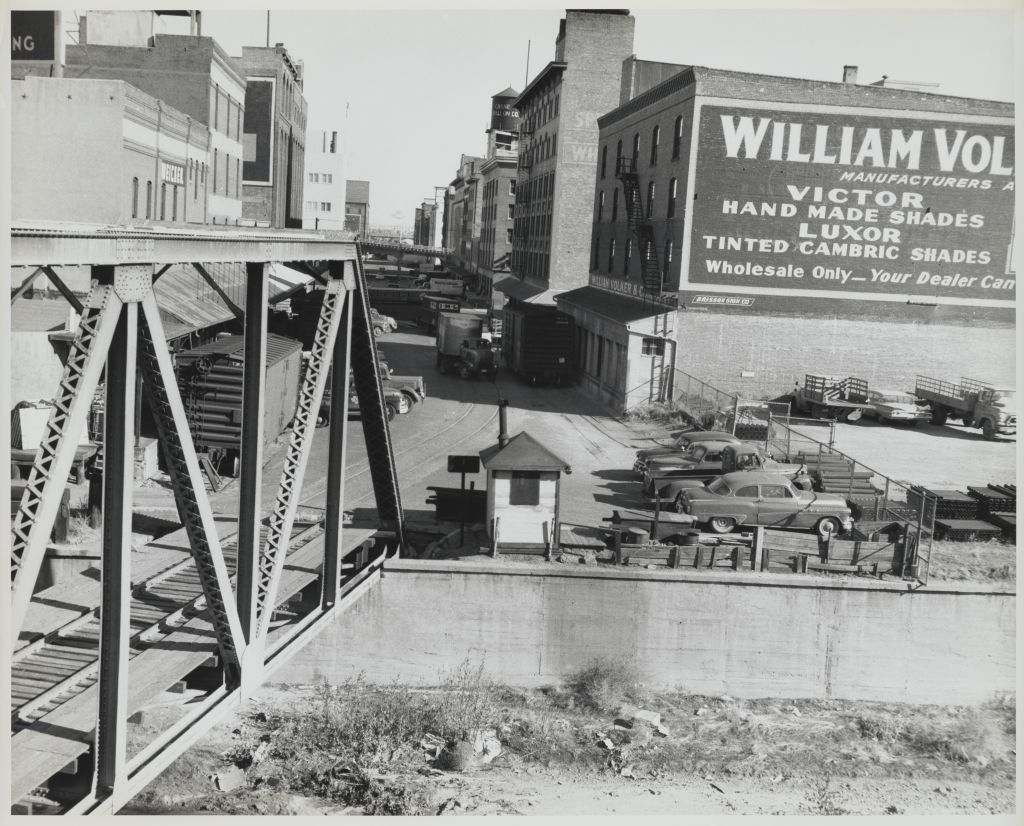
10. Streets should mostly be concrete, but I want a couple of areas with cobblestones covered with asphalt. Again this will serve as practice for Warehouse Row. Photo graphs of Wynkoop Street circa 1960 definitely show cobblestones between the tracks and in some areas where the asphalt has degraded into potholes.

11. Timeframe can be somewhat variable but probably a hard stop at 1960-61. If buildings and other features can be swapped out then they can be matched to the era. Not sure if I want to venture into the steam era but it would be nice to have the option.

12. Interesting sightlines! Keep the camera in mind and close by when thinking about where things will go.

13. The size is defined. This will be hard and fast at least for the length and depth. It will be 18" deep and 40" long. Height is a variable element since I could adjust the heights of the shelves it will live on. Removable buildings will help this too.

In order to avoid wasting time and making to many mistakes I will be building a model of the harbor scene in 3/16" scale. Big enough to work with but not to big to be overwhelming. I have gone ahead and started messing around with the foundation of the model.

Grabbed the graph paper and started looking around the workroom to see where this thing could live. Hence the 18" x 40" dimension.

I have five background kits from Walthers. This is the smallest of the bunch and probably my favorite. I'm going to use this one for sure along the back. Its about 12" long and maybe 1 1/2" deep.

Here are the components. I'm not sure I have ever really looked at the parts until now. It has everything needed to build the background structure including two full sprues for the window glass. There is enough to put glass into two full versions of this building. The green sprue is all the windows and doors. Its the full sprue for the full building kit. I'm going to have a lot of left over windows and doors from this one. The arched windows may come in very handy for other projects down the line. We all need a box of random parts anyway.

Started working on a piece of gatorboard. I cut out the base to the full dimensions plus 1" all the way around it. Not sure why but it seemed like a good idea when I cut it.

Added a few lines just to better figure out what's going on. There are two rules in the photo. The small one on the right is for measuring, the heavier one at the top I use for cutting. When I start  a project I will keep using the same ruler through out the build. I use the small one here because that heavy ruler is 18" long and a bit unwieldly. The triangle is to make sure that I'm at least close to square when I start the project.


Thursday, December 22, 2022

Returning to Denver's Warehouse Row - Another Look

Our thoughts have turned to what room we will be renovating next. I'm pushing for the "library" room, a small bedroom that has a bunch of bookshelves plus our large craft cabinet in it. This would involve getting rid of the existing bookshelves (or at least moving them somewhere else in the house) and then painting the walls and probably the ceiling. Once that's done then we can start putting up new shelving.

There are couple of requirements for the renovation. First it has to provide some desk space, probably under the window. This is important as we both work at home now and while we prefer to be in the same room, however, when we are both on conference calls one of us has to move. Right now I'm moving into my workshop room in the basement which means I'm constantly putting away model projects because I need the desk space. Which further delays my model projects! 

Second is to replace the bookcases with bookshelves. What do I mean by that? We need something that's more flexible than a standard bookcase. My intent is to line the walls with french cleats which will allow let us arrange the shelves as we need. While we would still be restricted by the location of the cleats we would not be restricted by height (other than the ceiling) or the width of a bookcase. In turn this would allow me to use the cleats to attach a layout to (the secret reason for using french cleats) directly to the walls without a lot of extra effort.

The third requirement is non-negotiable at this time, the craft cabinet must stay. While it is fairly compact when closed when fully open it occupies a 7' width. However, it would be closed the majority of the time and it doesn't have to be fully opened to use. I will capitalize on that aspect. Since the cabinet doesn't have to be tied to the wall I can leave a gap behind it to provide a limited amount of staging which would, again, be suspended on french cleats to a spot behind the door where cassettes for staging would reside. This would keep these hidden except when the layout is in operation.

I have been studying Warehouse Row on Wynkoop street for sometime now. Recently I asked a question on the D&RGW forum about what local or job switched Wynkoop street. A fair amount of information tumbled out (and may result in an article for "The Prospector" the Rio Grande Modeling and Historical Society's quarterly publication) in a fairly active discussion. 

This is the discussion that unearthed a photo that showed a diamond crossing directly under the 15th street viaduct on the east side. This crossing doesn't show up on any Sanborn map that I have access to and it would be crucial to switching the area efficiently. In fact I had added such a crossing on the last plan that I had drawn but centered between 15th and 16th street.

Photograph by John Hill. A picture that I had not seen before. Its sometime after the 15th Street viaduct was put in and you can see some interesting trackwork right underneath it. This is the kind of information that can be found when you ask a question in the right forum!

I have been dithering about the year and I think it will be 1958. This would be before the postal annex was built so the long siding serving those businesses would be present and it would have been possible for the 15th street viaduct to have been built (based on when it was first proposed, I think it was actually constructed in the early 60s). I'll have to decide if a couple of the businesses will be back dated to earlier occupants or not. 

The amount of space available for the main section of the layout is 13' 9". I was messing around with scales and I think I can almost fit the entire area between the Speer Viaduct (across Cherry Creek) all the way down to 16th Street with very little compression needed. I have been doodling around with that concept for the past week or so. The problem I'm running into is the arc of the curve needed to move trains in and out of the staging area. So nothing final by any means but I think I'm getting closer. Close enough that I have a bought a some freight cars off of eBay (great deal on that one) and I'm looking for some motive power. The 1958 period allows a lot of leeway there; Alco RS3, Alco S2, Baldwin VO660, Fairbanks-Morse H10-44 and H15-44. I don't know exactly what was used in the area but all of those are available, on way or another, in HO scale. I do know that these area was handled by the 7th Street Yard and I think in that long discussion it was determined that it was probably not a specific job just handled by the yard crews probably at night or early in the morning. Still information to uncover.

Picture is a little small, but this map is pieced together from three different Sanborn maps. If you slide the map further to the left the edge of the 16th Street Viaduct just goes over the edge of the space. Without doing to much measuring I think I don't need to lose more than a couple of inches to get the whole 16th Street Viaduct on the layout. This makes for a great LDE that fills the space without any major constraints to deal with.


Friday, August 26, 2022

Warehouse Row - The Wynkoop Street Bridge

There is a picture from the Cornell University Library in the US Railroad Commission photographs that shows a very busy section of Wynkoop Street where it crosses Cherry Creek on a skewed Pratt through Truss bridge that figured prominently in my decision to shift which railroad I was modeling and what location to use.


This is the photo, the original is black and white, I was trying out some colorizing software and there are a few odd color selections being made by the software (check the blue section in between the trusses at the end). I'm not sure exactly when the photo was taken but it can't be any later than 1960.


And here is the original

From a slightly different angle


This particular picture is what convinced me to shift from modeling the "Patch" district in LA to Warehouse row in Denver. Now admittedly I'm still clutching at a few straws around actual operations but I have the general area figured out pretty good, or at least I thought I did. I was in a D&RGW discussion group and it was noted that the bridge, apparently, doesn't show up on the listing of D&RGW steel bridges (I suppose I need to try and verify that).

Which also brought up the fact that crossing the bridge to the south actually takes you directly into the C&S' Rice Yard, although you can get to the D&RGW 7th street yard. So which railroad actually switched the area and who owned the bridge? And just to confuse the issue on an old Sanborn Map (1903) the trackage is listed as D&RG/UP trackage, so maybe the UP owns the bridge, although their yards were to the north so probably not. Yet another little mystery. I might have come full circle and need to model the C&S in the '50s and '60s.

Thanks to a couple of websites I at least know who built the bridge; The Pennsylvania Steel Company and it was built in 1907 (which is after the date on the Sanborn map, not really relevant except that this one must have replaced an iron bridge that existed previously since Sanborn indicates it is an iron bridge in 1903).

Photo by Bob Morgan 2/2009

Photo by Bob Morgan 2/2009


Thursday, October 10, 2019

Warehouse Row - Wynkoop Street

One of the problems I had with the original LA Warehouse district layout was the scenery. There were three key structures for the layout; The Walnut Building and the two buildings that created the curved entrance to the railroad alley. The restrictions on the layout size and the location of the staging cassette meant that a lot of compromises would have to be made with these three buildings and while that was okay the rest of the layout was made up of rather uninteresting brick buildings, none of which even featured loading docks. While I like the brick canyon feel it was going to be a rather low walled canyon in this case since none of them were more than two stories high. Good for operations but not so much fun from the building perspective.

This time around I'm even more interested in the photographic aspects of the layout and I still want to establish that brick canyon feel specifically for B&W pictures. Denver's Warehouse Row on Wynkoop Street in lower downtown (Lodo) features warehouse as tall as six stories on both sides of the street. While the space is still pretty restrictive in width I think I can pull off that brick canyon feel more effectively with these taller elements. Denver has the added bonus of being in love with viaducts so the area has some natural endpoints; the 16th street viaduct on the north, the 14th street (Speer) viaduct on the south and the 15th street viaduct right in the middle, effectively dividing the area into two "scenes". There are definitely some things to overcome but the tall buildings combined with some a dawn to dusk lighting sequence offers some real opportunities for photography.

Here are a couple of shots of the area I have managed to dig up:

The Spratlen & Anderson Wholesale Grocers Warehouse, at this time I believe it was occupied by the Davis Brothers Wholesale Drug Company. That's the 15th street viaduct separating the 1400 block from the 1500 block. It was built in 1968 which makes that the earliest date for the railroad equipment. This is D&RGW territory. Denver Public Library, Department of Western History call # Z-10895

This is in the 1500 block of Wynkoop looking South. The huge washed out structure on the left is the Postal Annex which takes up the entire block. On my version I would replace it with the original warehouses that stood there originally. The buildings on the left are all part of the Morey Mercantile Company although by this date it had been sold. Note that at this time the 15th St. Viaduct is missing. Cornell Library from the 1960 President's Railroad Commission #5003pb63f117

The 1400 block of Wynkoop from the 14th Street (Spear) Viaduct. Weicker Transfer and Storage on the left the Volker and Spratlen-Anderson buildings on the right. Cherry Creek has cement walls and is crossed by a Warren Truss bridge. Note the trucks parked behind the boxcar effectively blocking it in. There is another boxcar in front of the Volker building's unusual loading dock. Cornell Library from the 1960 President's Railroad Commission 

The Kennicott-Patterson Warehouse which occupied a good portion of the west side of the 1500 block of Wynkoop. The six story portion is the original building, the rest of the massive complex is an addition. Picture is taken from the 16th street Viaduct. Denver Public Library Western History Collection call # MCC-3700

Now rail served businesses on the west side of the 1500 block of Wynkoop. Note the signage on the side of the Kennicott building appears to have at least two layers of painted signs at this point. Denver Public Library Western History Collection call # MCC-1701

Thursday, October 3, 2019

Switching Warehouse Districts - LA to Denver

I have been doing the research for a couple of months now and have decided that I'll be switching from the LA Warehouse district and the ATSF to the Lower Downtown (Lodo) district and the D&RGW.  After pouring over Sanborn Insurance maps, pictures, websites and a couple of books it looks like Wynkoop street between Cherry Creek and the 16th Street Viaduct will provide both the action and the architecture to satisfy my thoughts for an urban switching layout.

The space is not huge but I think it will be quite satisfying to both build and operate.


The room, a former spare bedroom converted to the library.

Layout on the north wall with the staging against the west wall.


A more detailed look at the layout.