Quotes

Life is short, break the rules. Forgive quickly, kiss slowly. Love truly, laugh uncontrollably and never regret anything that makes you smile. - Samuel Longhorne Clemens (Mark Twain)
Showing posts with label laser cut MDF. Show all posts

Thursday, March 7, 2013

Building Calamity - Sarissa Precision Railroad Station Part 3 Finished

There really isn't a lot to say at this point. I have spent a week or so slowly working on the railroad station and getting it to a table ready state. The interior on this one is a bit small so I don't think I'm even going to think about doing any interior work.I'll just get some paint on the inside walls and leave it at that. I think that overall I have managed to save the poor fit resulting from the out of spec MDF that was used. I think its likely that this one will be replaced at some point, either when someone else does a railroad station or with a scratchbuilt one. I certainly have enough plans laying around to build my own without to much trouble. Don't get me wrong, this is a good kit (especially if the MDF is actually 2mm instead of 2.5mm) it just doesn't suit my personal taste very well.

I tried another brand of shingles for this model that I really like. They are from Laser-Art Designs, a department of Branchline Trains which is another one of the model railroad laser cut manufacturers. The material is much heavier and has some texture to it. I was able to get a slightly fancier shingle at Caboose Hobbies which should help make the station stand out a bit more.. These shingles were a bit more expensive but the pack comes with two large sheets of shingles and I didn't use a full sheet for this building so I probably have enough for at least two more buildings, maybe three depending on the sizes of the roofs. Very nice product.

There is a little bit more paintwork going on as well. I used a white ink (from Liquitex) thinned down and use that to fade the yellow and the green a bit more. Trying to give it a more faded look. Unfortunately it doesn't really show up in the pictures very well. Neither does the detail on the roof, so look close!

Pictures, lots of pictures!

First up a look at the shingles


Then its on to paintwork. I wanted a darker green for the base color, so out came the Vallejos

Then a lighter green applied in streak pattern working down from the peak.


The third color was a bone color from reaper, a very light grey that was applied working up from the edge to the peak. Unfortunately it is really washed out by all the light. So you are basically seeing the finished builidng at this point, with the additional color fade applied to the building's yellow and green surfaces.


Overall I enjoyed working on the railroad station. I think it could stand some improvements but its still going to look good on the table. I'll be doing some additional weathering once I mount its base. There is a whole stage of weathering that will be applied to all of the buildings to tie them together, but that stage won't happen till I'm much closer to actually building the boards themselves.

Saturday, February 23, 2013

Building Calamity - Painting the Sarissa Precision RR Station

Production pretty much stopped on the Calamity scene while I was getting ready for the convention. The process on painting the building started about three weeks ago, not long after it was weathered.

The first step was weathering the building. After working with the MDF a bit more it appears that if you need to prime it Kilz is by far the best thing to use. The MDF just seems to soak everything else up and ask for more. I managed a much smoother coverage with the Kilz and used a lot less of it than the two other regular primers I tried. Before I started up the airbrush I thoroughly taped up the building so I was only painting the surfaces that I wanted to paint and not worry about overspray.


The next step is to take the rubber cement and dab it on in patches on the building. Pay some attention to where you are applying it. It should be mostly on the lower exposed surfaces rather than on more protected areas. It can be higher up on a wall as long as its in an exposed spot. Take a look at other 9as in real life!) buildings and see where the paint is peeling. Trim is really susceptible to peeling paint. If you don't like the rubber cement then you can try the same hairspray technique that is used on military models. The hairspray you want is the pump spray type, and it should be applied with a brush, rather than an aerosol can.


One you have applied the rubber cement to the weathered surface its time to paint the whole building or at least the surfaces that you intend to have paint on them. It wasn't uncommon for only the front of a building to get paint. So I painted this a nice red as you can see in the photos, and then I couldn't decide on the trim color so I decided to go back an paint it yellow instead. Then I thought it would be interesting to show both coats of paint so before I applied the yellow I dabbed on some more rubber cement and then sprayed on the yellow. I did use my airbrush for both the red and yellow coats.


Once the paint had dried I went in with an eraser and started to rub it gently over the surface. The eraser will remove any paint that has a layer of rubber cement under it. The eraser I had was to hard though and I managed to get all the way through the weathering to the primer in a couple of spots. So be gentle with this technique whether you used rubber cement or hairspray and use a softer eraser. I have a couple of big pink erasers at work and I think I'll try one of those next time.


Then I waited for it to dry and started painting the window and door trim with a nice green. I left the tape on the building so I could get a little sloppy with areas near the platform. I still need to do the side trim and I'll apply some weathering to that but I'm going to keep it fairly light as the green tends to high the exposed weathered areas.


I'm not completely happy with the way things are going at this point though. The problem with the out of spec MDF is really becoming more noticeable as I move forward with the finishing work, particularly at the puzzle cut corners. I am hoping that when I add the trim to hide the puzzle cuts that it will also hide the poor fit in a couple of places. The eraser removed to much of the weathering that I exposed and its harder to see than I thought it would be. On the plus side I think I can go in sort of redo that and make it more apparent. It didn't help that I managed to erase all the way down to the primer in a couple of spots, which muted it more than I wanted. The inside may be tougher to deal with at this point too.

I'm going to finish this building. I think I'm going to chalk this up as a test piece and consider replacing it. Of the five manufacturers: Battle Flag, Knuckleduster/Tri-City laser, Aetherworks, Gamecraft Miniatures and Sarissa Precision, Sarissa is the only one that makes a railroad station. I may replace this one with a scratchbuilt station as that would make me happier about some of the inaccuracies in the structure itself. Not that the gaming group is going to notice those details but I do. I would definitely salvage the platform if I go the scratchbuilt route.

Wednesday, February 6, 2013

Building Calamity - The Tools

I have used a lot of different tools putting together the laser cut buildings that make up my Old West town of Calamity. First, I would like to emphasize that you don't need fancy tools to put these buildings together, some large rubber bands will do the job. Model railroad laser cut kits tend to be more complex and tools definitely help get those together. In general tools make some things easier, especially when it feels like you need four hands to get something together. If you like to scratch build your own structures some of these are downright invaluable. If you see a stock number, that's the stock number for that item from Micro-Mark

First up are the spring clamps. I have a bunch of spring clamps in a variety of sizes. I'm showing the two smallest clamps I have and the ones I use the most often. The small multi-colored clamps came from Micro-Mark. I bought the bucket of 50 (stock #82979) and there have been times when 50 hasn't been enough. The rest of my clamps I picked up at Home Depot can came in a nylon bag for like $7 (NIL 22-Piece Spring Clamps). There were 4 different sizes of clamps in the bag, the very largest I rarely use (at least for hobby use) but the other three sizes I use all the time. The smallest is the same size as the ones I bought from Micro-Mark and are a bit stronger. My own philosophy you can never have to many clamps.

The next clamp that I use quite frequently is the "right" clamp. This is used to clamp two pieces together that are at right angles to each other. The pair I have are probably close to 30 years old at this point and I have no idea who made them. Although I use these frequently they aren't particularly good clamps. There are better ones out on the market and I'm considering replacing the pair I have with something newer.

The clamp I really like, although it can be a bit fiddly, is the mini 4 corner clamp (#60716). It will go from 1/2" x 1/2" up to 4" x 5". Basically it wraps around a cube or rectangular building to pull the corners in tight and square for gluing. Its not possible to use this clamp in every situation but I use it whenever I can. Quite frankly though some rubber bands would do the same job just not as well since the rubber bands can't hold your object square.


While I'm talking about keeping things square here are some neat little 90 degree angle plates (#60713) that I picked up recently. These are 1"x1"x1" and I use them to keep parts vertical while glue sets. This is the smallest size that I could find.

The other way to keep larger items square while they dry is the magnetic jig (#60304). This consists of a steel tray with the edges turned up at 90 degrees. Then you use the magnets that are sandwiched between the plates to keep everything tight and square while the glue dries. These are powerful little magnets and it takes some effort to move them. I picked up the extra set of 8 magnets (#60305) and I'm quite glad I did, they have come in handy.

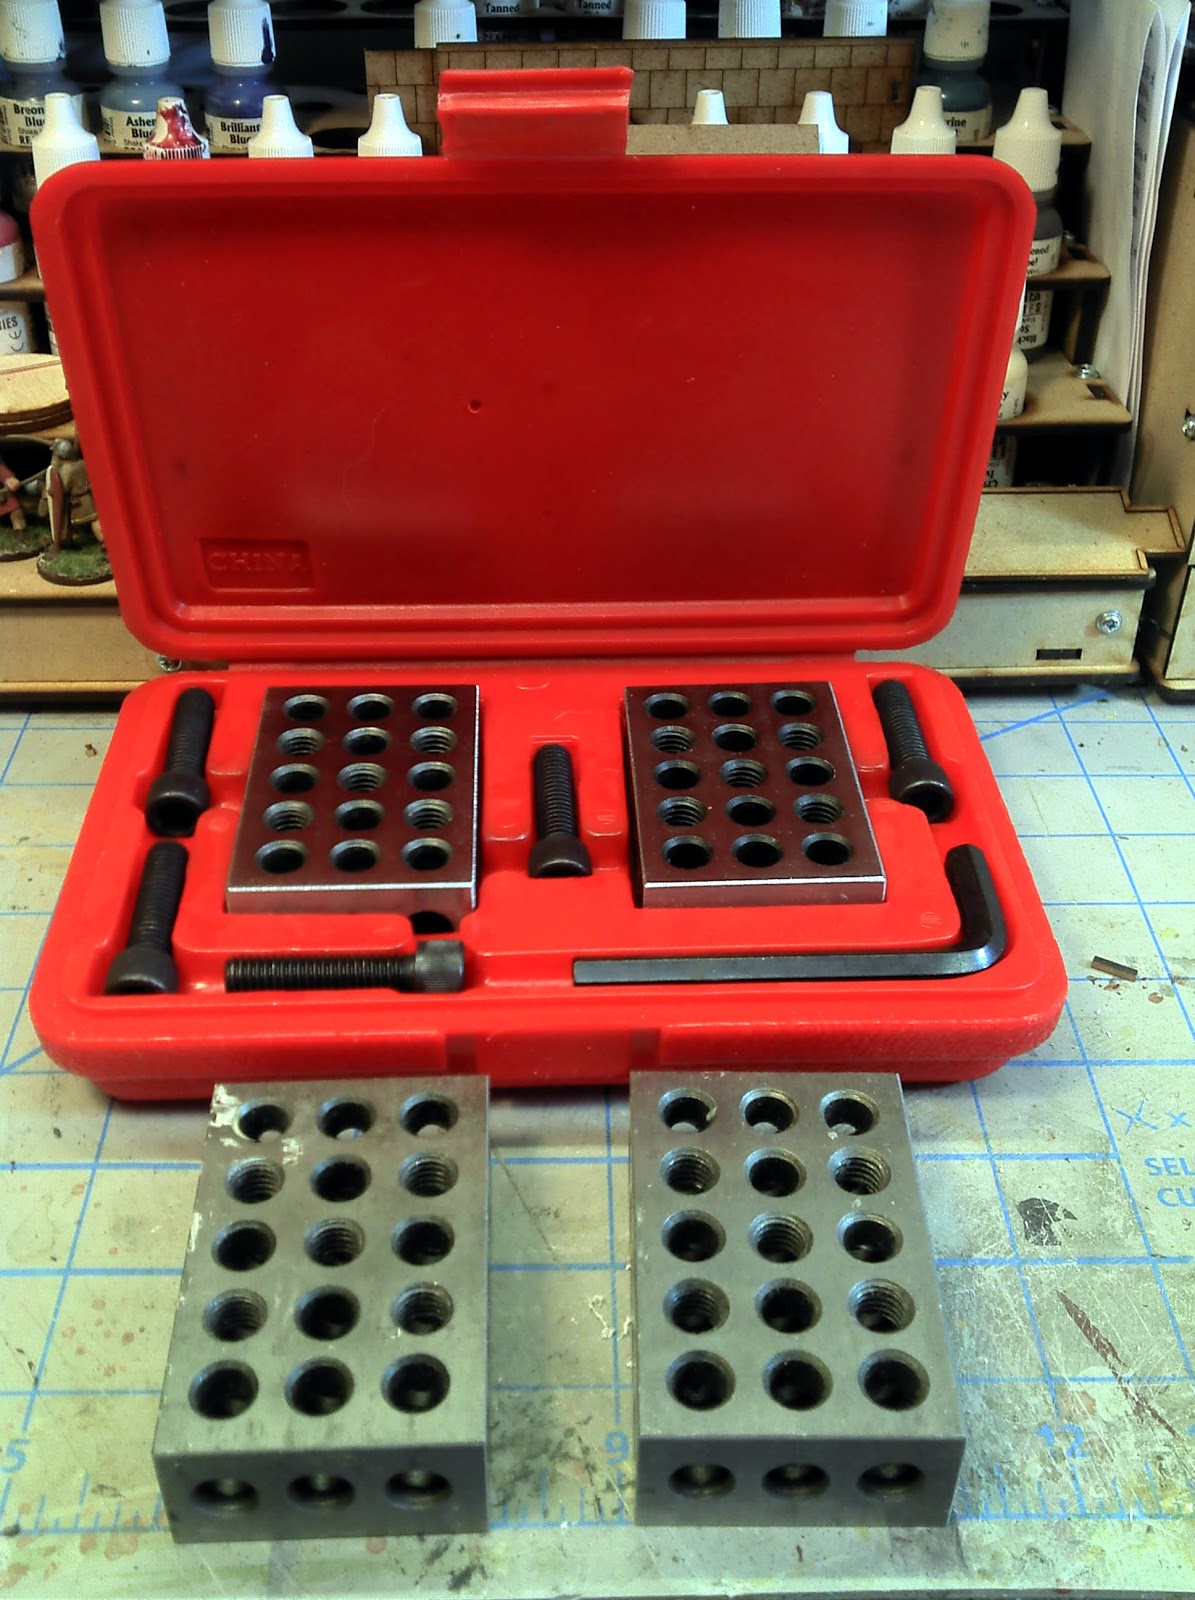
My last handy tool helps me keep things square and can be used to help weigh things down. These are 1-2-3 Precision blocks. I have an economy version which was just the blocks (#84644) and an ultra precision set that came with a case, screws and an allen wrench (I got these from Shars Tools). Apparently these are used to gauge things in some type of machining process. I use them to hold things in place (they weigh about 1 pound each), and since they are machined at precise 90 degree angles they can be used to hold things square as well.

Beyond that I use the regular assortment of modeling tools; x-acto knives, razor saws, pin vice and files. I prefer Titebond Carpenters glue  for the laser cut mdf and plywood kits. Super glue is not a good choice as the surfaces are so porous. Regular white glue or PVA will work just fine as well. And remember if you don't have these tools all of the laser cut mdf and plywood buildings will go together fine using just a few rubber bands to hold things together while the glue dries.


Tuesday, October 16, 2012

The Workroom; The Final Piece (well pieces)


Some where in here there is a post about my workroom. At that point it was pretty darn close to be finished. What was missing were the paint racks and tool drawers that I wanted. I had spent some time searching around and quite frankly as far as tool drawers or racks there is not much out there, at least that appeals to me. I looked at the racks and drawers from Back 2 Base-ix a couple of times, even put together an order and then stopped when I got to the shipping. Back 2 Base-ix is based in Australia and the shipping chargers are really high. I kept looking and kept going back so I decided to make an order even with the shipping charges.

I ordered two of the inner corner paint rack (for Vallejos and Reapers), 2 of the small tidy drawers, 1 center paint rack with two drawers and the larger version of the tidy drawers. They arrived today and I immediately went into construction mode. The word tidy keeps throwing me, I'm not sure if its normal usage in Australia or they are just using it as a descriptor. They won't be "tidy" for long when I start putting things in them.

Although I would have preferred some printed instructions, their online videos are pretty good, although I did pause frequently to catch up. I had the sequence down pat after the first couple of builds and I think I built all 6 components in about 4 hours. Pretty good time I think and I like the engineering that went into these. My only complaint is that the drawers are smaller than I thought they would be and I'm not sure they will actually hold what I want them to hold. That's on me since I didn't translate mm to inches very well. However, the small tidy drawer could stand to be a little bigger.

This is what I ordered (these are the mdf versions and there are no stock numbers)
The Rack: The Drawer Tidy (x2)
The Rack: The Bigger Drawer Tidy
The Rack: 90 degree Internal Corner
The Rack: Straight Section, large, paints (vallejo/reaper) & 2 drawer unit.

I'm still waffling if they are worth the price, mostly because of that huge shipping charge which added another $87 to the price of a $200 order. I think the paint racks are going to be fine, although the drawers in the center paint rack unit are really small and might hold my small files, they will certainly hold bits, so maybe bits drawers is what they will become. So the drawers are all smaller than I expected but the various units still take up a fair amount of space on my workbench!

Here are some pictures of the units and how they are arranged on my desk.
The 90 degree internal corner paint rack
The Small Tidy Drawer


The Large Paint Rack with drawers

The Large Tidy Drawers


How it all fits on the workbench