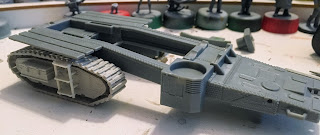
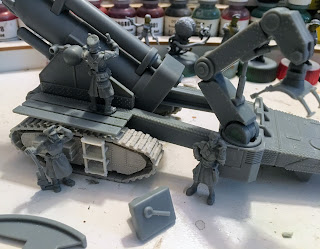
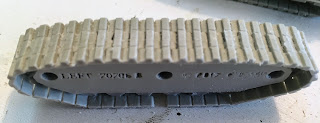
I pulled out some of the parts that I have been accumulating and fixing them into the appropriate place. Work was done on the crawlers and the gun supports. These were white metal and brass components that I spent some time cleaning up and gluing into place. This involved removing some of the rivet detail to ensure that the new parts would lay flat. It really wasn't much work at this point. These are foundation pieces that will provide attachment points for the parts that I will have to fabricate. I need to pick up some styrene rods, both circular and hexagonal, for the next part of the detail. I think I have enough of plastic of other sizes to build the other components.
So half an hour of work or there abouts resulting in these pictures.
The Town of Calamity, The D&RGW RR Warehouse Row and Historical Miniature Gaming
Quotes
Life is short, break the rules. Forgive quickly, kiss slowly. Love truly, laugh uncontrollably and never regret anything that makes you smile. - Samuel Longhorne Clemens (Mark Twain)
Friday, February 8, 2019
Wednesday, February 6, 2019
Sledgehammer Project; Preparation Pt XVIII - BFG Sub Component Assembly
Trying to move forward from the rather disastrous UE build I pulled out the Sledgehammer BFG itself and resolved to at least get the sub assemblies together so I could start planning how the extra detail parts are going to be added.
I took a bunch of assembly shots figuring that it might help others that are working on this little beauty at some point. First thing to remember is that I did a lot of filing and filling before this. Since some of the filling required is for gaps and injection marks that are very visible I would really recommend going through the filing/filling exercise before you begin any of the assembly.
I took a bunch of assembly shots figuring that it might help others that are working on this little beauty at some point. First thing to remember is that I did a lot of filing and filling before this. Since some of the filling required is for gaps and injection marks that are very visible I would really recommend going through the filing/filling exercise before you begin any of the assembly.
 |
| Starting with the gun carriage, this is pretty straight forward. |
 |
| glued up and ready to go. |
 |
| I have opted to go with the tracks from Victoria Miniatures, rather than the kit supplied wheels. Again these are pretty straight forward and are conveniently labeled left and right on the back side. |
 |
| Some cleanup is required. The mold line goes right down the middle of the tracks. |
 |
| And of course on the bottom you will have to deal with the resin blocks. |
 |
| From the bottom, its evident that this is definitely a miscast, the mold was filled enough or may have slipped slightly during the casting process. |
 |
| The ladder attached quite nicely, although I did have to shorten the locater pins on the ladder a bit. |
 |
| The tracks all ready the extra detailing that will come later. |
 |
| Like this (looking from the bottom where the tabs are located) |
 |
| This is how it looks from the top |
 |
| Whew, it all fits together quite nicely. Note that I have not glued the tracks on at this point. |
 |
| Here I'm starting on the barrel assembly |
 |
| The hydraulics to the recoil. Note that the end cap needs a fair amount of filing and filling and its very visible on top of the gun. |
 |
| Getting it together, its a very large gun |
 |
| The front side of the breech block. I may scrape off the molded on handle, its very soft looking. |
 |
| Getting ready to do a little gluing. At this point just the counterweights since I need to work on the Fin. |
 |
| These are the cable reels with cable molded on. |
 |
| And the reels glued in place. |
 |
| The components for the crane |
 |
| You can glue this piece but I didn't. I wanted a little bit of swing to it since the diorama will feature the gun being loaded. |
 |
| All glued up. |
 |
| The upper piece for the shell carrier is glued to the the ring. I have not glued the base plate on yet, I'm not sure what position I will need to have it in so I can make it swivel appropriately. |
 |
| Mounting up the gun. Again, this has not been glued into place yet as it will be receiving a bit of extra detail. |
 |
| Test fitting the platforms. Again no glue, my intent is to use the supports underneath the three planks and replace it with a metal walkway on both sides. |
 |
| A first look at the whole thing |
 |
| Adding a few of the crew |
 |
| This is what I have left to deal with. I won't be using the two plates in the lower right side of the picture. |
 |
| Still a long way to go at this point. |
Tuesday, February 5, 2019
Acquisitions - Expanding the PzKfw III Library, Military Modelling Book
I have acquired another book for the PzKfw III Library titled "Military Modelling Book Panzerkampfwagen III Ausf. J-N. Its published (I think) by Shinkigensha Co Ltd. Printed in 2011 it apparently is long since out of print as I found numerous copies being sold for $85 plus. I found this one for $35 plus shipping. I think that is close to the original publication price but in any event it was a price I was willing to pay. There is a second book (well actually the first book) for the Ausf. A-H. This is a pure modelling book and features builds of various kits that were available in 2011. It has great pictures of the models from a wide variety of angles and close ups but all of the captions are in Japanese. While I can glean quite a bit from the pictures of what is being done it would be nice to be able to read the captions. In the back is a short section with a lot of close ups of actually Pz IIIs although I probably have most of that in other books already. There are some nice line drawings in the back as well, those are quite nice but again I have access to a lot of line drawings at this point! From a modelling standpoint is a pretty good book and one I'm likely to actually use. Being written completely in Japanese certainly limits its usefulness to me. I would like to acquire the first book at some point but only at a reasonable price, something significantly less than $85.
It is a large format book with a fairly stiff cover and it actually has a dust jacket as well. The little purple/pink band at the bottom is an advertising slip that can be removed. Again marvelous pictures but not particularly useful beyond a modelling reference and limited due to language.
It is a large format book with a fairly stiff cover and it actually has a dust jacket as well. The little purple/pink band at the bottom is an advertising slip that can be removed. Again marvelous pictures but not particularly useful beyond a modelling reference and limited due to language.
Monday, February 4, 2019
Sledgehammer Project; Preparation Pt XVII - The Renault UE Build Continues
I, basically, finished the build of the Renault UE which consisted of finally getting the tracks completed. Quite frankly it took to long, was incredibly frustrating and despite my best efforts look really bad. I might take a look to see if there are some aftermarket tracks available for it but I really doubt there are. The tracks pretty much preclude including this model on the diorama, they just aren't going to pass muster.
 |
| Instead of flexible tracks its made up of 17 different pieces that just don't quite wrap around the drive and idler wheels nicely. |
 |
| I'm not sure why the pieces on this side went on better than the ones on the other side (shown below) |
 |
| The back is just a disaster. |
 |
| This side is better, overall, but still quite ugly |
Subscribe to:
Posts (Atom)


