Quotes

Life is short, break the rules. Forgive quickly, kiss slowly. Love truly, laugh uncontrollably and never regret anything that makes you smile. - Samuel Longhorne Clemens (Mark Twain)

Wednesday, March 29, 2017

PzKfw IVH - Warlord Games vs Rubicon - The Basic Turret

I moved on to the turrets at this point. The builds from both kits are nearly identical, the major difference is that the gun on the Rubicon kit can be raised or lowered and the Warlord Games kit is fixed in place. The hatches are handled in a slightly different manner as well, but that's not as significant as the gun. If you want to be able to raise and lower the gun barrel then the Rubicon Kit is the only choice here. If that's not an issue for you then read on!

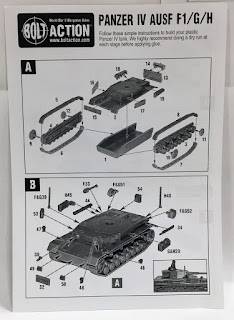
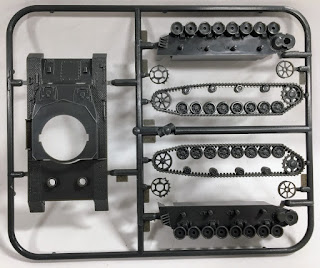
Again, I started with the Rubicon Models kit for this part of the comparison. This is a pretty straight forward build.


The basic turret pieces

The gun barrel and mantlet pieces

Before the gun is installed.


The gun assembled

the completed turret. I need to pull my references but I'm pretty sure that the side hatches are really poorly done.


The basic hull and turret assembled. After this its on to the extra details (like say the muffler on the Rubicon kit)


From here I moved on to the turret for the Warlord Games kit.


basic turret components. Just like the hull the plastic is thinner than the Rubicon Models kit

The gun pieces, much simpler from a build standpoint

The basic turret finished. I like the side hatches on these much better. On either model its going to take some cutting if you want the hatches open for any reason.


The completed turret, there will be no changing of the gun elevation on this kit


Basic hull and turret together. After this come the rest of the details.


Like the hulls the turrets are almost identical. The Rubicon turret is every so slightly wider than the Warlord Games turret, but its not really noticeable unless you have them right up against each other. I like the storage bin better on the Rubicon kit, although its likely to be bit more fragile since it only as three small attachment points to the turret. The Warlord Games kit is a more classic take on this with the box basically flush up against the turret. I'm a little irritated that Rubicon did such a hatchet job on the side hatches though. Looks like sloppy work, most of that will be hidden by the turret skirt, but if you are modeling an earlier version (F or G) its going to be right out there in the open. I also would have liked it better if there was an option to have the side hatches open rather than closed. Its going to take some serious cutting to have those hatches open. Like I mentioned above the Rubicon kit is made from thicker plastic overall and its feeling both heavier and sturdier than the Warlord Games kit.With the hull and turret completed you get a much better idea of how the two tanks are going to look when they are finished. Yet to come are all the final details yet, I'm not sure how much more time that will add but right now I suspect I could get one of these to this point inside of 30 minutes without to much effort. We will see how long it takes to get the final details done and in place. I'll spend some time after that filling seams and cleaning up anything I missed. I'm seeing pros and cons to both kits but I'm leaning towards the Rubincon Models kit being the choice for me, although I'm seriously tempted to see what it would take to fix those side hatches on the turret.

Tuesday, March 28, 2017

PzKfw IVH - Warlord Games vs Rubicon - The Basic Hull


The instructions for both the Warlord Games kit and the Rubicon Models kit start off with the basic hull both upper and lower. Pretty traditional from an assembly point of view. I'll start off with the Rubicon kit.

Dealing with the lower hull usually just means working with the running gear and maybe the tracks depending on the kit. The Rubicon model adds a twist, unlike the more traditional single piece lower hull, this one is two pieces and requires assembly. This, in turn, creates a more rigid structure, from a gaming standpoint this model already feels more substantial. Let's take a look at how this one came together.


The main components of the lower hull. Left and right hull halves and back plate and lower front glacis

Assembled, I really needed clamps for this part but I didn't have any with me.


Ready to add the tracks now. note that the running wheels are your best way to make sure everything lines up

Some fiddlyness as the drive and return sprockets need to have a back piece glued in place BEFORE you glue them to the lower hull!


The lower front glacis and the back engine plate are overlays on the basic lower hull. This should provide quite a bit of extra strength that would be needed for handling on the gaming table. With the lower hull complete the instructions moved on to the upper hull. 


Here are the basic upper hull components. Again this are primarily appliques to the basic hull. Pretty easy to assemble.

Upper Hull 

Completed hull

From here I moved on to the Warlord Games kit. I mentioned in the first post that I thought this was an Italeri kit. That appears not to be the case. In the comments section Leif points out that this is a scaled up version of PSC 1/72 scale kit. The instructions, like Rubicon, start with the lower hull so lets take a look at that.


The three main components of the lower hull. A single piece lower hull and the running gear. Note the basic upper hull in the background.

Like the Rubincon kit you must glue in the back half of the drive sprocket and return roller.

Here the lower half of one of the tracks is glue in place on the driver side. Just be sure you haven't switched left and right as well as top and bottom as this point.

The top half of the track glued in place. Pretty seamless method of doing it. In the Rubicon version you have a mold line running right down the middle of the track.

Tracks are on! So one important note. In this shot and the one above you can see that the back engine plate is not glued in place yet. The way I was viewing the instructions made it seem like this should be glued in place after you glue the upper hull in place. This is not the case. Its much easier to position this piece BEFORE gluing the tracks on. It will go on this way I just made it a tad more difficult on myself.
At this point I moved on to the upper hull and completely forgot to take any pictures till I was done. Here is the finished lower hull. Its similar to the Rubicon upper hull in that you are attaching plates to the basic structure, including the air intakes on the back which had me baffled for a few minutes trying to figure out how they should go on. 


With this basic assembly complete I can do an initial comparison between the two models. The Rubicon kit is definitely the heavier of the two and feels more rigid. The details are about the same from one kit to the other. the details on the Warlord Games kit are a bit crisper or sharper. I do believe that the rear engine deck on the Rubicon kit is more accurate detail wise, but the tracks on the Warlord kit are much better. Right now, unpainted, these two kits are really neck and neck with each other. Once there is paint on the models that may not be important. From a build standpoint it took me slightly longer to put together the Warlord kit because of the tracks, but maybe only five minutes or so.

From a size standpoint, these kits are almost identical. The tracks on the Rubicon kit are a tad bit wider but the hulls are almost identical in size to each other. Without considering the turrets or the skirts I wouldn't hesitate to have both of these next to each other on the table.

A quick side by side look at the two lower hulls


Monday, March 27, 2017

PzKfw IVH - Warlord Games vs Rubicon

Another weekend has passed without much happening on the painting and gaming front. I still have three vehicles from Mad Bob Miniatures still waiting to be finished along with M1s, M113s, M106s and modern infantry for Team Yankee. I have miniatures prepped for ReaperCon in October, hopefully I'll get that diorama down this time. So what better thing to do than start another little project!


To be fair it is at least going hand in hand with the WWII Normandy effort. I received a package on Friday from Rubicon that contained a PzKfw IV (F, G or H), a STuG III G, German and Allied stowage sets and a couple more sets of decals. Since a Warlord Games package had arrived earlier with a PzKfw IV (F, G or H), I figured it might be useful to build them side by side and see which one might be better or if it was just to close to call.

The list price for the Warlord Games version is $32.00, the Rubicon Models version is gong to run you $29.00. Odds are the way I typically order shipping is going to be free so that's not a factor, although delivery time is. Warlord Games is coming from the UK, while Rubicon is coming from the US so I can make a Rubicon order on Monday and actually have it by Friday.

Step one is to open up the boxes and see what we get inside:

Here is what comes in the Warlord Games box (which is slightly smaller than the Rubicon box):


These instructions are pretty simple, I would like to see something a little more in depth but I shouldn't have any problems assembling this kit using these.


Here you can see that the running gear is cast as a single unit to which you add the tracks (which are on the first sprue)


And here is what you get in the Rubicon box:


These are very similar to the instructions I would expect to find in a regular model kit.


The running gear on the Rubicon model is handled in a slightly different manner with the tracks included as part of the unit.

Right now I'm not seeing to many out right differences. I think Rubicon has better instructions, or at least more steps. I do like the Rubicon decals better there is just a greater variety on it compared to the Warlord one. Both kits come with three sprues. The biggest difference I see is in the approach to the running gear. The Rubicon kit has fewer parts so it should go together quite a bit faster than the Warlord kit. In that respect the Warlord kit more closely resembles a display model and I want to say that Italeri is producing their plastic kits but I'm not positive on that. If they are then that approach makes a lot of sense.

Both kits can be built up as either an F2, G or H, while the Warlord version can also be built as an F1 (short 75). Since I'll be playing mostly late war I'll be building these as H's which really means, visually, they will get the side and turret skirts.