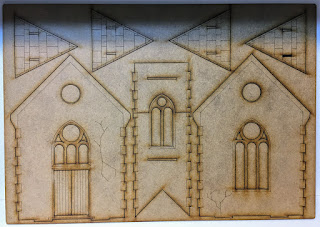
I mentioned the photo realism concept in an earlier blogpost and I'm definitely going to move forward with that idea. I have buildings on hand from Charlie Foxtrot Models and Sarissa Precission with more buildings on the way from Sally 4th.
I have never really built up terrain at this scale so I decided starting with buildings, which is at least a familiar task, and would be a good place to start. The biggest issue with lasercut MDF or plywood buildings is that there is no effort made to really add depth to the surface. There are some nice ones out there that do (the stone barn from Charlie Foxtrot for example), but for the most part its just scored lines in a flat surface, no texture or depth. This has always bothered me and its one reason that I eventually decided that I would scratch build all the buildings for Calamity (also rethinking that).
Sally 4th created a kickstarter featuring their Normandy buildings and billed them as photo realistic, a concept that they really have pioneered in the gaming world for the lasercut buildings. Basically you have a flat shell and you glue a "picture" of the siding you want to use to the building. They have been doing this in the model railroad hobby for a long time now with Lance Mindheim is one of the biggest proponents of this type of model. Its pretty fast and by cutting out the windows and doors and then adding even a little bit of 3D detail, as it were, they can look very convincing.
Now Sally 4th could have taken this one step farther but they did enough to get the idea light lit and for me to contemplate how to approach this. As an example I have two models from the order from Sarissa that are good candidates for this. One is the railroad station and the other is the Norman church. The opportunity that Sally 4th really missed here is the possibility of layering the paper. If you take the top layer or final layer you can always cut through it to a lower layer to reveal a different kind of texture. Now some companies have sort of, kind of, done this with their laser designs but they really never pull it off very well. Now you can control exactly where and how much of the lower layer of paper you want to expose. While I haven't tried it yet, the only real obstacle I see is that you do need to plan your cutouts before you glue paper to model.
I think step 1 will be to glue the base texture on (which would allow my to fold excess around edges and get rid of one of the other faults of a lasercut building those ugly edges) and into door and window openings, thereby covering a lot more surface. In step 2 I would take the final or top layer and cut out where I want to expose the bottom layer and glue that into place. It should be pretty simple and relatively fast.
Following that I could take it a step further and take scrap wood or plastic to be used for window and door sills. Wrap the appropriate paper around those pieces and glue them directly to the building to further enhance the 3D effect. With this in mind I went to my favorite paper model website (also for model railroads) and purchased some of my favorite textures. Yes, you can certainly find photo textures on your own for free but I'm willing to pay a little money for the convenience here: Clever Models
I will probably start off with the Charlie Foxtrot models since the pieces are already popped out and they are smaller making them easier to work with.
So let's take a look at some pictures and that might better help describe better what I plan to do.
The Town of Calamity, The D&RGW RR Warehouse Row and Historical Miniature Gaming
Quotes
Life is short, break the rules. Forgive quickly, kiss slowly. Love truly, laugh uncontrollably and never regret anything that makes you smile. - Samuel Longhorne Clemens (Mark Twain)
Subscribe to:
Post Comments (Atom)


No comments:
Post a Comment