Quotes

Life is short, break the rules. Forgive quickly, kiss slowly. Love truly, laugh uncontrollably and never regret anything that makes you smile. - Samuel Longhorne Clemens (Mark Twain)

Friday, September 29, 2023

Painting the Modelu HO Scale Transitional Era Crew Bundle - Part 2

I started things off a little differently. Normally I just move straight to the skin tones but this time I decided to start out with a wash over the entire figure. Some of the detail is subtle enough that I needed something to make things pop a bit. For this I used Walnut Brown (9136) from Reaper Miniatures. I thinned this down to a wash consistency. I used Vallejo Airbrush Thinner for this instead of plain water. 

I then painted each of the five figures with the wash and let them dry.


Time for the skin. My normal process is to paint all of the skin tones first, on these figures that's just the face. I painted all of the skin with three paints from Ammo by Mig. The first layer was Burnt Red Brown (A.MIG-0134) I thinned this down a bit, regular water this time, I didn't want the paint to be to thick. The second layer was with Red Leather (A.MIG-0133) again from Ammo by Mig, I applied this over most of the face trying to make sure the deeper areas weren't covered like under the brim of the hat.  My final color was Burnt Sand (A.MIG-0118),  thinned with water, I mostly, gently, dry brushed this straight down from the top of the head, catching just the higher areas to make everything pop a bit. Everything tends to look a little rough at this stage so I made a glaze of Burnt Red Brown and applied it on the entire face to help blend the colors together. A glaze is thinner than a wash and I used airbrush thinner rather than water for it.

I think I deleted a picture here, but at least two of them have the shadow skin color applied


Now the second layer, this is essentially the base skin color.


And then a combined step. The drybrush with the highlight skin tone with the shadow glaze,


With all of that done its time to sit back and ponder what colors I want to use on the rest of the clothing.

Thursday, September 28, 2023

World War II Project - 28mm Village Church - Sarissa Precision - The Walls Part 9

I finally figured out what to use for the window sandwich, paper! Specifically some heavy weight drawing paper. I tried it out and was mostly pleased with the result. I used the stained glass cut out for each window as a template and cut out the outline. I then held it in place and marked the areas I needed to cut out from the other side.

I glued the plastic stained glass panel in place with CA and also used CA to glue the paper on top of it. There is a "stain" on the paper from the CA soaking through a bit but paint will cover that. The paper sits lower than the built of "frame" around the window so it looks pretty good. It is a bit tedious with all of the cut and fit involved.


Cut to fit

Cut outs marked

Glued in place

Looking good so far. A little paint it should pass muster.


Thursday, September 21, 2023

Painting the Modelu HO Scale Transitional Era Crew Bundle - Part 1

I know I haven't finished the church yet. However, since that is giving me some frustrations at this point I need to have something else to turn my attention to while solutions simmer for the church. So I pulled out the Modelu Transitional Era Crew to work on. I elected to start with the HO scale crew first. 

I had an initial look at this and they look like they will be a challenge with all of the fine detail. I removed all the supports from the printing machine and did a little cleanup. Since these are 3D prints there are no mold lines or injection marks to fill in. I think the print resolution is really high since I don't see any layering that needs to be cleaned up.

After I cleaned them up a drilled out a small hole in the foot for a piece of wire and super glued the wire into place. After trimming the wire to length I mounted them on one of my painting sticks. This one that I used previously for the Preiser work so its double thick and has holes for the wire already. So far so good.

After that I pulled out the airbrush and primed them with Badger Stynylrez Grey Primer (SNR-402)

The only comment I have at this point is these guys are short! Initially I thought they were going to be bigger than the Preiser figures that I had already painted, definitely not the case. The Preiser figure scales out to about 6' tall with his hat on. The Modelu figures scales out to about 5'6" with his hat on. I don't necessarily have a problem with that people do come in different heights. I'm just curious if all the Modelu figures will scale out to be this short.

First steps complete. Drilled, wired and mounted to the painting stick


Little short, maybe 5'6 compared to the Preiser figure who is pushing 6'. Nothing wrong with it, but all five of them are this short.


And after the primer. Hard to tell, the grey of the resin is pretty close to the Stynylrez grey primer


Monday, September 18, 2023

World War II Project - 28mm Village Church - Sarissa Precision - The Walls Part 8

As work continues mistakes get made. I have a couple of pictures below of the biggest ones so far. My next goal is to figure out how to best sandwich in the stained glass into place. When I started this stretch I was more worried about cutting the stained glass to fit. That turned out to be much easier than expected. Its amazing what you can do with a sharp knife. Now I need to figure out how to cut out the interior piece to hold it into place. That is proving to be a bit more difficult.

Progress so far:


This is what happens when your knife is not sharp enough.

Another mistake. While I was cutting this one out I miss-counted and cut the wrong pieces out on the left side.

I trimmed off the offending pieces.

And then I glued replacements in. I literally had saved, accidentally, all the cutouts so I had plenty to choice from. Once I stipple on some texture you won't be able to tell I had made a mistake.

Cutting out the stained glass was easier than I expected.

Here is the whole wall

This is how it will look from the outside.


Monday, September 11, 2023

World War II Project - 28mm Village Church - Sarissa Precision - The Walls Part 7

After a bit of a break for ReaperCon its time to dive back into the Church. I can see a light at the end of the tunnel now so I want to push through this project and move on to a couple of others.

I'm continue moving forward with the walls. Again everything is easier when they are flat. Here I have added the exterior detail to the windows and started added the stone edging for the interior arches. At this point its just a lot of cutting, nothing terribly difficult. I also started adding the interior window detail, again I'm keeping this simple, its not going to get a lot of scrutiny during a game so I'm okay with it.

I have come to a bit of a stand still with the stained glass. I realized that I need something to sandwich them into place with. If I use the cardboard that I have been using then it will be slightly "higher" than the surrounding stonework. I have to decide if that's going to bother me or not. But I do need to cut out enough of those pieces to add match the configuration you see from the outside.

These are the interior arches, cut out and ready to be installed
The combination view. Exterior details visible while the interior arch stones are glued in place,
A couple of arches after the glue has set

And here is the arch all cut out, 


Saturday, September 9, 2023

Acquisition - Modelu - HO and O Scale

Since I batched painted that group of HO figures I have been sort of looking for something of a higher quality. The Preiser figures are fine for background figures but the planned layout is not very deep and there will be a definite need for some better quality figures in the foreground areas. I have done a little research on the various model railroad forums looking for what other folks think are better. Two keep coming up Miniprints and Modelu. I have been looking at both online and while I will buy something from Miniprints at some point I'm not impressed with the offerings I see online at this point.

I have, obviously, spent a lot of time on the Modelu site as well. Both of these are 3D print companies. Miniprints seems to follow the more traditional "sculpted" method while Modelu is doing 3D scanning of people in the appropriate "costumes".  I decided to pull the trigger on the Modelu figures first as I'm really curious about how good the scanning is. The photos online certainly look impressive.

For this first foray I selected the Railroad & Lineside pack 9029-087 and -048 Transitional Era Crew Bundle. One pack in HO and one pack in O just to see how much of a difference there might be scaling the files up and down between different scales.

The figures arrived yesterday (they were out of stock, basically just needed to be printed) from the UK and I must say at first glance I'm pretty impressed. I think I'm going to work on these as soon as the church is finished. I'll let the pictures speak for themselves.


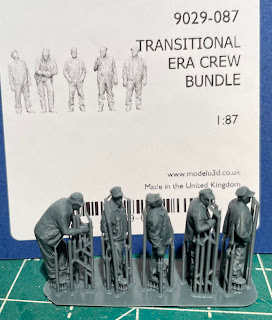
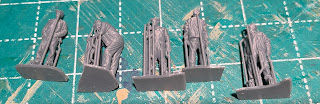
HO Scale 9029-087 Transitional Era Crew Bundle. 5 railroad crew figures basically fresh off the printer.

Here is a better look as they come out of the package

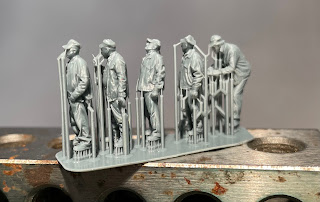
I went ahead and cut them apart to make them easier to clean up

Here is the HO group after a rough clean up. Mostly the bottom of the feet and removing the supports

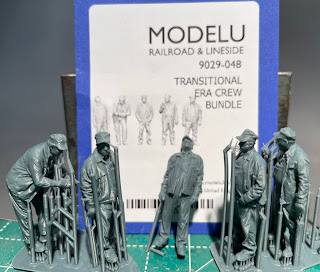
HO Scale 9029-48 Transitional Era Crew Bundle. The same 5 crew figures

Here they are after the same rough prep

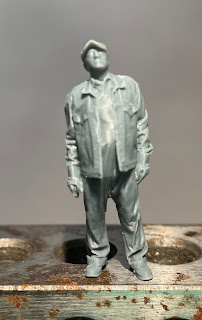
A close up from the front
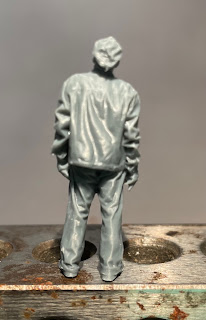
and from the back.

I received a 15% discount for my first order from Modelu which made the two packs come to 44.52 (in pounds) which works out to be about $55 so each individual mini was about $5.50 after shipping. That's pretty good for the O Scale and I was thinking a bit outrageous for the HO Scale (although the HO pack was 15 pounds and the O Scale pack was 25 pounds), again though that's just quickie math. Using this average these are still cheaper than Miniprints HO scale figures. But to be fair I do need to order from them to get a good feel for the product. Right now its a big thumbs up for the Modelu.

Friday, September 8, 2023

Acquisition - More Paints - Scale 75

Like many painters I always seem to be in search of the next best paint. In this case oil paint. I have found that I'm using a lot more oil paints for weathering vehicles and I'm branching out to figures as well. I was curious about the Scale 75 brand and decided to get some of the basic colors and give them a shot. In addition they have an interesting line of inks so I through that into the order as well. I think they could be quite useful for puddles and stuff. The color selections reminds of the ones that use to be available for Secret Weapon.

With new brushes on the desk and new paints to try I think I'll finish the Church build and move on to some figures. I'm a little jazzed to get back to some of my painting projects with the thought of having them ready for ReaperCon 2024 (some of these have been in the works for years!).


The selections: Scenery (top left), Core (top right) and Poison Flasks (bottom)


Wednesday, September 6, 2023

ReaperCon 2023 - This is all I got

I think I have become somewhat jaded with game conferences in general. I do love to go to ReaperCon, its definitely unique in the miniature hobby world. But as I have managed to wean myself off of the "oh shiny" syndrome (not completely mind you) I find that I don't really buy much at the show anymore. It may also have something to do that since my part of the show typically starts in March, that by September I'm already tired of the whole thing.

None the less, I did actually spend money this year which maybe the first time in three or four years now. From Scale 75 I bought four new brushes. These are from Avante Art World and they have two types: Kolinsky Lux and Kolinsky Plus. The Kolinsky Lux are pure Kolinsky sable brushes, I picked up a #1 and a #2. They are roughly equivalent in size to my DaVinci Maestro Series 10 brushes. The Kolinsky Plus are a hybrid brush, the core is synthetic and the outer layer is Kolinsky sable. These seem to run a little small so I picked up a #2 and a #3 as they seem roughly equivalent to the #1 and #2 in their Kolinsky Lux line. I'm definitely interested in finding out how these perform as I typically stay away from synthetic brushes in general.

My other purchase was from Turbo Dorks (who make a metallic paint that I'm interested in trying but I wasn't going to risk paint in our carry on) a wooden painting handle. I have a plastic one and I find that I don't really use it but I thought maybe the feel of the wood might provide me some extra incentive to use it. I think its because they all seem a little short in my hand but the designer showed my how he holds it which is different from the way I was holding them. I'll give it a try and at the end of the day I have a template to work from if I decide to turn my own, maybe from a nice piece of walnut.

Four brushes and a painting handle, not very impressive

The gold label Kolinsky Lux are on the top, the silver label Kolinsky Plus