Quotes

Life is short, break the rules. Forgive quickly, kiss slowly. Love truly, laugh uncontrollably and never regret anything that makes you smile. - Samuel Longhorne Clemens (Mark Twain)

Thursday, October 29, 2020

World War II Project - Back to the Stug - Debris Shield II

Progress has been made. I filed down the plastic that I used for the first debris shield and it looks much better although I think it sits a little to high, but I'm actually not going to worry about it. Since its a field modification there is definitely going to be some distinct difference between one vehicle and the next. I also added some strip styrene in the gap to add some strength and serve as the beginning of the weld seam. I wanted to add some rod styrene but what I had was to big and I resorted to using the .010 x .020 strip.

Unfortunately it just seems to be really hard to capture what the edge looks like now.


After going through this and snapping off at least three "legs" trying to recreate it. I decided that I needed a different approach. Instead of using the .030 (which is to thick visually anyway) I decided to use two pieces of .010. This way I could cut through the top piece (carefully) and the bottom piece would still hold everything together. This .010 sheet is very flexible and it worked like a charm to build the other three debris shields.


I was finally to the easy part. I glued the three shields in place, dropped in the strip styrene to fill the gap and started trimming it to fit. Once it has dried solidly I'll apply some liquid cement to the "weld" and as the plastic softens from the glue work it with a knife to resemble a weld. After that I'll add a couple of bolt heads to each side and the STuGs will finally be ready for paint...again.

Glue them in place

Fill the gap

Starting to trim. The high part of the strip will get trimmed up after it has dried solidly. Thank goodness for sharp clippers.


Friday, October 23, 2020

World War II Project - Back to the Stug - Debris Shield

Now that I have my spinner rack project out of the way I have had time to ruminate on how to deal with the debris shield on the STuG III. I kept trying to make this from three pieces and I now think that was a mistake. I went back to how I handled bending the top edge of the side skirts and thought that approach might work better. Well it actually worked, mostly. As you can see in the photo I have managed to get something that at least resembles the debris shield from the pictures and I might just call that good enough.

I only have three reference photos to work with. The first is from the Tank Craft book STUG III & IV, German Army, Waffen SS and Luftwaffe Western Front 1944 - 1945 (by Dennis Oliver) page 17 the second color plate has a photo reference. This is one of the better shots, although it is slightly different in appearance than the other photos. There are three photos of the same STuG in: Sturmgeschutz III on the Battlefield 2, vol 4 from Peko Publishing (by Matyas Panczel). These photos are full pagers, found on pages 99, 100 and 101. Of these the one on page 99 is the best and it is obviously at least slightly different from the one in the Tank Craft book. Its also a better photo in general. The picture on page 100 is not useful at all, but the one on page 101 you can sort of see the shield just over the top of the superstructure. Both of the STuGs in these pictures are from the 341st Sturmgeschutz-Brigade, 2nd and 3rd companies so it was definitely something peculiar to the unit along with the inward bend of the side skirts.

The thing that I'm puzzling over is how the shield was made. Did they just bend a piece of side skirt (it looks to thin to be side skirt material) or was it three pieces welded together and then bolted to something. I haven't been able to find anything that might help me on that score. However, if I continue with this method then I think I need to make it look like three pieces welded together. Without being able to find anything to contradict me, I think its the best way to proceed and finally get to the painting step on these STuGs.

I'm slightly concerned with the shield being to thick. It doesn't look that thick in the pictures. Its really just there to keep falling debris out of the gun mantlet.


Wednesday, October 21, 2020

Something a little Different - Spinner Rack Assembly

 It has finally all come together. I cut the center posts and the interior supports and moved straight into putting the spinners together. These actually went together easier than I expected and overall I'm quite pleased with them.

This is a stack of 4" lazy susan hardware (the spinner part). These just barely fit underneath the 5" diameter spinner racks and only because the corners have been rounded off. Unfortunately while there is plenty of space under the 6" spinner rack it does make it look a little tippy although it seems stable enough. I'll go look and see if I can find any 5" lazy susan hardware for the future.

Everything stained, cut and ready to assemble. I only had to use the rubber mallet once.

Step 1, Insert center post, and glue 3 supports to it.

In step 2, I slid the center tier down the center post and in to contact with the support posts on the bottom, this way I didn't have to constantly measure if I had the top tiers at the right heights.

The tall racks all assembled and ready for spinner hardware

And the group shot of all the racks

It was getting late so I quickly attached a spinner to each of the 4 different sizes. Everything looks like its not standing straight in this and the next few pictures. That's because they aren't. Over the years the lamination has started to separate from this section of the counter top which is quite annoying since its the easiest spot to work at.

The dropper bottle rack with a full compliment of paint. This will hold pretty much anything that comes in the standard sized dropper bottles

The large jar rack with a full compliment of 24 jars. It holds the bottles from AK Interactive, Ammo by Mig and even a very old jar of MIG.

The Oilbrusher rack with a full compliment of 8 tubes. Right now only Ammo by Mig uses these containers. I think with a little plotting I can get a future version to hold 12 tubes.

The tool rack holds 16 tools. I modeled this after the rack from Micro Mark. The 1/2" holes are just to small to hold all the tools i wanted it to. Since I used a paddle bit there is a pretty deep center hole for some tools to slide into. While perhaps not an outright failure it needs to be reworked with a larger hole in the top tier. I could probably combine this rack and the oilbrusher rack together.

The full time loaded up and ready for some modeling.

Like any project I learned a few things that I would definitely change if I did another run of these racks.

1) Height. The bottle and jar racks are very tall, I wanted to make the bottles and jars very accessible, that being said I could reduce the height between levels by 3/4" and and 1" and achieve the same thing. On the plus side the bottle rack as built should fit my wife's craft paints.

2) The six inch diameter rack needs a bigger piece of lazy susan hardware for stability

3) The 1/2" holes on the tool rack are to small, make them the same size as the holes on the oilbrusher rack and reduce the hole count from 16 to 12.

4) The oilbrusher rack could have handle 12 holes up from 8 as built.

5) Staining was a huge hassle and it really meant that I had to stain every thing before I assembled it. I think I would prefer to paint the next run after I assemble it and do it with a rattle can. Staining just took forever

Other than that I think this was a very successful little project and I think I'll do another run of these with the improvements.


Monday, October 19, 2020

Something a little Different - Spinner Build Continues

Some more time stolen from other projects and put into the spinner racks! It sounded so simple in the beginning. At this point I have managed to drill more holes than I care to count (and I didn't) and cut squares into circles on the bandsaw. Some quick work with a palm sander and I was able to get the initial coats of stain on them.

At this point I need to apply another coat of stain to the edge and stain the bottom of all the discs. The dowels that will provide the center and interior supports are also finished although I'm debating doing another coat of stain on them. I was just going to do one but I think it would be better to give everything two coats. The 4" spinners that I will be using arrived on Saturday, although I do need to pick up some wood screws to attach them with.

Here is the progress so far (rapidly reaching the assembly point).

I think my hands are still vibrating from cutting out all the discs. You can see where the top layer of the plywood chipped out during the drilling. Those are the half inch holes and I probably should have used a regular 1/2 drill bit instead of a 1/2 paddle bit which would also avoid those little holes in the middle!

Two coats of Minwax Pecan Stain on the top, one on the sides. I need another on the sides and one on the bottom. I used the Minwax that contained stained and polyurethane to provide a bit of protection from the abuse I expect to heap on these.


Friday, October 16, 2020

Something a little Different - Tool & Paint Spinner Racks

Normally those titles means my wife has projects for me. This time its a project for me. While I was going through the last round of weathering on the U304(f)s I was continually misplacing the different bottles of what ever I was working with at the time. Mostly because I have managed to create three distinct work areas across the long counter in the workroom, which I must point out I share with my wife. In addition to misplacing things on a regular basis I tended to leave my tools spread across said counter as well. So its time to do something about it.

I have always been fascinated by the spinning ranks for tools, paints and such but I needed something a bit more compact than what seems to typically be available. I  envisioned two different sized spinners; 6" and 5" in diameter. Two different sizes seems excessive but the requirements deem that necessary. I have four items that I want to use these for; tools (including paintbrushes), the standard dropper paint bottle, the Oilbrushers (from Ammo by Mig), and the larger bottles that most pigments and enamel paints come in. Micro Mark has a tool spinner that's the right size so I'm using that as the model. The 5" version can handle three of the hole sizes I need; 1/2", 3/4" and 1". The 1/2" spinner will have 16 holes which should handle most of my tools and brushes, I'll make two of these. For the 3/4" and 1" I can only fit in 8 holes of each size comfortably. I'm planning to make 3 of the 3/4" spinners which, like the tools, will only have a single level. For the 1" I'm planning on two spinners each of three levels so they will hold 24 bottles of paint each for a total of 48 paints in a small area. The 6" spinner will have the larger 1 3/8" holes  and again will hold 8 bottles on each level and I'm planning on three levels.

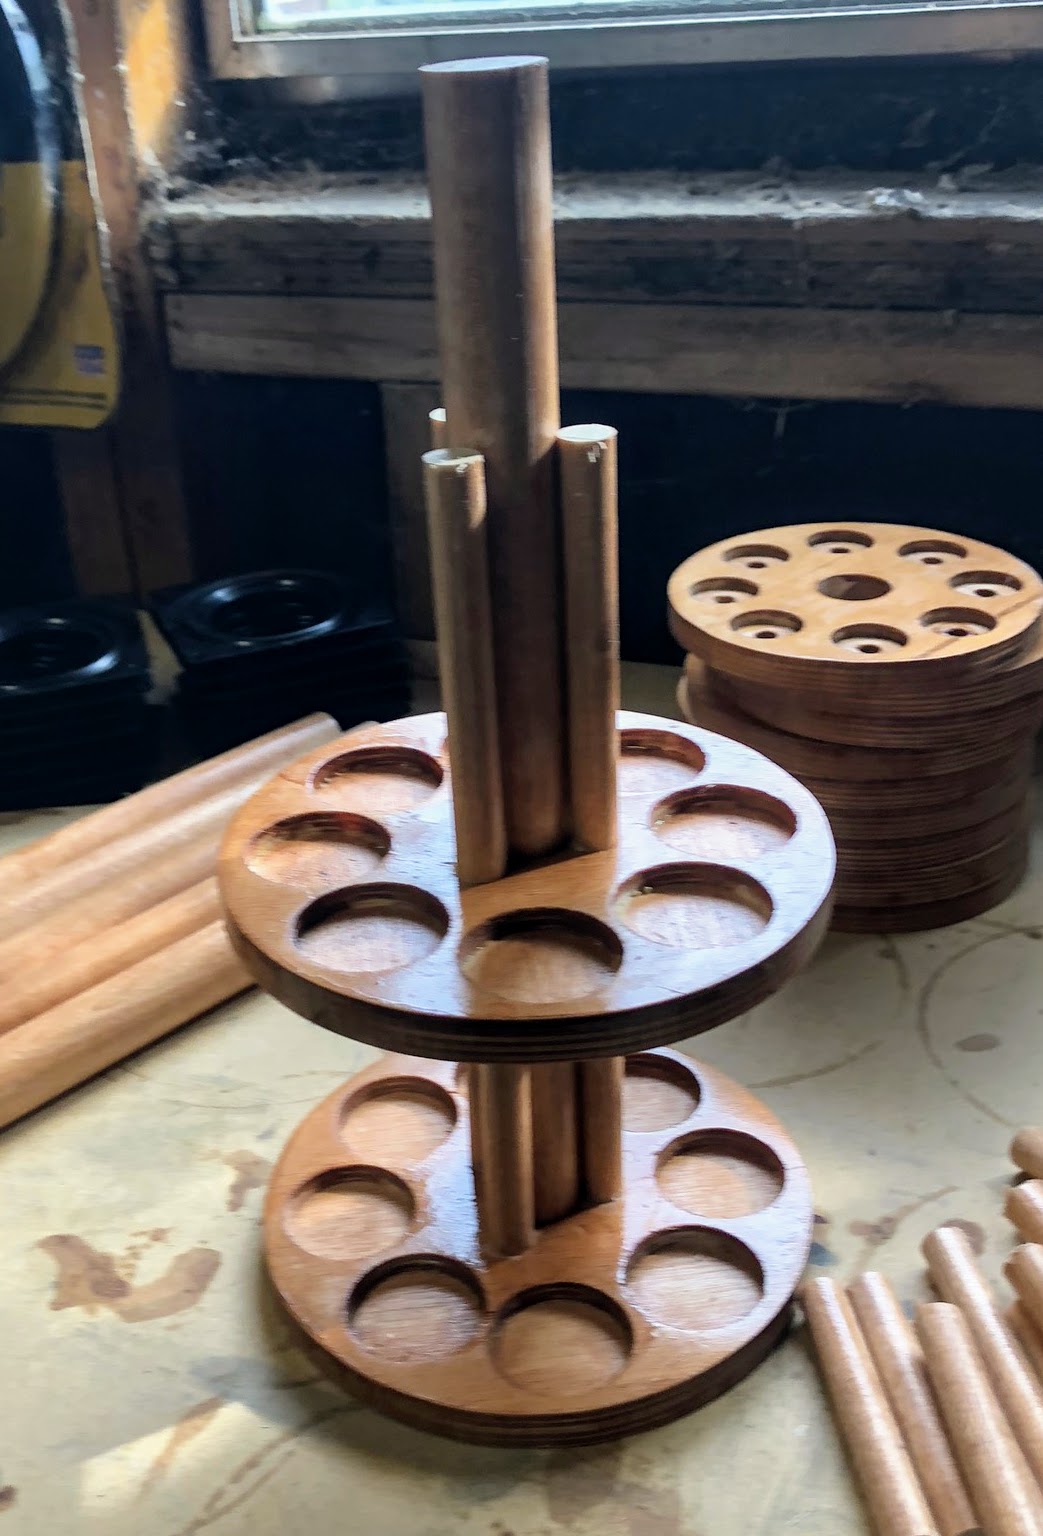
For this first run I'm using Baltic Birch plywood, if I had a planer I would use something else because I have discovered that plywood tends to splinter when I use the big paddle blade style drill bits. While the 5" spinners can all be made from 1/2" plywood the levels for the 6" spinner need to be made from 1/4" plywood. I can drill the holes all the way through the top piece and then glue a bottom piece to it. First because I couldn't find a paddle blade the right size but I did have saw toothed drill bits but with these you can't just drill down a 1/4" and stop like a paddle blade you have to be able to cut all the way through and then pull the "plug" out of the bit. Its a pain when you are doing drilling so many holes but I'm happy with the result.

At this point all the pieces for the 6" spinner are drilled and glued together and the pieces for the 5" spinner with the 1/2 holes are drilled as well. I had started the 3/4" holes but ran out of time. After I finish the holes I will cut out the circle on the band saw and then figure out the best way to mount the different levels together. Dowels are the obvious answer but the width of that center hole needs to be determined, and I'm thinking that something a bit more decorative would be nice. I won't actually assemble anything till after I have applied some finish so I have a little time to think about it.

The spinners themselves are relatively inexpensive, I'm currently looking at 4" spinners that come on a square base which should fit under both the 5" and 6" spinners.

Here's some pictures so you can skip the rambling

This will be a six inch spinner. All 8 holes have been drilled and the bottom has been glued on (with five clamps, one in each corner and another in the center, I need more clamps).

Loaded up with eight of the larger bottles in my collection


You can see the line for the final shaping cut here. Hopefully a steady hand will yield something that at least looks like a circle in the end.


Monday, October 12, 2020

World War II Project - Jagdpanther by Rubicon - Progress continues

Found some more time to work on the Jagdpanthers but not the STuGs, still struggling with the debris shield (I just need to go to the hobby shop and gaze at the Evergreen and Pastruct racks for a while). I also forgot to mention I have one more reference book, the Panzer Tracts book (Panzer Tracts No. 9-3) and from a technical perspective is most thorough work, it does make for some rather dry reading though. Panzer Tracts books seem to go in and out of print so if you can't get your hands on this one then the Kagero Photosniper book is a reasonable replacement for it.

The  build is basically complete at this point. Note that while I have the tracks in place right now they are not glued on and I'll remove them for painting. I have one more to build and I'll use the G2 hull for the last one.


Making sure that the lower hull is firmly attached to the upper hull


Initial filling of the attachment spots that I don't need on the sides


Stuff that needs to be relocated to the back deck or in the case of the D-Rings (C12 & C13) moved from Step 1 to Step 3

Based on the photo I looked at, after I glued these on, The axe should be located where I put the sledgehammer. The Sledgehammer should be mounted perpendicular to the back edge, rather than parallel like I did, and between the engine hatch and the fan on the right side. 

The  bolt cutters can me mounted here or on the top of the rear deck.


Friday, October 9, 2020

World War II Project - Jagdpanther by Rubicon - In progress

I have stalled out, again, on the STuG builds. I want to add the debris shield over the gun mantlet but my first few attempts were poor at best. That, of course, delays getting them painted...again. In the meantime I decided to take on the Rubicon Models' Jagdpanther.

The first one is just about completed. I was able to replace some of the posts and hooks on the side to better match what you might see on a vehicle from the 654th Schwere PanzerjÀger Abteilung. I have also found some better thread to represent the tow cables so I need to return replace the ones I made originally, fortunately that won't hold up the painting itself. I have left the tracks unassembled at this point. It consists three major pieces; the tracks with the outer road wheels, the middle road wheels and the inner road wheels. I really can't even think about assembling these until after everything has been painted. That, of course, means that you would have to wait to add the side skirts till after painting as well. Fortunately I have no intention of adding the skirts, the maintenance unit of the 654th typically removed the skirts, along with all the other changes, before they were released to a combat platoon.

With the first one, basically, complete and ready for paint I started building the second model. This one will also use G1 hull and the single piece cannon. I didn't get very far last night but I was able to complete the lower hull and start modifying the upper hull. Modifying the upper hull basically requires scrapping off some of the cast on details like the shovel and the axe that are located near the front on either side. Again not a lot of progress but its a start and the Rubicon kits are relatively quick builds after you have finished the first one. I think the one criticism I have on this kit that the G1 really should have a coating of zimmerit on it, the G2 hull is kind of a 50/50 proposition but the G1 definitely should.

Filling the gaps in the hull. These are where tools and other things would have been located on a factory fresh Jagdpanther G1 hull. The 654th removed all these things are relocated them to the rear deck, rear plate and rear of the superstructure. If I was really clever I would figure out a way to leave the marks where the brackets were located. Something to think about for a future build.


Here I have added the round post to the front edge and the three "L" brackets to the side.


Here is the second Jagdpanther under construction. Lower hull is complete and tools have been removed from the side. On the lower hull which is Step 1 in the instructions there are two D-Rings (for lack of a better term) Parts C12 and C13 that attach to the lower glacias. DO NOT assembly these in step 1 has indicated. They are in the way and will either pop off or you will have to remove them when you assembly the lower and upper hulls together (either in Step 3E for the G1 hull or 4F for the G2 hull). This happened to me during the first build and fortunately I remembered this on the second build. I didn't add these D-Rings until after I had assembled the upper and lower hulls.

The other side. In the background you can see the STuG that I'm using to test fit the debris shield to.

I have more Jagdpanther references than I realized including the Tank Craft book for the Jagdpanther which I had totally forgotten about it. The primary, and definitive, reference is "The Combat History of Schwere Panzerjager Abteilung 654" which is also an excellent reference for the Ferdinands/Elephants that the unit initially deployed with on the Eastern Front at the battle of Kursk. Another good reference is the Photosniper book on the Jagdpanther from Kagero and the last one is the Military Miniatures book on Jagdpanzers which is okay, but its not focused specifically on Jagdpanthers (especially considering there the Jagdtiger is featured on the cover!).


Tank Craft book by Oliver

Schwere Panzerjager Abteilung 654 by Munch (This one may be out of print, it is the companion volume to Schwere Panzerjager Abteilung 653)

Photosniper series from Kagero. This one has some great walkaround pictures of a Jagdpanther in a museum as well as a ton of line drawings.

Military Miniatures publication on Jagdpanzers


Thursday, October 8, 2020

Pz III Library Addition - Panzer III from Tank Craft

I have acquired another book to add to the Pz III library. This particular volume is a new one from Tank Craft. I discovered the Tank Craft books about six months ago (or there abouts) and I thoroughly enjoy this series. This one is titled Panzer III, German Army Light Tank Operation Barbarossa, 1941 by Dennis Oliver. I must admit to being a bit confused about the title as I have never heard the Pz III referred to as a light tank before. Mr Oliver does a very nice job on the subject in 64 pages.

As stated the book covers, primarily, the Barbarossa period with a little background to go with it. For the most part it shows ausf Fs through ausf Js (with the short 50). Detail on the campaign and the units involved are included. There is a section of color plates which are nicely done, although mostly in grey! Following that are some model builds followed by manufacturers of both kits and aftermarket parts. He concentrates on 1/48th and 1/35th scale kits with a brief mention of a company out of Scotland called Milicast that I need to check out. Unfortunately Rubicon Models is not mentioned although it is mentioned in one of the other books from Tank Craft (either the Sherman or STuG III book, not sure which one).

There is a very short section on the different models from A to the early J as well as the different uparmoring programs. Its very short and is much better covered some of my other books (especially the ones from Panzer Tracts). However, it is loaded with pictures and color plates and is really written for the modeler rather than the researcher. This is probably the first book I would pull out for reference for eastern front Pz IIIs for this campaign for paintwork and decaling and I would supplement it with the Panzer Tracts books for building models.

Its a high quality paperback that does a very good job introducing the 1940-1941 Pz IIIs. I would certainly recommend it for those with casual interest as a good starting place.

Thursday, October 1, 2020

World War II Project - StuG III Skirt Modifications II - Rubicon

Moving forward on the STuG III skirts. The original vision for the skirts was to get that loose, out of alignment look. Easy to achieve with Rubicon kit just cut the panels apart and you are good to go. This creates a couple of issues:

1) Painting, I discovered this during the priming stage and then got stubborn about it. If you cut them apart before you paint them then you need to tape them down to something or they will blow all over the place if you are using and airbrush or rattle can.

2) Once you cut them apart it basically becomes impossible to figure out which ones were part of the same skirt. Why is this an issue? Its an issue because unless you can match up the pieces you cut apart they don't fit together as well and you will need to do some filing to get nice fits, even if the plan is for the loose look.

All of that is easily solved, just need some double sided tape and popsicle sticks. Painting the back will be a paint but that to can be overcome, especially since the back side will only be painted in the base dunkelgelb color. On the positive side of cutting the panels up first, it was much easier to bend the tops of the first three panels than if it had been one solid piece.

The skirts are just about ready to get back into the spray booth.

Panels bent, the second set went much faster.

Squadron Green to fill the joint. I split a couple almost all the way through so some Squadron Green was needed on the front in a couple of places.

Filing and cleaning up the obnoxious Squadron Green putty.

I had already mounted the first set on popsicle sticks, there is that hindsight issue again. You can see that I did manage to completely snap off the top of one panel. I'll still paint that one as a single unit and I just won't mount that panel.

Filing and cleaning... again would have been easier to do before I taped them down. I didn't pull them up since I would have needed to put new tape down and two-sided tape is kind of expensive.

Panels ready for painting. They will be much easier to paint mounted to the popsicle sticks.