Quotes

Life is short, break the rules. Forgive quickly, kiss slowly. Love truly, laugh uncontrollably and never regret anything that makes you smile. - Samuel Longhorne Clemens (Mark Twain)

Monday, November 30, 2020

Printing Begins

Things have gone better than expected with the card. While the image transfer didn't work out quite as well as I had hoped it would, it worked well enough to get the carving done. Next time I need to be sure to cover both surfaces with the gel. I only coated the lino and while that worked the image did pull away with the paper so I need a stronger bond.

All three "plates" are carved and some test prints have been made. The registration of the blocks needs to be adjusted a bit but really it was pretty good considering I really forgot about needing to make registration marks at all.

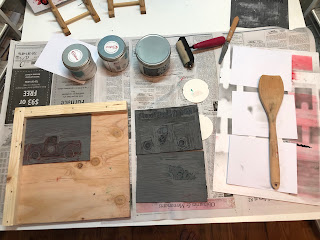
Here we go ready to start full scale production!

In the upper left you can just make out the drying racks. Under that are the three cans of ink being used for this card. Bottom left is my quickly thrown together registration plate, it is as perfect a 90 degree angle as I can make with my carpenter squares. In place is the red plate and the black and green plates are off to the right. Brayer and ink knife towards the upper right and then my wooden spoon I use as a baren (and no I didn't steal it from the kitchen, my wife gave it to me because it wasn't a good wooden kitchen spoon, makes a great baren though!).

Friday, November 20, 2020

Transfer design to block for Linocut

Lo and  behold it actually worked! Yesterday I painted the matte gel medium on to the linoleum and put paper copies of the design on top of it. I let that dry overnight. I had hoped to peel it off the top like the one youtube video I watched (although I see that he used glossy gel medium) but it didn't. I then proceeded to Plan B. I simply rubbed the paper off with a damp sponge and it "magically" left the design on the block. Success!

Next step is to start the carving. Each block will be used for a different color; red, green and black and I have a spare if I really screw one of them up. I need to move pretty quickly at this point so that the linocuts are ready when the ink arrives. The ink is arriving from a couple of different sources, it seems there has been quite the run of printers ink across the country during the pandemic.

I cut down the paper to the size of the block after the gel had dried.

Here the paper is wetted down and I'm rubbing it off gently with a damp sponge.

And here the image is revealed. I didn't rub the paper all the way off since most of it is going to get cutaway anyway. Time to bring out the blades!


Thursday, November 19, 2020

Its That Time of the Year - Making Christmas Cards

So many Trees last year

With everything that has been going on neither my wife or I have felt particularly festive. Yet the holidays are closing in fast and the only thing we have done for the Christmas card is the design (which will not yet be revealed). Suddenly I'm feeling very enthused about it though, so I'm running with it.

I have ordered new inks for this card as I'm going to try my hand at using multiple colors this year. That means that each color needs its own printing block to be carved. The design is pretty straightforward so the carving is pretty simple, especially compared to last year's tree. The key will be getting everything lined up properly.

I'm also go to try a new transfer technique using acrylic gel medium, crossing my fingers on this one as its by far the fastest and easiest way I have seen. The one example I saw was a piece that must have been 2'x3' and it worked like a charm. I made four copies of the design and started the transfer process on to the linoleum. I'll need to have the carving done quickly so we can get straight to the printing stage since each color needs about 3 days to dry completely, although I suppose they don't have to be completely dry, will  have to think about that.

Forgot that we had to make a trip to Hobby Lobby. We are going with a brown card this year, although that will now require some rethinking of the design which originally was going to use the white of the card for an element of the design will just have to rethink that a bit.

Starting the transfer, a piece of linoleum, a cheap brush and Matte Gel

Spread a relatively thin coating on the linoleum, as thin and even as possible

Here I'm using the registration marks on the design to get the linoleum in the right spot. Far easier on this small card to place the linoleum on the paper than the other way around.


A fuzzy image with the paper side up and any air pockets smoothed out. In theory, I should be able to peel this off and it will leave the toner from the print on the linoleum. If that doesn't work I'll try an alternative technique using the matte gel.


Monday, November 16, 2020

World War II Project - 70th Tank Battalion Markings

The wording on the sash is 70th in French. The unit's motto is Strike Swiftly.

As I have mentioned in some earlier posts I have dropped the idea of modeling my M4s as part of the 4th Armored Division. Instead they will be marked up for the 70th Tank Battalion, one of the 60 or so independent tank battalions that supported the infantry divisions.

Initially the 70th was a light tank battalion equipped with M5s. One of its four companies was deployed to Iceland the remainder participated in Operation Torch and fought through the Tunisian campaign. The 70th was assigned to support American, British and French units during this campaign.  

Still designated a light tank battalion it participated in Operation Husky the invasion of Sicily. It primarily provided support to the 1st Infantry division for this operation. It was here that the battalion developed a "top down" attack on German armor. The 37mm main gun was not capable of defeating the frontal armor of most German armor. Tankers developed the technique to maneuver to higher ground so they could shoot at the top armor of German tanks.

From Sicily the 70th was pulled back to England and re-equipped as medium tank company with M4s in companies A, B and C with D Company keeping its M5s. It would participate in D-Day supporting the 4th Infantry Division on Utah beach and for most of the rest of the campaign in Europe. On D-Day companies A and B were equipped with M4A1 DD tanks while C Company was equipped with M4s with wading trunks. From here it becomes very interesting from a modeling standpoint.

On D-Day companies A, B & C had red numbers with a white outline while company D had solid white numbers. I have seen the numbers located on the turret (more towards the back of the turret and often on the turret bustle) and the hull side. On the hull side the numbers tend to be either centered on the hull (between the applique armor plates on the right side) or towards the rear of the hull side (just after the applique armor plate on the right). For D company the number was on the hull side, again towards the rear.

Some tanks, perhaps all at this date, had the Joe Peckerwood turtle mascot painted on the hull side more towards the front, often on the front applique armor plates. After this date replacement tanks tended to get solid white numbers and no mascot. From photos various details come to light. Small versions of the tank's number can often be seen on the armor plate that was used to cover the driver's direct vision slot (like A-1, B-12, C-5). The armor group information likewise sometimes appears on the bow gunner's armor plate (70 + hollow triangle). Sometimes this information appears on the lower glacias, sometimes its completely missing.

By the end of the war I have several pictures showing a wide variety of M4s making up the equipment of the 70th; M4A1(75), M4A1(76), M4, M4 Composite, M4A3(75), M4A3(76), M4A3E8, M4A3E2 and my personal favorite the M32B1 ARV. There are versions of these with and without the Summerfield matting that was used to attach camouflage. It really is carte blanche when it comes to modeling the 70th. This would be true of any independent tank battalion they weren't part of a division so they tended to get what ever was available as a replacement. Getting spare parts was hard because of this to the point the maintenance units just said they were with the 70th Tank Division just to get their hands on parts.

There are 1/35th scale decal sets available from both Star and Bison (Its odd but as near as I can tell these two companies are run by the same guy). I'll use those for reference. Company B has a small sheet of 1/56th scale decals but it only includes white stars, the red numbers, the Joe Peckerwood mascot decals and a pair of registration numbers. On top of that its listed, rather generically, as Sherman D-Day Markings. I'm musing on having a custom set of decals made, but I sometimes have problems with their decals which makes me leary of a custom set. Things to ponder, I still have STuGs and Jagdpanthers to finish before I get back to the Sherman fleet so no rush right now.
Saturday, November 14, 2020

World War II Project - Jagdpanthers - Priming

More action at the airbrush booth saw all three Jagdpanthers get coats of both black and grey primer. Like the STuGs the lower hulls were done in black and the upper hulls were done in grey. I had a little speckling going on so I may have to go back with some steel wool and remove the imperfections in the primer. I was pretty pleased with how well the thread I used for the tow cables looks with just a bit of primer on it. I think that's going to look really good by the end of the painting process. I was tempted to use my Vallejo primers on these just to compare the Vallejo vs Badger's Stynylrez primer, but once I have painted loaded up in the airbrush I tend to just keep going with what's in it.


Thursday, November 12, 2020

World War II Project - STuGs - Painting Begins

Finally managed to get over to the airbrush booth and applied some spot primer to the STuGs. I basically primed the debris shields and the backs of the skirts where I had bent the top edge. I also reprimed the lower hulls with black, hopefully to help keep those areas a bit darker. I used my favorite grey and black Stynylrez Primers from Badger for this work.


Tuesday, November 10, 2020

World War II Project - Jagdpanther Mods - Brackets and Tow Cables

It was a good weekend, along with finishing off the STuG modifications I was also able to finish off the Jagdpanther mods. I was originally trying to cut the brackets from little square pieces of styrene sheet. This was not going well. I then ran across some styrene angle stock and cut the rest of the brackets from that. They aren't as consistent looking as I would like but I figure with a little paint folks aren't likely to notice. The tow cables are made from the cable ends provided in the get and some black thread. I have no idea where the black thread came from but its braided and is just about the perfect diameter.

It was certainly a struggle to get everything to fit nicely and the cable to bend a bit but I sure like how it looks on the Jagdpanthers. I'll definitely keep using this thread for cables (I used it on the M32B1 as well) and looking at the spool I probably have a lifetime supply.

Tow cables ready to go

The brackets after I starting cutting them from the angle stock I found. It was hard to control the width go freehand with an xacto knife. Of course afterwards I remembered that I do have a chopper that would have made it much easier. After I cut them from the styrene stock I trimmed the ends with my good clippers to the right size.

The G2 ready for brackets

Looks pretty good. Note that the I ended up replacing the bracket on the lower left side with styrene rod and moved it over to the right a bit more. It was to close to the spare tracks and I noticed in a couple of pictures that this appeared to be a post rather than a bracket. A lot of variety is apparent when you go through pictures of the 654th .

Brackets on the other side

Three Jagdpanthers ready for tow cables

A little straighter than I wanted on my first attempt.

This might be to much on the other side.

Tow cables complete


Ready for the airbrush booth.


Monday, November 9, 2020

World War II Project - STuG Mods - Debris Shield Finished

The STuGs are finally ready for some paint. Over the weekend I was able to finish off the debris shield. I filled the gap with a styrene strip filed it down a bit to fit and then created the weld seam using plastic glue. I basically spread the glue along the seam to soften the plastic and then scored it with a somewhat sharp knife. I then added the two rivets or bolts. I started with a long piece of styrene rod and then once it had set I trimmed it down to the right height.

STuGs are now in the airbrush booth ready for a little primer and then some camo work.

Long pieces of styrene rod in place, these get trimmed down after the glue has set

After trimming

Three STuGs and one STuH after mods

Ready for the airbrush booth...finally