
Wednesday, September 30, 2020
Tuesday, September 29, 2020
World War II Project - P107 (f)/U304 (f) 21st Pz Div Halftracks - Finished
I have finally managed to bring the U304(f)s to completion. After I finished the tracks and wheels I went in and finished the machineguns and the headlights. The MGs are basically just flat black and then finished with a bit of metallic pigment (AK Interactive AK-086 Dark Steel) to make them shine a little bit. The headlights just received a quick coverage with Sandy Yellow a paint from the Reaper Miniatures MSP line (#9192) I wanted the headlights noticeable but subdued. There are drivers for these halftracks but I haven't finished them. The intent is to finish off the two drivers (the third one seems to have gone missing) and maybe add a crewman manning the front MG. I'll probably end up doing the crews for all the vehicles at the same time, a bit more efficient that way.
I'm not completely happy with the tracks but in the end they are good for the table top which is where these will be ending up, hopefully at some point in the near future. I should some pics with all the 21st Panzer armor together.
Here are the shots of the U304(f)s, the light is a bit harsh I'll need to work on that for future pics. The light really washed out the work on the tracks from the back.


And if you would like to work your way through the entire build here are all the links (there are way more posts than I thought there were).
https://wargamesandrailroads.blogspot.com/2020/04/world-war-ii-project-return-to-normandy_30.html
[The Beginning]
https://wargamesandrailroads.blogspot.com/2020/05/world-war-ii-project-return-to-normandy.html
[Axles]
https://wargamesandrailroads.blogspot.com/2020/05/world-war-ii-project-return-to-normandy_4.html
[Windscreens]
https://wargamesandrailroads.blogspot.com/2020/05/world-war-ii-project-return-to-normandy_5.html
[MGs]
https://wargamesandrailroads.blogspot.com/2020/05/world-war-ii-project-return-to-normandy_7.html
[Primer]
https://wargamesandrailroads.blogspot.com/2020/05/world-war-ii-project-return-to-normandy_11.html
[Base Coat]
https://wargamesandrailroads.blogspot.com/2020/05/world-war-ii-project-return-to-normandy_12.html
[Decals]
https://wargamesandrailroads.blogspot.com/2020/08/world-war-ii-project-p107-fu304-f-21st.html
[Paintwork]
https://wargamesandrailroads.blogspot.com/2020/08/world-war-ii-project-p107-fu304-f-21st_25.html
[Paintwork con’t]
https://wargamesandrailroads.blogspot.com/2020/09/world-war-ii-project-p107-fu304-f-21st.html
[Chipping]
https://wargamesandrailroads.blogspot.com/2020/09/world-war-ii-project-p107-fu304-f-21st_10.html
[Streaking]
https://wargamesandrailroads.blogspot.com/2020/09/world-war-ii-project-p107-fu304-f-21st_17.html
[Dust & Dirt]
https://wargamesandrailroads.blogspot.com/2020/09/world-war-ii-project-p107-fu304-f-21st_10.html
[Tracks & Wheels]
Monday, September 28, 2020
World War II Project - StuG III Skirt Modifications - Rubicon
 |
| Rubicon Models STuG III ready for paint |
I started the STuG III project much earlier in the year and they have been languishing on the back of the workbench for some time now. As the U304 (f)s near completion I have pulled these out to figure out exactly what I wanted to do with them. Work has been held up for a couple of different reasons, I wanted to practice the weathering techniques that I have been using on the 21st Panzer Division vehicles and I wasn't quite sure which unit I wanted to model.
At this point I'm pretty confident with the weathering techniques and while there is always more to learn I feel that I can really do justice to the STuGs at this point. I was still undecided about the unit though, I have been flipping through a couple of books but in one of them there is a picture of a single STuG from the 343rd Battery. It has the heavy green and brown camo characteristic of the late war, and it has somewhat unusual side skirts which intrigued me. The picture indicated that these style skirts were unique to this particular unit (always a bonus in my mind). These are the standard skirts with the top of the skirting on the first three panels bent inwards. No idea why someone would do this, I don't see any gain to protection. From an armor perspective those skirts are quite thin from a metal working perspective that would take some serious effort by the maintenance unit. These STuGs also have a debris shield over the gun mantlet which would be easy to model as well (I hope anyway).
The question becomes can I modify the Rubicon skirts to reflect this interesting skirt modification? I figured I could sacrifice three panels without a problem, missing panels wouldn't be uncommon or one STuG (well probably the STuH) could go without skirts.
 |
| The first mark, time to get cutting |
Pushing everything else to the back of the desk I proceeded to start cutting up the side skirts. The toughest one is the front panel. In addition to the bend in the armor it has been cut down to reveal the entire drive wheel, I guessing for maintenance reasons. Determining the point of the cut was a little difficult since I had already cut the skirts panels apart from each other (perhaps I should have waited till after the painting was finished to do this, will remember that when I get to the PzKfw IVs). I lined everything up starting with the back skirt and its location relative to the return wheel and then sort of pushed everything in place till I got to the front panel and marked the positioning. The cut was made from the mark on the bottom of the panel to the upper right corner. So far so good, a small quick vertical cut to match the picture and the easy part was done.
 |
| Everything marked, cut and bent |
I flipped the panel over and measured on 1/8th inch down from the top of the shield, well two marks one on the front edge and one on the back edge, and proceeded to make a shallow cut here. I worked slowly since I didn't want to cut the panel and reattach it I just wanted to bend it. I made shallow cuts and then widen it on the bottom edge with a angled cut. I placed the top edge on the workbench and gently pushed, if it didn't bend I made another shallow cut, until it bent into the position I wanted. I did the same thing on the center skirts, which were much easier. The bend in the front shield required another vertical cut so it would line up straight with the next panel.
 |
| From the front, the important side and it looks pretty good. |
With that accomplished and the skirt panels lined back up for a quick visual check I was pleased enough with the result to do it on the rest of the skirting. I do wish I had found this picture before I had primed and based coated the STuGs! Live and learn, at least with the Jagdpanthers I already know which unit I want to represent and I planned the modifications in advance.
 |
| Looks good from here and the panels are behaving the way I envisioned them, kind of loose and out of place. |
 |
| The real work begins. |
Sunday, September 27, 2020
World War II Project - M32B1 ARV Pt 4 - Research

I have been on a bit of a pause on working on models for a couple of reasons. Currently I have the 3 U104s on the workbench waiting to be finished, I just received a package from Last Cavalry with the painting supplies that I was waiting for (in particular pigment fixer) and I can now wrap those up.
I have been deciding on which tank battalion I want to decal the four M4s on my desk for and I have decided that the 70th Tank Battalion is the winner, it checks all the boxes and there are more pictures available than the vast majority of the other separate tank battalions. So now the research begins on the correct markings for the 70th "Strike Swiftly" tank battalion (fortunately I have been taking notes already). I also want to experiment with some "sand" texture on the turrets of the M4A3/76 and the M4A1/76 as well as on the hull of the M4A1/76 and the M32B1. The M4A3 could be done with a glue technique but I need something else for the texture on the two resin kits. I'm also waiting for some Foundry markings from Archer to arrive which, of course, have been backordered. If you need modeling supplies I highly recommend Last Cavalry (lastcavalry.com), I made the order on Sunday afternoon and it arrived Wednesday. His website is much easier to navigate the Michigan Toy Soldier which is my normal go to for modeling supplies. However, I couldn't log into my account there and was so frustrated with it that I went looking for another source and found Last Cavalry.
Which brings us back to the M32B1 ARV. While I have managed to dig up a dozen or so photos out of the three Steven Zaloga books I have been waiting on one more; "Allied-Axis; The Photo Journal of the Second World War" issue #4. I picked up a copy through eBay for $10 from Canada. The series is long out of print (although David Doyle books still has a number of the issues in stock) although there seem to be plenty of used copies available on eBay. This issue has photos of some of my other favorite vehicles (M18 Hellcat, German 8-Rad ACs)so it was a no brainer for me. The most important piece was the photo spread of a couple of M32B1 ARVs in Czechoslovakia near the end of the war. Of the 15 photos in the spread I had only seen one. There are shots from all angles, including a couple of closeups, with the crane fully deployed and all the cables clearly visible. It confirms my suspicions about the interaction between the arms on the hook block and the cables when fully deployed, they should essentially be parallel to each other. There are two M32B1s in the spread with the other one in travel mode so you can see how the crews stored things on their vehicles. This one is a gold mine if you are building an M32B1 ARV in any scale. I think the key element that will help make this model stand out are wire rope clips that are clearly shown in the pictures.
There are also spreads on the British version; Sherman (ARV) Mk I and Sherman (ARV) Mk II which show off some interesting differences in philosophy of the ARVs.
At this point in time I finally feel like I can move forward with almost all the modeling projects including a return to the StuG trio +1.
Friday, September 25, 2020
World War II Project - P107 (f)/U304 (f) 21st Pz Div Halftracks - Tracks & Wheels
Halftracks are always such a joy when you get down to the suspension, getting to work on both tracks and wheels is so much fun. This is the last bit of work that the U304 (f)s are going to need and, of course, I'm still experimenting with the best way to weather both tracks and wheels to get them looking good.
I started with the tracks and basically followed the same set of steps I used on the S307(f)s. I was a little heavy handed on the tracks on these so I stepped everything back a little bit and I also purchased some pigment fixer that would make adding back in some grease and grime a little easier as it would fix the pigment permanently (and I do mean permanently) in place.
After the tracks I moved on to the wheels and tried out the oilbrushers to add the dust without resorting to pigments. I think these came out pretty good in the end. A little more practice and some better wheel castings and I think my wheels will start looking pretty good. I'm sure there will be some more halftracks in the future (not to mention jeeps) to practice on my wheel weathering technique.
 |
| Something to keep in mind you can mix pigments the same way you mix paint. |
 |
| Pigments on the tracks |
 |
| Tracks are a little shiny with the pigment fixer and while I waited for that to dry I started working on the wheels with the Oilbrusher (Buff). |
 |
| The tracks from the other side after applying a combination of paint mixed with pigments on the tracks |
 |
| A better look at the tracks with the paint/pigment combination. I think it needs more pigment and less paint but it looks okay. |
 |
| Tracks on this side are done, wheel needs a little more work |
 |
| Starting the wheels while the tracks dry |
 |
| I see a couple of spots that could use a little work but overall these wheels looks pretty good. |
Wednesday, September 23, 2020

Tuesday, September 22, 2020
A Pause for Research - World War II Project
A bit of a rant before I go much further with this post. I'm typically have multiple posts in process as I work through various projects on the workbench. The other day I discovered that with the advent of the new blogpost format the publication date and its order of appearance on the blog don't match. This has resulted in a number of my posts being out of order, like the M32B1 ARV build with part 3 appearing between parts 1 and 2. I certainly find this a bit confusing, in fact I started writing this particular post last Friday (Sept 18, 2020), at this point I have no idea what date blogger is going to use as the publication date or where its going to end up in the post order. [Edit: the last day I worked on this was 9/22, that's the day I last added information to the post and that's the day blogger used to publish it which puts it before Cartoon Wednesday. Looks like if I add something and save it will update the date. Now I have to pay more attention as since I wanted this one to post on 9/24/2020)]

Every now and then its good to pause and rethink things a little bit. The vehicles for the 21st Panzer Division let me do a little research (and still allow me to indulge in thoughts of North Africa). I'm starting to close in on the end of the French vehicle conversions and how knew the direction I want to take, mostly, with the rest of the German tanks that I have on hand. That leaves the Americans which have provided a distraction in the form of the M32. As we all know its much better to have multiple vehicles that are, more or less, the same to paint it just makes things a bit more efficient when going through the various steps especially when time is precious.
For a long time I have figured that the M4s would all be marked for one of the tank battalions from the 4th Armored Division. That would make sense if my sole goal was to game out actions involving the 4th Armored. While I certainly realize that gamers don't really care if the unit markings are correct or the right version of the M4 is on the table it makes a bit of difference to me. By modeling one of the three tank Battalions (8th, 35th or 37th) I would really be limiting myself as the armored division tank battalions tended to always get the newest equipment and finding a old model M4 in the same column as the newest model M4 would become increasingly rare as you through 1944 to 1945.
I was reading something a few days ago that I knew about but I had stuffed into the back recesses of my mind (pretty easy to do actually); the separate or independent tank battalions. One of these would be almost perfect from a modeling perspective and for a game like Chain of Command which is infantry oriented with armor support its the ideal solution. The separate tank battalions were assigned to an "armor group" which was really just organizational but the tank battalions would be assigned directly to the infantry divisions where they would get parceled out to infantry regiments, battalions and even companies. They rarely worked as a battalion instead companies and platoons would be assigned where needed by the infantry division. There are a lot of these battalions, in fact there are more separate tank battalions in just the ETO than were part of the actual armored divisions. In the PTO there were no US Army armored divisions present all of them were separate tank battalions.
I have three main requirements for modeling such a unit.
1. I can field multiple versions of the M4 on the table and still be historically "correct"
2. The unit had the Summerfeld matting on their tanks (the wire mesh used to hold foliage)
3. The unit had at least one M4A3E2 assigned to them at some point.
Optional; some kind of interesting marking that could be considered unique to the unit.
Time to pull out the books. Immediately at hand I have:
Armored Strike Force by Charles C Roberts Jr
Armored Thunderbolt by Steven Zaloga
Armored Attack by Steven Zaloga
Armored Victory by Steven Zaloga


The first book on the history of the 70th Tank battalion and features a lot of pictures from members of the unit. The other three by Zaloga are essentially picture books but are well indexed. The book on the 70th is the most interesting of the bunch at this point as its focus is on an separate tank battalion and right on the cover what appears to be an M4A3E2 (with a 76mm gun) with the Summerfeld matting attached (this same picture appears on page 224 and does identify it as an M4A3E2). Two out three right out of the gate. Throughout the book are plenty of individual shots of various M4s including M4 Composite hull variation. The big bonus picture is on page 235 taken in about March 1945, showing a column of M4s moving off road. In the lead is an M4A3 76mm gun early turret, followed by an M4A3E8, following that is an M4A1 with the M34 gun mount, after that is an M4 with the three piece differential housing and the M34 gun mount. There are at least 4 other M4s in the shot which aren't identified but in addition to those there is a dozer tank and a deuce and a half at the top of the hill. Another picture on page 253 shows a column of parked M4s in the summer of 1945 after the VE day. This column consists of an; M4A3 76, an M4A1 76 and and M4A3E8, there are a number of other M4s in the column that can't quite be identified from the picture. In addition three out of the first four tanks have Summerfeld matting attached to them. Those two pictures alone make this a very attractive unit to model. The 70th even has a emblem that does appear on some of its tanks and soft vehicles. Its a turtle nicknamed Joe Peckerwood.
There are a couple of other unit histories out there about other separate tank battalions that I'll try and acquire and see if any of them make good candidates but right now the 70th is fitting the bill pretty good.
The Zaloga books I'm just going to use to see if there are any additional pictures of the various separate battalions that might be useful. Finding unit markings is the first priority which, again, makes the 70th very attractive. For now I'm going to limit my search to the following; the 70th, the 740th (because it has a cool nickname; Daredevils), the 741st and the 781st (this one because it was involved in the action around Wingen during the Germand Nordwind offensive).
This won't actually keep me from painting any M4s, it will just stop me at the decal step.
Friday, September 18, 2020
World War II Project - P107 (f)/U304 (f) 21st Pz Div Halftracks - Dust & Dirt
I updated the blog post that I did for the streaking effects on these vehicles which many folks are not likely to see. Basically for any type of streaking effect the best surface to do it on is a semi-gloss surface. A matte surface has to much tooth and makes the technique harder to use while a gloss surface doesn't enough tooth and you can easily wipe away the paint when you apply the thinner. A semi-gloss surface seems to be the best option for streaking. When I move on to the next batch of vehicles waiting for paint (likely the STuGs) I'll be sure to seal the decals with a semi-gloss rather than a gloss.
For the first part of the weathering I'm going to work on the dust on the upper surfaces. Since I want a more random look, I'm going to use the dot technique using my Oilbrushers. I have picked three colors to do the dots with; Buff, Dusty Earth and Yellow Bone.
 |
| 3 U307 (f)s ready for some dust. Oilbrushers are: Buff, Dusty Earth, Yellow Bone from "Ammo by Mig" |
 |
| Applying the dots, may have gotten overly enthusiastic with the dots. Less is more and you can always come back and add more to intensify the effect. |


 |
| This is the first pass with a flat brush used to "drybrush" on the thinner. Remember these are oil paints and you need something a bit stronger than water, I have a low odor thinner (mineral spirits) that I use. |
 |
| 2nd Pass with the brush, again trying to always move vertically on this types of surfaces. It still needs a refinement but you can see where it is going. |
 |
| All done |


 |
| The overhang is so extreme its hard to see the effect from the pigments but it is there. Started with the Burnt Sienna Extra Dark, followed by the Raw Umber and finally the Yellow Ochre Shade. But it up in layers really heightens the effect. |

So these are finally closing in on being finished. I need to do the tracks and the wheels and they will be done.
Thursday, September 17, 2020
World War II Project - M32B1 ARV Pt 3 - Rubicon Models
After the hull has been assembled its time to move on to the A-frame crane. This can be assembled in either the standby/travel mode or in operating mode. The decision here is forced a little early in the assembly (Step 3A) of the model, but if you have left the "turret" off you could change your mind and pry up which ever piece you used and replace it with the other (R08 or R09). I have been committed to the operating mode from the beginning of this build as I don't really intend it to be a gaming piece (although I suppose it could become a big objective marker). I might get a second one and build it in travel mode for the wargame table.
Step 10 - The A-frame
You would think this is pretty straightforward assembly involving three components; P01, P02 and P03. The reality is different. Clean up any mold lines on these pieces while you contemplate the rest of the build. If you haven't decided on Standby/Travel or Operating Mode you must do so now which will determine how much work you need to do. Something to think about, if you don't mind rigging cables then you are good with either mode. If you don't want to fiddle around with wire or thread to represent said cables, then Standby or Travel mode is for you.
 |
| P01 The A-Frame, P02 Hook Block, P03 Limiter (for lack of a better term on my part) |
For Standby/Travel Mode: Don't try and glue the pieces together and hope you will get the angles right. Glue P1 (the A-Frame) and P03 (Limiter) together first. There is only one way for them to fit together so you can't go wrong there. Attaching P02 can be tricky because its going to sit at a different angle in Standby/Travel mode than it does for Operating Mode. There are two small pins on P02 and those will fit into the holes/dimples on the attachment point on the A-frame. Push it into place, DON'T GLUE IT YET, make sure it is in position and then take a pair of pliers and gently squeeze the outside pieces of the A-frame together trapping P02 in place. Now skip to Step 11. Gently put the feet of the A-frame into place at the front. The fit is relatively tight so be careful because you are dealing with a resin attachment point. With the front feet in place set the feet of the hook block (P02) into place on the back of the ARV. Now everything should look like this:

For Operating Mode there are a couple of things you should do before you glue these pieces together. Make sure you have found and cleaned up any mold lines remaining on these pieces. P02 the hook block needs some holes drilled in it for operating mode. Much easier to drill those now than after its been assembled in Step 13. It is much easier to drill the three 1mm holes you need in the hook block (P02) before you try getting everything into place.
 |
| The hole at the top of the tackle block. Mine is not straight, its centered on this side but exited the other side less than centered. |
 |
| They may be straight through but they are definitely not centered. Fortunately no one will ever know (well except if you looked at the pictures, then it will be forever etched on your mind). |
Just like for Standby/Travel mode don't try and glue the pieces together and hope you will get the angles right. Glue P1 (the A-Frame) and P03 together first. There is only one way for them to fit together so you can't go wrong there. Attaching P02 (Hook Block) can be tricky because its going to sit at a different angle in Standby/Travel mode than it does for Operating Mode. There are two small pins on P02 and those will fit into the holes/dimples on the attachment point on the A-frame. Slip it into place, DON'T GLUE IT YET, make sure it is in position and then take a pair of pliers and gently squeeze the outside pieces of the A-frame together trapping P02 in place. Now skip to Step 13 and get out whatever you are going to use for cabling. Make sure you have drilled the other three holes needed for Operating Mode. There is one in the "turret" front and the others are the two D-hooks on the rear of the vehicle. Once you have that done you can continue forward. Gently put the feet of the A-frame into place at the front. The fit is relatively tight so be careful because you are dealing with a resin attachment point and you don't want to accidentally snap it off. With the front feet in place raise the A-frame to its full upright position, you can tell because the limiter piece will rest against the block on the right side of the hull and stop. You should be at the point pictured below (I placed a very small drop of super glue at the top to sort of freeze the hook block into place).

Now thread your cable, start at one of the D-hooks on the rear, then through the hole on the side that matches the D-hook over to the other hole in the hook block and back down through the D-hook on the other side. Please note that your cable should not cross over itself to form an X!
The next bit I'm not sure about. It makes sense to me that that "arms" of the hook block should be pretty much in line with the cables when they are taut. I pulled the string taut, broke the super glue at the A-frame attachment point and then re-glued it when it was in the position I wanted. Then you can glue everything in place. I did remove the cable and I'll re-thread that after painting or during the detail painting so it can be properly weathered.
 |
| Cables are taut, glue has not been "broken" the angle doesn't look right to me so I "broke" the glue so I could adjust the hook block. I could have but did not glue the A-Frame into place. You certainly can, the only thing that needs to move right now is the hook block. In theory you could make the whole thing "working" but I don't feel that it would be worth the effort. |
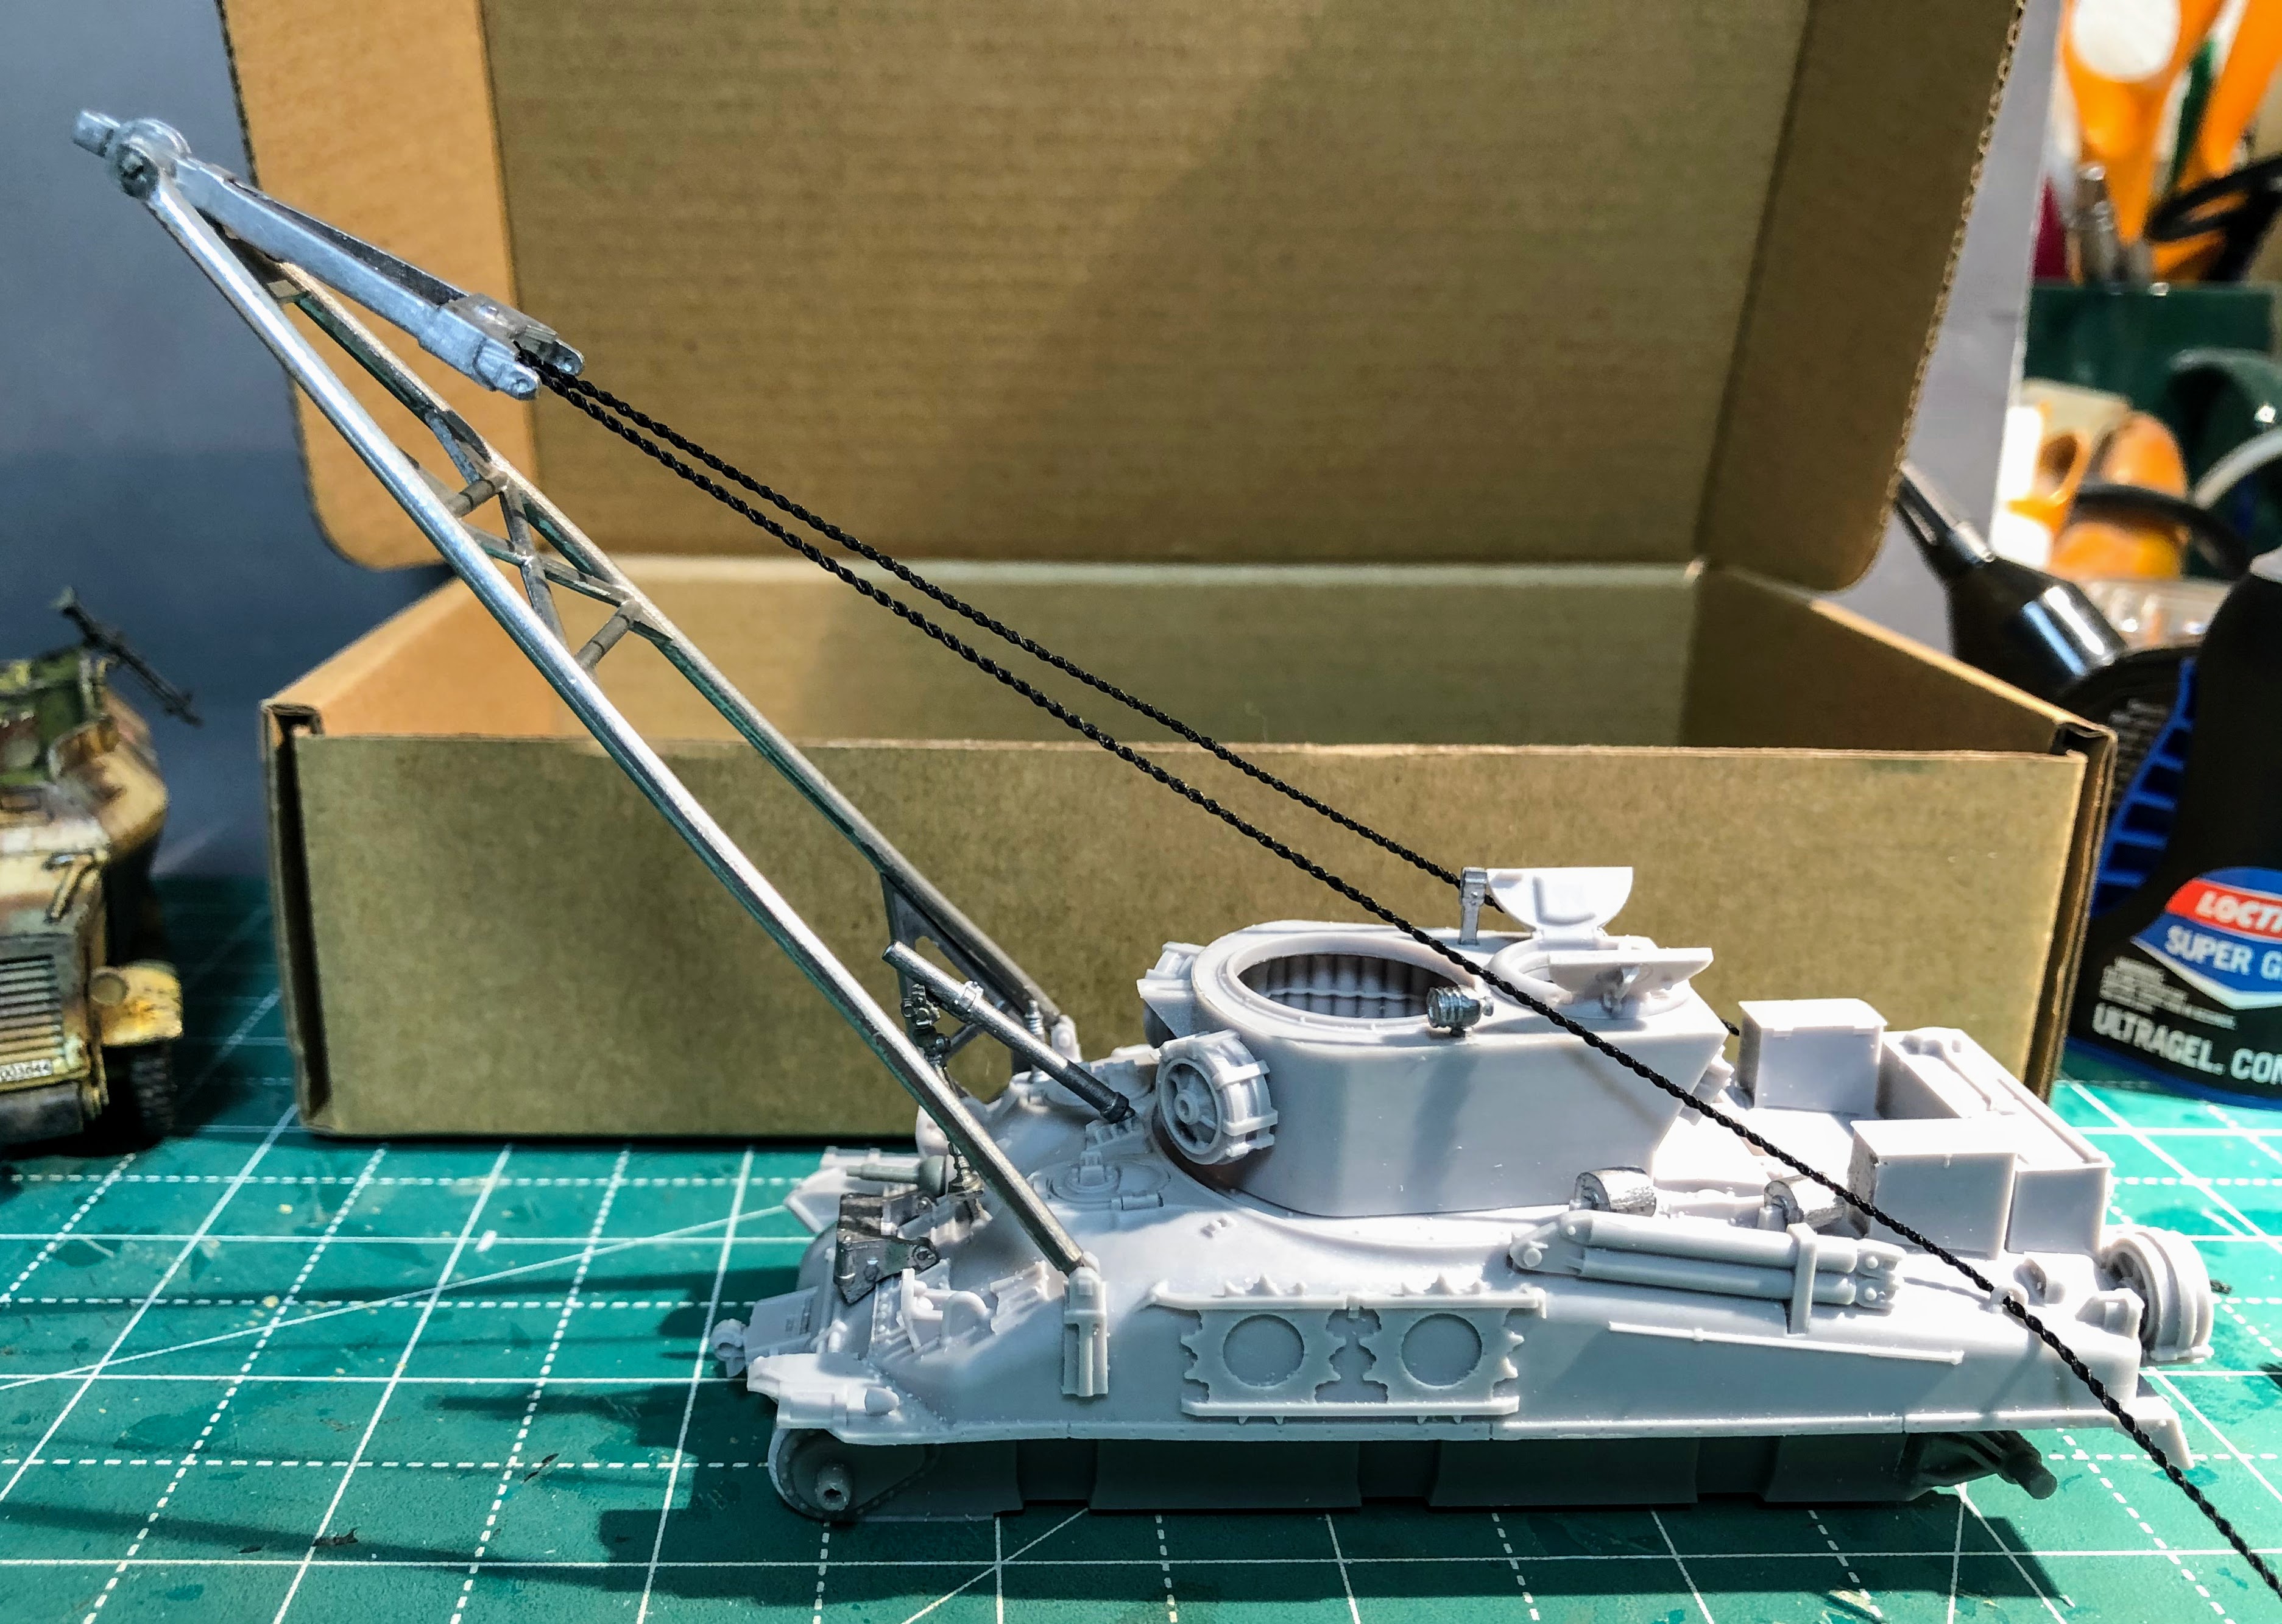 |
| I'm much happier with this angle so I applied super glue to the A-frame/Hook Block attachment point. I didn't glue the cable into place so I could remove it for painting. [Update; while paging through my Zaloga books I found a couple of pictures that I missed. It did prove my guess that the hook block arms should be basically parallel to the cable when the crane is deployed.] |
Step 11 - Standby/Travel Mode
I'm skipping this step all together, and if you followed the directions above you are already finished with this step.
Step 12 - Operating mode
If you have followed the steps above for Step 10 you have basically completed this step.
Step 13 - Cabling
The instructions call this part optional but since its in operating mode its going to look pretty silly without the cabling in place. If you followed the instructions in step 10 for operating mode then you are ready to do all the cabling. I'll won't really complete this step until after the painting has been completed.
That wraps up the build now its time to move on to painting. I have the M4A3E2 and M4A3 and an M4A1 that will be painted (or for the M4A1 repainted) to more or less match.
References are hard to come by for the M32B1 or any of them for that matter. I have found pictures a few pictures of them in the following books (there may be others, these are just ones I have on hand).
Armored Strike Force by Charles C Roberts Jr
Armored Thunderbolt by Steven Zaloga
Armored Attack 1944 by Steven Zaloga
Armored Victory 1945 by Steven Zaloga
Allied-Axis Photo Journal Issue 4
There are also photos online mostly of completed plastic kits which might be your best reference. There are very few photos of the M32B1 in Operating Mode.
Subscribe to:
Posts (Atom)