The Town of Calamity, The D&RGW RR Warehouse Row and Historical Miniature Gaming
Quotes
Wednesday, May 26, 2021
Tuesday, May 25, 2021
Acquisition: Setting The Scene Volume 3; Norway 1940, The Road to Dombas
While I can't seem to get painting time in (spring yardwork has beckoned) I can still order stuff online and even read it! The newest acquisition along gaming lines is Setting the Scene Volume 3 by Pat Smith. I own the first two volumes (Vol 1; Winter Wargaming, Vol 2; The Mediterranean) and I found them very well written with lots of pictures!
Volume 3 differs slightly in theme focusing on a campaign, the invasion of Norway in 1940, and even more specifically on the German air assault on Dombas. Pat said he was inspired by the Chain of Command campaign written by David Hunter titled "The Road to Dombas, 1940" which appeared in the 100th issue of Wargames, Soldiers & Strategy magazine.
Like the other "Setting the Scene" books Pat runs you through everything you need to know about constructing wargame table that is both functional and looks fantastic in only 112 pages packed with the techniques you need in only 112 pages. While many of the techniques are the same as Volume 1; Winter Wargaming, there are new techniques as well as new tips & tricks. One of the major differences is Pat creates a "permanent" board with the roads and rivers fixed in place, very different from the boards he created in Vols 1 & 2. He also delves a bit into the conversion world by converting the Norwegian infantry from a Warlord Games box of plastic Germans in great coats. A fairly simple conversion but worth the read. Also new in this book is a short 7 game campaign for the fighting around Dombas for both Chain of Command and Bolt Action.
Even if you already own Vol 1 which featured winter warfare during the Battle of the Bulge there is enough new material here to make it worth adding to your collection.
 |
| The cover shows just how well Pat was able to capture the desolate snowy landscape of Norway. |
 |
| Before you delve into the material inside you might want to get your winter jacket. Easy here because we never put away our winter jackets in Colorado. |
Wednesday, May 19, 2021
Wednesday, May 12, 2021
Monday, May 10, 2021
Chester the Rooster - Pt 5 - Back at it
I realized that its been a long time since I have worked on Chester, since October of 2019 as a matter of fact. The game plan at that time was to have him ready for Thanksgiving of 2019. Obviously I didn't make that goal. My mom certainly isn't getting any younger so I need to get moving on Chester. Its hard to tell how much work is actually left, I still don't have a lot of free time and this isn't something you can sit down for 15 minutes and get something accomplished.
For the most part the "money" side is finished (Chester's left side) it will need some touch up but the colors and carving are more basic on that side (its the side you don't see when you are looking at the carousel, its also the side that you typically mount from). The "romance side needs the most work. This sessions effort was focused on the wings, butt and saddles. I made pretty good progress over about a 3 hours stretch and just getting the initial saddle colors blocked in helped immensely with his appearance.
I'll try and carve out some more painting time for Chester as soon as I can.
 |
| This is where I had left off back in 2019. The saddle needs to be blocked and the wings, butt, tail and legs need the most work. |
 |
| This is the section I focused on for this session |
 |
| Breaking out the paints. The jars on the left hold the enamel equivalents of the primary oil paints I'm using. The oil paints in the middle and a selection of fairly good sized brushes on the right. |
 |
| At the end of three hours, the saddle is all blocked in (both sides) and the wings and butt feathers have been refined quite a bit. Just getting the saddle done improved the look quite a bit. The saddle blanket will eventually be a fairly bold red (as close to USMC red as I can get) with blue striping. The leather will have a faint red tone to it when its done with black edging. I'm working on making a stencil so I can get the USMC EGA painted in the corner of the blanket (undecided on if it will go on both sides or not at this point). |
Thursday, May 6, 2021
World War II Project - Rubicon Models PzKfw III H - The build complete
Since I'm apparently stalled on painting anything...again, I thought I would try and finish up the Rubicon PzKfw IIIH (with the 50mm KwK 38/L42). As you may recall from the last posting on this I had discovered quite a gap at the rear of the vehicle and I finally diagnosed the issue. I was pretty sure that someone at Rubicon or the hundreds of others that have built this kit would have noticed such a gap. When I glued on the back plate (part C25) I wasn't paying enough attention and instead of slipping neatly into place I managed to hang the top edge over the tab on the lower hull so it wasn't sitting flat. In addition this covered up the two slots for the tabs on part C26. Since I didn't attach C25 correctly in the first place it was easy to "break" off and glue in correctly. Of course I figured that out after I had cut the two tabs off of C26 and modified the back plate to get the right fit. Since the kit is so well engineered you can't even tell that I screwed it up even after I cut off the tabs and snipped away some detail on the back plate (C25).
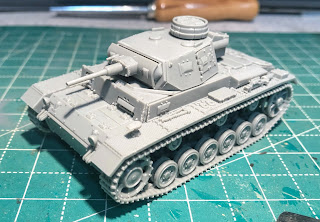
The final part of the build was finishing off the turret. This went together quite easily and really was a pleasure to put together, the fit on all the parts was perfect (well I admit that I was not happy with the way the cannon barrel [A03] seated into the first portion of the mantlet [A07] it just kind of sticks in there and I really had to pay attention as the glue set to make sure it wasn't crooked) . In the enlarged view of the turret I see a couple of little gaps but a little putty will take care of that, heck just priming the vehicles would probably take care of it. Let there be no mistake I'm a big fan of Rubicon Models, but this kit is probably the best one I have put together so far.
Current progress on my collection German Rubicon kits (from most complete to unbuilt):
1) STuG IIIG (x3) weathering in progress
2) STuH IIIG (x1) weathering in progress
3) Jagdpanther (x3) ready for decals
4) PzKfw IIIH (x1) ready for priming
5) PzKfw III (H-N box) (x2) unbuilt
6) PzKfw III Befehlswagen (x1) unbuilt
7) PzKfw IV (x6) unbuilt [This are from the first production run with the missing gun so I also have bunch of the replacement sprues to compensate for the incorrect one in the kit)
8) PzKfw VIB Tiger II (x2) unbuilt
I have obviously have developed a bit of back log!
Let's take a look at the pictures:
 |
| This was my first clue that I had messed up something. I was test fitting the fit of the upper chassis to the lower hull and found quite a gap at the rear and piece 26 (part of the muffler system) |
 |
| From the side you can just make out piece C25 in the middle of the gap. That's the piece that I didn't quite get into the right position |
 |
| A couple shots of the large locator tabs on C26, which I subsequently (and erroneously) cut off. |
 |
| The turret assembled with the short 50mm cannon |
 |
| A good overall look. As per my usual method the wheels and tracks have not been glued into place. |
