Quotes

Life is short, break the rules. Forgive quickly, kiss slowly. Love truly, laugh uncontrollably and never regret anything that makes you smile. - Samuel Longhorne Clemens (Mark Twain)

Tuesday, December 31, 2019

Life Intervenes - Again

Here are the kind of things that have kept me from doing to much of anything else.
The upstairs bathroom, at one point in time this was the main bathroom for the entire house. We have removed the top and what you see here is that area demoed to the studs and the new shower pan poured and drying. Everything else has been removed, the old linoleum stayed in place and was covered with hardibacker board and tile. Linoleum from that period was loaded with asbestos best to leave it in place.
This year's Christmas card, linocut block and Prussian Blue Ink. Not sure why we add this extra bit of stress but we do. I'm currently in the process of trying to save the linocut, whatever material it was mounted to absorbed water and warped making additional prints difficult at best.


And the Master bathroom, to the left


In the center, shower enclosure

To the right, where the tub should be and will be after they redo the tile.

And to answer the question, no both bathrooms were not torn up at the same time, the upstairs bathroom is finished except for one light and the Master is currently in the state you see here.

Friday, December 6, 2019

Review - Setting the Scene Vol 2 The Mediterranean

You will have to excuse the pictures I apparently deleted the good pictures, so these are just place holders till I can retake them.


With banged up copy in hand I sat down and read Pat's newest book; "Setting the Scene Vol 2 Creating a Wargames Layout for the Mediterranean". That's a long title and its a big book 148 pages packed full of text and to explain that text a ton of pictures. I'm sure there are plenty of reviews out there at this point but figured I would put in my 2 cents worth as well.

The nature of the beast says that there is going to be some duplication between Pat's book on winter scenes and this new one on the Mediterranean. The biggest difference between the two books is Vol 1 is focused on a season, winter, while Vol 2 is focused on a region. I think the regional focus allows some better in depth looks at the terrain types than Vol 1 does. On top of that while the focus of Vol 1 is strictly WWII, although it certainly is not a stretch to apply it to other periods, Vol 2 focus on two timer periods; WWII and Napoleonics. While the bulk of the information applies to both periods, there are areas on how to make things compatible with both periods. So instead of needing to build two identical pieces of terrain one with a bunker and one with a blockhouse you can do it with one piece of terrain and a little forward thinking.

Pat starts off with creating a mat, but with some significant improvements which I certainly appreciate! Better material suggestions along recommendations on applying the caulk and how much. Good stuff. One note that I would make is while Pat is a firm believer in PVA glue (Elmer's white glue in the US) you could replace it with Matt Medium, especially when applying flock. In the long run I suspect that the glue will hold up better depending on how often you unroll and roll up your mat.

He goes over creating his flexible roads again, but again there are improvements to the process make it worth reading through and not skipping. Making up those mountains is all new information. Pat makes references to other websites and videos for alternative ways to create those cliff faces. I'm not a big fan of using bark so those nods to other methods and where to find them are much appreciated. Since model railroading is my other time intensive hobby I already have a store of rock molds to use for my cliff faces (assuming I actually get to the point where I need them). I can already imagine games of Sharpe's Practice taking place around the bridge to the Monastery.

There are chapters on bridges, buildings and destroyed buildings all of which add to the methods you can use to create them rather than just repeating information from Vol 1. Completely new to this book is a chapter on painting for gaming as well as a guest chapter if you want to level up your painting skills. Vol 2 is an excellent companion book to Vol 1 so don't hesitate to pick this book up now or at least get it on your Christmas list!

Oh and in regards to my banged up book, Steve said that he would send a replacement for it. Which he certainly didn't have to do. I'm feeling quite special about this book with the first one being stolen right out of the package and the second looking like it had been through a war. Steven mentioned that in the 500 books he has shipped this way mine was the first one that had truly been beaten up so badly. Prior to this he only had a couple with minor spine damage.


Thursday, December 5, 2019

Kickstarter Rewards - War & Empire III - Forged in Battle

I received the kickstarter rewards from Forged in Battle (Westwind productions) yesterday. I have been eagerly anticipating this one for sometime. Since the production of the rulebook had fallen behind they opted to go ahead and send out the miniatures and would follow up with the book later.

I had opted for two starter armies rather than trying to mix and match packages with an unknown rule system and hope the Forged in Battle know what they are doing with the starters. I received the Norman army and the "Viking" army. Viking is in quotes here because I suspect that what I actually received is the Saxon starter army as all of the packs are marked either SG or SX. Since my four extra Viking packs are marked VK I figured something was off.

So that email is on the way, so far I'm not doing well with orders from the UK lately! However, everything else looks great. The miniatures are clean and fresh and just crying out to be painted. Of course we know how that goes in my house, they might be crying for sometime. I have vowed no miniature painting until Chester is finished, he remains my top priority.

Along with the Viking army I had to get a a couple of Viking longships to transport them. Both castings are quite clean and the metal miniatures (oars and upper torsos) look great. My only beef is that the ship hulls were cast with the shields mounted on the side which looks good but near as I can tell from the historical record is not how the shields would have been carried on board, its more for show and would have probably only been done in quiet waters for parades and funerals, not for going into battle. They still look great, some tiny casting flaws which are not unexpected in something like this. Certainly one of the better Viking longships out there right now, especially in 15mm.

Now that's a box full of stuff!

Shield transfers because I just couldn't bear the thought of painting all those shield designs by hand.

The extra Viking packs which provided the first clue that something might be amiss,

The Norman starter army with an extra NR3

The "Viking" Starter Army, all those SX notations make me think that this is more likely the Saxon Starter Army.

A beautiful Viking Longship, one of two.


Wednesday, December 4, 2019

Acquisition - Setting the Scene Vol 2 - Pat Smith

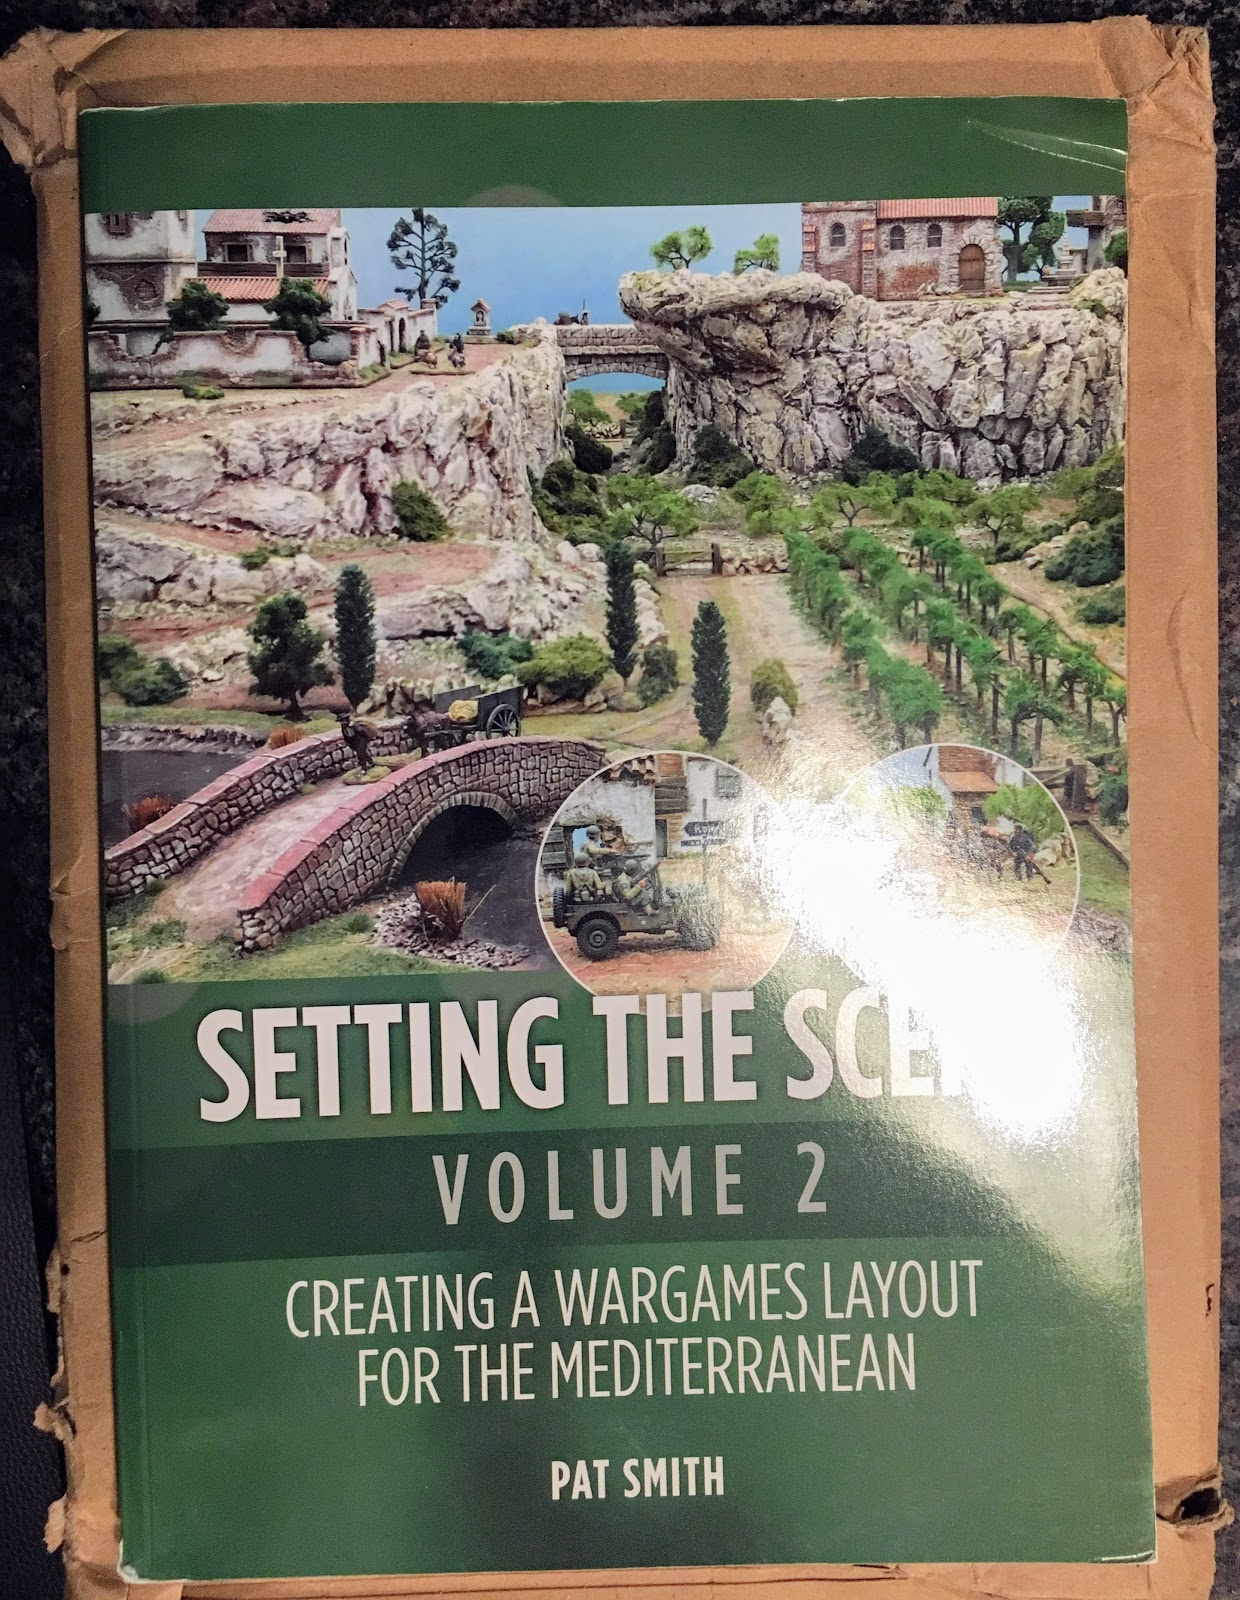
This is actually the second time that I have received this book or at least attempted to receive it. The first time it "arrived" the mailer had come open in transit and the book was missing completely. I guess there is some postal employee out there that is a wargamer and needed a copy of Pat's book more than I did. I contacted Steve Lampon who does the mailing and he was kind enough to send another copy.

Well that copy arrived yesterday and I guess that postal employee (not sure if it was a Royal Mail employee or a USPS employee, probably both) was outraged that I still needed a copy of the book:


At least the puppy didn't eat this one! I'm eager to dive into this book as Pat's first volume on winter gaming tables was excellent.

Monday, December 2, 2019

Acquisition & Review - Model Railroading as Art - Lance Mindheim


I bought this book a while ago and have been slowly making my way through it. Not because its particularly difficult to read but time seems to be in short supply this year and the puppy managed to eat it not once but twice, so this is my third copy of the book.

There are three writers that I really admire in the model railroad industry; Iain Rice, Tony Koester and Lance Mindheim. Earlier this year I was thinking that it had been quite a while since Mindheim had published a book although he is published in the model railroad press on a frequent basis. I did a quick search and my timing was perfect a new book was in the works. I was hoping that it might be a compilation or perhaps a complete guide on how he does creates his model buildings, but it was quickly evident that he was going to go in a slightly different direction than that. I ordered a copy pretty much as soon as it was available. I eagerly started reading and was about 2 chapters in when the puppy dragged it out of my backpack for a quick snack. I promptly ordered a second copy since the direction that Lance takes is quite fascinating. Being somewhat more careful this time I was keeping it my laptop bag which I unfortunately left unzipped and she found it again. Copy number 2 was good for a mid morning snack. At that point I took about a month long break before ordering my third copy of Lance's book. While the material presented was worth the wait I don't recommend having to purchase it 3 times.

Model Railroading as Art is a very different approach to the hobby than what we are used to seeing and reading. While there isn't new material on how to build something it does present an entirely different perspective on how we should (or at least could) view and design our layouts. I think Iain Rice uses some of these concepts, almost unconsciously, in his approach to design. Lance really does a fine job of translating how to take long established concepts of artistic design and philosophy and applying that to our layouts.

He takes on the visual elements of color, space and line and how we can use those elements to highlight features on are layout. Helping to direct the viewer's eye to where we want it to go and not see the layout as a model railroad but distinctly as a railroad. Scene composition becomes the key, we cannot represent the entirety of even a small part of a railroad in the typical spaces we have available, but rather than compressing our subject and perhaps trying to put to much in we should think about cropping our subject. Change our perspective around the physical boundaries, better element selection (time to stop buying all those cool kits, focus on what is important, time to sell off some of the stuff I have been accumulating) and how to think about placing those elements (or not placing as the case may be). This revolves around your focal point for a given area and requires you to look closer at spacing, scene compression, scale and proportion.

Scale is particularly intriguing within the context of the book. Its not so much about the scale you work in but how things within that scale look, not everything scales down very well. In particular how to deal with overly thick items that we just can't get smaller like hand rails. Lance maintains that the miniature people that populate our layouts also fall into that particular category. While I might agree that the current generation of miniatures that are available to us fall into this classification I think that is more a production problem within the model railroad hobby. If we look at the tabletop miniature world, fine scale miniatures and even our friends in the armor modeling world we can find plenty of samples of miniatures that fit very well within their scaled environments. I have compared some O scale miniatures available through Knuckleduster that not only are much cheaper than the O scale miniatures produced by model railroad companies but totally blow them out of water on both price and quality. So it can be done but we need some one to step up and actually do it in HO scale (at least for me).

None the less, that's a pretty minor disagreement on my part. I only wish that in a couple places Lance had gone into a bit more detail than is actually present but all the information is incredibly useful. This book really dovetails into some of the goals I have for my Warehouse Row layout and I certainly intend to take advantage of utilizing the  "Art" approach that Lance is pushing in this book. I definitely feel that this is a must have book for your model railroad library.


Thursday, November 21, 2019

A new, very old book - Pictorial History of the American Revolution

I found this book in a used book store in Charlottesville VA and quite frankly forgot about it with everything that has been going on. The "cover" for the spine has come off, but it was saved. Other than that I think its in reasonably good shape for a book that is about 134 years old.


Looks like someone received this book as a gift in 1885. I'm using that date as the publication date, kind of figuring that you would give a new copy of the book as a gift.


The only date I see on this page is 1847. If that's the publication date then its older than I thought. But there is the odd line that says Twenty Three Thousands and I'm not sure if that is the number printed so far or what.

Nice map of the Bunker and Breed's Hill

A fold out copy of the Declaration of Independence

And the back six pages are used for advertisements!


Tuesday, November 19, 2019

Chester the Rooster - Pt 8 - And Still More Feathers

The more feathers I paint the more there seem to be. Over the course of the last couple of days I have pretty much completed the head, neck and chest feathers. I was quite pleased with myself till I looked back along the body and its seemingly endless supply of feathers.

These were the colors I was anticipating using during this round of painting. I ended up adding Prussian Blue, Cobalt Blue and Pthalo Green to the mix as well.

Here I feel like I have finished up the head and neck on the romance side. I'm contemplating bringing the yellow down farther though. Will mull that over.

Here I have worked on the wing, and the body feathers. the first layer is green and then blue under that,

A closer look. The wing feathers need some highlight yet.

In the front I brought the green a bit further down.

And the same level of progress on the money side.

Friday, November 15, 2019

Chester the Rooster - Pt 7 - More Feathers

Still working slowly on the head at this point. The money side of Chester's head is pretty much done, maybe some touch ups but that's about it. I worked on the front (below the peak) and on the romance side last night. Pretty rough at this point but it should only take another hour or so to get it to the "finished" point.

The money side

From the front, which also shows some of the difficulty created by the lighting conditions in the living room.

The romance side, roughed in.


Thursday, November 14, 2019

Warehouse Row - "Where is this?" Figuring out a photo location

Among the Railroad Commission photos in the Cornell University Digital Library is this one:


In the Cornell description it just says its probably in downtown Denver. I knew that couldn't be the case since by this date (1960) there were no tracks in downtown Denver, only in lower downtown Denver. Since I had been focusing on Warehouse Row on Wynkoop St I was pretty certain it wasn't in that area, tracks down alleys just don't exist in LoDo. So it became a bit of an obsession to figure out where this particular photo was taken.

My first thought was it wasn't even taken in Colorado, its that unusual a location. The Cornell site really allows you to blow up the photo and I could just make out the license plate on the car just right of center. While you can't read it you can make out enough to figure out it is a Colorado license plate. So at least its in Colorado and most likely Denver, but certainly not downtown.

The one clue that really does standout is the viaduct, just about guarantees that it is in Denver (there are no viaducts that I'm aware of in Ft Collins or Colorado Springs), but which one is it? I know from its construction that its not the 14th street (Speer) viaduct, nor 15th or 16th or the 20th street viaducts. Its definitely not Lawrence or Brighton and probably not the 23rd street viaducts. That pretty much leaves the southern viaducts, 13th street, 8th Ave and 6th Ave. Pictures of the viaducts are actually somewhat hard to find so I settle on it just being south of Cherry Creek so 13th St, 8th Ave or 6th Ave.

Another clue is the sign on the wall in the lower left which says "Notice Spot Tank Car Here". That and the unusual loading dock would indicate that it must be a manufacturer that receives tank cars but certainly not a refinery type operation, more likely some kind of food or beverage operation. Not much of clue at this point, but important later on.

Signs are usually the big clues, if you can read the whole sign. Partial signs are harder to work with. Above the viaduct on the left side you can see a painted wall sign. You can definitely read "Dry Goods CO" on the top row but not much on the second row; "Sh" ..... fidence" with the bulk of the phrase broken up by the top of a neighboring building. Zooming in you can just make out what looks like an "R" just before Dry in the top row and a good guess on the "fidence" lettering would be confidence.

That "R" is the key, because the big dry goods company in Denver, at the time, was the Denver Dry Goods Company which happens to have the slogan "Shop with Confidence". Great! Except that the Denver Dry Goods Company occupied a huge space in downtown and that location was not rail served.

Final clue is the track configuration. The boxcars are of no help, you can't read any reporting marks on them and even if you could you wouldn't be able to tell location from those marks. Time to go back to the Sanborn insurance maps. One thing I discovered is that you can look up businesses on the index page for the volume being referenced. I started with the 1929 - Dec 1951 maps (which is the 1929 map with paste ups for changes in 1951). There I found that Denver Dry Goods (The Denver) had three locations; Dep't Store (sheet 19), Garage (sheet 82) and a Warehouse (sheet 80). This seemed a little to easy but I went to Sheet 80 and there was a good candidate for the photo. There is an alley between Wynkoop St and Wazee St with 13th street on the "north" end. No indication of the viaduct in 1951 but the 13th St viaduct was built after that date so that's not an issue. Track configuration is right, "The Denver" warehouse is in about the right spot, the short building in front of it is likely the Empire Casket Works and on the "west" side is the D&RGW Freight Depot. What isn't shown are the buildings "north" of 13th street. Fortunately the sheet for that section is listed right on sheet 80 and in this case its sheet 3.


Sheet 3 is mostly made up of the area north of Cherry Creek which includes the area from Wewatta to Wazee Streets, including the end of Warehouse Row on Wynkoop Street. I already had a copy of this sheet in my folder since it was the latest map of that area. On the "south" end is a little corner on the south side of Cherry Creek. This little angle is the "north" end of the alley way. On the "east" side is Brecht Candies on the "west" side is another Weicker Storage & Transfer building. For me this is pretty solid evidence that I had found the actual location of the photo. It even shows the funky little dock that separates the tank car location from the rest of the building.


And as an added bonus the Brecht Candy Company building is still there, with a helpful sign showing where the loading docks are (left side).


And here is the front of the Denver Dry Goods Warehouse. I haven't found pictures of the back side, unfortunately.


Here is the clinching photograph.


This is the Colorado Casket Company, the building next door to the Denver Dry Goods Warehouse. Above and to the left is the sign that helped narrow down the location of the Cornell photo. Puzzle Solved!

Thursday, November 7, 2019

Chester the Rooster - Pt 6 - Starting on the Feathers

Now the real hard part begins on Chester working on the feathers. I spent an hour working the colors down the feathers on the money side, which is the side you can get away with a few mistakes. The color change isn't to bad but it needs some more work before I shift over to the romance side. Still not bad work.

There should be four fairly distinct changes of colors in the feathers when its done. Looking at the "model" those changes occur in bands of color that can cut right through the middle of a feather which I find rather intriguing.

Monday, November 4, 2019

Chester the Rooster - Pt 5 - A little Red a little Yellow...

A little more work on Chester over the weekend. With the body finally blocked in I started the finish work on the head. Essentially finished all the red work and the beak. The beak probably needs a little touch up yet, but overall I'm pleased with the results thus far. At this stage I worked with a combination of tube oils and enamel paints. To make the enamels a little easier to handle I transferred them into jam jars. That essentially means that when I spill I will spill less paint at once. And yes I did manage to spare part of the jar full of Raw Sienna paint. The spill was definitely minimized by the smaller jar!

This is where I started the day. Again just blocked in colors with a bit of blending,

The reds about mid way to being finished, the blending is pretty rough at this point.

Blended reds and a yellow beak now. The beak still needs a bit of work.

Jam jars filled with enamels and tubes of oil paints

The brushes. I opted for craft brushes at this point. This type of painting is incredibly hard on brushes, especially the stippling brushes. Once you have a stippling brush broken in so its not shedding so much its just about ready to give up the ghost.