Quotes

Life is short, break the rules. Forgive quickly, kiss slowly. Love truly, laugh uncontrollably and never regret anything that makes you smile. - Samuel Longhorne Clemens (Mark Twain)

Monday, June 29, 2020

World War II Project - Return to Normandy - Railroad Station - More Brick

I stole some time and managed to get started on the brick trim for the railroad station. A little strip wood to make the edges pop out and follow that with the brick paper. Like I have in the past I wanted to score the paper and fold it around the corners and avoid having any seams. The contact paper backing made it really hard to do that, while I could get away with it on a single edge, like the foundation, trying to wrap it three or four times in a small area proved quite difficult. First I tried pealing off the backing which worked but was time consuming and not as successful as I had hoped it would be. I finally opted to cut small strips for the really small edges and then fold the larger piece around a single corner to cover the front seam. I'll have to go back over the other edge with a marker to hide the edge of the paper on the side.

The hobby shop is only 4 blocks away but I'm have to cut my own stripwood right now, blah. I need a new tool if I'm going to keep doing this.

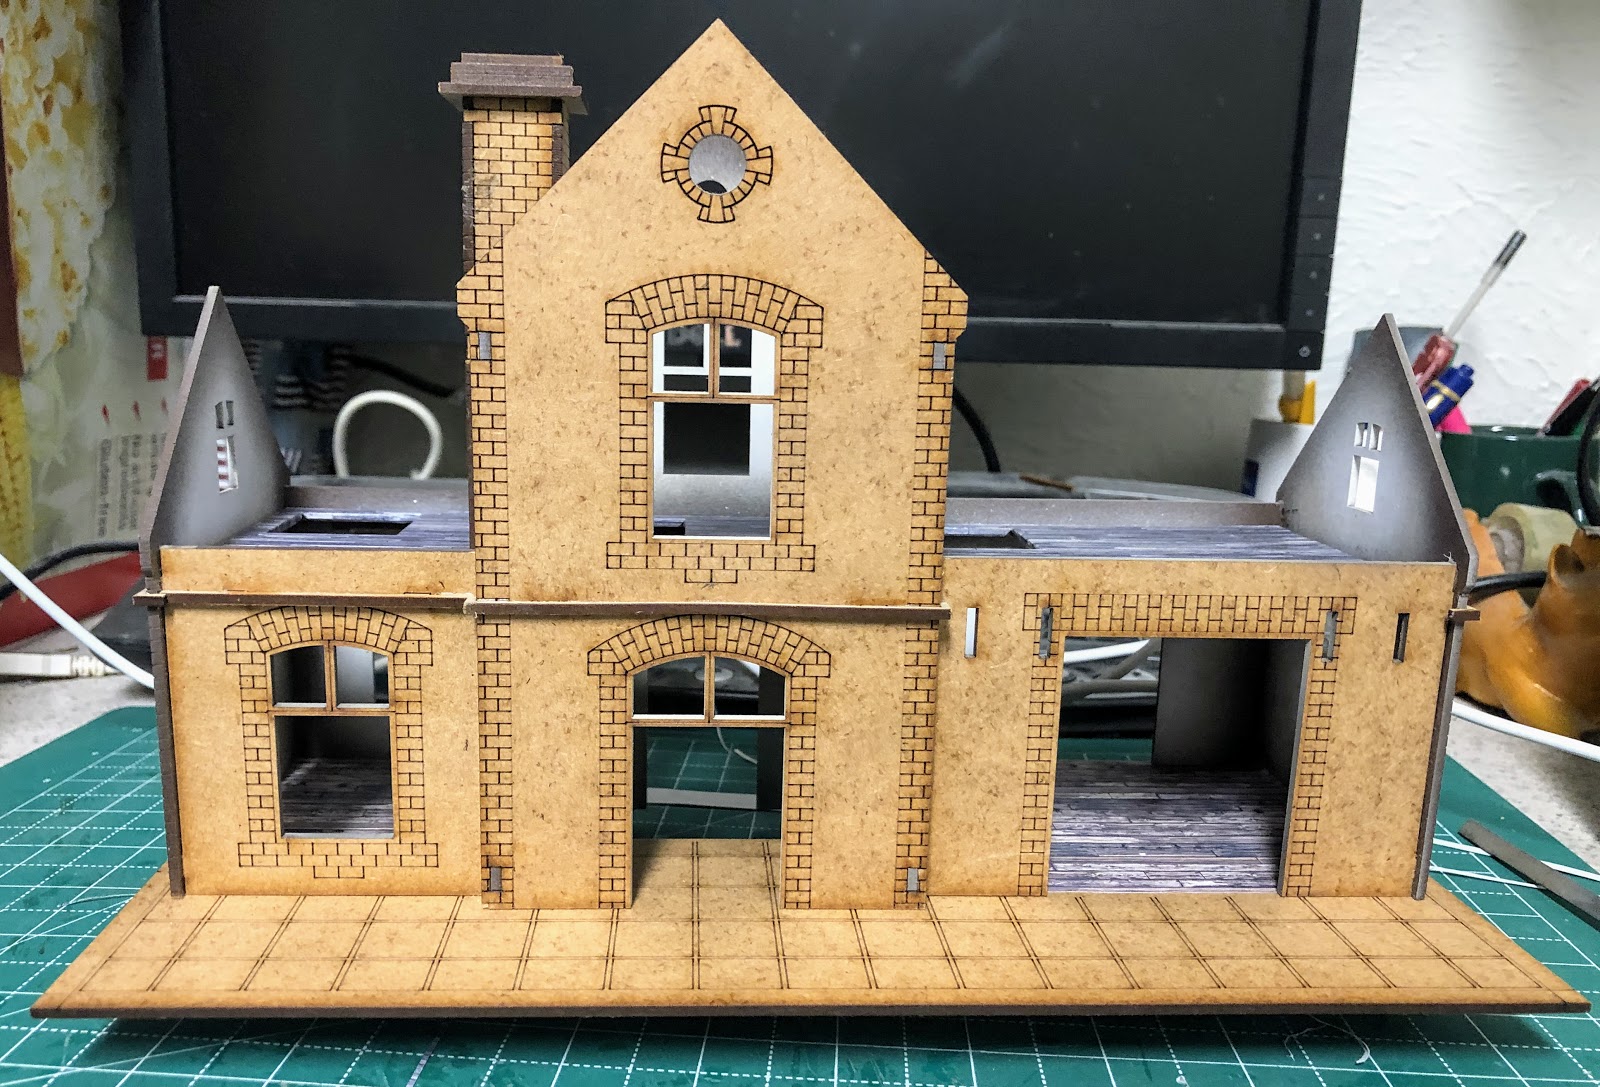
Gluing the stripwood into place on the platform side. On the center portion of the building I'll do this all the way up to the top.


One corner done. Looking at this pic I realized that I need to go up higher on the one edge as well and I have that funky corner to deal with.

The narrow interior of the brick column. That was a just a pain to do using a single piece of the brick paper.

This will work better. The narrow edges applied as its own strip and then fold the paper around the larger corner of the two larger edges.
I'm also re-considering the doors and windows. My original thought was to pop them out as well, which actually doesn't make much sense from an design perspective. I think I'll cut the brick paper to overlay directly on the surface instead of bumping them out. The paper is thick enough to stand out from the wall a bit even after I "plaster" the exterior walls. Still mulling that thought over.


Friday, June 26, 2020

World War II Project - Return to Normandy - The Gangs all Here - Fading

Next step trying to fade things a bit. In this instance I'm using the new Oilbrusher paints from Ammo as opposed to straight up oils. They are a little easier to use but I wasn't found of the green fade and I ended up mixing in a bit of the buff to lighten it a bit more. Its hard to see the photos though, the lights tend to wash things out a bit much.


Decide where to apply paint. The Oilbrusher has its own brush. On this first vehicle those dabs of buff paint are a little large. A drop of oil point goes a long way. If you choose to use straight up tube oils, you should put them on something (cardboard works) to pull out some of the excess oil.


All three faded. Most of it is on the upper surfaces. Clicking on the picture will give you a better idea of what's going on.


And on the Pak 40 S307(f)

And blended in. Blending done with some older brushes and clean. low odor, mineral spirits.

The three colors I tried. In the end the green wasn't a good choice and I added some buff to it to lighten it up.


All three camo colors blended. Next step is chipping but they need to dry for about 24 hours before I do that.


And the S307(f) finished up after the Lorraines.


It has  been an interesting process and its definitely going to take some practice to really pull it off effectively. Gaming models are the perfect test bed or this.

Thursday, June 25, 2020

World War II Project - Return to Normandy - Railroad Station Brickwork

A little more progress on the RR Station. I have started putting the brickwork on. In order to make it "pop" I'm gluing some strip wood into place and covering it with the brick paper.

Actually this is a bit bigger than strip wood, cutting it from a piece of basswood.

This is a total pain to do, especially that small fold to cover the top edge.

Not bad, a long way to go though.

Monday, June 22, 2020

World War II Project - Return to Normandy - The Gangs all Here - Lining

Again, grabbing a few spare moments I was able to finish lining the three lorraine schleppers and the pak 40 S307. I see some spots that need more lining and some spots that need more cleaning, nothing like feeling a little rushed and missing things. Overall I like the effect so far, it really makes the vehicles "pop". Will see how it all works out with the weathering in the end.


Friday, June 19, 2020

World War II Project - Return to Normandy - Railroad Station Platform

Grabbing a few small increments of time to do a little work on the railroad station. All I really did at this point was add the brick paper to the base of the platform and then glue the building and the platform together. Its going to make painting the floor inside the center portion of the building a bit difficult but I just feel the need to move forward on it at this point. As a bonus I think I have figured out how to go about adding the "depth" I want for the brick on the outside of the building. I'll have to save that for the next installment though.

A couple of corner clamps to keep things in place while the glue sets.

And 4 pounds of weights to make sure that the top of the platform is firmly attached to the foundation.


Tuesday, June 16, 2020

World War II Project - Return to Normandy - Railroad Station Chimney

While I mull over how to do the rest of the brick I figured I could at least work on the fireplace/chimney. For the first floor this will be "plastered" so the brickwork itself only needs to extend as deep as the floor in the attic. Much like the main floor there are some very long slots so you can slide the chimney in from the top of the building to the first floor. An added complication is that it goes farther down in the center of the building than it does on the office side. In other words pay attention to what you are doing and don't try to force the chimney all the way down if you managed to reverse it. This one took a fair amount of filing to get it to slide nicely, again the fit is tight, really tight, and you need to widen those slots a bit before you try and jam it into place.

The chimney is going to have a seam and I decided I wanted it in the center of one side rather than at a corner. Since it goes up through one of the tall walls and out through the highest roof I figured I could but the seam in the center of the side that would be mostly hidden when the roof is in place. I also figured that if I did a decent job of wrapping the paper around you won't see the seam at first glance anyway.


The chimney with a line drawn for where I want the bottom edge of the brick to come down. Anything below that line will be "plastered". You can see one of the two slots on this side, there are matching slots in the wall and that will run up into the brick paper. Like the Sally 4th kits, you will need to remove the paper from the area where the chimney slides into position.

Here is the brick I'll be using. Its a little thicker than the stonework sheet I used in the Sally 4th buildings because its printed on a contact type paper. And the contact glue is not strong enough for our purposes so you have to apply glue anyway.

I opted for the seam to be on the long edge of the chimney. I was also able to use the brick pattern, etched by the laser, to keep things nice and straight. Here I'm only gluing down one side, then I'll wrap the whole thing around the chimney and then match back up along this line.

Always best to either clamp or apply weight while the glue sets.

Turning the first corner and gluing the next side.

Wrapped up in brick. I can see the seam but I know what to look for, still it stands out more than I hoped it would.

Chimney in place. Note that I cut the channel on the side a little to high. Although its harder to see than I expected. I might go back and fill this in with some scrap brick paper.

The "channel" seems a bit more pronounced on this side. But the roof is going to cover almost all of it. Still thinking about filling it in.

The inside with the seam. Really seams to stand in this photo.

With the attic floor in place. At least I got that measurement right.

And a peak through the windows. Plain or plastered downstairs and brick through the upper window. The view through the upper window can only be seen when the roof is not in place, otherwise the roof support blocks  this view.

Monday, June 15, 2020

World War II Project - Return to Normandy - Railroad Station

Long time readers may have vague recollections of the Sarissa Precision Railroad Station that I started work on. After I built the Mid-Terrace House from Sally 4th as far as I could (ran out of roofing materials) I decided to pull this building out and see what I could do with it.

While I do like Sarissa kits, in general, I still have a few issues with them. In some cases the laser cut are just to precise and tabs and slots need to be filed a bit in order to get a good fit without breaking anything. This is definitely the case with this kit. I have broken off several key components while trying to get things to fit together. Remember, MDF is fragile and to much pressure is more than likely to break something than to actually get it to fit together.

I added wood floor paper to the main floor, removed the old brickwork on the platform and basically fixed things up so I could move on to the next phase. The same phase that stopped me before, brickwork. I want the brick to stand out more from the building, otherwise the plastered surface and the brick are on the same level which is not what I want for this particular building. I need to cut some pieces to be able to wrap the brick sheet around and give it a little bit more depth. The only "bumpy" brick I have is on contact paper which makes it a little thicker and the contact paper is really not sticky enough for this type of work. After doing two terrace buildings with "bumpy" paper I want to keep that theme going I think it really improves the look. I'm actually considering redoing the outside of the Charlie Foxtrot dormer house with it I like it so much.

This is the state of the building when I finally managed to dig everything out.

I managed to get the floor piece in place. This is a large piece consisting of the platform, the floors and long cuts to slide it the building. Argh, thought I was going to break the darn thing and I did break one of the edge pieces off. Here you can see that I managed to get the wood floor paper in place. A real chore, but if I had glued down first then tried to slide it into place I would have torn it, the fit is that tight. Remember to keep your files and sandpaper handy to smooth down trouble spots!

Attic floors in place and papered up. They are removable (thank goodness). I added some extra ledges for them to rest on. There is some exterior trim with long tabs that should serve that purpose but I'm not using them in a couple places and in others I just didn't just the length of the tab sticking through the wall to be strong enough to support miniatures in the attics. If this was a rural American RR Station the spaces upstairs would be the living quarters for the station agent and his family. The only access should be through the small room on the right and there shouldn't be an attic floor at all in the baggage room on the left. The attics are really small too and because of the roof design the windows on either end are actually block off from seeing inside.

Got the fireplace/chimney assembly into place. That one was a very tight fit trying to slide it down the wall. Again keep the files handy. For the time being it is not glued into place (and probably doesn't need to be). This will be my first brick wrapping project for the station.

And a look from track side. A lot of work still to go on this one.

Friday, June 12, 2020

World War II Project - Return to Normandy - The Gangs all here

There has been a lot of building and not much painting for a while now. Here is the line up for the paint shop


15cm sFH 135/1 (Sf) auf Geschutzwagen Lorraine Schlepper (f), Pak 40 auf S307 (f) both from MadBob Miniatures

Pak 40 auf S307 (f), Unic P107 Halftrack (f) [Warlord Games]

First up; a filter to help bring the colors together a bit more.

Filter applied and lining started on one of the schleppers. The filter affect is hard to see in the photos, it is subtle but the colors are a bit more unified because of it. The lining on the first schlepper may be to dark a brown might have been a better choice. Further weathering may tone it down quite a bit. I'm going to try a different wash for lining on the next one, more of an umber brown I think.


Thursday, June 11, 2020

World War II Project - Return to Normandy - Putting it together

I have a much of sub-assemblies and its time to bring them all together into a single massive edifice now. As you can tell I have pretty much thrown out the instruction book from Sally 4th at this point. After you have built one of these terrace house kits they are pretty much the same and you should build them in a way that best suits you. I think that overall this second one went together faster and easier. Not sure if its because I opted to build up all the sub assemblies first or not but it certainly made some things a lot easier. I'm definitely all for not assembling the basic building shell till the very last step at this point.

First thing to remember is to remove your exterior paper anyplace where another section butts up against a wall. On the back wall there are four spots where this happens. If you don't get back down to the original MDF none of the pieces in the backyards will fit very well or the fit will be so tight that you may actually break something. Its much easier to do this now than after you have started gluing things together (lesson learned when building the Left End Terrace House).
Nice fit and you can't even tell the paper was cut away from the main building.


Moving down the line, test fitting first and then adjusting things with a knife and file for a good fit.

Here are the center three sections cut. At this point I hadn't done the end walls, both of which just butt up against the back wall.

Everything looking pretty good at this stage.

Front and back walls all glued up with windows, doors and shutters.

Second floor built up and ready to go


Backyard "sheds" built up and ready. Note that I still need to add a little bit of stone wall to and edge here. I didn't bother gluing that bit on till after everything was assembled.


Here are the pieces for the main building. 
I glued up the back wall first as there is a lot going on here and it will really affect how the rest goes together.


Then adding an side wall.
 
Then the main floor fireplaces and the other end wall.

And then the front. Note that I have removed all the rubber bands that I used to hold this together while the glue dried.

Looking down at the main floor after the staircases were added.

And the second floor in place

The front and the roof. But wait the roof isn't finished! I didn't realize that I had completely run out of roofing material. So the roof will have to wait while I wait for more roofing material to arrive.

And from the back

Now sitting up against the left end terrace house.


I think its going to look really good once I get the sidewalks in place and some of those extra details like gutters and downspouts.