Quotes

Life is short, break the rules. Forgive quickly, kiss slowly. Love truly, laugh uncontrollably and never regret anything that makes you smile. - Samuel Longhorne Clemens (Mark Twain)
Showing posts with label Railroad Station. Show all posts

Tuesday, June 27, 2023

World War II Project - Return of the Railroad Station - Part 3

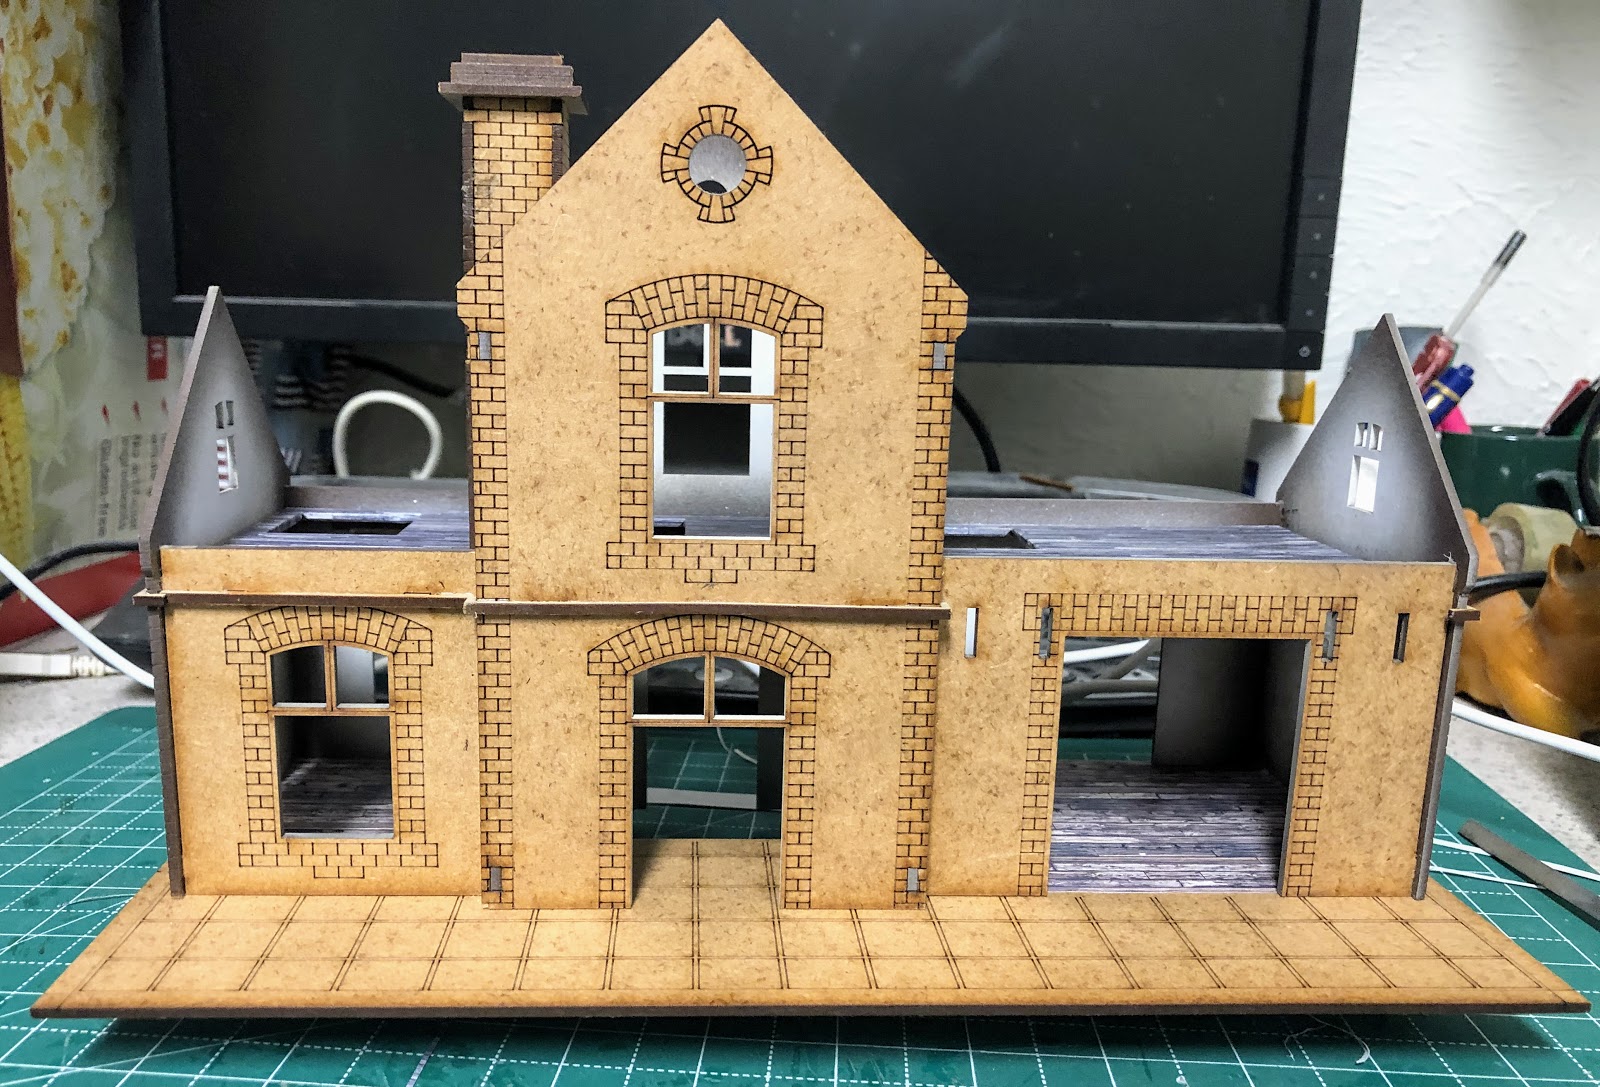
After that kind of weird first paint color went on, I followed it up with kind of darker tan and did a heavy dry brush of a greyish white. Everything seems to blending together pretty well at this point.


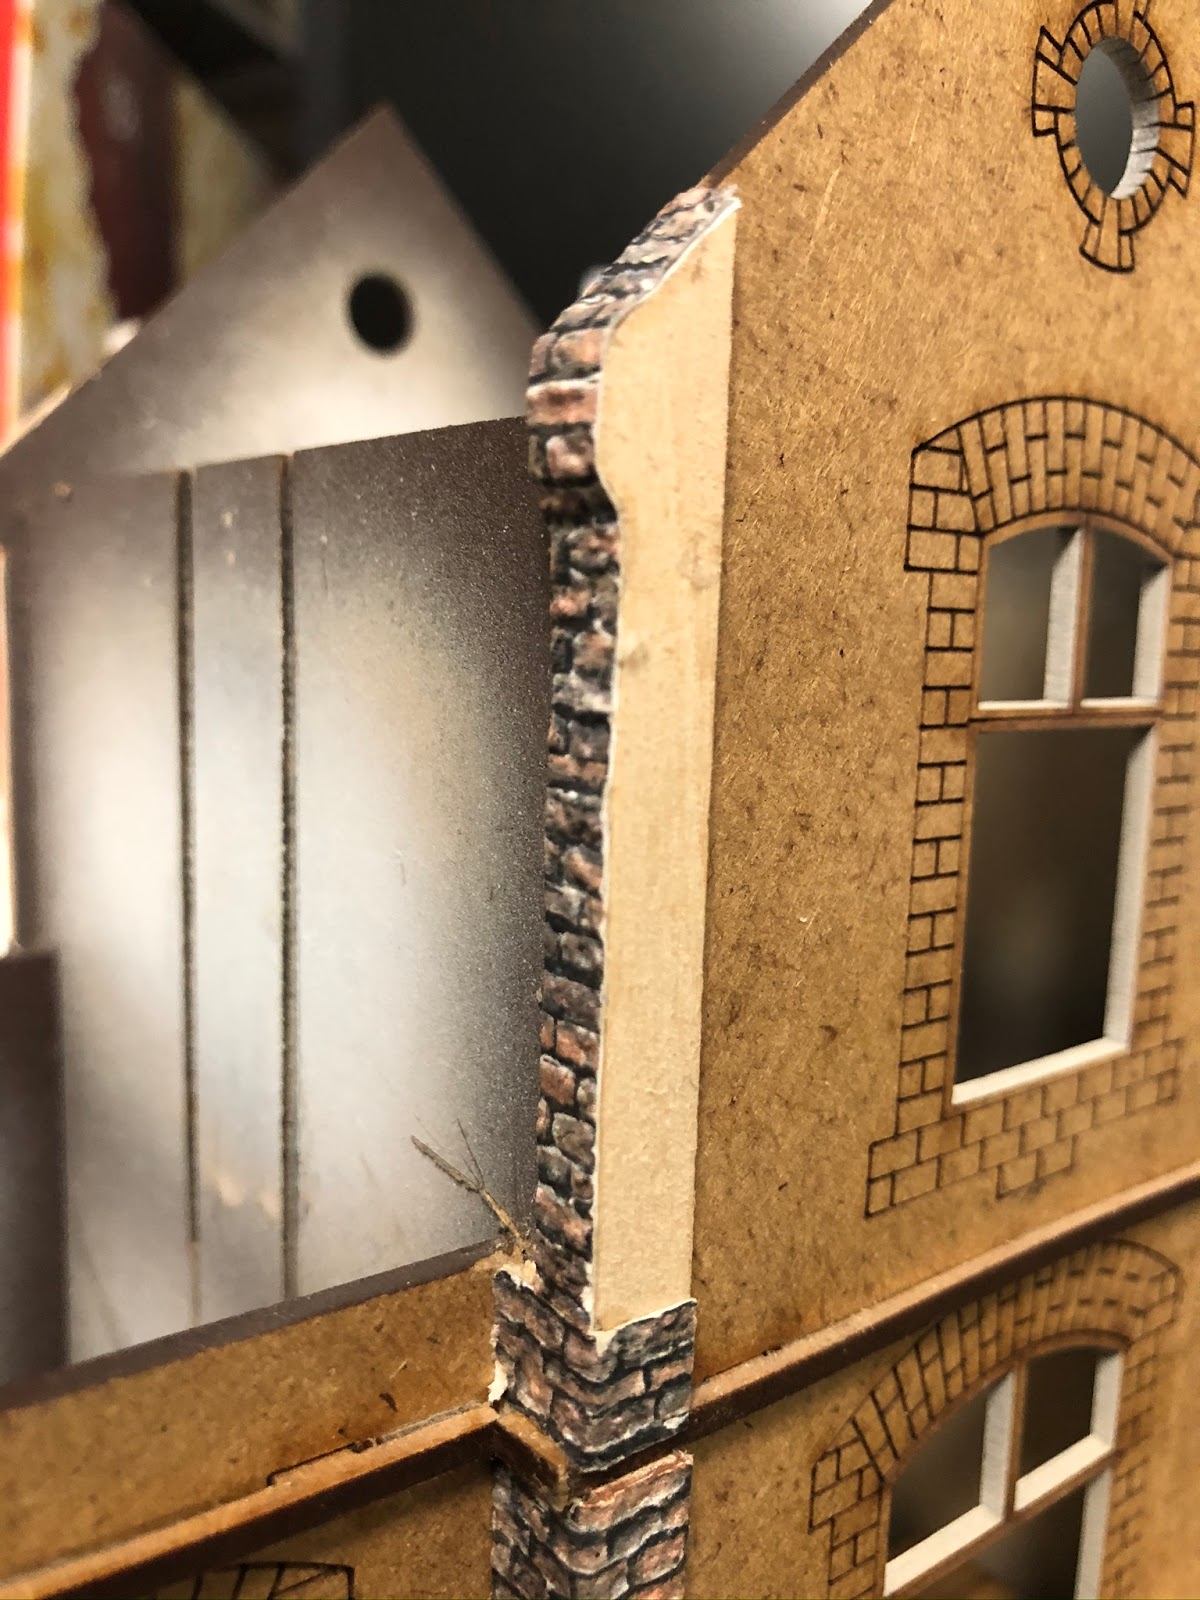
There are two different layers of base color on this side and I think I did a pretty good job of blending everything together and you can't really tell. I fell like I made a bad choice with the brick color and should have gone with the other shade which has quite a bit more red/orange to it.


Its hard to see but there is a gap between the top of the platform and that first layer of brick. A significant gap. This is because I made not one but two mistakes in the assembly. The first was not dry fitting first and making sure everything was actually going where it was supposed to. Second I didn't clamp the top of the platform down and apparently didn't make sure that all the tabs had engaged and it was flat against the top of the brick wall. My thought is to just glue a couple of courses of brick paper strips along this and hiding it.


Thursday, July 16, 2020

World War II Project - Return to Normandy - Railroad Station - Brick con't

In between painting sessions I have been working on the Railroad Station. I needed to work through some of the problems and potential solutions before I posted anything about it. Progress has definitely been slow. I did decide that the brick around the openings would be applied flat to the walls. I'm counting on the thickness of the paper to make it pop out after I have "plastered" the outside walls and it saves a lot of stripwood which seems, like other things lately, to be in short supply.

Other than that I have popped the brick out from the corners with stripwood and applied the brick paper. As I have mentioned before, trying to do more than a single corner with this stuff is really tough, removing the adhesive backing would solve that issue but it would add a lot of time. For the next brick project I have acquired another batch of bumpy paper without the contact backing.


Finished all the brick corners for the ground floor, that seemed to take forever. Here I have cut out and glued on the stripwood for the upper floor.

Applying the brick edge. I actually did both sides so there won't be any folding necessary on the facing piece, but it does have to be wide enough to cover two edges now.

Can I trace things accurately enough to make a template? I just needed to trace the outline of the laser cut brick. Not as easy as it would appear but certainly doable.

The test template. It became a test because it basically disintegrated when I applied the glue.

Thick paper to start with and paper cut to the full size of the wall to help maintain proper registration.

I mounted everything to cardboard first this time and then cut out the templates after the glue had dried. I actually don't need the small circular window, those will have to be done one brick at a time.

 I used the template to create the four windows of that size that are required.
And here is everything cut out. Do you see the problem? I need to make the arched portion with bricks going vertically not horizontally. I will have to cut out the offending section and then lay the brick strips in one by one. Fortunately I will be able to use the lasercuts on the building to guide me through this, I'm sure it will be tedious to do.


This is the street side. The framing around the freight doors was easy enough. A regular horizontal pattern on the edges and a soldier row across the top.

And from the platform side.

Monday, June 29, 2020

World War II Project - Return to Normandy - Railroad Station - More Brick

I stole some time and managed to get started on the brick trim for the railroad station. A little strip wood to make the edges pop out and follow that with the brick paper. Like I have in the past I wanted to score the paper and fold it around the corners and avoid having any seams. The contact paper backing made it really hard to do that, while I could get away with it on a single edge, like the foundation, trying to wrap it three or four times in a small area proved quite difficult. First I tried pealing off the backing which worked but was time consuming and not as successful as I had hoped it would be. I finally opted to cut small strips for the really small edges and then fold the larger piece around a single corner to cover the front seam. I'll have to go back over the other edge with a marker to hide the edge of the paper on the side.

The hobby shop is only 4 blocks away but I'm have to cut my own stripwood right now, blah. I need a new tool if I'm going to keep doing this.

Gluing the stripwood into place on the platform side. On the center portion of the building I'll do this all the way up to the top.


One corner done. Looking at this pic I realized that I need to go up higher on the one edge as well and I have that funky corner to deal with.

The narrow interior of the brick column. That was a just a pain to do using a single piece of the brick paper.

This will work better. The narrow edges applied as its own strip and then fold the paper around the larger corner of the two larger edges.
I'm also re-considering the doors and windows. My original thought was to pop them out as well, which actually doesn't make much sense from an design perspective. I think I'll cut the brick paper to overlay directly on the surface instead of bumping them out. The paper is thick enough to stand out from the wall a bit even after I "plaster" the exterior walls. Still mulling that thought over.


Friday, June 19, 2020

World War II Project - Return to Normandy - Railroad Station Platform

Grabbing a few small increments of time to do a little work on the railroad station. All I really did at this point was add the brick paper to the base of the platform and then glue the building and the platform together. Its going to make painting the floor inside the center portion of the building a bit difficult but I just feel the need to move forward on it at this point. As a bonus I think I have figured out how to go about adding the "depth" I want for the brick on the outside of the building. I'll have to save that for the next installment though.

A couple of corner clamps to keep things in place while the glue sets.

And 4 pounds of weights to make sure that the top of the platform is firmly attached to the foundation.


Tuesday, June 16, 2020

World War II Project - Return to Normandy - Railroad Station Chimney

While I mull over how to do the rest of the brick I figured I could at least work on the fireplace/chimney. For the first floor this will be "plastered" so the brickwork itself only needs to extend as deep as the floor in the attic. Much like the main floor there are some very long slots so you can slide the chimney in from the top of the building to the first floor. An added complication is that it goes farther down in the center of the building than it does on the office side. In other words pay attention to what you are doing and don't try to force the chimney all the way down if you managed to reverse it. This one took a fair amount of filing to get it to slide nicely, again the fit is tight, really tight, and you need to widen those slots a bit before you try and jam it into place.

The chimney is going to have a seam and I decided I wanted it in the center of one side rather than at a corner. Since it goes up through one of the tall walls and out through the highest roof I figured I could but the seam in the center of the side that would be mostly hidden when the roof is in place. I also figured that if I did a decent job of wrapping the paper around you won't see the seam at first glance anyway.


The chimney with a line drawn for where I want the bottom edge of the brick to come down. Anything below that line will be "plastered". You can see one of the two slots on this side, there are matching slots in the wall and that will run up into the brick paper. Like the Sally 4th kits, you will need to remove the paper from the area where the chimney slides into position.

Here is the brick I'll be using. Its a little thicker than the stonework sheet I used in the Sally 4th buildings because its printed on a contact type paper. And the contact glue is not strong enough for our purposes so you have to apply glue anyway.

I opted for the seam to be on the long edge of the chimney. I was also able to use the brick pattern, etched by the laser, to keep things nice and straight. Here I'm only gluing down one side, then I'll wrap the whole thing around the chimney and then match back up along this line.

Always best to either clamp or apply weight while the glue sets.

Turning the first corner and gluing the next side.

Wrapped up in brick. I can see the seam but I know what to look for, still it stands out more than I hoped it would.

Chimney in place. Note that I cut the channel on the side a little to high. Although its harder to see than I expected. I might go back and fill this in with some scrap brick paper.

The "channel" seems a bit more pronounced on this side. But the roof is going to cover almost all of it. Still thinking about filling it in.

The inside with the seam. Really seams to stand in this photo.

With the attic floor in place. At least I got that measurement right.

And a peak through the windows. Plain or plastered downstairs and brick through the upper window. The view through the upper window can only be seen when the roof is not in place, otherwise the roof support blocks  this view.

Monday, June 15, 2020

World War II Project - Return to Normandy - Railroad Station

Long time readers may have vague recollections of the Sarissa Precision Railroad Station that I started work on. After I built the Mid-Terrace House from Sally 4th as far as I could (ran out of roofing materials) I decided to pull this building out and see what I could do with it.

While I do like Sarissa kits, in general, I still have a few issues with them. In some cases the laser cut are just to precise and tabs and slots need to be filed a bit in order to get a good fit without breaking anything. This is definitely the case with this kit. I have broken off several key components while trying to get things to fit together. Remember, MDF is fragile and to much pressure is more than likely to break something than to actually get it to fit together.

I added wood floor paper to the main floor, removed the old brickwork on the platform and basically fixed things up so I could move on to the next phase. The same phase that stopped me before, brickwork. I want the brick to stand out more from the building, otherwise the plastered surface and the brick are on the same level which is not what I want for this particular building. I need to cut some pieces to be able to wrap the brick sheet around and give it a little bit more depth. The only "bumpy" brick I have is on contact paper which makes it a little thicker and the contact paper is really not sticky enough for this type of work. After doing two terrace buildings with "bumpy" paper I want to keep that theme going I think it really improves the look. I'm actually considering redoing the outside of the Charlie Foxtrot dormer house with it I like it so much.

This is the state of the building when I finally managed to dig everything out.

I managed to get the floor piece in place. This is a large piece consisting of the platform, the floors and long cuts to slide it the building. Argh, thought I was going to break the darn thing and I did break one of the edge pieces off. Here you can see that I managed to get the wood floor paper in place. A real chore, but if I had glued down first then tried to slide it into place I would have torn it, the fit is that tight. Remember to keep your files and sandpaper handy to smooth down trouble spots!

Attic floors in place and papered up. They are removable (thank goodness). I added some extra ledges for them to rest on. There is some exterior trim with long tabs that should serve that purpose but I'm not using them in a couple places and in others I just didn't just the length of the tab sticking through the wall to be strong enough to support miniatures in the attics. If this was a rural American RR Station the spaces upstairs would be the living quarters for the station agent and his family. The only access should be through the small room on the right and there shouldn't be an attic floor at all in the baggage room on the left. The attics are really small too and because of the roof design the windows on either end are actually block off from seeing inside.

Got the fireplace/chimney assembly into place. That one was a very tight fit trying to slide it down the wall. Again keep the files handy. For the time being it is not glued into place (and probably doesn't need to be). This will be my first brick wrapping project for the station.

And a look from track side. A lot of work still to go on this one.

Thursday, September 4, 2014

Calamity Gets a New RR Station - Part 10

The RR Station has been sitting off to the side of my work area for just over a month now with now progress, although it has served as a handy spot to set my decals on. If this was just a model for one of my train layouts (yes, plural) that would be one thing, but its a gaming piece and not even just a gaming piece but one of my "Hero" buildings. As such I need to be able to get to access the inside which means being able to get to both the first and second stories. With a regular structure this wouldn't be terribly difficult but the roof on this one is also a little complicated. I sat at my desk contemplating the second story and figured that I could at least start laying out where the interior walls could go.  As I contemplated this I realized that the whole second story could turn out to be rather flimsy so how could I fix that?

I decided that I would at least make some rafters and see if that would help the though process. I made these while watching Zulu (again!). Then I decided I could, at least, cut the interior walls for the two many rooms and see how that might fit together. Once I had the walls cut and kind of stacked everything together ideas finally started coming. I think that to add strength I'm going to only have half the roof come off. So I think I'm going to take the rafters and cut them roughly in half and permanently glue the bottom half to the interior walls and bottom edge of the floor. So far the clearances seem to indicate that it will work. There will probably only be a couple of the complete rafters included as fingers and minis need to be able to fit inside the building. Hopefully, this will get the process jump started again and I can get this building finished and off the workbench.


I have a couple of pictures from last night and since pictures are like bacon I figured I would include them.


The dilemma; There are no side walls, only roofs.

Well I need some rafters, here's one way to make sure the angles are good and add a bit of trim to the gable which helps finish it off.

Let's reinforce it so I can mess around with it a bit

I'm thinking so I think I make some more. They should be useful for something.

Well, I know I need some short interior walls.

And finally at work today, I may have figured it out. All except how to actually make that complex part where the two roofs come together.

Sunday, July 27, 2014

Calamity Gets a New RR Station - Part 9

I started to assembly the first floor of Calamity's railroad station over the weekend. Its been a rough assembly to say the least. Between dropping parts and breaking glue joints (learn to let the glue set!) I did finally manage to get the first floor together. I even remembered to put the raised floor in on the baggage/freight side of the building. Its still lacking some of the necessary interior details (like the two interior walls) but I think I'm going to take a break for a few days before getting to that.

Overall I'm pretty happy with the how the things are looking. I did not get the floor get exactly right but a little trimming combined with the exterior platform should hide those mistakes, that's what I'm hoping for anyway.

On to the construction photos!

So I approached this as four sub assemblies. This is the waiting room side.

Trackside Windows

Townside

Baggage room side

Corner clamps and blocks of steel

Trying to glue it to the floor! Those steel blocks weight 1# each or so

Waiting room side. I have had these corner clamps for about 35 years


Inside Trackside

Another view of the trackside window bay

Maybe that joint will hold this time

One of my small 90 degree angle blocks

One for each corner

I think they will hold now

Let's try getting that bay window together again

Something easier, the raised interior floor for the baggage room

And a little paint on the floor

Okay, maybe I'll try putting together the broken pieces directly to the floor

A little scale. I like the height of the modified S Scale door

Finally starting to come together

Just the trackside bay window left to go

Okay, it looks like its going to stay together, just going to anchor that corner to the table for a while

And clamp that corner

Looking good from the ground though

Town side

Yea, still missing the door to the baggage freight room.

Tracksdie


Looks pretty roomy in there without the walls

And a fuzzy shot showing the difference in height. And yes, those windows really are suppose to be there. The interior wall here will have door to the baggage/freight room, I'm guessing I should put a couple of steps up to the door to make things easier on the inhabitants