
Wednesday, August 26, 2020
Tuesday, August 25, 2020
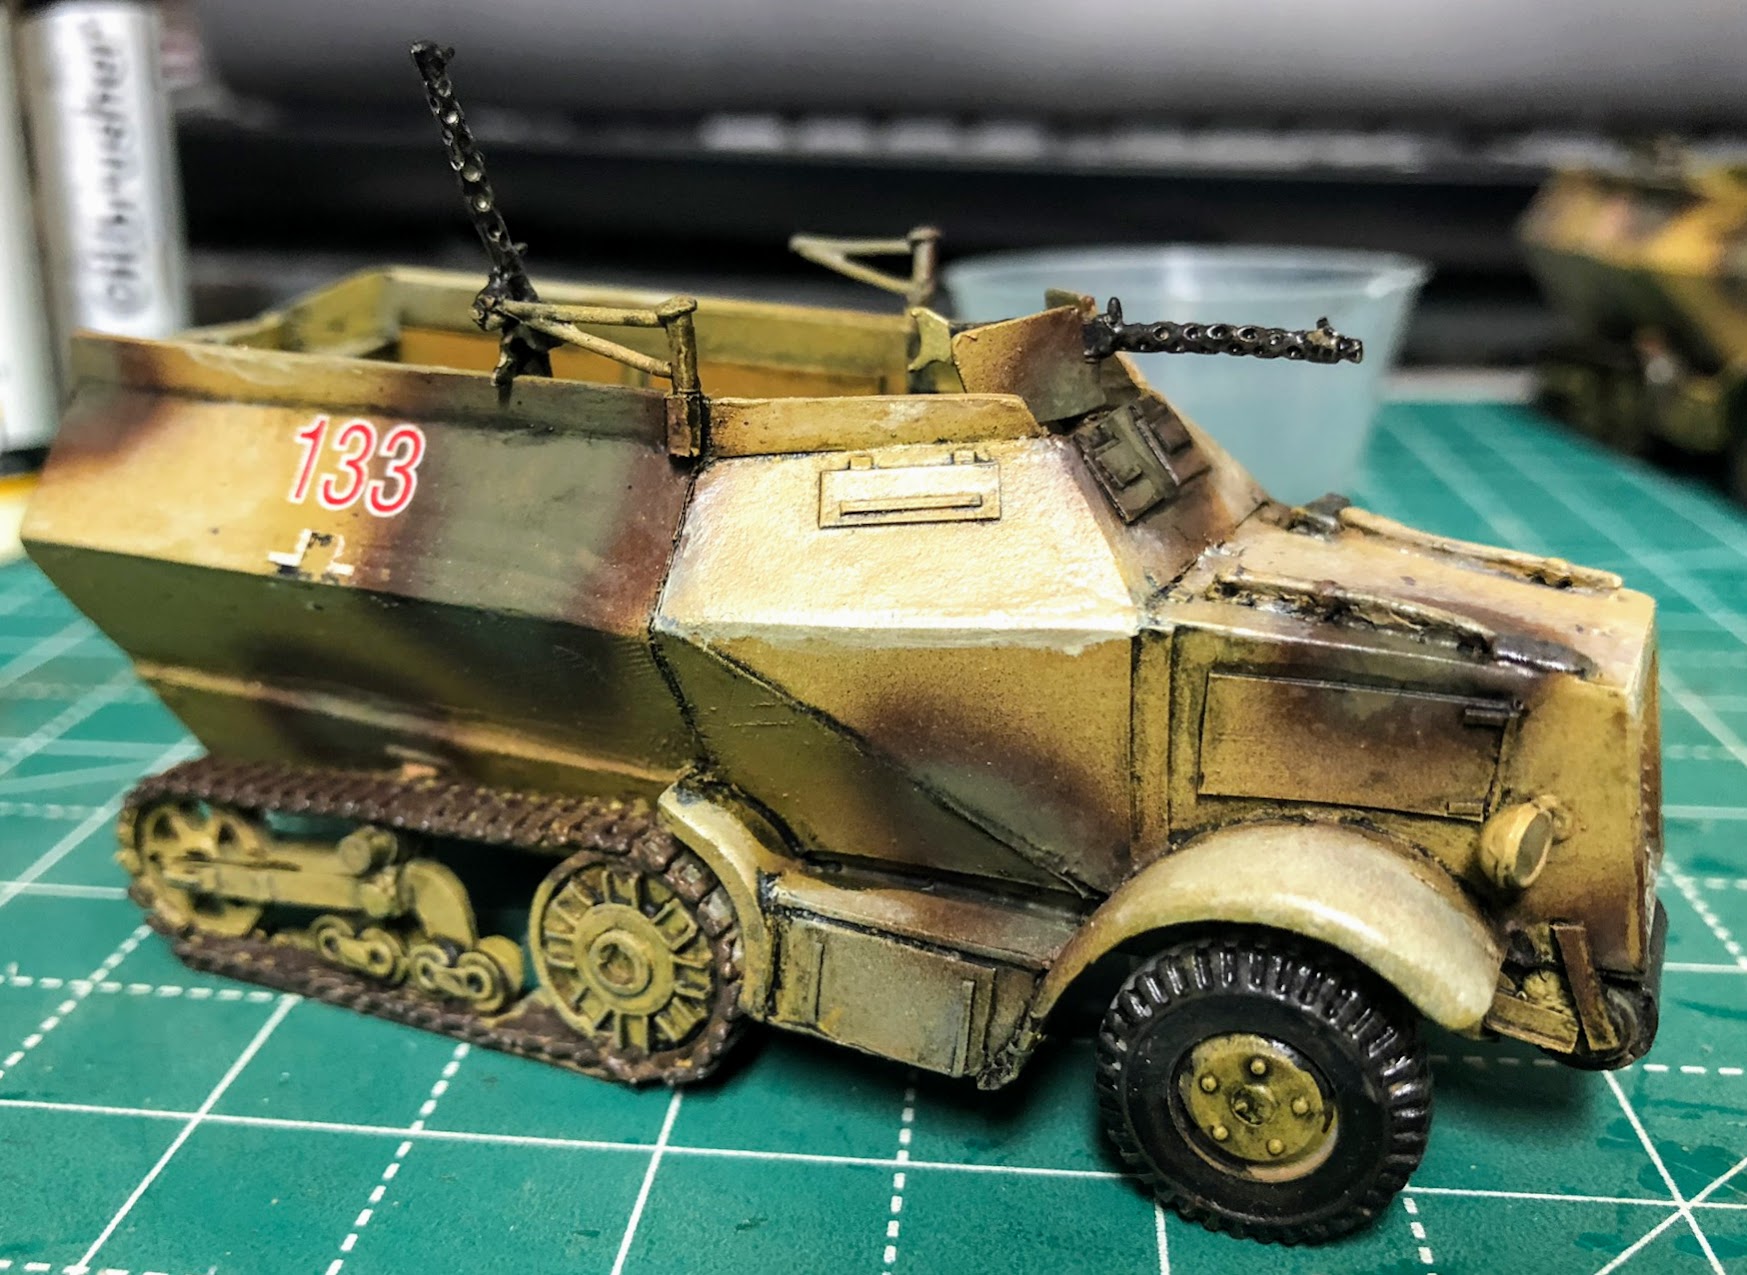
World War II Project - P107 (f)/U304 (f) 21st Pz Div Halftracks - Painting Con'ts
Painting really can't be described as anything but a process. Adding in oils and pigments really does lengthen the time it takes to complete the paint work. Its becoming increasingly clear that if I stay the course on this style of painting that I really need to be working on multiple models at once. Unlike acrylics which tend to dry in a matter of minutes (sometimes seconds) here, the oils I'm using take hours and I usually let them sit for at least 24 hours before continuing on to the next step. I'm a bit of an impatient painter to begin with so the waiting can be quite trying at times but patience is really the key to making these techniques work. On several occasions I have finished something like streaking and moved to fast to the next step and wiped out all the streaking effects that I have done.


You can substitute acrylics for oils for all of this, put its decidedly more difficult to pull off. With the oils I have minutes and even hours to work with the paint to get it right, with acrylics I better get it right the first time. I see that Ammo by Mig does make an acrylic thinner maybe I'll try experimenting with that.
In the meantime, I have finished the fading on the U304 (f)s. I used the Abteilung oil paints on two of them and Oilbrushers on the third. I like the Abteilung oils the only disadvantage I see is using tubes which always wastes paint. The Oilbrushers are just a bit easier to deal with in this regard since I can go straight from the bottle to the surface with the build in brush. Once the fading was finished though you can't tell the difference so which one you decide to use really comes down to personal choice.
Fading in progress:
 |
| This is how it starts out, just a few streaks of paint. |
 |
| Starting the blending, the key to be successful here is very little thinner on the brush. |

 |
| Kind of messy yet, but I'll get it cleaned up. |
A few days after I did the initial work I was able to, more or less, finish off this portion of the paint work. I did a fade on the mostly upper surfaces and I darkened the green in some other areas. What I really discovered is that, at least for me, that its best to keep you oil paint dabs very small and you don't need to use any thinner at all, or very, very small quantities. It didn't take much thinner to wipe away my work. Which means I might consider sealing these again after I do the chipping.


World War II Project - Unboxing - Rubicon M4A3E2 "Jumbo"
I have tried to be good and concentrate specifically on the German forces I need for the Too Fat Lardies Von Luck pint sized campaign. For the most part I thing I have done okay, as the German AFVs for this campaign are nearing completion now. But there are still a lot of German vehicles waiting in line (I discovered a Warlords Game Tiger I in the cabinet yesterday). Not to mention moving towards finishing all the German Infantry and British Paras that I need for Von Luck. However, I have always had a fascination for the "Jumbo" Sherman (M4A3E2). I needed to fill out an order to Rubicon to get free shipping so I slipped this resin conversion kit in along with the M4A3 kit (which is required).
I have already built and M4A3 from Rubicon and it is a marvelous kit so I know what to expect from that. What came in the small box was a bit unexpected though. Traditionally conversion kits usually just provide the parts and you provide the knowledge to get it right during the build. Not the case with this conversion kit. First thing out of the box was an instruction manual covering the areas where the conversion parts come into play so I'll mark the instructions for the base M4A3 kit so I know when to move over to a section where the resin parts come into play. The resin parts are amazing, I'm not sure they will need any clean up at this point. The turret sides may actually be to clean and may need to be roughened up a bit to better represent the rougher surface of the cast turret (if I go that far with it). Right now I have no qualms about the parts fitting well with the plastic kit. I need to do a little research on this one. I'm fairly certain that the parts are for the production version that came from the US factories and not the "Panther" conversions that were done in the field.
Although I'm in the middle of all those German kits, I may need a break from those to build up this little gem.
A few pictures:


Monday, August 24, 2020
World War II Project - Unboxing - Rubicon PzKfw III H/J/L/M/N
I have been waiting for this kit for a long time. This is the 2nd Edition of Rubicon's PzKfw III kit. I never acquired a copy of their first effort but I did have a copy of their 1st Edition PzKfw IV kit. That particular kit was rather average, the fit of the parts were excellent but some of the details needed to be re-worked. I suspect that the 1st Edition PzKfw III was similar.
This new kit is very versatile, as advertised, you can build the later models of the PzKfw III series, H-N. The early versions are covered in a second kit covering the E-L versions . I'm guessing there is overlap in between the two kits because of vehicle upgrades, field units being upgraded to the next version on the fly (perhaps in the E-L kit you would get armor upgrades consisting of bolted on armor, whereas in the later kit those armor upgrades are built in, guess I'll need to buy as early version box and find out). If you want to build a Panzerbefehlswagen (command) version you no longer need to do conversion work, Rubicon has kindly created a specific kit that will allow you to build one of the E/H/J/L variants (now I need to buy this one since I don't believe there is an L version, it should be E/H/J/K, the E & H have fixed turrets with the big deck mounted aerial frame and the J & K have the star antenna mounted on the back deck, I"ll have to pull out my Panzer Tracts books now).
This kit comes in the big Rubicon box and comes complete with 5 sprues of parts, including two sets of tracks with different versions of the drive wheels and multiple turret and gun mantles to cover the number of guns that were mounted on this chassis. Of course you get all those guns as well from the 5cm KwK 38/L42 to the 7.5cm KwK 39/L60. The version I'm most interested in is the J, so I may have to buy the early kit to better reflect the Afrika Korps vehicles which would have bolted on armor upgrades as opposed to those for the 6th Panzer Division which would have straight from the factory Js. If you want to see the sprues I would recommend heading over to the Rubicon forum and look up the PzKfw III in the Works in Progress section.
The instruction are pretty standard although the one in this kit is a booklet, 14 pages long, since it has to cover so many variations of the build. I would suggest highlighting the sections that pertain specifically to the version you are going to build so you don't go down the wrong path (which I did with the StuG III kit on several occasions when I was building those). The decals are excellent giving you a lot of variety on potential unit markings including red, white and black turret numbers for the sides and the back of the turret. Since I have two kits I'll try and use as much as I can from a single sheet and save the second sheet for other projects, you can never have enough decals.
I'm definitely looking forward to building this kit, but the line in front of it is long. I have to finish painting the 3 U304 (f) halftracks and 4 StuG IIIs. I have one Jagdpanther that is partially built with 2 more to follow that not to mention 6 PzKfw IVs (3 for Afrika and 3 for Europe). I might go ahead and shift this in front of the PzKfw IVs but no farther up than that.
A few pictures:

 |
| Its an intimidating stack of sprues, my bits box will be very full at the end of this build. |
 |
| The five versions you can build are right on the cover and there is a chart inside as well that covers the years and numbers produced. |
 |
| It has the 21st Panzer Division markings which makes me happy but the palm trees are in black instead of white which makes me sad. |
Friday, August 21, 2020
World War II Project - P107 (f)/U304 (f) 21st Pz Div Halftracks - Paintwork
Its been a while since I have worked on these but its time to get them across the finish line. I did a little more research because I was getting a little confused about some of the information I was reading. I blame it on Becker. So the P107 (f) itself is actually the unarmored version, which looks a lot like a halftracked truck. The original function, for the French, was as a light artillery tractor or an engineering platform. Enter our friend Alfred Becker. The 21st Panzer Division was short on all types of armored vehicles, but especially the SdKfz 251/1 halftracks. Becker took the P107 and from them created the armored U304 (f) halftrack. It looks very similar to the SdKfz 251 and I suspect that was intentional to help avoid friendly fire as the angled armored sides would not have been easy to construct.
I'm using the Warlord Games P107 (which should be called the U304(f)) which required some fairly major "adjustments" to get it to come together properly. Warlord also makes a U304(f) with the PaK 36 (I'm not sure how I missed that). I don't know if its the same body as their P107 or a new model but I'm fairly certain it was not available when I bought my P107s which was, admittedly, a number of years ago. I have also learned that Mad Bob Miniatures is also making the U304 (f) now and that would probably be my first choice if I were to do it again or just needed more. Mad Bob makes two AA versions (armored and partially armored) the MG version and the Pak 36 version. Their castings tend to be a little on the rough side but the simplicity of construction and the price go a long way in making up for that and really there are plenty of ways to fix a rough casting.
Here are links to the previous progress on the U304 (f)s:
And with that I started off with the paint sequence (still trying to figure out the best sequence for this, so subject to change without notice). I applied a filter first to tie the colors together a bit more. I did two very thin coats which harmonized the colors a bit more than a single coat would do. Following that I did the lining. This really starts to make the vehicles standout and its definitely a bit tedious. You don't just apply an dark wash over the whole vehicle which would really hide what I was trying to do with the filter, instead I use a brush with a reasonably good tip and outline the areas, especially around raised panels, panel lines and the like. I don't use my good Kolinsky sables for this, I'm using Ammo's Dark Wash which is an enamel wash and enamels will eat a brush really fast. Which means I finally found a good use for those double ended brushes I got on a kickstarter so many years ago now. Oh and apparently I didn't really get enough gloss varnish over the decals in a couple of places and the filter really ripped them up. However, I think they look quite good after that so I didn't bother to replace them. They will help with the chipping.
After that was finished I started to fade the upper surfaces a bit. I'm trying some oil colors from Abteilung to see how those work differently from the Ammo Oilbrushers. Unfortunately I really didn't really let things dry adequately so the initial work was not what I had hoped for. Time to step away and let things dry before I try it again.


The step I was hoping to get to, fading using the new Abteilung oils I purchased. Best to spread these out on a piece of cardboard to absorb some of the excess oil, helps it dry faster too. I'll go back to these after the U304s have had some more time to dry.
Wednesday, August 19, 2020

Friday, August 14, 2020
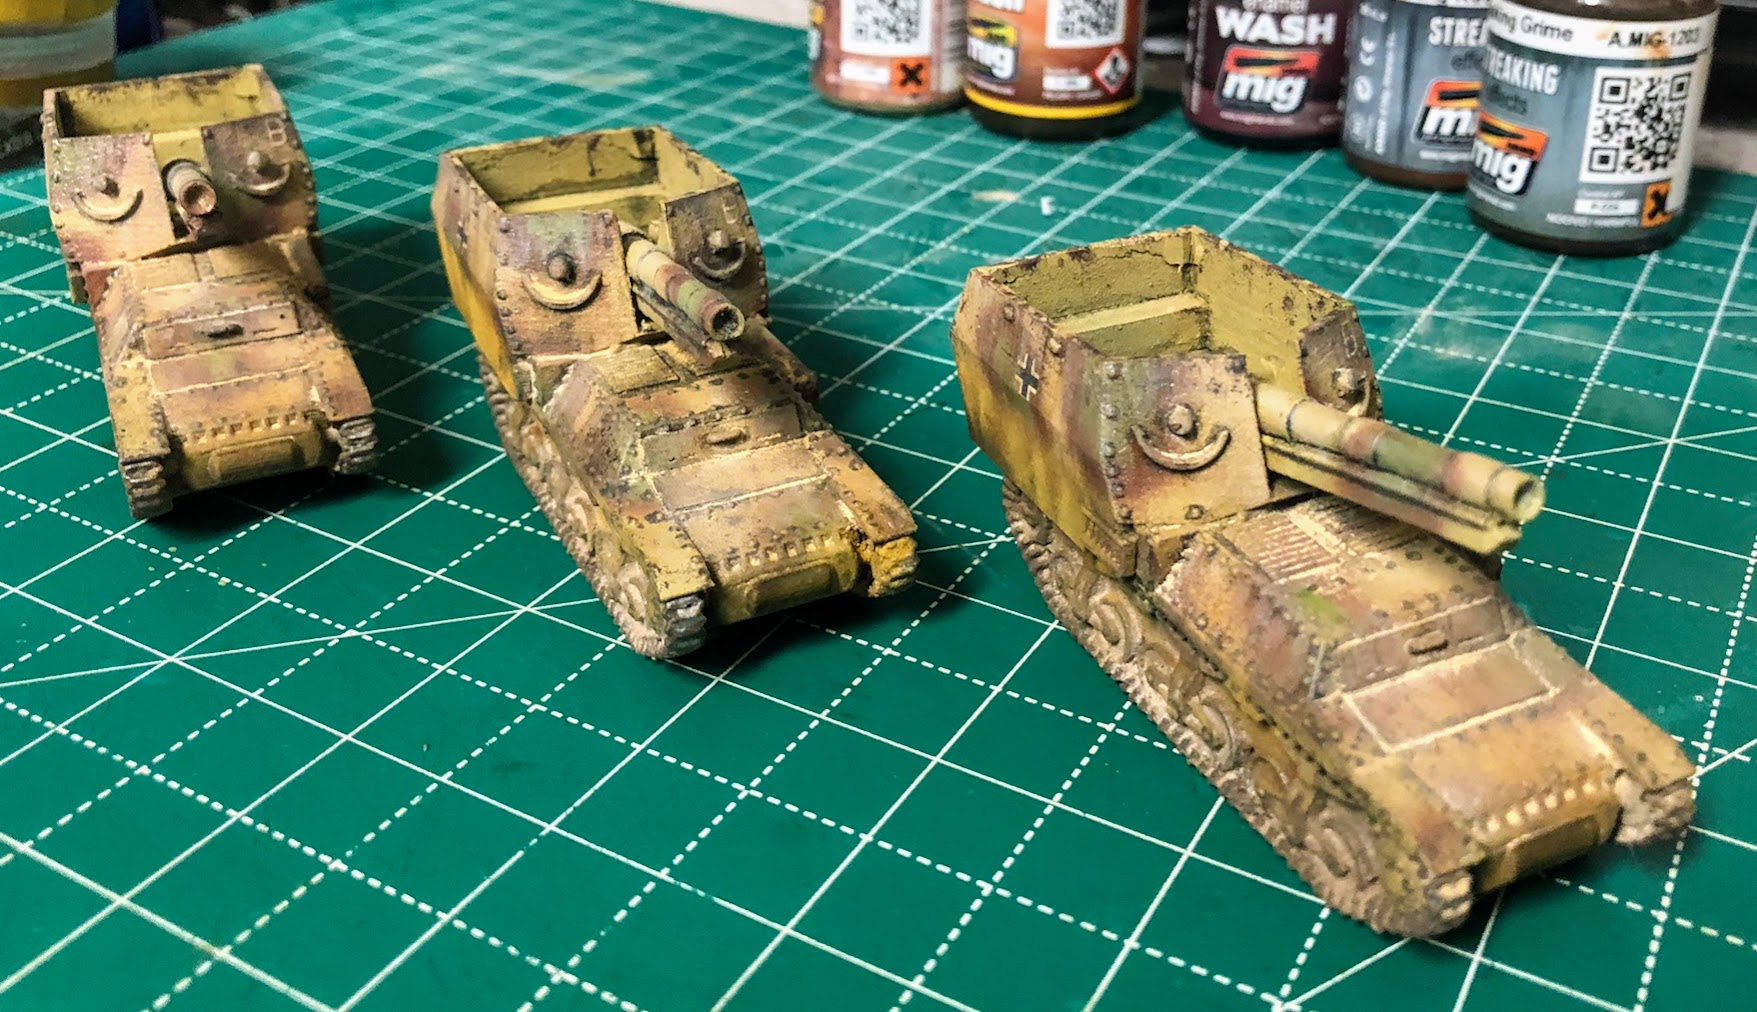
World War II Project - Return to Normandy - The Gangs all Here - Finished
Going to call these done and ready for the table, although I'm still toying with mounting them to bases.
 |
| mSPW S307(f) with Pak 40 ATG by Mad Bob Miniatures |


 |
| 15cm sFH 135/1 (Sf) auf Geschutzwagen Lorraine Schlepper (f) by Mad Bob Miniatures |


Thursday, August 13, 2020
World War II Project - Return to Normandy - The Gangs all Here - Recovery
I sat down with these and finished them up. First thing I did was stir my matte varnish really, really well! I used that to cut the glossy shine down and give a nice matte surface for the pigments to adhere too.
First the dust up. I applied some dusty colored pigments to the top surfaces and the bogies and tracks. I wet that down with white spirits and then wiped off the excess with a makeup sponge. Maybe a little heavy but not bad.


I followed that up with some more pigments. This time I used the Pan Pastels and applied three layers.


Wednesday, August 12, 2020

Monday, August 10, 2020
Age of Sail, Black Seas - Plastic Frigates - Primed
I needed a little break so I grabbed all the plastic frigates from Black Seas, set the airbrush pressure to about 8 psi and hit them with the black primer. I know I have popsicle sticks around here some place but I couldn't find them while I was thinking about doing this, hence the lower PSI level. I thinned the Stynylrez primer down to handle the low pressure and did a couple of coats to get everything covered. So these represent the three smaller US frigates from the original six and six more brigs of one kind or another.


Primed and ready for some detail. Looks like they will need some pretty precise painting.
Wednesday, August 5, 2020
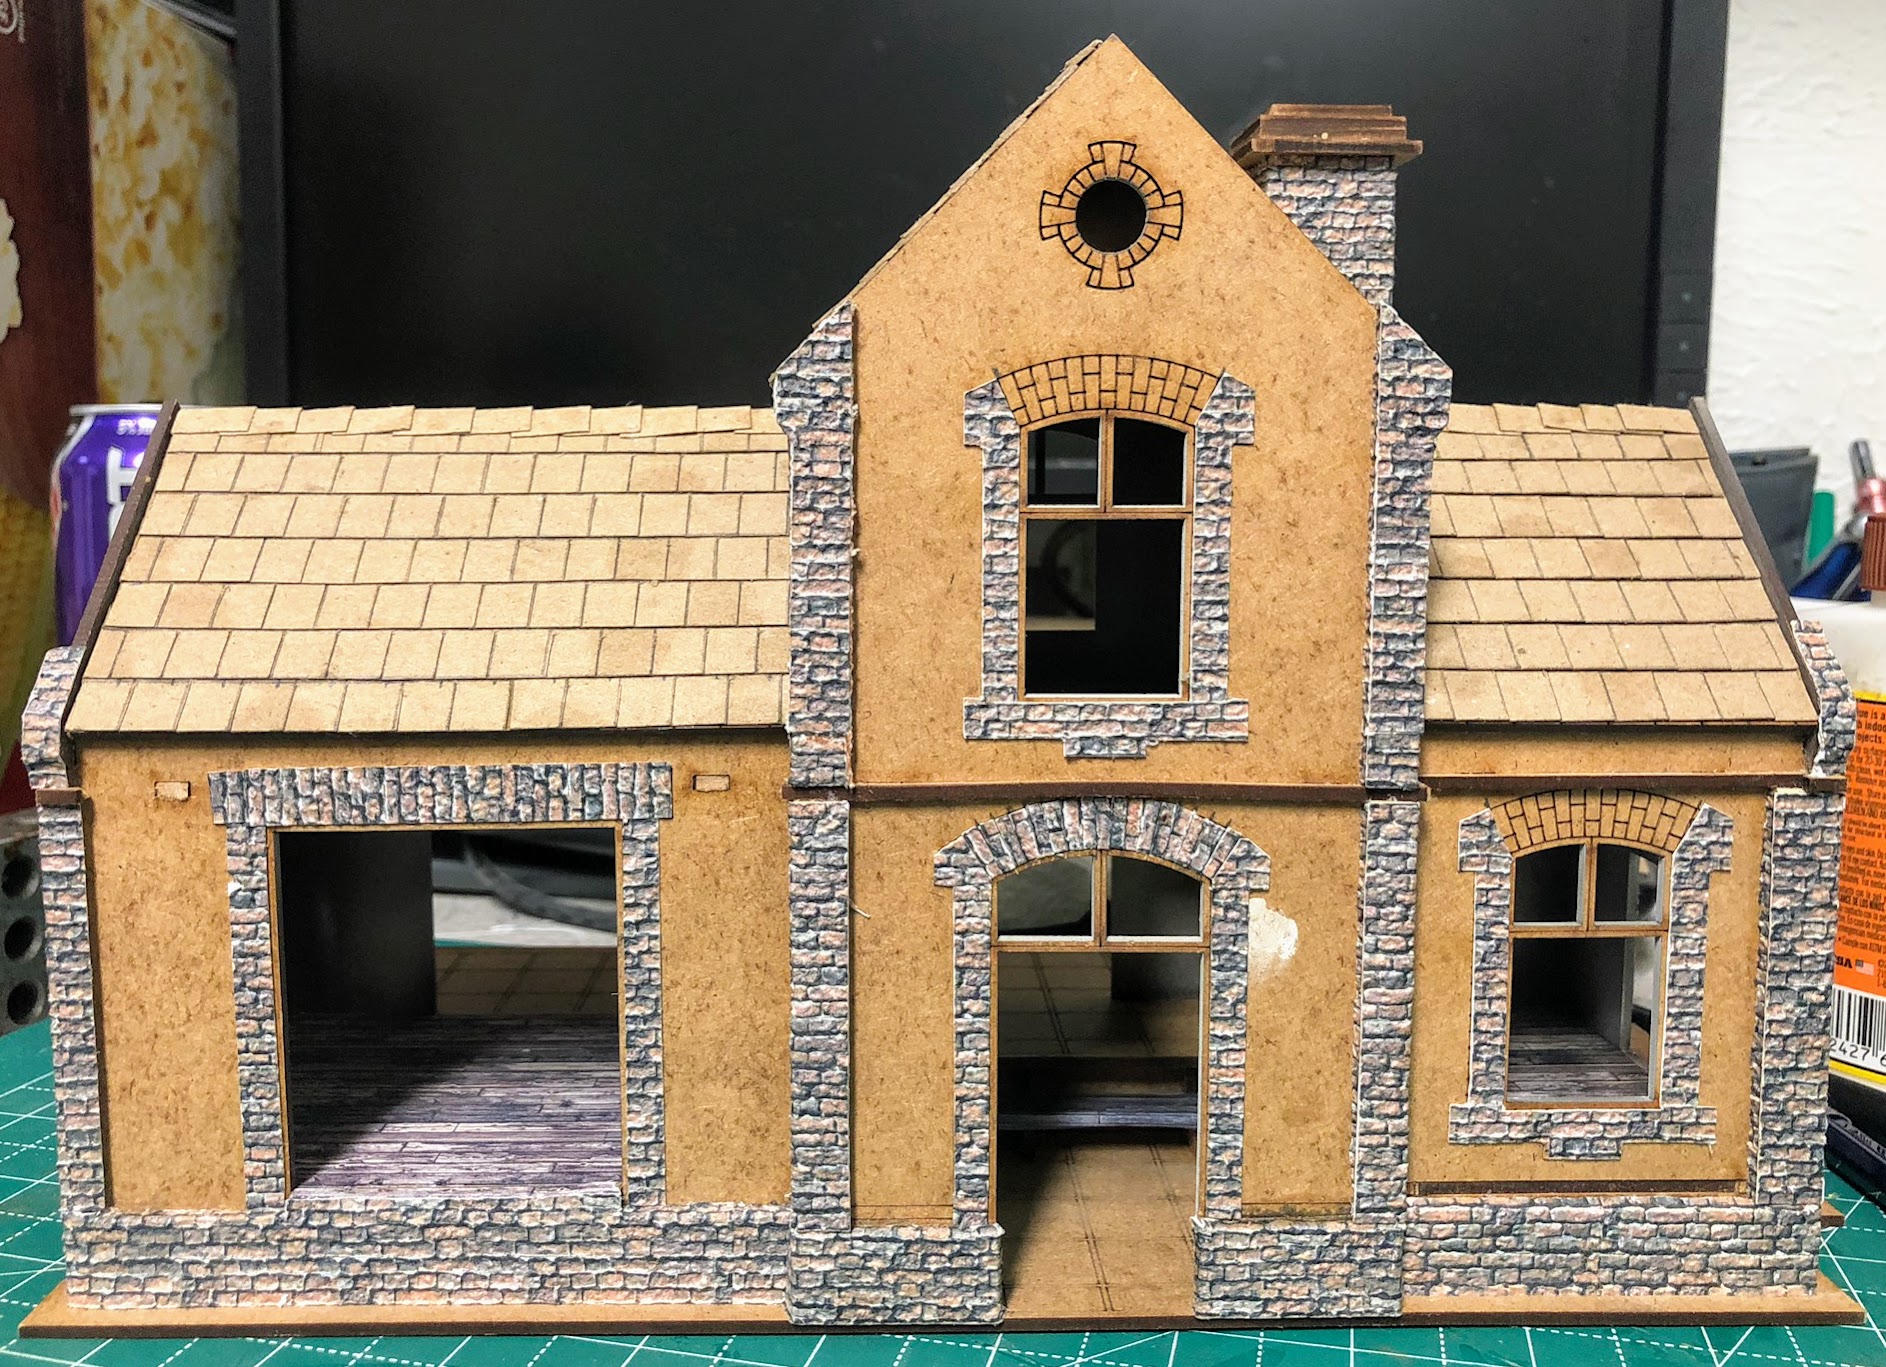
World War II Project - Return to Normandy - Railroad Station - Roofs...Again
I finished shingling all four roof sections for the station. Everything has been tested fitted and filed down to fit. While I really hate hand cutting shingles I think these turned out pretty good. With a little paint and some weathering the station should really stand out. I have plenty of cardboard to make more and it will be something easy to source, Costco is my friend. We buy the big boxes of dog biscuits from Costco and each layer is separated by a thin layer of cardboard, there are five pieces of cardboard to a box and with four dogs in the house we go through a box about every two weeks or so and they have nice straight edges to work with.
 Gluing up the last roof section, this is the center section with the chimney coming up through one side.
 Trackside
 Streetside

Since they worked out so well on the station I'm going to back and redo the roofs on the Sally 4th Terrace houses too. One has a roof finished with printed paper shingles and I stopped work on the second one because I didn't have any shingles or shingle material available at the time. Looks like there will be a lot of cardboard strips in my future.


Streetside with another piece of cardboard laid out for cutting.

Monday, August 3, 2020
World War II Project - Return to Normandy - Railroad Station - Arches
I sat down and did one, yes one, window arch. It takes longer than I would like it to but not as long as I had feared, maybe 15 minutes all told and it will likely go faster now that I'm not experimenting. This is one of those spots where the laser cutting really helps out. I just need to cut some of the brick to the proper length, cut it to the proper taper using the cut as a guide and I'm good to go.
 |
| Starting off. I actually worked three bricks at once. One on the left, one on the center and one on the right. The key is to make sure the glue is good and dry before you try and cut the taper in the brick otherwise its going to slide on you and make a mess. Lesson learned (maybe). |
 |
| And the finished arch, looks pretty good and all the marks will get cover with the "plaster". One arch down, nine to go. Oh and two of this decorative circular windows, that should be a load of fun. |
Subscribe to:
Posts (Atom)