Quotes

Life is short, break the rules. Forgive quickly, kiss slowly. Love truly, laugh uncontrollably and never regret anything that makes you smile. - Samuel Longhorne Clemens (Mark Twain)
Showing posts with label Airbrush. Show all posts

Friday, January 15, 2021

Lani & Phoebe Musings - Selecting and Airbrush

Lani speaks

Phoebe disagrees

This is a long one, get your favorite beverage and put your feet up.


Before I get to far there is an Airbrush Compendium thread in the Reaper Miniataure Forums:  https://forum.reapermini.com/index.php?/topic/62981-airbrushing-the-compendium/

It is pinned and updated on a regular basis. There are a ton of links to airbrush threads in the forum as well as links to other forums, websites and videos.


I constantly see questions about what airbrush to buy and why, I thought a post specifically about selecting an airbrush would be helpful. While I’m certainly not an expert airbrush user, it is a part of my painting tool set. I find it indispensable for applying even coats of paint to large areas and for some types of detail work. For vehicles it is the only tool I use for applying the primer and basecoat all the way through to the final camouflage. For miniatures I use it to prime large groups of minis as well as blockingut areas of color for uniforms (shirts and pants) and some initial shading work. It is really useful for painting busts and getting nice smooth applications of color and shading in preparation for detail painting. Those are just a few of the painting activities you can use it for. 

Major Airbrush Components - The parts that make the difference

For our purposes we are only concerned with two types of airbrushes; single action and double action.


Triggers

Single action airbrushes are the simplest of the two, you press the trigger and you get paint. The better single action airbrushes will have an adjustment screw at the end which allows you some control over how much paint is flowing through the airbrush.


Double action airbrushes are more complicated, but they allow you a lot more control. With a double action you get air when you depress the trigger and as you pull it back it allows paint to flow through. The further you pull it back the more paint you will get. This allows you to adjust how fine a line you paint and as you pull back the trigger farther you can widen the line. In other words, if you want to paint a large area you would pull the trigger back all the way, for a smaller area just pull the trigger back as far as you need. Since you control the trigger you can vary how much paint comes through “on the fly”. Some double action versions have an adjustment screw on the end. Like a single action this allows you to set the maximum amount of paint you want to spray. If you were painting a lot of very fine lines you could set the adjustment screw to only allow you to pull the trigger back enough to get just the amount of paint you need.


Paint Supply

There are two primary ways to get paint into the airflow; siphon and gravity feed. You can get single and double action airbrushes with the method of your choice and there are a few types out there that will allow you to switch from one to the other. You will find that the higher end airbrushes are usually dedicated to one or the other.


Siphon Feed

With a siphon feed the paint goes into a jar and the jar is mounted to the front of the airbrush. A hose feeds down into the paint jar and paint is drawn up through the hose into the airbrush when the trigger is depressed. This type tends to be a bit nose heavy with the weight of the jar and the paint. This type of feed is great when you need a lot of paint for large areas (like terrain). Not as useful for smaller work as the jar typically needs to hold quite a bit of paint for the siphon to work correctly and the jar sometimes is in the way if you are trying to do close in work.


Gravity Feed

This is a paint cup that either sits directly on top of the airbrush or on the side (the top mount is the most common). The paint cup size can vary in size quite a bit, if there is a choice, I would recommend getting the largest cup available to avoid constantly reloading paint for larger projects. The gravity feed works by gravity! Paint is dropping down, internally from the paint cup to mix with the airstream. I have played with a couple of airbrushes that have side mounted paint cups but I find the side mounts are a little heavier on the side they are mounted on and I tend to spill paint out of the cup (primarily because I don’t always put the cap on the paint cup, but that’s my personal problem).


Internal or External Mix

An external mix airbrush introduces paint into one side of the air stream. An external mix is very difficult to clog so it is much more forgiving of paint viscosity. They also tend to be much easier to clean; a supply of pipe cleaners will do the trick most of the time. Because of the way the paint is introduced into the air stream you get uneven atomization. In other words, if you paint a line one edge will have more coverage than the other edge. Its hard to paint fine details because of this. I would only use an external mix for large areas where details are not an issue.

An internal mix airbrush introduces paint directly into the middle of the air stream. This allows for very fine atomization and a more even distribution of the paint. This allows you to paint very fine details as the paint is guided by the needle. This does require thin paint, thick paint or any kind of debris (dried paint from the rim of a paint bottle is a good example) introduced through the paint will clog the airbrush. Sometimes trying to figure out why your internal mix is clogging can be a real challenge!


Needle Size

Needle size is the key attribute for an airbrush. Without the needle you just have an expensive spray can. The needle acts as the flow limiter and directs the atomized paint down the taper. This taper determines how finely you can paint. For example, a general purpose needle, 0.7, will cover a much larger area when fully open, than a super detail 0.3 will. Conversely the 0.3 will paint a much finer line than the 0.7 can.


An important note about the needle. Depending on the size the tip can be bent relatively easily (super detail needles in particular) so you need to take care when you are breaking it down or re-assembling it. A bent tip is not the end of the world though and can still be used its just not going to spray straight so you can’t use if for detail painting but you can still paint large areas or prime minis or apply basecoats with it.


It is possible to straighten a needle with a little care. Take two smooth edged coins (in the USA pennies and nickels are good quarters are not) and place them on either side of the needle. I apply a pressure to the coins to hold them in place and then push them towards each other as I pull the needle between them. Just make sure that the direction of the bent tip is facing one of the coins, if the bend is straight up or down it will not come in to contact with the coins and will not have a chance to straighten. I usually have one or two spare needles on hand, but I never throw a bent one away, like a brush with a curved tip it still has its uses.


Selecting your airbrush

Now that you have an idea of what makes up an airbrush we can move on to the big question. What do you really want to do with your airbrush? If you only have one thing you intend to use it for it’s a pretty easy question. For most us there are multiple answers to this question, and it may be that it will take multiple airbrushes to achieve radically different goals. If all you intend to do is paint terrain or to prime miniatures then a single action, siphon feed, 0.7 needle airbrush is all you need. If you intend to have an air brush as part of your painting tool kit then a double action, gravity feed, 0.5 needle airbrush would be a good place to start. One important thing to keep in mind is while most airbrushes are dedicated to a single needle size some of them are capable of using multiple sizes of needles like the Harder-Steinbeck Infinity or the brand new Reaper Miniatures Vex.


Example :

Define the painting goal(s):

I am, primarily, an army painter mostly painting both 15mm and 1/56th scale vehicles along with large batches of minis both 15mm and 28mm. Along with priming I tend to do initial painting and shading of the 28mm miniatures with the airbrush. None of those goals seem to be radically different. Can I do this with a single airbrush?

The basic answer is yes, I could, but it makes achieving some of my goals a bit more difficult. On the other hand, my list of goals is a lot more all encompassing then when I first started looking for an airbrush. At that time my army painting was almost exclusively 15mm. Based on that I decided that I would need a dual action airbrush for the flexibility it offered while painting, a gravity feed because I didn’t need to have a lot of paint in the paint cup due to the size of the minis (and I remembered absolutely hating the siphon feed on my very first airbrush) and a detail needle, again, due to size.


Based on my needs and some recommendations I went with an Iwata Eclipse (Dual Action, 0.35mm needle, 1/3 oz paint cup). This is an excellent brush and it got the job done, but priming was a pain in the butt it took forever because the coverage area of the detail needle was so small. I also found that I couldn’t really paint for long sessions, 30 minutes was about the limit because my hand would begin to cramp.


A couple of years later I bought a Harder-Steinbeck Infinity Two in One (Dual Action, 0.15 needle and a 0.4 needle, 2ml and 5ml paint cup) specifically thinking that I could replace the Iwata with it. In the end I kept using both. The Iwata for detail and the HS for more general painting with the larger .04 needle. It was just a pain to swap out the needles in the HS since there was a specific tip for each needle. While the 0.15 can paint incredibly small things it clogs at the hint of the paint being too thick. Again, I found my sessions to be limited with my hand cramping up after an hour or so, although longer than the Iwata allowed.


At some point in time I managed to break (well lose when cleaning) some parts in both the Iwata and the HS and replacing those parts was difficult (parts replacement is a lot easier now, I really should get both of those airbrushes up and running again) so I decided that I would try something else. This time I went with the (then new) Badger Renegade Velocity. The Velocity is a dual action airbrush with a 0.21 needle, and 1/3oz paint cup. When compared to the Iwata and the HS it is heavy and I didn’t know that till I pulled it out of the case. I was already sacrificing the larger coverage of the HS and I was concerned that my hand would cramp even faster with the Velocity. Fortunately, I was wrong the design fits much better in my hand and I have used this brush for 2-3 hours without my hand cramping.


I’m now considering adding another airbrush to take care of priming large batches of figures and that initial uniform work (because that is still a pain point with the Velocity). I’m contemplating the Badger Patriot 105 or the Reaper Vex. Pricing might end up making the decision for me as the Vex is definitely on the higher end of airbrush prices. I have handled a Vex prototype at a ReaperCon and it is about the same weight as the Velocity, so I know it fits nicely in my hands (and swapping out the needles in the Vex is very easy) while the Patriot is a bit of an unknown.


Airbrush Brands

Which brand to pick? This is one of those personal preference things. First pick out the type of airbrush you want; i.e. single action or double action and either a siphon feed or gravity feed. Then you can go looking for airbrushes. The most frequently talked about airbrush brands are: Badger, Grex, Harder-Steinbeck, Iwata, Master and Passche. If you know someone that owns an airbrush, try theirs out or go into a store and see if they will let you handle them. Otherwise take a shot and just order one and give it a go. I will say that I’m not a fan of Master, while the price is right the quality is not. It is kind of like the difference between using cheap brushes and Kolinsky Sables.


Other Required Equipment

Compressors

The other crucial item that you will need is a compressor (there are other options like canned compressed air or actual oxygen bottles). There are a whole lot of compressors out there to pick from. Stay away from the big pancake style compressor/tank combinations. While they hold a lot of air they are incredibly noisy when they are running. I was in an airbrush class one time with about ten people and one of them brought a big pancake style compressor, it was so loud that we made him put it out on the dock about 25’ away and on the other side of a wall and you could still hear it when it was running. The basic features we are looking for are relatively quiet, a tank, a regulator (which allows you to control the PSI) and a moisture trap (which is often a part of the regulator). Having a tank means that the compressor won’t be running all the time, it will run when the PSI level in the tank is to low and turns on when the tank is to low.


Regulator

Without a regulator a compressor is pretty much useless for our purposes. Fortunately most compressors come with one, but check before you buy I have seen a few that don’t come with a regulator. If you can’t control the airflow you are at the mercy of whatever PSI level the compressor can push through your hose which is likely to be way to high to work with (great for filling the tires on your car though). A lot of regulators have a moisture trap built into them, this trap keeps water out of the hose, you don’t want to be adding additional water into your airbrush after you have carefully thinned your paint! If you live in a low humidity area you can get by without one. In Colorado I have seldom seen water in the water trap in my regulator.

A quiet compressor will allow you to run your airbrush without disturbing everyone in the house or in the apartments around you. While the compressor from Harbor Freight is really tempting, I would avoid it. It is a bit noisy and it has a tendency to overheat and shutdown, typically in the middle of painting session.


You may have heard talk about the airflow pulsing if you don’t have a tank. This is mostly a true statement its just how compressors work. A tank will take care of the pulsing by storing the air and only releasing it when the trigger on the airbrush is depressed allowing an even flow of air, however, if you have a hose from the tank to the airbrush that’s 4’ or longer that will take care of the pulsing too. I ran a compressor without a tank for years without seeing the effects of “pulsing” air. A better benefit of having a tank is not having the compressor running the entire time you’re painting.


What the heck is PSI and why do you care? PSI stands for “pounds per square inch” which seems like an odd measurement for air but its all about pressure. The higher the PSI the more forcefully the air flows through the brush. You need to know at least the maximum PSI number for a compressor. Something in the 30+ range is what you are looking for. The regulator is what actually determines the pressure of the air coming through to the brush so it is important that the regulator have a good range with the top end being at least 30 PSI and the bottom in a 0-5 range. The regulator on my compressor goes from 0-100 PSI. The higher you set the PSI on the regulator the farther away you need to hold the airbrush from the model or mini. Distance affects how fine a line or how small an area you can paint. You cannot create a pencil thin line from 8” away. In fact, if you are to far away the paint may even dry before it hits the surface, this will result in a rough, pebbly texture on the surface of your mini or model. The lower the PSI the closer you can be to the mini. Lower PSI requires thinner paint which is why there is no magic ratio for thinning paint it, depends on what you are doing. You can happily run at 20+ PSI when you are priming or painting large areas, but you can’t run at that same level if you are painting details or small areas. I usually try to do the bulk of my painting, even priming, in the 10-12 PSI range and will step down as low as 8 PSI for really fine lines.


Hoses

You can’t get the air from the compressor to the airbrush without a hose. If the compressor doesn’t have a moisture trap you can get an inline one for the hose to take care of it. Most compressors have ¼ fittings at the regulator and you may need an adaptor to make it fit at the airbrush end. A lot of airbrushes will come with the correct adaptor but double check. There is nothing more frustrating than not having all the pieces to make your new toy work. Even if you buy a complete “kit” double check for hose adaptors or if it even comes with a hose!


Painting booths (Optional, kind of)

The very nature of how the airbrush works means that there will be overspray. You can get an airbrush booth to help contain it or just a cardboard box. When painting in a confined area its quite possible that you will be breathing in the overspray that’s not all that good for your lungs. Painting in a large open area (outside or perhaps a garage space) can alleviate the need for a booth/box setup. To protect yourself there are a couple of options. Wear a mask, a full mask not just a little sanding mask, you need something that will filter the air you are breathing. Better yet a spraybooth with a fan that can vent out a window or in a pinch into a box that you can close up. There are a lot of DIY solutions to this problem as well just be aware that it is something you need to deal with.


Thinning your paint

Airbrushes don’t work very well with paint straight from the jar or bottle. Quite frankly I thin all the paint that I run through my airbrush including paints designed specifically for it. Thin your paint with thinners designed for it, for acrylic paint tap water is fine (distilled water if you are in an area with hard water). I personally do not recommend Windex, the chemicals (ammonia in particular) in Windex can break down the seals in an airbrush. There are folks that use Isopropyl Alcohol, while it works well I’m not a fan of it after a little research, unless you are wearing a mask. In an atomized state this stuff is really, really bad for you. I personally like Vallejo’s airbrush thinner but there are a lot of similar products out there.

Thinning paint is more art than science. The thing to remember is that the finer a needle you are using the thinner the paint needs to be. The closer you want to be to the mini the thinner the paint needs to be. For more general work start at about a 1:1 ratio of paint to your favorite thinner and be prepared to adjust from there.


Cleaning

I’m not going to get to heavy into this subject as it’s a bit off topic. I bring it up because people in forums will say that they can paint something faster than it takes to setup an airbrush and clean it when you are done. It is either because they don’t use their airbrush regularly or they don’t take proper care of it and it clogs as soon as they pull the trigger. Keeping an airbrush clean and ready to go doesn’t take any longer than getting ready to paint with a brush. Its like any tool, if you use it regularly you know what to do, if you use it infrequently then it feels like you are relearning every time you sit down with it. If you are using it infrequently why did you buy it in the first place?


If you are swapping out colors you usually don’t need to do more than run a capful of water (or whatever is used to thin the paint) through the airbrush until the spray is clear before moving to the next color (if you are shading sometimes you don’t even need to do that). At the end of a painting session I run a cup full of cleaner through the airbrush (Vallejo makes an airbrush cleaner, and I’m sure there are others), then break it down. Smaller components go into a small jar that has just enough cleaner to cover them. I pull out the needle and wipe it clean (be careful of the tip you don’t want to bend it) and set it aside in the tube it came in or in a protected spot. Then I run a micro cleaning needle through the main airway to remove anything that has built up, you can do this with a cleaning brush (or even a pipe cleaner depending on the brush) as well. Do pay attention to the warranty on your airbrush, there are tools that you can use to clean it that might void the warranty. The Velocity has a spot right between the paint chamber and the nose where  that tends to build up with dried paint and clog the airbrush. The other bad spot is the small tip where the needle comes through. I run a very fine wire through this and then put it in the jar to soak and clean it again before I start my next session. If you aren’t using a super detail needle ( 0.15 – 0.31 or so) you probably don’t need to do this. You will quickly identify areas in your airbrush that must be really clean in order to work properly especially the detail airbrushes.


That’s about it. If you have questions feel free to ask or see if your question has already been asked and answered in the Reaper Miniature Forum Airbrush Compendium thread.

Saturday, July 25, 2015

Airbrush Down!

A week ago I was excited and jumping up and down about the new AWI minis I received from Fife and Drum (seriously go buy some). I prepped them and mounted both those and some Wargames Factory miniatures up for priming and painting. About half way through the process my airbrush clogged. I had noticed that my Vallejo primer was a little thick but didn't thin it like I should have. I sat down to clean it up and managed to ruin one of the O rings. While not catastrophic is does make it pretty much useless as a tool right now. I ordered parts from Chicago Airbrush Supply and I'll be up and running again as soon as they arrived. Then I can finish priming and get some paint on my first foray into the AWI.

In fact my parts did arrive today and I'm up and running again, the delayed AWI are now primed and ready for paint.


My Harder & Steenbeck Infinity Airbrush
Fife and Drum Minis waiting to have their primer coat finished

One of my AWI reference books.


Tuesday, July 29, 2014

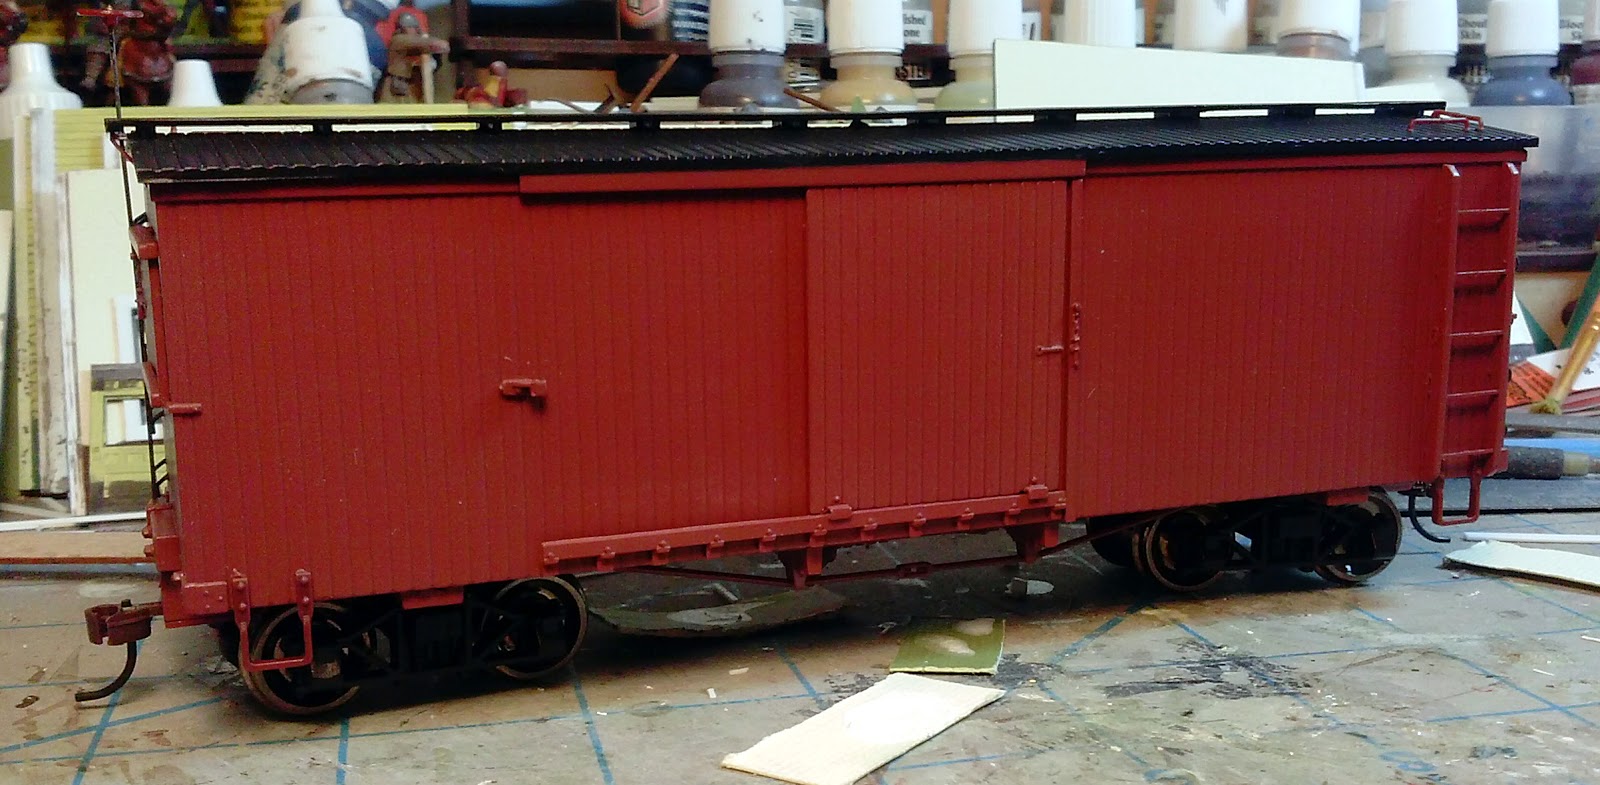
Airbrushing Freight Cars with Tru-Scale Paint

When I started this little project I figured I would just fall back on those old stand by railroad paints from Floquil. Well I haven't been paying attention and Testors, who bought Floquil, has discontinued them, in fact discontinued them some time ago. Not knowing much about the railroad paints available now I leaned on somebody that has been more involved than me, Darel from C&Sn3. He recommended Tru-Scale as the best replacement at this point. I went to Caboose Hobbies, who didn't have the color that Darel recommended, and I stood in front of the paint rack for 15 minutes and decided on TCP-139 MOPAC Boxcar Red. I then went looking around for information on how to shoot this paint through an airbrush. This is definitely airbrush paint and a bit on the expensive side at $4.99 for a one ounce bottle. I grabbed all three bottles Caboose had to make sure I had enough and for future additions to the C&N rolling stock roster. After reading up on it that may have been a mistake. Apparently Tru-Scale has a tendency to evaporate out of the bottle, probably because it has an acetone base. Which brings up the fact that this is a solvent based paint and when you shoot it through your airbrush be in a well ventilated area, or a use an airbrush booth and either way wear a mask, and not one of those little sanding masks.

So there is a lot of different information out there and a lot of it is not very informative. In fact I even saw one post that said that Tru-Scale didn't use pigment and that's why it didn't separate. Now that is possible as colors are either built from pigment or dyes, but generally anything called paint uses pigment (inks are dyes). Tru-Scale talks about pigment right on their website. So I combined the information I could find into something that, I hoped, would work for me. This paint is pretty thin already but it wouldn't go through my Infinity airbrush straight from the bottle. I pulled out some little graduated cups that I keep around and measured out three parts paint to one part acetone, that's right acetone as a paint thinner. I got lucky and hit the right combo off the bat and this 3:1 ratio worked like a charm.

Going into the booth were four boxcars, one stockcar, two flatcars, two short cabooses and one combine caboose. The C&N kept all its freight cars and cabooses the same color which means I don't have to switch out colors. Most of the prep consisted of removing trucks and in the case of the cabooses applying a liquid mask to all the windows. The cabooses I completely dissembled and removed the interior lighting components. They are actually quite nicely detailed on the inside, to bad you can't really see it through those small windows.

So two bottles of paint and 10 cars later I was finished, a pretty good days work. The cabooses will probably need some touch up. Its hard getting up underneath some of the overhangs and I found a thumbprint on the side of one so back to the booth for those, probably later this week. With the painting done this bunch is ready to see if these brand new decals I made are going to work. Pretty exciting stuff!

On to the pictures!


Three boxcars like this.

Fortunately only one in this ugly color

One stockcar

two flatcars

The reefer, although I reconsidered and left this one in yellow. I'll go back and do some decals in black for this one.

Disassembling a caboose. Removed the lighting and was surprised by the nice detail on the inside.

Easier to see the detail on the red interior as opposed to the black interior in the first caboose

Dissembling the second one, went much quicker this time.

The combine caboose, of course this one didn't come apart in quite the same way.

The interior, again some nice detail that you just can't see

Airbrushing complete! I left the stockcar with a black roof.

The cabooses and the flatcars.

Sunday, November 4, 2012

Painting and Flocking Felt Gaming Boards


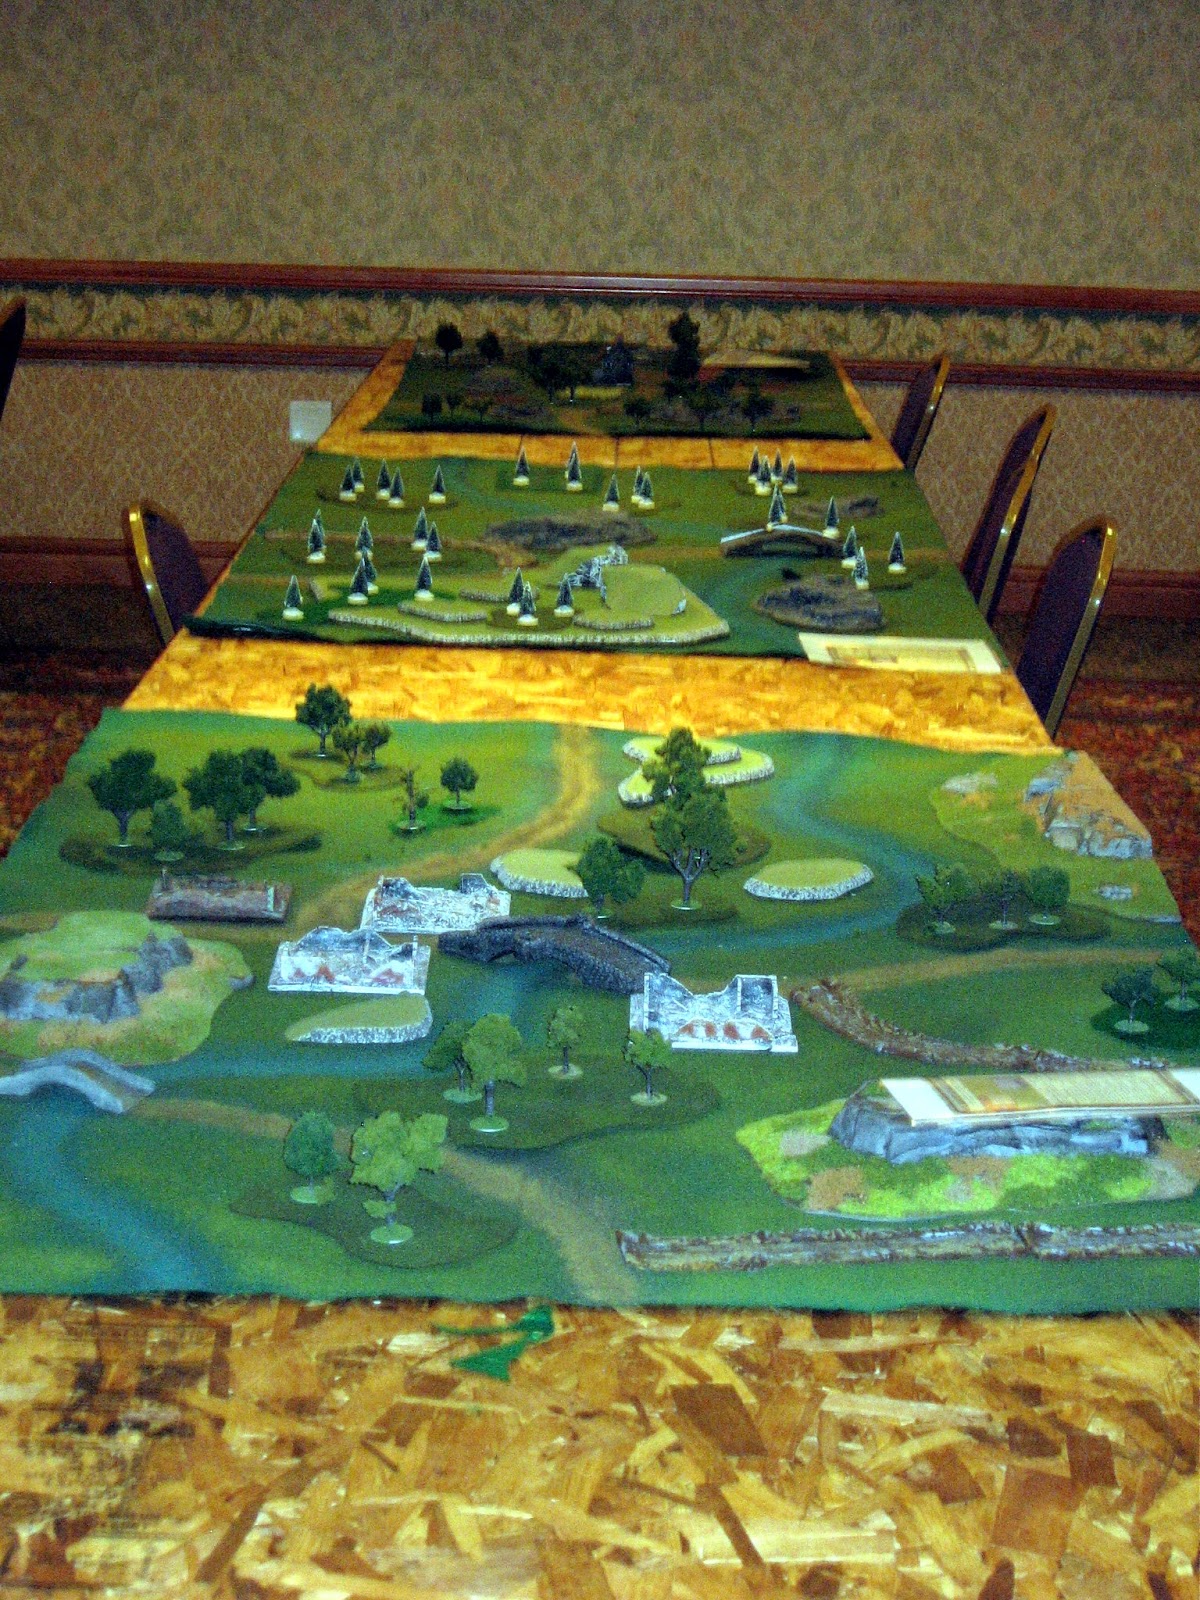
I'm part of a wargame group known as LEG (League of Extraordinary Gamers). In a bout of insanity several years ago we decided to run a LaSalle tournament at Genghis Con and some how figured that we would have upwards of 32 players sign up. It was based on a somewhat reasonable assumption at that time. The FLGS couldn't keep the rulebook in stock and had sold over 60 copies, 15mm Napoleonics were flying out the door and there was a lot of buzz on the net. To accommodate 32 players we needed 16 6x4 game boards. We had been playing for a years on a couple of felt boards that the owner of the FLGS had made. He had painted them up and flocked them and we forced him to reveal his secrets. There are two key items to making this work; high quality felt and matt medium. Somehow I managed to volunteer to get the boards ready while the rest of the club worked on the scenery.

A couple of decisions were made before we got completely stuck in.
1) Semi-Geomorphic. The club occasionally puts on big games, the FLGS had 6 6x4 tables and it was just possible to arrange them end to end in the room. They were also on wheels, that could be locked down, to make them pretty easy to move around. Semi-Geomorphic boards let us create an gaming area where the roads and streams at least looked like they went together. To that end I created a 4x4 grid map and layed out the road net and river courses.
2) Easy to Store. This was big we didn't have space to actually store 16 boards so we turnedto the felt board as something that could be rolled up and stored easily. This would make them much easier to transport as well.
3) Good Looking. Since this was to be our signature event we wanted something that was definitely a step above a piece of felt layed out on the table. We matched the colors of the hills as closely to the board colors so that they looked like that went together.

We  were able to purchase the felt in bulk, we were fortunate in having a fabric expert in the club and she was able to handle this purchase for us. I went off to Walmart to purchase acrylic craft paints. Regular model acrylics were going to be way to expensive for this project. There were two goals as far as paint went. We wanted to break up large expanses of green and I wanted to be able to try and give some visible depth to the rivers when there really wasn't one. I purchased a couple of different greens, browns and blues to get started. This project would certainly prove that you can push darn near anything through an airbrush.

Rather than cut them up into the individual boards right off the bat, we basically cut them into four sections essentially representing one row of the 4x4 grid. I marked out the spots where the roads and rivers would enter and exit each board. Since I would be going through a lot of paint I bought some big cups to mix paint in. I thinned the paint with Windex starting at 50:50 paint to Windex and then thinning more from there if necessary. In the end most of it was probably thinned down closer to 40:60. I started off by creating blotches of green and brown across the entire section. I then moved on to the streams. I reversed the way you would usually try and show deep water and went for something that would show up better. I layed down a wide swath of dark blue and then came back down the center with the teal. This made it look like there were wet banks and "framed" the lighter blue. Not quite the effect I originally wanted but it looks good on the boards and helps the rivers stand out a bit more. The base for the roads was laid out in a single color of brown, a bit lighter than the brown I used to splotch the board with. I did this painting over the course of a couple weekends at the FLGS as it was the only space big enough to lay out the felt. I struggled through a lot of airbrush clogs trying to get the mix right. I certainly learned how to tear down and clean my airbrush pretty quick though. It was a good experience from that standpoint, it was still quite frustrating on more than one occasion though.

With the painting completed over the 4 "strips" I was ready to start flocking. I used the finest grain Woodland Scenics flock I could get my hands on. Fortunately the largest model railroad store (Caboose Hobbies) in the US is right here in Denver so I didn't have any problems getting what I needed. Again I wanted a number of different colors to help break things up. I purchased a couple of different medium to light greens and a couple of brown/sand colors for the roads. Step 1 was to sprinkle the flock on to the boards using a strainer. You must keep the layers of flock as then as possible, this is critical! Once you have finished flocking the board its time to apply the matte medium. Matte medium is a foggy white fluid available at your local art or craft stores. The brand we used for this was Liquitex. I'm not sure what artists use it for but its about the best glue in the world for scenery! Again I cut this down 50:50 with water. I then sprayed this over the entire board and I laid it on thick, you should just be able to see it almost puddle on the surface. You need it this thick to make sure it penetrates the flock all the way through to the felt and then into the felt itself. If it doesn't get all the way through the flock it will just form a crust that will peel off later. I let this layer dry completely. Fortunately I live in a high, dry climate and the drying time was somewhat reduced. This first layer of matte medium will slightly adhere to the surface underneath. I was able to peel it right up without a problem and we haven't had any residual stickiness problems. After the first layer had dried I applied a second coat of matte medium just to be sure everything was going to stay in place. Of that didn't help those areas that had formed a crust so it may not have been necessary.

Once that had dried, we cut the boards up into their final pieces. I used some stencils and airbrushed a number on to the back of each board in each corner. The numbered represented its place on the original 4x4 map. Then a copy of the map with the section of board inside outlined in red was taped to the outside of the tube. This makes it easy to look at the original map and figure out which board you want to use and which boards will easily connect up with it. Since we kept the road entry and exit points consistent there are a lot of possible combinations other than the combinations shown on the map.

Overall we have been pretty happy with this little project. The boards get a lot of use and have held up really well over the last couple of years. The only problems we have encountered are with those areas where a crust of flock formed rather than getting glued all the way down. I have some recent shots taken by Ian Darley showing some of the boards in use for the FOW tournament at the Feast of Blades convention here in Denver.


Tuesday, September 25, 2012

The Workroom

I have been quite on the posting front because another project was occupying my attention. I have spent time over the last few months and a lot this last week taking down my old darkroom and converting it into a proper painting space. There is still some stuff to do and clean up but it is to the point were I can start painting in it. The under shelf lights are some wicked expensive LED lights, but they are very bright and run very cool and will last a long time.. Overhead are two sets of 4' fluorescent lights and of course I can pull out all kinds of extra light if I want. The workbench top is a hollow core door so there is plenty of space to work on. The airbrush station is sitting on its own table. the compressor sits underneath and I can add a lot more light if I need to. Its vented out the back and up into the crawl space.

I have managed to fill all this space up and I still haven't managed to get everything into it. I'll have to really work at getting the stuff underneath cleaned up for more miniature and game storage space.

So really pictures say it all.
Airbrush Station with Reference Books and Games Above
Reference and Rule books
 Old Space Hulk Marines and ...Books!
 Mostly Rulebooks here
 Some Seriously old gaming books


Empty Space! How did that happen?
 Osprey Books

 Modeling Books
 Reference Books, who would have thought
 The Traveller Section. This may have to get moved else where so free up mini storage space
 A few clamps

 And behind the workbench more shelves!


Monday, April 9, 2012

Norman Saga Commission - The Horses

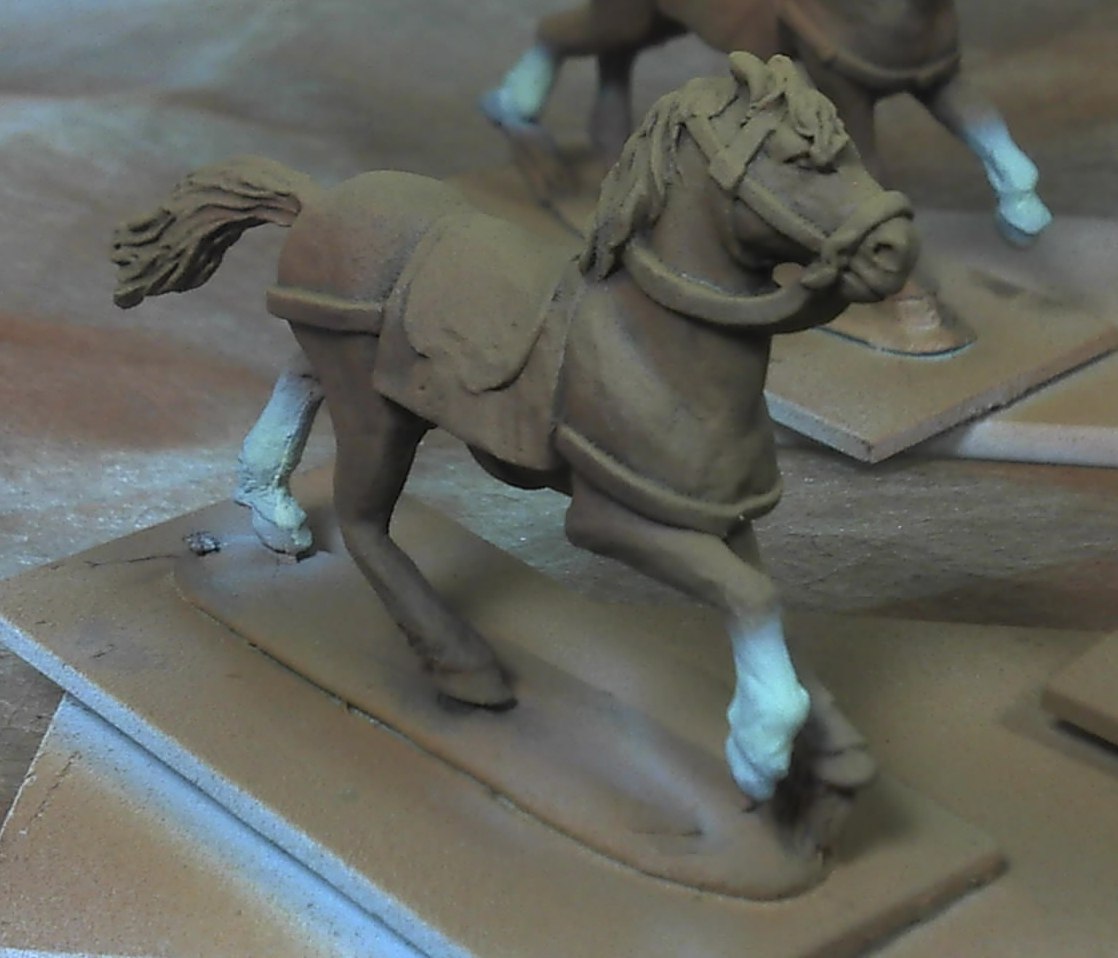
Well, after spending a whole weekend learning to use the airbrush, I figured I better put it to good use. So out came the horses for the three points of SAGA Hearthguard and the warlord, 13 horses. They were mounted up and primed white (and quite frankly, despite my grey primer leanings, black is a better primer for the airbrush sometimes with a shot or two of white primer over the top to really make things pop). I messed up the midtone initially (bad color choice) but easily overcame that since the airbrush paint goes on so thin. Overall I'm pleased with them at this point. They are down to brush work right now. I did airbrush the socks just to see if I could do that and really didn't have much problem with that. The black manes were tougher and that really will need the paint brush to finish up. I did one blaze but I think it will be better to do the blazes with the brush. Some are better than others but I'm still learning what I can and cannot do and what will work best with different things. I worked with Vallejo Model Air, Vallejo Panzer Aces, Flames of War (which I believe is just Vallejo Game Color re-packaged) and Reaper HD paints.
Here are tonights results:


Airbrushing - My thoughts after the weekend

Two days of airbrushing class time is certainly going to influence how I approach painting from now on.

1) Once you are familiar with the equipment it doesn't take much longer to setup for airbrushing than it does for painting. That's just not even a valid argument against not pulling out the airbrush for me anymore. It does require some specialized tools and material but once you have them why shouldn't you use them?

2) Airbrushing saves time, a lot of time in most situations. Had I known completely what I was doing and not been experimenting as much the initial base coat, shading and highlighting that I did on the Nurgle Demon Prince could have been done in 30 - 45 minutes. That would have been an easy 2 hours with a brush. I'm not sure I could have matched the smoothness of that base coat with a brush either.

3) The first question to ask for any given project now is; how much of this can I airbrush?

4) An airbrush doesn't need a complete cleaning to change colors. Add clean water/alcohol in the cup, squirt through a few times, dumping the rest out of the cup and wiping the cup clean is just about all you need (white being somewhat of an exception). Add new paint, spray off the model till the color comes through and you are good to go. It does need to be stripped down and cleaned at the end of a session just like you would take care of any tool (you clean your paint brushes when you're done with them, right?). When coming back to start another paint session I found that it helps just to run a little bit of the water/alcohol mix through it just to prime the pump so to speak.

5) I can strip an airbrush blind folded now, well not really. I actually only had a couple of minor clogs over the weekend none of which actually required me to take the thing apart. Rocking the trigger back hard three or four times cleared most of the issues, if that didn't do it then I would actually pull the needle out of the way and do it again. Those two actions cleared it every time. However, the guy to my left (Derek) had a Paasche that he seemed to require a lot of attention and the guy to my right (Scott) had issues with his Harder & Steenbeck, until he changed his needle out from the .15 to the .4mm, after that he didn't have a problem.

6) I love my Iwata Eclipse (HP-CS), although I will definitely use the Harder & Steenbeck Infinity as well. This past weekend I wanted to concentrate using an airbrush I was familiar with.

7) The solution to use for both mixing up paints and cleaning the airbrush is about 10% Isopropyl Alcohol (rubbing alcohol, available at just about any major grocery store, department store or Walgreens equivalent) and 90% Distilled Water. Distilled Water is important to prevent non-paint build up inside your airbrush. Especially in areas with a high mineral content in the water, like Colorado.

8) Huge key, knowing when to stop using the airbrush and go in with the paint brush.

9) I haven't yet run across an acrylic paint that I can't send through the airbrush but some of them are a lot easier than others. This weekend I used; Vallejo Model Color, Vallejo Model Air, Reaper Master Series and Reaper HDs. Other people around me were using regular Citadel and Citadel Foundation paints (none of the brand new stuff though). I have also managed to get craft paints through my airbrush (not a lot of fun though). My favorite of the bunch was definitely the Vallejo Model Air, it was just easier to work with and required very little thinning to get it working, makes sense, its designed for airbrushes. Both the Reaper lines were easy to work with too. Oh, and sadly Vallejo Model Color Smoke, does not like airbrushes, that gave more problems to Derek (on my left) than any other single color. It seems to just be a gritty paint.

10) All pigments are not the same. This is not in reference to any specific brands, just some colors are thicker and require more thinning than others. Other paints required (especially airbrush specific) required very little to almost no thinning.

11) Messing around with the PSI is over-rated. I left mine on 20psi the entire weekend, regardless of the paint I was using and they all behaved the same. I won't rule out that there will be times when I will need more or less pressure, but you certainly don't need to be adjusting it all the time.

12) You can thin your paint to much! If it is taking more than a couple of passes with the airbrush to build up the paint coverage then you need to add more paint to the mix.

13) Little bottles with good lids are your friends. Its much easier to mix up the paint you want in a small bottle/jar and then dump it into the airbrush cup than trying to mix it right in the cup. I bought two packs that each contained a dozen little plastic jars with lids for the second day and things went much smoother and quicker. If I was working my way through a bunch of figures (say my WWI US Marines) or vehicles I would go ahead and pre-mix the colors I needed in larger more sealable jars. The important thing to remember here is that everything still separates and you need to make sure the color you have pre-mixed is thoroughly mixed again before you pour it into the airbrush cup.

 That's the stuff I learned this weekend. I'll be firing up the airbrush again tonight and looking forward to doing it rather than thinking of it as a chore.

Sunday, April 8, 2012

Airbrush Class with Aaron Lovejoy - Day Two

I didn't work on the Nurgle Demon Prince at all today. The airbrushing work is done on that one and I need to go in with the brush and finish the detailing. Today I concentrated on the vehicles I brought. Over all I'm fairly pleased with the results. Then I took pictures, there is nothing as unforgiving as looking at a picture blown up to 5x actual size. They are now at the point of needing brushwork to finish them off. Windows, headlights, tail lights, license plates and weathering, that sort of thing. I'm going to rust out the Soviet Lada Rivas pretty good. I'm undecided on how to finish off the rest. The Cougar MRAPs will get weathered and dusted up. For the most part it looks like Marine units keep their vehicles pretty clean. So here are the results from today: