Here are tonights results:
The Town of Calamity, The D&RGW RR Warehouse Row and Historical Miniature Gaming
Quotes
Life is short, break the rules. Forgive quickly, kiss slowly. Love truly, laugh uncontrollably and never regret anything that makes you smile. - Samuel Longhorne Clemens (Mark Twain)
Showing posts with label Vallejo Model Air. Show all posts
Monday, April 9, 2012
Norman Saga Commission - The Horses
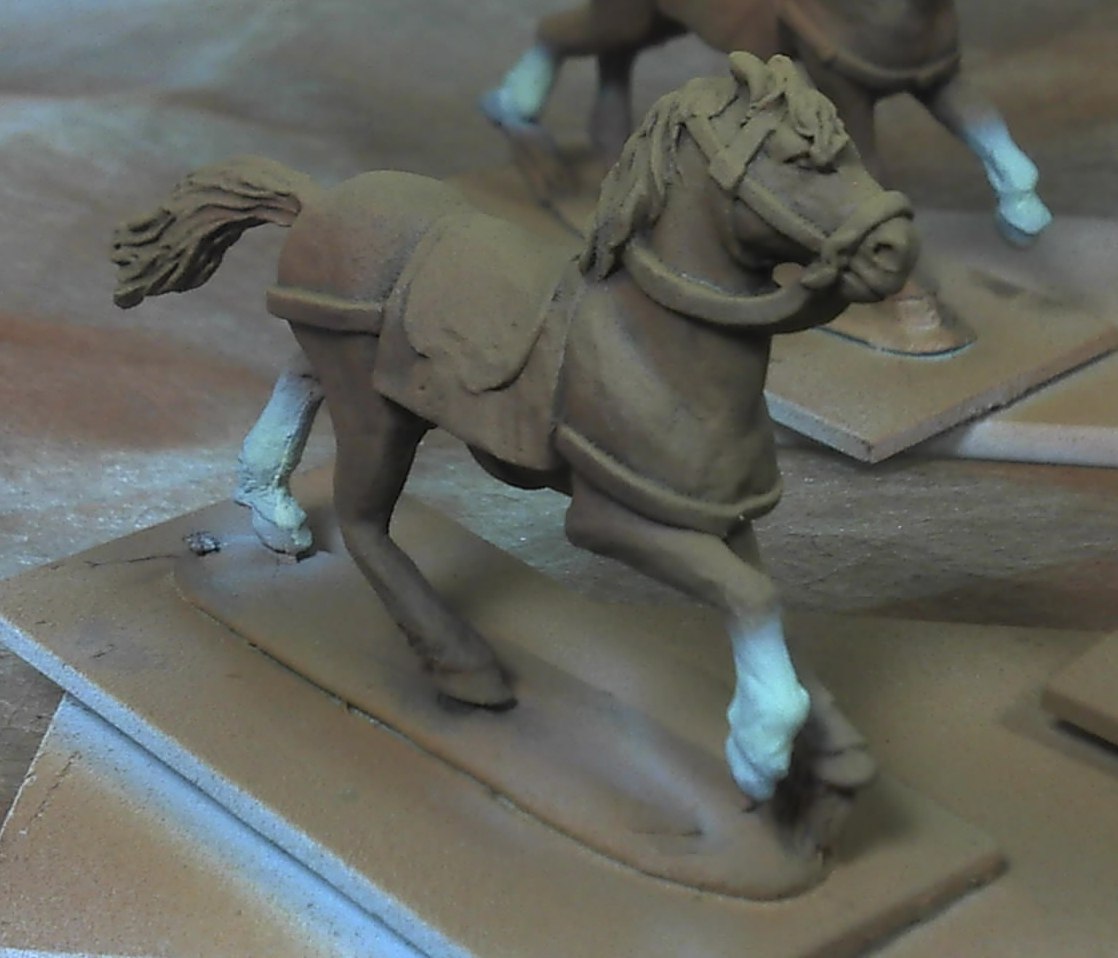
Well, after spending a whole weekend learning to use the airbrush, I figured I better put it to good use. So out came the horses for the three points of SAGA Hearthguard and the warlord, 13 horses. They were mounted up and primed white (and quite frankly, despite my grey primer leanings, black is a better primer for the airbrush sometimes with a shot or two of white primer over the top to really make things pop). I messed up the midtone initially (bad color choice) but easily overcame that since the airbrush paint goes on so thin. Overall I'm pleased with them at this point. They are down to brush work right now. I did airbrush the socks just to see if I could do that and really didn't have much problem with that. The black manes were tougher and that really will need the paint brush to finish up. I did one blaze but I think it will be better to do the blazes with the brush. Some are better than others but I'm still learning what I can and cannot do and what will work best with different things. I worked with Vallejo Model Air, Vallejo Panzer Aces, Flames of War (which I believe is just Vallejo Game Color re-packaged) and Reaper HD paints.
Here are tonights results:
Airbrushing - My thoughts after the weekend
Two days of airbrushing class time is certainly going to influence how I approach painting from now on.
1) Once you are familiar with the equipment it doesn't take much longer to setup for airbrushing than it does for painting. That's just not even a valid argument against not pulling out the airbrush for me anymore. It does require some specialized tools and material but once you have them why shouldn't you use them?
2) Airbrushing saves time, a lot of time in most situations. Had I known completely what I was doing and not been experimenting as much the initial base coat, shading and highlighting that I did on the Nurgle Demon Prince could have been done in 30 - 45 minutes. That would have been an easy 2 hours with a brush. I'm not sure I could have matched the smoothness of that base coat with a brush either.
3) The first question to ask for any given project now is; how much of this can I airbrush?
4) An airbrush doesn't need a complete cleaning to change colors. Add clean water/alcohol in the cup, squirt through a few times, dumping the rest out of the cup and wiping the cup clean is just about all you need (white being somewhat of an exception). Add new paint, spray off the model till the color comes through and you are good to go. It does need to be stripped down and cleaned at the end of a session just like you would take care of any tool (you clean your paint brushes when you're done with them, right?). When coming back to start another paint session I found that it helps just to run a little bit of the water/alcohol mix through it just to prime the pump so to speak.
5) I can strip an airbrush blind folded now, well not really. I actually only had a couple of minor clogs over the weekend none of which actually required me to take the thing apart. Rocking the trigger back hard three or four times cleared most of the issues, if that didn't do it then I would actually pull the needle out of the way and do it again. Those two actions cleared it every time. However, the guy to my left (Derek) had a Paasche that he seemed to require a lot of attention and the guy to my right (Scott) had issues with his Harder & Steenbeck, until he changed his needle out from the .15 to the .4mm, after that he didn't have a problem.
6) I love my Iwata Eclipse (HP-CS), although I will definitely use the Harder & Steenbeck Infinity as well. This past weekend I wanted to concentrate using an airbrush I was familiar with.
7) The solution to use for both mixing up paints and cleaning the airbrush is about 10% Isopropyl Alcohol (rubbing alcohol, available at just about any major grocery store, department store or Walgreens equivalent) and 90% Distilled Water. Distilled Water is important to prevent non-paint build up inside your airbrush. Especially in areas with a high mineral content in the water, like Colorado.
8) Huge key, knowing when to stop using the airbrush and go in with the paint brush.
9) I haven't yet run across an acrylic paint that I can't send through the airbrush but some of them are a lot easier than others. This weekend I used; Vallejo Model Color, Vallejo Model Air, Reaper Master Series and Reaper HDs. Other people around me were using regular Citadel and Citadel Foundation paints (none of the brand new stuff though). I have also managed to get craft paints through my airbrush (not a lot of fun though). My favorite of the bunch was definitely the Vallejo Model Air, it was just easier to work with and required very little thinning to get it working, makes sense, its designed for airbrushes. Both the Reaper lines were easy to work with too. Oh, and sadly Vallejo Model Color Smoke, does not like airbrushes, that gave more problems to Derek (on my left) than any other single color. It seems to just be a gritty paint.
10) All pigments are not the same. This is not in reference to any specific brands, just some colors are thicker and require more thinning than others. Other paints required (especially airbrush specific) required very little to almost no thinning.
11) Messing around with the PSI is over-rated. I left mine on 20psi the entire weekend, regardless of the paint I was using and they all behaved the same. I won't rule out that there will be times when I will need more or less pressure, but you certainly don't need to be adjusting it all the time.
12) You can thin your paint to much! If it is taking more than a couple of passes with the airbrush to build up the paint coverage then you need to add more paint to the mix.
13) Little bottles with good lids are your friends. Its much easier to mix up the paint you want in a small bottle/jar and then dump it into the airbrush cup than trying to mix it right in the cup. I bought two packs that each contained a dozen little plastic jars with lids for the second day and things went much smoother and quicker. If I was working my way through a bunch of figures (say my WWI US Marines) or vehicles I would go ahead and pre-mix the colors I needed in larger more sealable jars. The important thing to remember here is that everything still separates and you need to make sure the color you have pre-mixed is thoroughly mixed again before you pour it into the airbrush cup.
That's the stuff I learned this weekend. I'll be firing up the airbrush again tonight and looking forward to doing it rather than thinking of it as a chore.
1) Once you are familiar with the equipment it doesn't take much longer to setup for airbrushing than it does for painting. That's just not even a valid argument against not pulling out the airbrush for me anymore. It does require some specialized tools and material but once you have them why shouldn't you use them?
2) Airbrushing saves time, a lot of time in most situations. Had I known completely what I was doing and not been experimenting as much the initial base coat, shading and highlighting that I did on the Nurgle Demon Prince could have been done in 30 - 45 minutes. That would have been an easy 2 hours with a brush. I'm not sure I could have matched the smoothness of that base coat with a brush either.
3) The first question to ask for any given project now is; how much of this can I airbrush?
4) An airbrush doesn't need a complete cleaning to change colors. Add clean water/alcohol in the cup, squirt through a few times, dumping the rest out of the cup and wiping the cup clean is just about all you need (white being somewhat of an exception). Add new paint, spray off the model till the color comes through and you are good to go. It does need to be stripped down and cleaned at the end of a session just like you would take care of any tool (you clean your paint brushes when you're done with them, right?). When coming back to start another paint session I found that it helps just to run a little bit of the water/alcohol mix through it just to prime the pump so to speak.
5) I can strip an airbrush blind folded now, well not really. I actually only had a couple of minor clogs over the weekend none of which actually required me to take the thing apart. Rocking the trigger back hard three or four times cleared most of the issues, if that didn't do it then I would actually pull the needle out of the way and do it again. Those two actions cleared it every time. However, the guy to my left (Derek) had a Paasche that he seemed to require a lot of attention and the guy to my right (Scott) had issues with his Harder & Steenbeck, until he changed his needle out from the .15 to the .4mm, after that he didn't have a problem.
6) I love my Iwata Eclipse (HP-CS), although I will definitely use the Harder & Steenbeck Infinity as well. This past weekend I wanted to concentrate using an airbrush I was familiar with.
7) The solution to use for both mixing up paints and cleaning the airbrush is about 10% Isopropyl Alcohol (rubbing alcohol, available at just about any major grocery store, department store or Walgreens equivalent) and 90% Distilled Water. Distilled Water is important to prevent non-paint build up inside your airbrush. Especially in areas with a high mineral content in the water, like Colorado.
8) Huge key, knowing when to stop using the airbrush and go in with the paint brush.
9) I haven't yet run across an acrylic paint that I can't send through the airbrush but some of them are a lot easier than others. This weekend I used; Vallejo Model Color, Vallejo Model Air, Reaper Master Series and Reaper HDs. Other people around me were using regular Citadel and Citadel Foundation paints (none of the brand new stuff though). I have also managed to get craft paints through my airbrush (not a lot of fun though). My favorite of the bunch was definitely the Vallejo Model Air, it was just easier to work with and required very little thinning to get it working, makes sense, its designed for airbrushes. Both the Reaper lines were easy to work with too. Oh, and sadly Vallejo Model Color Smoke, does not like airbrushes, that gave more problems to Derek (on my left) than any other single color. It seems to just be a gritty paint.
10) All pigments are not the same. This is not in reference to any specific brands, just some colors are thicker and require more thinning than others. Other paints required (especially airbrush specific) required very little to almost no thinning.
11) Messing around with the PSI is over-rated. I left mine on 20psi the entire weekend, regardless of the paint I was using and they all behaved the same. I won't rule out that there will be times when I will need more or less pressure, but you certainly don't need to be adjusting it all the time.
12) You can thin your paint to much! If it is taking more than a couple of passes with the airbrush to build up the paint coverage then you need to add more paint to the mix.
13) Little bottles with good lids are your friends. Its much easier to mix up the paint you want in a small bottle/jar and then dump it into the airbrush cup than trying to mix it right in the cup. I bought two packs that each contained a dozen little plastic jars with lids for the second day and things went much smoother and quicker. If I was working my way through a bunch of figures (say my WWI US Marines) or vehicles I would go ahead and pre-mix the colors I needed in larger more sealable jars. The important thing to remember here is that everything still separates and you need to make sure the color you have pre-mixed is thoroughly mixed again before you pour it into the airbrush cup.
That's the stuff I learned this weekend. I'll be firing up the airbrush again tonight and looking forward to doing it rather than thinking of it as a chore.
Saturday, April 7, 2012
Airbrush Class with Aaron Lovejoy - Day One
Its been a long day here. Spent most of the day with 10 other people attempting to learn how to airbrush better. All of us had one main model to work on (it came as part of the class). I think there were five we could pick from (all from GW); Dark Elf Dragon w/rider, Manticore, Chimera, Demon Prince and something I don't remember. Anyway it was a good day I think I have picked up more control of the airbrush, learned how to make use of really quick masks and I really managed to reduce the number of clogs. I used a variety of paints today and didn't have problems with any of them; Vallejo Model Color, Vallejo Model Air (awesome!), Reaper Master Series and Reaper HDs. They all came through like champs for me today. So here are a few pictures. Post of these are to the point of needing regular paint brush work rather than airbrush work.
The Nurgle Demon Prince will end up in my oldest son's Demon Army
Got started on the Cougar MRAPs for my modern USMC.
Tuesday, January 3, 2012
Spraybooth and Paint
I like using my airbrush but I don't use it as often as I would like to. In the last month I have made a concerted effort to acquire more paint that won't need as much work to get it through the brush. To start I'm trying out the Vallejo Model Air paints. I have given up reading reviews on paint for the airbrush, it seems to either work for you or it doesn't. Since I have managed to get Vallejo Model color to flow through the airbrush I figured the Model Air should be a snap. Hopefully I can test that theory out in the next couple of weeks.
The Artograph spraybooth I ordered also arrived. I guess I should have read the description more carefully. Although the base is heavy steel construction the top and sides are actually cardboard. I guess in the long run it doesn't really matter what they are made of as long as air is getting pulled down through the filters. Again something that I hope to be able to try out in the next couple of weeks.
So much paint, so little time.
The Artograph spraybooth I ordered also arrived. I guess I should have read the description more carefully. Although the base is heavy steel construction the top and sides are actually cardboard. I guess in the long run it doesn't really matter what they are made of as long as air is getting pulled down through the filters. Again something that I hope to be able to try out in the next couple of weeks.
So much paint, so little time.
Subscribe to:
Posts (Atom)


