Quotes

Life is short, break the rules. Forgive quickly, kiss slowly. Love truly, laugh uncontrollably and never regret anything that makes you smile. - Samuel Longhorne Clemens (Mark Twain)

Thursday, October 20, 2022

Solar Power in the Greenhouse

This earlier this summer we had a custom shed built that will perform, somewhat, as a greenhouse. The south facing side, which is pretty much sun facing all year round, is just made up of windows. We didn't go with a full blown greenhouse because we needed a place for all the garden tools. You can see the initial progress here: Greenhouse Construction. I still need to insulate the ceiling but the rest of it has been insulated and paneled.

The new greenhouse at the back corner of our lot. Its on the same concrete pad, which we extended a bit, as the old shed. Note the large pole, that's a power pole. The electrical supply for the neighborhood is above ground and runs along the back. Ironic that we had to use solar power for the greenhouse since its within about 3' of that pole. The solar panels will generate 600 watts of power. I wasn't thinking when we decided to up the wattage and bought to 100 watt panels instead of a single 200 watt panel and made my life a tad bit more difficult.

Power was a requirement (need to charge those batteries for electric tools), however, its just to far away to hook it up to the house, at least not without some significant trenching and laying of conduit. Since we get a lot of sun all year round we decided to go solar. Definitely an easier said than done statement. But as of this afternoon we are fully hooked up and running off of solar energy in the greenhouse.

We started off with a kit from Grape Solar, although calling it a kit is being very generous. It basically came with the solar panels, the battery controller and some (but not all) cabling. There were  not enough brackets to mount the panels to the roof and the website doesn't really help if you want to expand the system like we did (from 400 watts to 600 watts). I probably could have gotten everything if I had actually talked to someone at Grape Solar, so chalk some of that up to my own stubbornness.

Oh and one of the key components that you must have if you want to run anything that needs AC current is not included; the (now) infamous power inverter. This is purchased separately and without it you are only running on DC current through the battery controller. The whole thing was a bit of an exercise in how many ways I could be frustrated, it doesn't seem to matter how much research I did something was always missing at the end of the day. I would think that a "kit" would contain literally everything you would need to set things up, nothing else to buy, well except the batteries. It doesn't come with the batteries, which I totally understand.

Its a bit messy now but at least its running. I'll take some time this weekend an neaten everything up. The key components here are the battery charging controller (the white box) and the power inverter (blue and silver box up high). The power inverter is mounted high up on the wall to keep it in the shade. I could have mounted under the workbench but that makes it a pain to access. I might move it anyway but I'm going to let everything simmer for a week before I rearrange things.

That brings us to the batteries. I opted for 12V 100A Lithium batteries and they cost a pretty penny. Two of these cost more than the whole solar system itself and we are using three (which may be overkill but its hard to say how much power we are going to need to keep things warm in the winter out there). These are, basically, what you might find in an electric golf cart. They should be good for 10+ years so hopefully we won't be replacing them anytime soon.

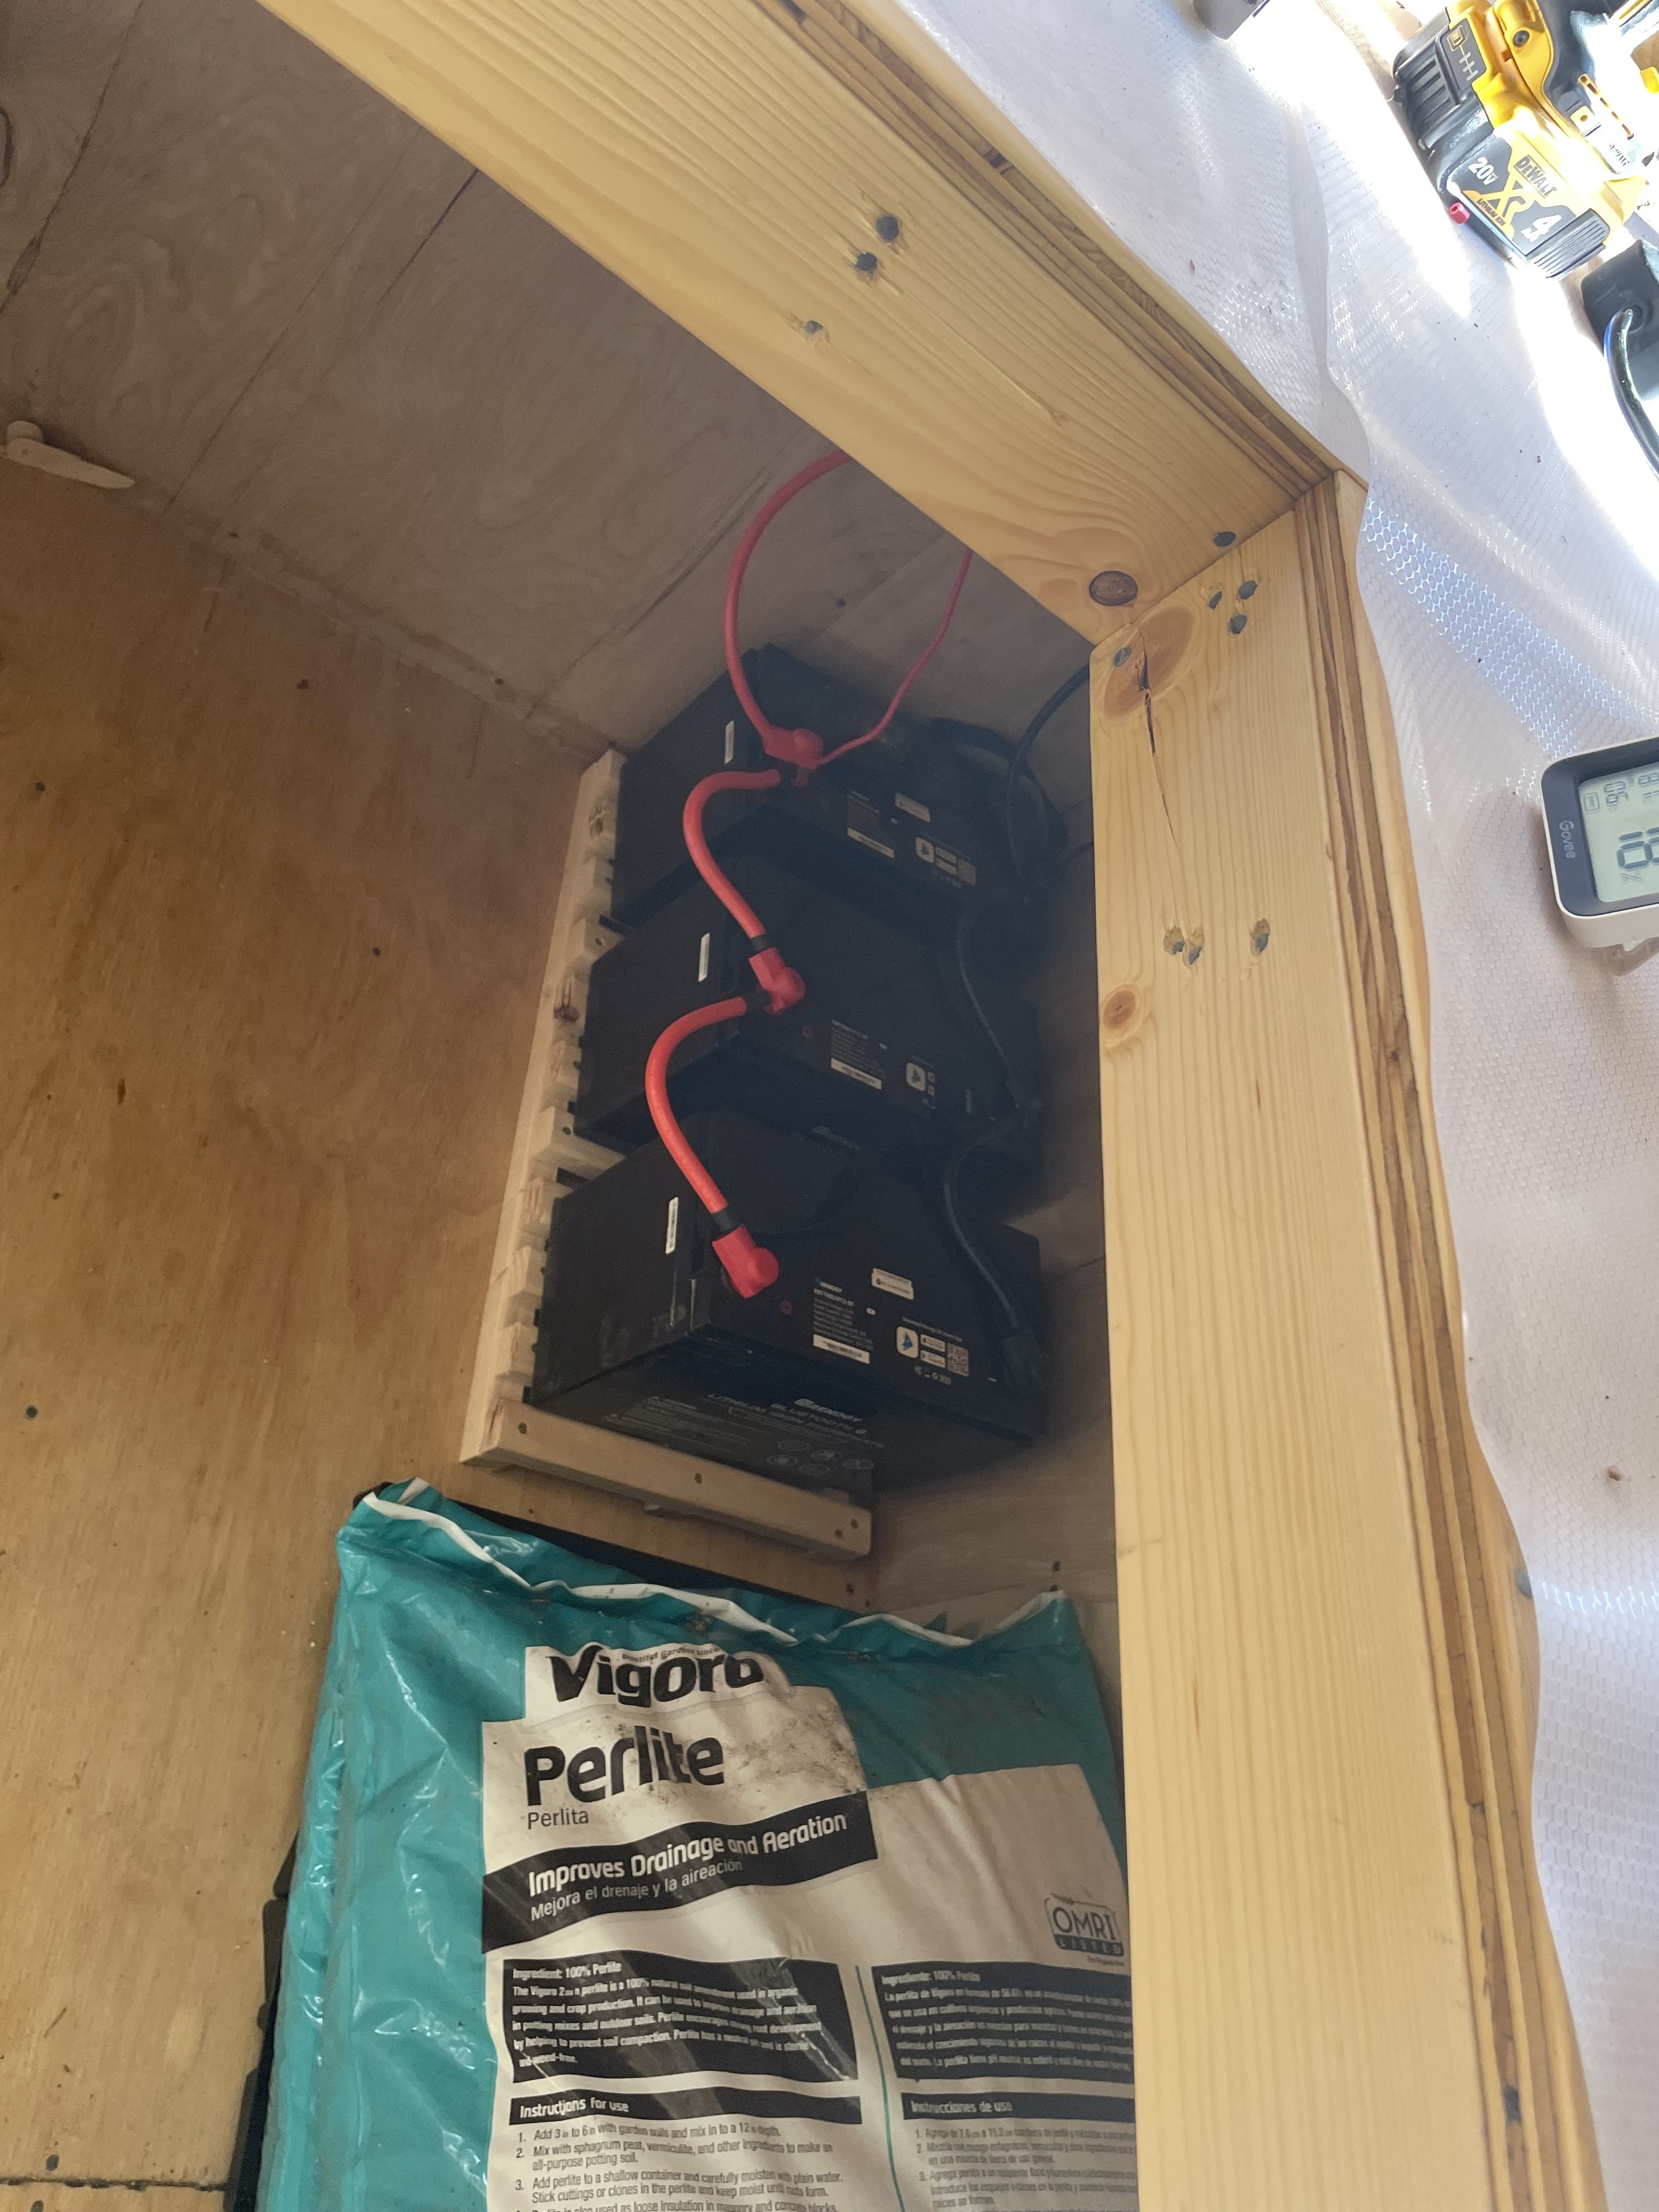
The battery charger controller dictated how to setup the batteries. Our controller needs the batteries in parallel so that's what you are seeing, each battery linked to the next the same connection (positive to positive, negative to negative). The other option was in series which would have linked them positive to negative.

As of yesterday, the fan and the heater were both running from power being collected through the panels. We only anticipate needing the heater in the winter to maintain a somewhat even 60 to 70 degrees and the fan runs when the temp is above 78 and we need to cool things off a bit. I was quite excited to have everything running as expected today.

Tuesday, October 18, 2022

Its That Time of the Year - Christmas Productions

I knew it would be a long holiday season when I saw Christmas decorations co-mingling with the Halloween decorations at my local Lowes. Just a week later I was at Home Depot (better wood, better selection) and they were clearing out an area getting ready for Christmas and just down the way was another huge display of Halloween decorations. Do we really need a Christmas season that lasts for 3 1/2 months?

But what it did remind me to do was get busy on the Christmas cards for this year as that is just a time consuming process and this holiday season looks to be a busy one for us. Fortunately I'm way ahead of the game because we ended up not producing cards last year so my printing block is already to go.

I did a few test prints to see what they were going to look like and if there was anything glaring that I might need to correct. Last year I did the initial work on my little Neje laser, unfortunately it didn't burn deep enough but it was good start to the carving and saved me a lot of work. All I had to do was get out the ink, paper, a brayer and the block and I was set to go. You can see the results below.


My basic, and primitive, printing setup. Just a some wood thrown together (and made as square as possible) to hold the block in place and hold the paper in place and square to the block. I use a piece of plastic to spread ink out on.

The first two prints. The first one I did is on the right. I did rub it down well enough to get a good imprint. The second one was better and it showed where I had some high points that needed to be cut down.

After a bit of minor work I like this print. All the high spots have been knocked down. The "a" in Christmas is a bit deformed but there is nothing I can do at this point to fix that. This first color I'm trying out is Phthalo Green. I will be trying Prussian Blue and Ultramarine next and then we will decide what to use. I have a Napthol Red, but I'm not wild about it.


Monday, October 17, 2022

Finally! Setting up the D1 XTool

Its been sitting in its box for ages, but I finally spent some time and got out the D1 and set it up. Partially because I wanted to see what I was going to need to build to house it and actually use the darn thing,

Here are some quick pictures of the setup and the final result. Now I just need to download the software and see what I can do with it.

Just what I needed, more foam. Ridwell won't even take this stuff.

Here we go with all the parts pulled out of the foam.

Here is the basic frame assembled.

And a bunch of stuff going on that you can't see. Took this because it represents me not taking pictures.

The unit came with the 10W laser but when I purchased it they were working on the 20W upgrade and you could purchase it at a discount for being an early bird.

Another box full of parts. The laser now requires its own power supply.

And after a lot of messing around, this is what you end up with at the end. There are a couple of pieces that you didn't see in the other photos. I added the honeycomb plate which is what you see in the center cutting area of the laser. In the right top corner is the air assist to help blow out smoke and debris from the laser's path. Then there are two power supplies. The big one in the front is for the laser itself and the smaller one in the middle is for the device itself and can power the whole thing if you are only using the 10W laser.

After I put this together I went out looking to see what folks had built for enclosures. At that point I discovered that the honeycomb addition creates a few problems because of its height which reduces the Z Axis cutting area. I see a couple of good solutions out there already as well as some very useful jigs. I'm excited to get it up and running, I have a head full of ideas and Calamity is likely to be the biggest benefactor!


Tuesday, October 11, 2022

Acquisition - Accurail - D&RGW 40' DBL DR AAR Boxcars

This is my first acquisition of D&RGW rolling stock for the Warehouse Row layout. Granted construction of said layout is still a long way out but it was a good deal. I like Accurail kits and this was a set of three 40' Boxcars in one of their 3 box series, so you know the car numbers will be different. 

I was looking forward to putting these together, but I didn't read the listing close enough and these are already built. Nicely built I might add, the only thing I need to do is through on some better trucks and do some weathering and these will be ready to go. I was pleasantly surprised with the quality of the build so the $15 I spent on each one was money well spent!


Thursday, October 6, 2022

Windows for the Win!

I needed to cobble together a platform for the batteries for the solar power system in our greenhouse. Normally I setup my saws so that they are parallel to the window wall but for some reason I set up the miter saw perpendicular instead.  I knew that I needed to get the big doors open later today and I guess I was thinking about that instead of how to deal with long lumber.

I was cutting down some 8' long scrap lumber for this little project and as I set that first piece on the saw, I noticed that I didn't have enough room. The saw is in the middle of the room which is 12' wide which leaves 6' on either side. Now you see the problem, 6' width, 8' piece of lumber. Fortunately one of the windows was in the right spot. I opened it up, popped out the screen and BAM, plenty of room to cut long lumber with!

I happily cut up scrap lumber to make a base for the batteries and 30 minutes later that job was done. Windows and scrap wood for the win!


The miter saw setup in the wrong spot. But wait! There is a window!
Open window, remove screen, insert lumber! Sometimes it all comes together.