Quotes

Life is short, break the rules. Forgive quickly, kiss slowly. Love truly, laugh uncontrollably and never regret anything that makes you smile. - Samuel Longhorne Clemens (Mark Twain)
Showing posts with label MadBobMiniatures. Show all posts

Friday, August 21, 2020

World War II Project - P107 (f)/U304 (f) 21st Pz Div Halftracks - Paintwork

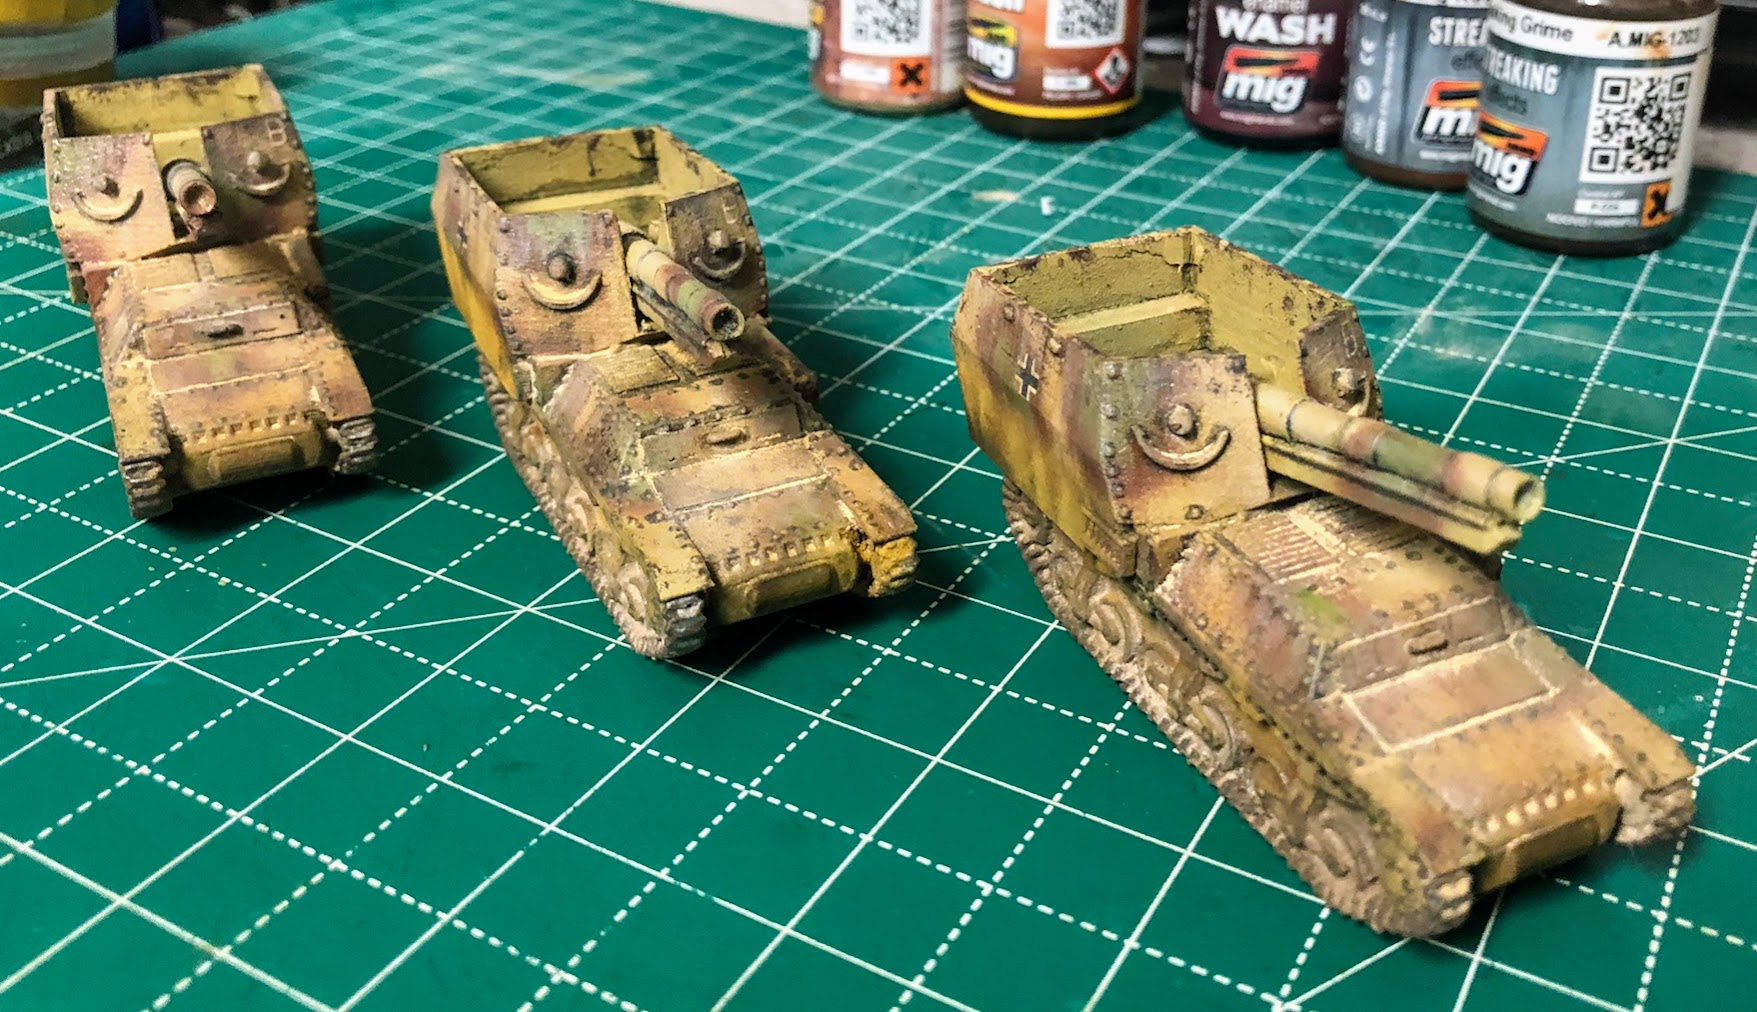
Its been a while since I have worked on these but its time to get them across the finish line. I did a little more research because I was getting a little confused about some of the information I was reading. I blame it on Becker. So the P107 (f) itself is actually the unarmored version, which looks a lot like a halftracked truck. The original function, for the French, was as a light artillery tractor or an engineering platform. Enter our friend Alfred Becker. The 21st Panzer Division was short on all types of armored vehicles, but especially the SdKfz 251/1 halftracks. Becker took the P107 and from them created the armored U304 (f) halftrack. It looks very similar to the SdKfz 251 and I suspect that was intentional to help avoid friendly fire as the angled armored sides would not have been easy to construct.

I'm using the Warlord Games P107 (which should be called the U304(f)) which required some fairly major "adjustments" to get it to come together properly. Warlord also makes a U304(f) with the PaK 36 (I'm not sure how I missed that). I don't know if its the same body as their P107 or a new model but I'm fairly certain it was not available when I bought my P107s which was, admittedly, a number of years ago. I have also learned that Mad Bob Miniatures is also making the U304 (f) now and that would probably be my first choice if I were to do it again or just needed more. Mad Bob makes two AA versions (armored and partially armored) the MG version and the Pak 36 version. Their castings tend to be a little on the rough side but the simplicity of construction and the price go a long way in making up for that and really there are plenty of ways to fix a rough casting.

Here are links to the previous progress on the U304 (f)s:

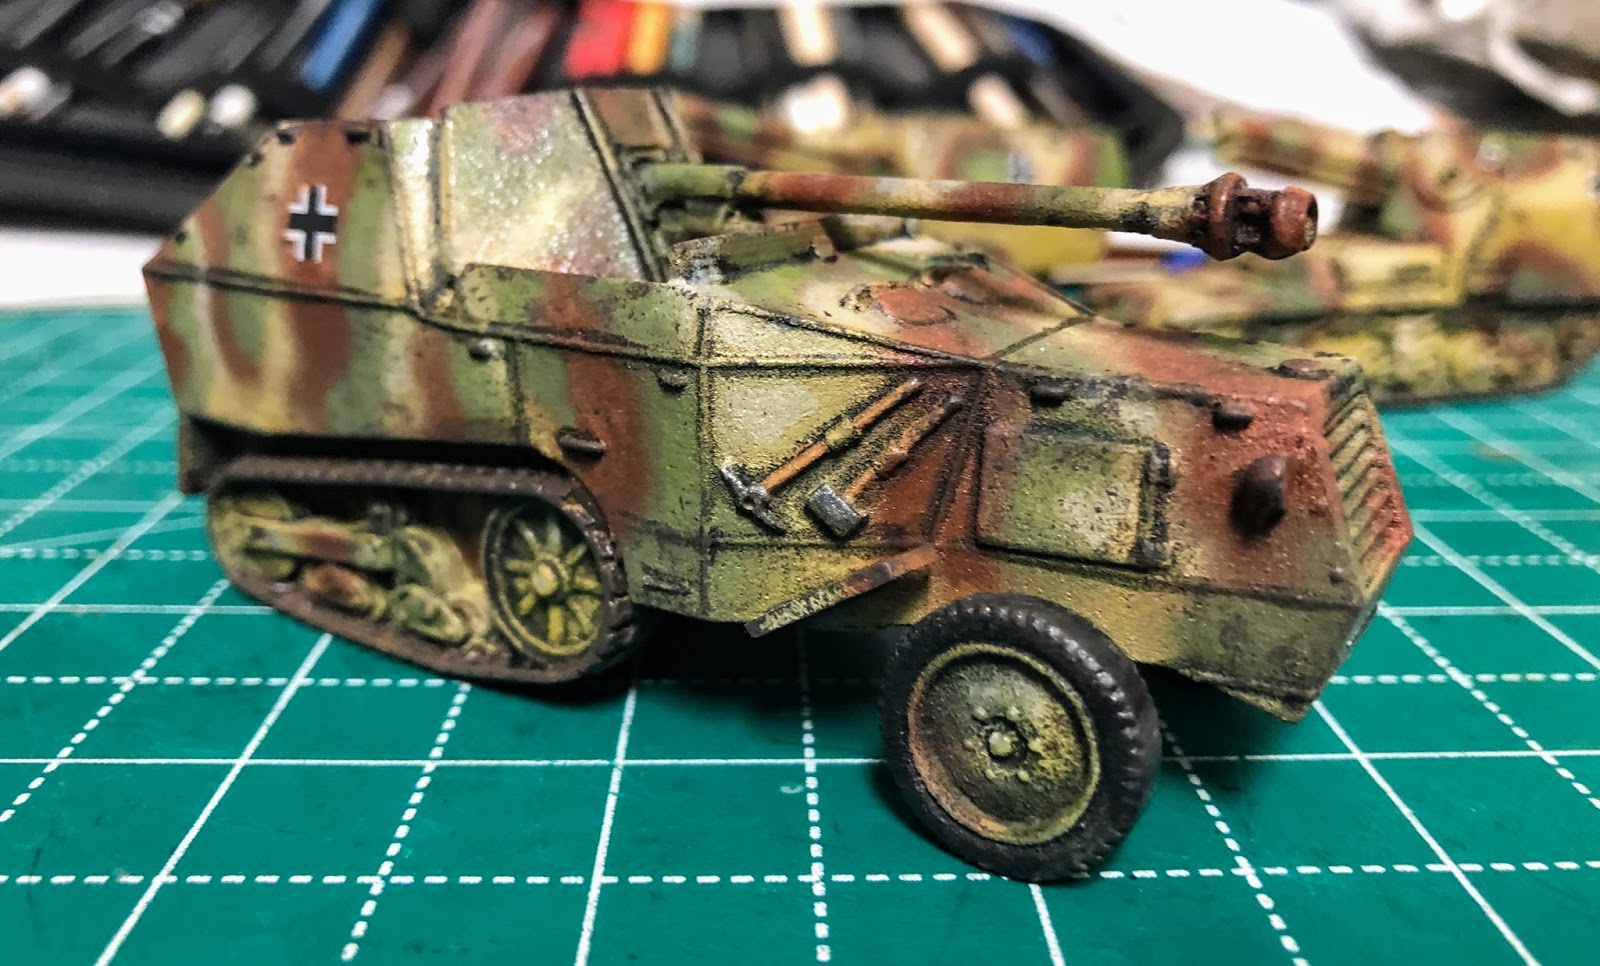
And with that I started off with the paint sequence (still trying to figure out the best sequence for this, so subject to change without notice). I applied a filter first to tie the colors together a bit more. I did two very thin coats which harmonized the colors a bit more than a single coat would do. Following that I did the lining. This really starts to make the vehicles standout and its definitely a bit tedious. You don't just apply an dark wash over the whole vehicle which would really hide what I was trying to do with the filter, instead I use a brush with a reasonably good tip and outline the areas, especially around raised panels, panel lines and the like. I don't use my good Kolinsky sables for this, I'm using Ammo's Dark Wash which is an enamel wash and enamels will eat a brush really fast. Which means I finally found a good use for those double ended brushes I got on a kickstarter so many years ago now. Oh and apparently I didn't really get enough gloss varnish over the decals in a couple of places and the filter really ripped them up. However, I think they look quite good after that so I didn't bother to replace them. They will help with the chipping.

After that was finished I started to fade the upper surfaces a bit. I'm trying some oil colors from Abteilung to see how those work differently from the Ammo Oilbrushers. Unfortunately I really didn't really let things dry adequately so the initial work was not what I had hoped for. Time to step away and let things dry before I try it again.


Beginning the lining, you can really see the difference between the one I just started and the next one in the lineup.
I have just started the lining on the U304 on the left, it really stands out from the one on the right even at this stage.


Lining is complete, next I'll move on to fading some of the top surfaces. If you look close you can see the disintegrated iron cross on the middle U304, the result of not applying enough gloss varnish over it.

And from the back

The step I was hoping to get to, fading using the new Abteilung oils I purchased. Best to spread these out on a piece of cardboard to absorb some of the excess oil, helps it dry faster too. I'll go back to these after the U304s have had some more time to dry.

Friday, August 14, 2020

World War II Project - Return to Normandy - The Gangs all Here - Finished

 Going to call these done and ready for the table, although I'm still toying with mounting them to bases.

mSPW S307(f) with Pak 40 ATG by Mad Bob Miniatures


15cm sFH 135/1 (Sf) auf Geschutzwagen Lorraine Schlepper (f) by Mad Bob Miniatures


Thursday, August 13, 2020

World War II Project - Return to Normandy - The Gangs all Here - Recovery

 I sat down with these and finished them up. First thing I did was stir my matte varnish really, really well! I used that to cut the glossy shine down and give a nice matte surface for the pigments to adhere too.

First the dust up. I applied some dusty colored pigments to the top surfaces and the bogies and tracks. I wet that down with white spirits and then wiped off the excess with a makeup sponge. Maybe a little heavy but not bad.


I followed that up with some more pigments. This time I used the Pan Pastels and applied three layers.


Monday, July 27, 2020

World War II Project - Return to Normandy - The Gangs all Here - AARGH!!

I hate this, and I know better and managed to do it anyway. From the last session I cleaned up the pigments and added back in some of the oil stains and such on the bogies. Then I applied some of my favorite pan pastels to finish everything off and was pretty happy with the final results.

Here comes the mistake, and I managed to make two of them. I have a bottle of Liquitex matte varnish, big bottle, will last forever. I sprayed it on and it was only watching it dry that I realized that I just lost all my pigment work. That was bad enough, except that on top of that I must not have shook up the varnish very well and instead of a nice matte finish I got a nice glossy finish.

Bottom line I have to re-apply the pigments and get rid of that nice gloss coat. I forgot about not being able to seal the pigment effectively, although using the pan pastels in a more heavy handed manor will work, hence why I'm seriously considering bases for the vehicles this time around. The pan pastels hold up much better to handling than regular pigments so its still up in the air. In the mean time it will take another session or two to fix the finishing mistakes.


Pretty happy at this point, just a little pigment adjustment and they are good to go.


Definitely to enthusiastic on this side

 
Here they are all finished up just before I sprayed them.


A bit more subtle on this side this time
Pigments disappeared and looking nice and glossy!


Thursday, July 2, 2020

World War II Project - Return to Normandy - The Gangs all Here - Chipping

I am having a love hate relationship with chipping techniques. If I use a brush I struggle to make it look even remotely like chips but using a brush allows more control. The "sponge" technique seems to work best for me. I grab a piece of foam from a miniature package and tear it up a bit and hold it with a pair of tweezers as I dab it against the side of the vehicle. Unfortunately its much harder to control and I struggle with trying to get the excess paint off the foam before I dab against the surface.

This is the first round of chipping or it might even be the final round of chipping just depends on how I feel about it. Overall I think it came out rather well. I should probably go back on the S307 and chip it with the yellow on the green and brown camo colors. Its just hard to see the dark chip color in those areas. I really am going to need a lot more practice with this technique before I get back to the StuG IIIs. Fortunately I still have those 3 P107s coming up.


Its hard to see the dark chip color in some areas. This is where I should go back and try chipping with the base yellow in those spots.


You can see some spots on the interior where I didn't get enough paint off the foam especially the big spot to the right of the Pak 40.

The chipping looks better on the Lorraines I think. More yellow to really show the chipping off. I see I do need to get in there and do the muffler though.


I need to really practice both the lining and the chipping. I got sloppy on the S307(f) here and it really shows in the fighting compartment and around the tools in particular. There is definitely a learning curve on how long to let things dry before you "clean" it up with thinner. To soon and its not dry enough and you just spread things around, to long and its really hard make a dent in it and you have big swatches of "lining" that aren't really lining. I should be able to cover some of this with the weathering though and tighten things up a bit.

In the end all of these are gaming pieces anyway and are going to look just fine on the table.

Friday, June 12, 2020

World War II Project - Return to Normandy - The Gangs all here

There has been a lot of building and not much painting for a while now. Here is the line up for the paint shop


15cm sFH 135/1 (Sf) auf Geschutzwagen Lorraine Schlepper (f), Pak 40 auf S307 (f) both from MadBob Miniatures

Pak 40 auf S307 (f), Unic P107 Halftrack (f) [Warlord Games]

First up; a filter to help bring the colors together a bit more.

Filter applied and lining started on one of the schleppers. The filter affect is hard to see in the photos, it is subtle but the colors are a bit more unified because of it. The lining on the first schlepper may be to dark a brown might have been a better choice. Further weathering may tone it down quite a bit. I'm going to try a different wash for lining on the next one, more of an umber brown I think.