Quotes

Life is short, break the rules. Forgive quickly, kiss slowly. Love truly, laugh uncontrollably and never regret anything that makes you smile. - Samuel Longhorne Clemens (Mark Twain)
Showing posts with label Warlord Games. Show all posts

Thursday, October 19, 2023

World War II Project - British Airborne - reboot prep

I have done all the initial prep work and the everything is ready for primer (or re-priming in some cases).
What you see is a British Airborne Platoon based on the organization in Chain of Command. I admit that I was unsure of the composition of Section 3 as it has two Bren gunners. After haunting some forums and digging deep I found that there was a spare Bren gun issue to the platoon. It makes sense that rather than waiting for one of the three assigned guns to break to assign it to a section and create a section that could serve as a base of fire for the platoon.

Everything is from Warlord Games. I started this platoon when all you could get was metal. The issue is there are way to many Sten guns and not enough rifles. I have a stash of Sten gun equipment soldiers now. I also built up as many of the support units that I could. That is why I have a fourth section of Airborne troops, there are 3 Vickers, 2 3" mortars to go with that. I still need to build a section of regulars that I is another support option. Hopefully I can use that as a nucleus for a British motor platoon.

Not sure when I'll have time to start priming but everything is sitting in the booth waiting for the fun to begin.

An overall look at the platoon with the supports. This is before I finished putting everything on 25mm bases.

I needed 8 more figures so I turned to the plastic Airborne box to flesh things out. Overall I'm pretty pleased with these, but they are definitely a bit bigger and bulkier than the metal troopers.

A look from the Back


Platoon HQ section


1st section.

2nd Section

3rd Section, they have the extra Bren gun and the sniper.


The extra Airborne section

Support weapons.  These are support weapons and crews. Within Chain of Command these need 5 man crews. Typically some kind of counter is used (a die or something equivalent) to count down casualties. I'm thinking something right on the base itself or maybe just go with kill rings.


Thursday, October 12, 2023

World War II Project - British Airborne - reboot

I have been more than a little distracted lately with work and Christmas projects (I may have over committed on puzzles this year). Not to mention that after developing a window solution for the Church I have run out of steam. So in order to try and get back on track I pulled out my British Airborne to figure out what I have and what I might need.

In theory I have one section finished and second section getting close. However, I thought I should just work it out from the beginning again. My rule set of choice for platoon/skirmish level actions is Chain of Command (CoC) by Too Fat Lardies. All the miniatures I have on hand are from Warlord Games. I would love to replace these as there are some much nicer options out there now, but this is what I have in hand. In addition to a much of metal I have box of their plastics which means I could probably put together a second platoon.

After the initial sort I have all the components of the HQ section, all three sections and most of the support options (including an additional section of Airborne). All of this in metal, although the extra Airborne section will need some plastics to fill it out to full strength. I also wanted to use different figures for each section leader so three of those will be made up from the box of plastic minis.

I put one section leader together last night, he is definitely a bit bigger than the original metals. Shouldn't be a problem once everything is painted and based. And speaking of that I'm going to repaint everything to ensure that its all consistent, even the finished troops that are based. I'm not going to strip them just re-prime over what is there. I'm going to change my painting philosophy about this and go the army speed painting route.

At the moment I just plan on getting everything prepped and ready for priming. I still need to finish the church and the group of HO scale minis I have started painting.

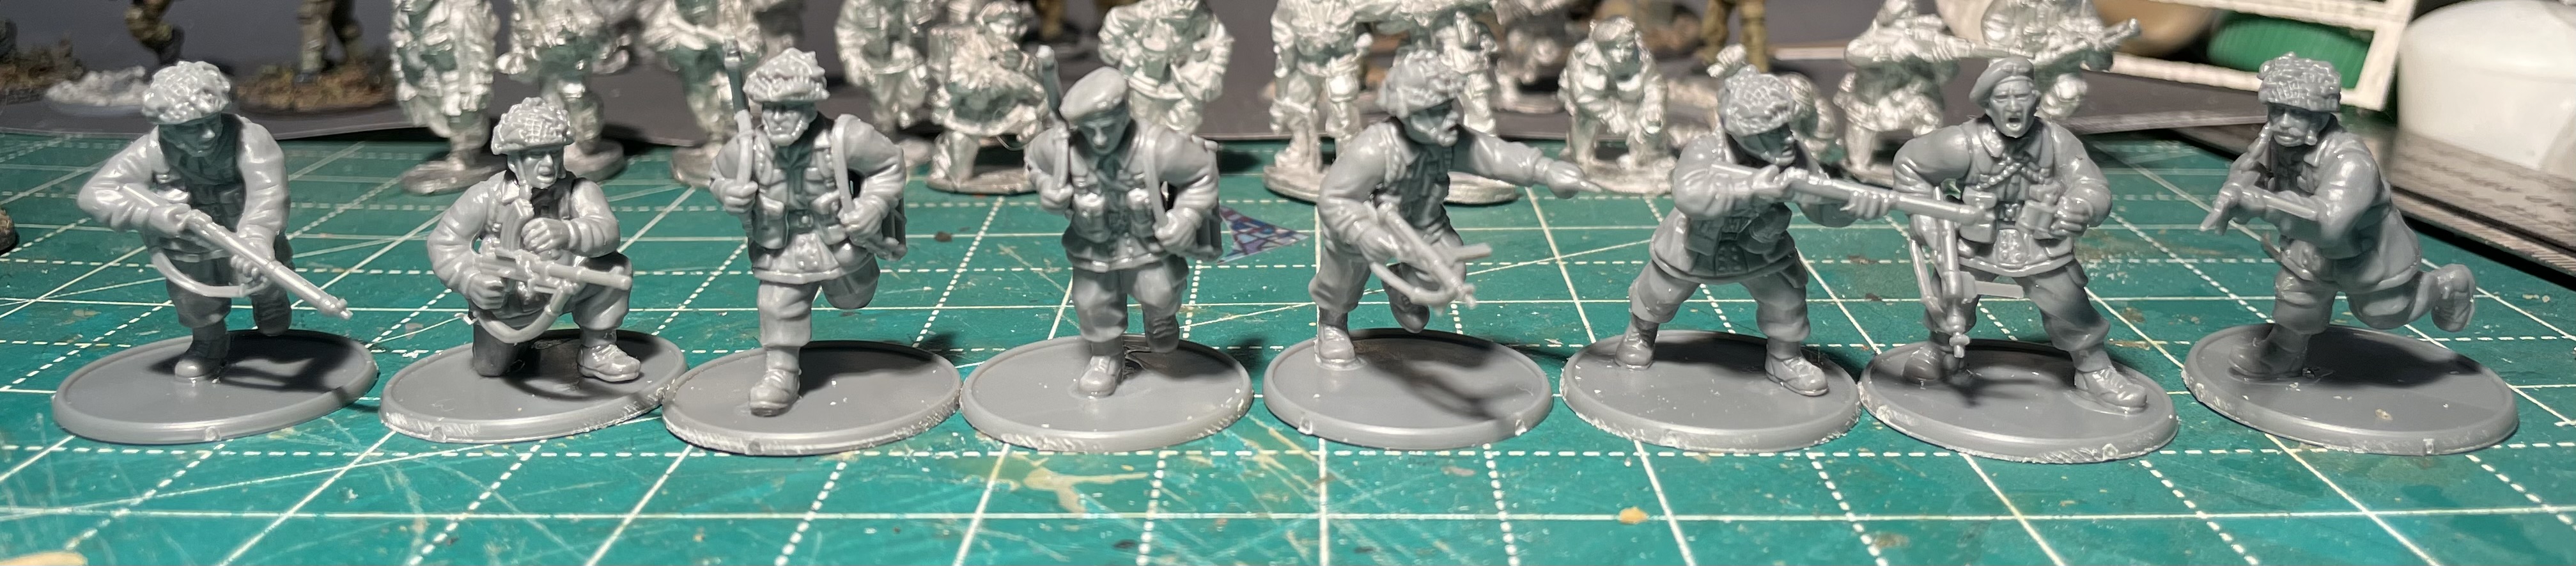
In this shot, three full sections for the 1st Platoon, two Vickers supports, 2 mortar supports and most of a 4th section (way to many sten guns in the metal packs, I need more rifles).

Here is the platoon HQ section and some additional supports; medics, 2" mortar team and another piat team (in addition to the ones in the HQ section

There are still some support units that I need to get my hands on, most of which are engineers which may need to be converted from my box of plastic British infantry. I also need to put together a section of regular infantry as a support.


Friday, September 25, 2020

World War II Project - P107 (f)/U304 (f) 21st Pz Div Halftracks - Tracks & Wheels

Halftracks are always such a joy when you get down to the suspension, getting to work on both tracks and wheels is so much fun. This is the last bit of work that the U304 (f)s are going to need and, of course, I'm still experimenting with the best way to weather both tracks and wheels to get them looking good.

I started with the tracks and basically followed the same set of steps I used on the S307(f)s. I was a little heavy handed on the tracks on these so I stepped everything back a little bit and I also purchased some pigment fixer that would make adding back in some grease and grime a little easier as it would fix the pigment permanently (and I do mean permanently) in place.

After the tracks I moved on to the wheels and tried out the oilbrushers to add the dust without resorting to pigments. I think these came out pretty good in the end. A little more practice and some better wheel castings and I think my wheels will start looking pretty good. I'm sure there will be some more halftracks in the future (not to mention jeeps) to practice on my wheel weathering technique.


Something to keep in mind you can mix pigments the same way you mix paint.

Pigments on the tracks

Tracks are a little shiny with the pigment fixer and while I waited for that to dry I started working on the wheels with the Oilbrusher (Buff).

The tracks from the other side after applying a combination of paint mixed with pigments on the tracks
A better look at the tracks with the paint/pigment combination. I think it needs more pigment and less paint but it looks okay.


Tracks on this side are done, wheel needs a little more work

Starting the wheels while the tracks dry

I see a couple of spots that could use a little work but overall these wheels looks pretty good.


Thursday, September 10, 2020

World War II Project - P107 (f)/U304 (f) 21st Pz Div Halftracks - Streaking

I was able to sit down and add some fairly extensive streaking to the halftracks. For this round I used the Ammo streaking effects; streaking grime and streaking rust. I tried to make the streaks a bit more obvious this time around by making sure that I kept the use of thinner to a minimum on the brush. I have definitely not mastered this technique yet but I am getting better at it. I think I have decided that I prefer using the Ammo Oilbrushers for this, the enamel streaking effects just seem to thin coming out of the bottle and I felt like I constantly needing to add a second "coat" to make sure there was enough paint to actually create the streak with. The tube oils work very nicely for this as well but at least two of the Abteilung tubes seemed to have completely separated in the tubes and I ended up with a huge mess on the palette which makes me lean even more towards using the Oilbrushers for just about everything that uses oil paints and supplement with tube oils.

NOTE: After looking at even more videos it seems that the best surface to do streaks on is a semi-gloss surface. A matte surface has to much texture making it difficult to work the streaking effect and a gloss surface (which is what I used on these) doesn't give the surface enough tooth for the paint to grab, which goes along way in explaining some of my frustrations with the technique. I will no better for the next batch test subjects.


Monday, September 7, 2020

World War II Project - P107 (f)/U304 (f) 21st Pz Div Halftracks - Chipping

I had a little time to start the weathering process with the chipping step. This time I started with lighter colored chips using Ammo's Dunkelgelb High Light (A.MIG-904). I then followed that with the darker chips using  Vallejo German Camo Black Brown (70.822). Pretty pleased with them at this point, some of the chipping is way to big but using the sponge technique can be trying. After I let them dry overnight I'm quite pleased with the result. They may need a little more chipping in a couple of spots before I move on to the rest of the weathering.


Light Chipping first with the dunkelgelb


Dark chipping with the German Camo Black Brown


Tuesday, August 25, 2020

World War II Project - P107 (f)/U304 (f) 21st Pz Div Halftracks - Painting Con'ts

Painting really can't be described as anything but a process. Adding in oils and pigments really does lengthen the time it takes to complete the paint work. Its becoming increasingly clear that if I stay the course on this style of painting that I really need to be working on multiple models at once. Unlike acrylics which tend to dry in a matter of minutes (sometimes seconds) here, the oils I'm using take hours and I usually let them sit for at least 24 hours before continuing on to the next step. I'm a bit of an impatient painter to begin with so the waiting can be quite trying at times but patience is really the key to making these techniques work. On several occasions I have finished something like streaking and moved to fast to the next step and wiped out all the streaking effects that I have done.

You can substitute acrylics for oils for all of this, put its decidedly more difficult to pull off. With the oils I have minutes and even hours to work with the paint to get it right, with acrylics I better get it right the first time. I see that Ammo by Mig does make an acrylic thinner maybe I'll try experimenting with that.

In the meantime, I have finished the fading on the U304 (f)s. I used the Abteilung oil paints on two of them and Oilbrushers on the third. I like the Abteilung oils the only disadvantage I see is using tubes which always wastes paint. The Oilbrushers are just a bit easier to deal with in this regard since I can go straight from the bottle to the surface with the build in brush. Once the fading was finished though you can't tell the difference so which one you decide to use really comes down to personal choice. 

Fading in progress:
This is how it starts out, just a few streaks of paint.

Starting the blending, the key to be successful here is very little thinner on the brush.


Kind of messy yet, but I'll get it cleaned up.

A few days after I did the initial work I was able to, more or less, finish off this portion of the paint work. I did a fade on the mostly upper surfaces and I darkened the green in some other areas. What I really discovered is that, at least for me, that its best to keep you oil paint dabs very small and you don't need to use any thinner at all, or very, very small quantities. It didn't take much thinner to wipe away my work. Which means I might consider sealing these again after I do the chipping.


Monday, August 10, 2020

Age of Sail, Black Seas - Plastic Frigates - Primed

I needed a little break so I grabbed all the plastic frigates from Black Seas, set the airbrush pressure to about 8 psi and hit them with the black primer. I know I have popsicle sticks around here some place but I couldn't find them while I was thinking about doing this, hence the lower PSI level. I thinned the Stynylrez primer down to handle the low pressure and did a couple of coats to get everything covered. So these represent the three smaller US frigates from the original six and six more brigs of one kind or another.


Primed and ready for some detail. Looks like they will need some pretty precise painting.


Friday, June 12, 2020

World War II Project - Return to Normandy - The Gangs all here

There has been a lot of building and not much painting for a while now. Here is the line up for the paint shop


15cm sFH 135/1 (Sf) auf Geschutzwagen Lorraine Schlepper (f), Pak 40 auf S307 (f) both from MadBob Miniatures

Pak 40 auf S307 (f), Unic P107 Halftrack (f) [Warlord Games]

First up; a filter to help bring the colors together a bit more.

Filter applied and lining started on one of the schleppers. The filter affect is hard to see in the photos, it is subtle but the colors are a bit more unified because of it. The lining on the first schlepper may be to dark a brown might have been a better choice. Further weathering may tone it down quite a bit. I'm going to try a different wash for lining on the next one, more of an umber brown I think.