After the hull has been assembled its time to move on to the A-frame crane. This can be assembled in either the standby/travel mode or in operating mode. The decision here is forced a little early in the assembly (Step 3A) of the model, but if you have left the "turret" off you could change your mind and pry up which ever piece you used and replace it with the other (R08 or R09). I have been committed to the operating mode from the beginning of this build as I don't really intend it to be a gaming piece (although I suppose it could become a big objective marker). I might get a second one and build it in travel mode for the wargame table.
Step 10 - The A-frame
You would think this is pretty straightforward assembly involving three components; P01, P02 and P03. The reality is different. Clean up any mold lines on these pieces while you contemplate the rest of the build. If you haven't decided on Standby/Travel or Operating Mode you must do so now which will determine how much work you need to do. Something to think about, if you don't mind rigging cables then you are good with either mode. If you don't want to fiddle around with wire or thread to represent said cables, then Standby or Travel mode is for you.
 |
| P01 The A-Frame, P02 Hook Block, P03 Limiter (for lack of a better term on my part) |
For Standby/Travel Mode: Don't try and glue the pieces together and hope you will get the angles right. Glue P1 (the A-Frame) and P03 (Limiter) together first. There is only one way for them to fit together so you can't go wrong there. Attaching P02 can be tricky because its going to sit at a different angle in Standby/Travel mode than it does for Operating Mode. There are two small pins on P02 and those will fit into the holes/dimples on the attachment point on the A-frame. Push it into place, DON'T GLUE IT YET, make sure it is in position and then take a pair of pliers and gently squeeze the outside pieces of the A-frame together trapping P02 in place. Now skip to Step 11. Gently put the feet of the A-frame into place at the front. The fit is relatively tight so be careful because you are dealing with a resin attachment point. With the front feet in place set the feet of the hook block (P02) into place on the back of the ARV. Now everything should look like this:

For Operating Mode there are a couple of things you should do before you glue these pieces together. Make sure you have found and cleaned up any mold lines remaining on these pieces. P02 the hook block needs some holes drilled in it for operating mode. Much easier to drill those now than after its been assembled in Step 13. It is much easier to drill the three 1mm holes you need in the hook block (P02) before you try getting everything into place.
 |
| The hole at the top of the tackle block. Mine is not straight, its centered on this side but exited the other side less than centered. |
 |
| They may be straight through but they are definitely not centered. Fortunately no one will ever know (well except if you looked at the pictures, then it will be forever etched on your mind). |
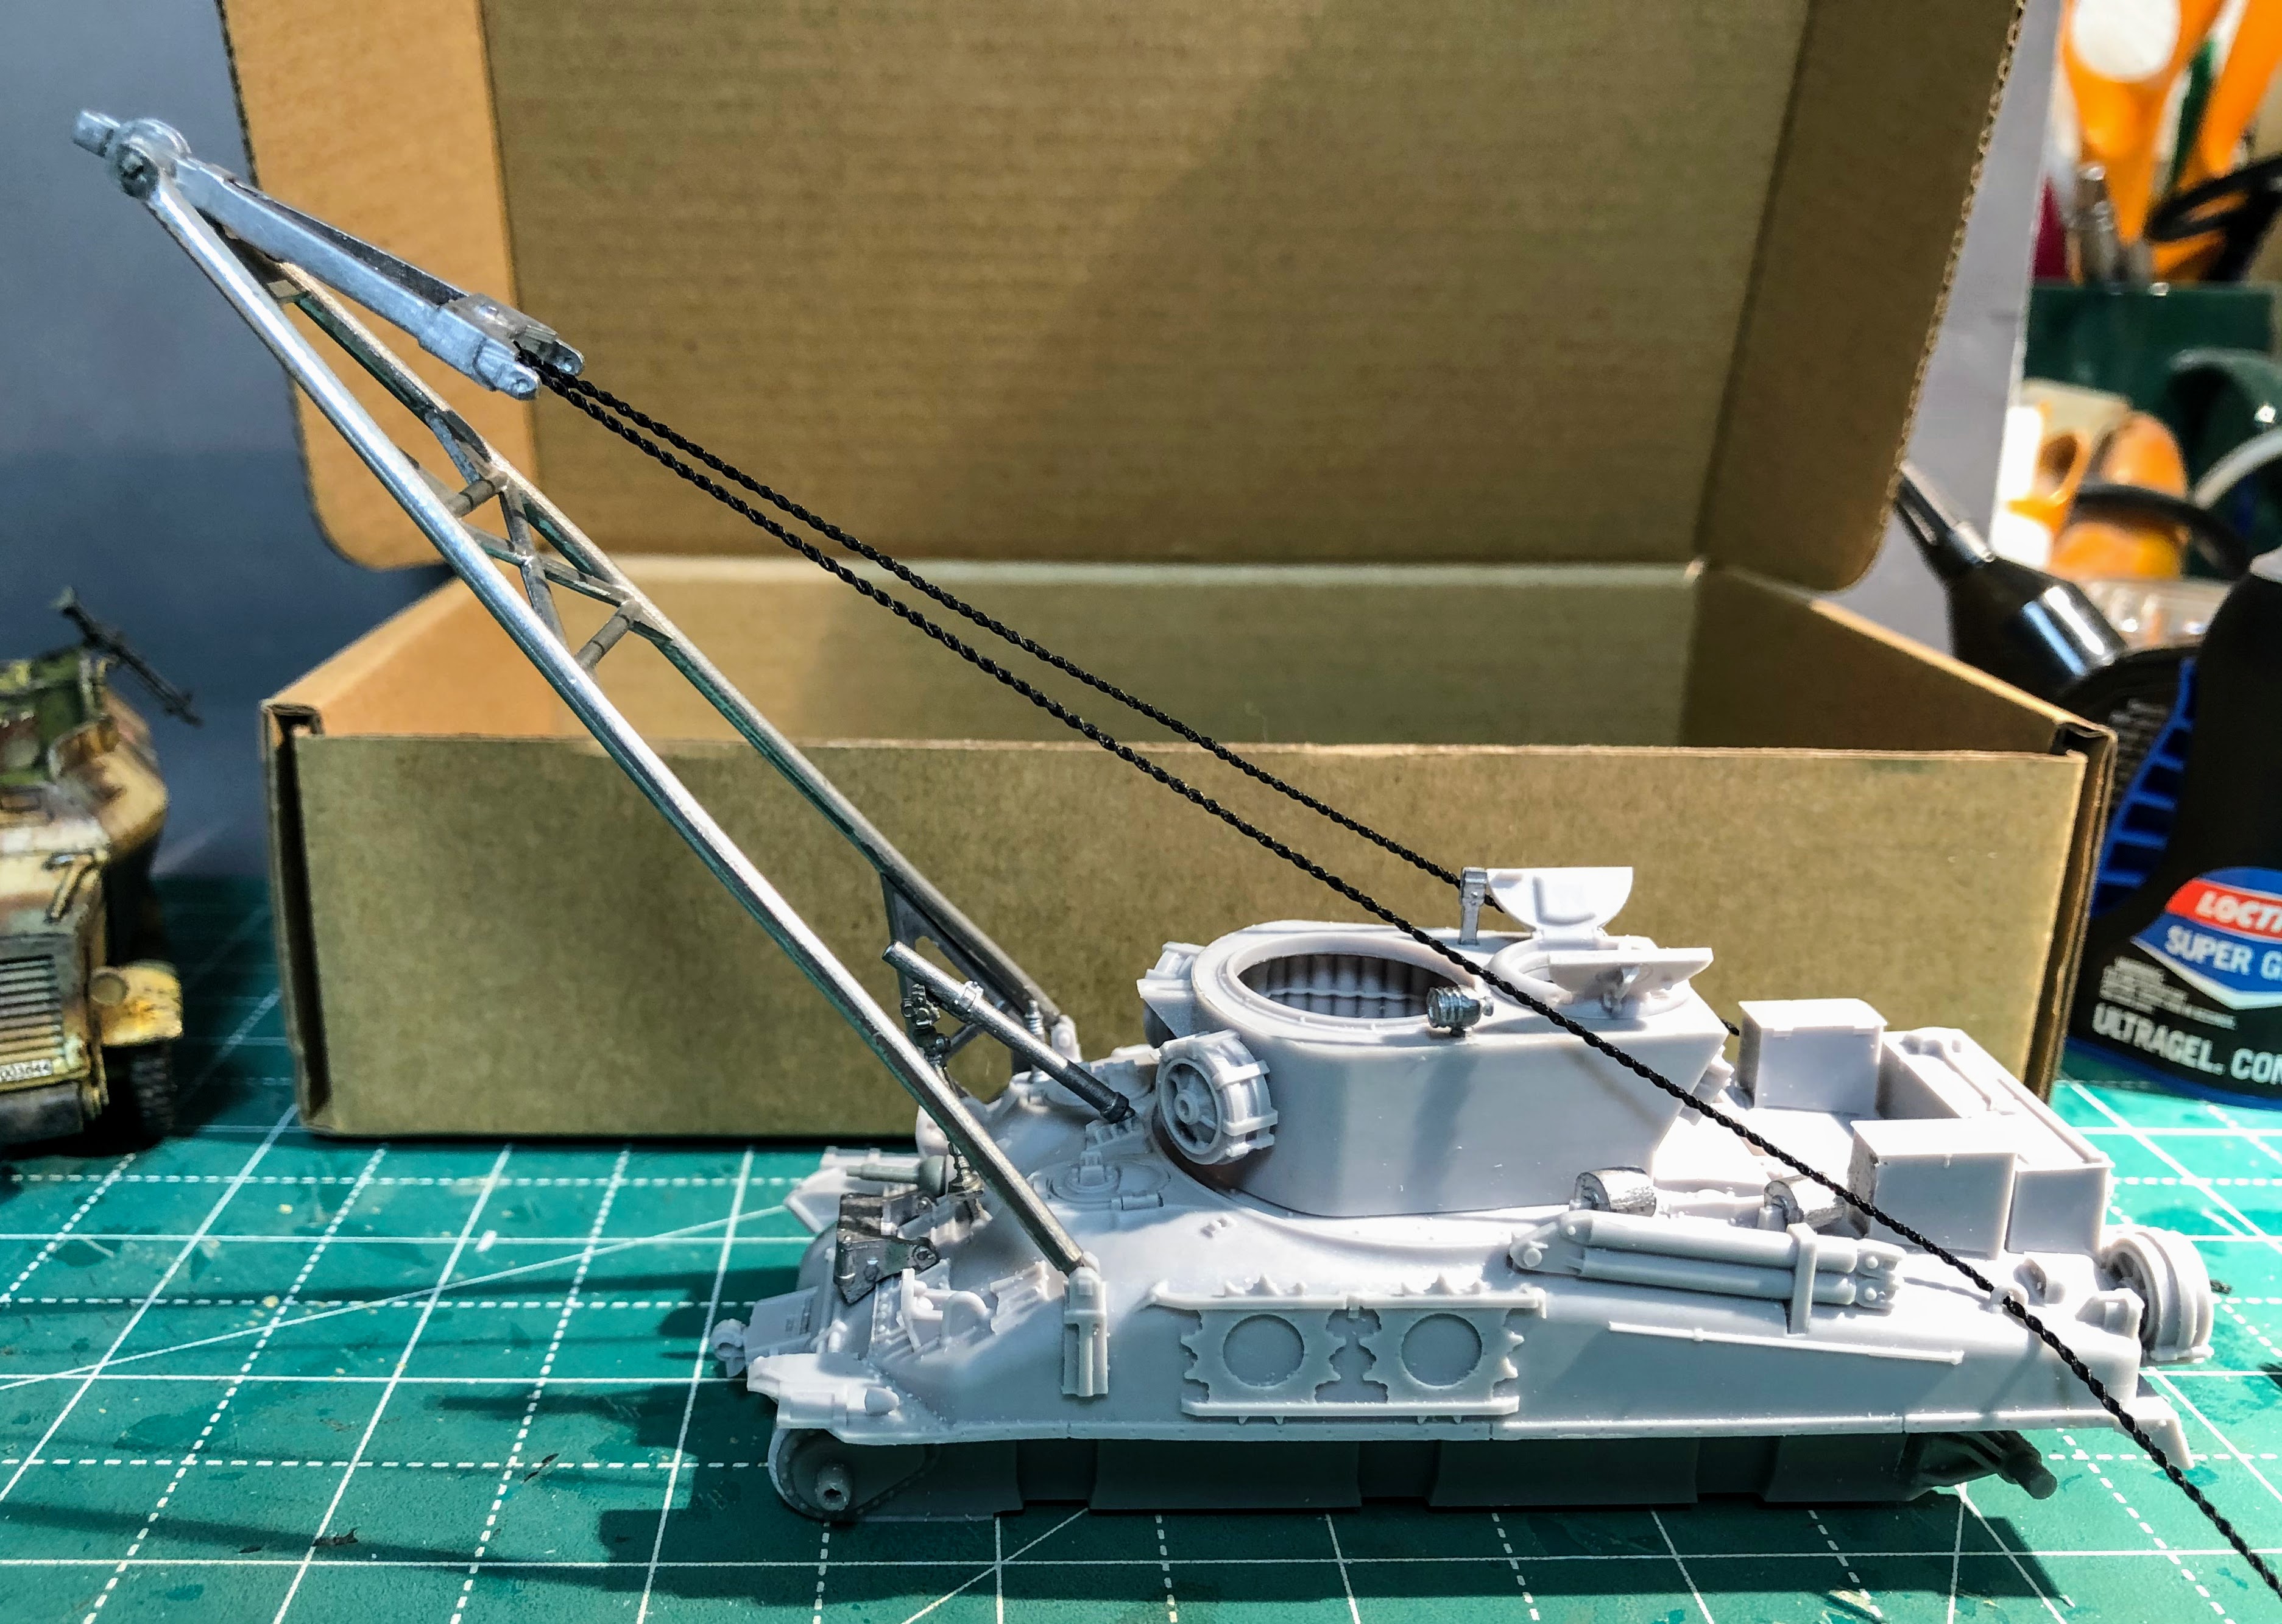
Just like for Standby/Travel mode don't try and glue the pieces together and hope you will get the angles right. Glue P1 (the A-Frame) and P03 together first. There is only one way for them to fit together so you can't go wrong there. Attaching P02 (Hook Block) can be tricky because its going to sit at a different angle in Standby/Travel mode than it does for Operating Mode. There are two small pins on P02 and those will fit into the holes/dimples on the attachment point on the A-frame. Slip it into place, DON'T GLUE IT YET, make sure it is in position and then take a pair of pliers and gently squeeze the outside pieces of the A-frame together trapping P02 in place. Now skip to Step 13 and get out whatever you are going to use for cabling. Make sure you have drilled the other three holes needed for Operating Mode. There is one in the "turret" front and the others are the two D-hooks on the rear of the vehicle. Once you have that done you can continue forward. Gently put the feet of the A-frame into place at the front. The fit is relatively tight so be careful because you are dealing with a resin attachment point and you don't want to accidentally snap it off. With the front feet in place raise the A-frame to its full upright position, you can tell because the limiter piece will rest against the block on the right side of the hull and stop. You should be at the point pictured below (I placed a very small drop of super glue at the top to sort of freeze the hook block into place).

Now thread your cable, start at one of the D-hooks on the rear, then through the hole on the side that matches the D-hook over to the other hole in the hook block and back down through the D-hook on the other side. Please note that your cable should not cross over itself to form an X!
The next bit I'm not sure about. It makes sense to me that that "arms" of the hook block should be pretty much in line with the cables when they are taut. I pulled the string taut, broke the super glue at the A-frame attachment point and then re-glued it when it was in the position I wanted. Then you can glue everything in place. I did remove the cable and I'll re-thread that after painting or during the detail painting so it can be properly weathered.
 |
| Cables are taut, glue has not been "broken" the angle doesn't look right to me so I "broke" the glue so I could adjust the hook block. I could have but did not glue the A-Frame into place. You certainly can, the only thing that needs to move right now is the hook block. In theory you could make the whole thing "working" but I don't feel that it would be worth the effort. |
 |
| I'm much happier with this angle so I applied super glue to the A-frame/Hook Block attachment point. I didn't glue the cable into place so I could remove it for painting. [Update; while paging through my Zaloga books I found a couple of pictures that I missed. It did prove my guess that the hook block arms should be basically parallel to the cable when the crane is deployed.] |
Step 11 - Standby/Travel Mode
I'm skipping this step all together, and if you followed the directions above you are already finished with this step.
Step 12 - Operating mode
If you have followed the steps above for Step 10 you have basically completed this step.
Step 13 - Cabling
The instructions call this part optional but since its in operating mode its going to look pretty silly without the cabling in place. If you followed the instructions in step 10 for operating mode then you are ready to do all the cabling. I'll won't really complete this step until after the painting has been completed.
That wraps up the build now its time to move on to painting. I have the M4A3E2 and M4A3 and an M4A1 that will be painted (or for the M4A1 repainted) to more or less match.
References are hard to come by for the M32B1 or any of them for that matter. I have found pictures a few pictures of them in the following books (there may be others, these are just ones I have on hand).
Armored Strike Force by Charles C Roberts Jr
Armored Thunderbolt by Steven Zaloga
Armored Attack 1944 by Steven Zaloga
Armored Victory 1945 by Steven Zaloga
Allied-Axis Photo Journal Issue 4
There are also photos online mostly of completed plastic kits which might be your best reference. There are very few photos of the M32B1 in Operating Mode.
Hey, I found it!
ReplyDeleteInterestingly, blogger showed this on my feed, but I am in the habit of clicking on the blog title so I can read all posts, rather than clicking the post name. So I did not find this post until your rant post... which was also out of order.
Anyway, for the post, again this is great stuff. The model is looking great so far. Since this is going to be more or less an objective piece, are you going to make a base for it?
I think this one will definitely get a base. While the model is really pretty robust I think its going to be a little delicate after all the cable is in place and the boom extended.
DeleteI'm definitely paying more attention to editing dates now so I can keep everything in order!