I started with the cockpit. This is two pieces and it has its own quirks (every section does). First you need to flex the cardboard along the scored lines, but be careful with this. There are some fragile sections and its easy to put to much "bend" into it and it will kink on you and be difficult to keep flat against the ribs (this applies every time you need to bend the cardboard).
Second, remember that the very back edge of the cockpit is not covered by the cardboard, it will be covered like a sleeve by the main fuselage (at least in theory). I did the wrap around the side first. Be careful here as window framing is quite fragile. I'm not convinced cardboard was the right medium for this, something thinner and with less internal layers may have been better. Rubber bands are your friend here because of the circular nature of the fuselage. I didn't have any with me at this juncture and my build is a little rough because of it. I think paint will hide a multitude of sins here. I then followed that up with the front of the cockpit which I had trouble getting to lay flat. There are some serious compound curves here. I finally managed to weight it down with my steel weights. I'm not happy with the end result as there is a flat part on the lower front of the fuselage that is not lining up with the front, I lost the curve there somehow. Again, probably won't be noticed once she is painted. I feel like I managed to get glue an everything.
 |
| The "side" skin for the cockpit. Be careful of those window frames, they are fragile! |
 |
| I need some weight here. That's three pounds of steel weights. Definitely overkill. But be aware that you will need something to hold the skin to the three front ribs of the cockpit. |
 |
| A very definite kink in the side skin right below the window. This is a tricky spot. |
 |
| Here I have managed to at least get the side windows to conform to the front edge, still nothing on the bottom though. |
 |
| Adding a fillet of glue and then I'll hold it till it dries to get this side to conform to that nasty compound curve. |
 |
| Here I'm prepping the skin by gently wrapping it around the tail first before applying any glue to it. |
 |
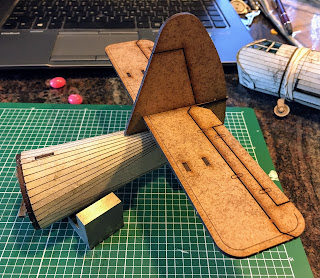
| Fixing the rudder and tailplane assembly that I broke early on. |
 |
| This is not an easy attachment with everything loose. I did one side first which stabilized everything and then the other side was much easier to get in place. |
 |
| The tailplane struts did a nice job of helping me get everything straight here. Quite happy with this repair. |
From here I moved on to the final piece the main fuselage. I wasn't looking forward to this part at all. First I went ahead and attached the skin for the door. Its hard to get wrong, there is a tab that will guide you to the right placement. Be careful when applying glue you don't want to glue it shut (well maybe you do, I did not). Having the door in place helps guide you in getting the rest of the skin on and keeping it straight. I then applied glue along the spine and clamped it in place and let the glue dry. This way you aren't constantly fighting trying to keep the cardboard in place on the two tabs on the top of the fuselage.
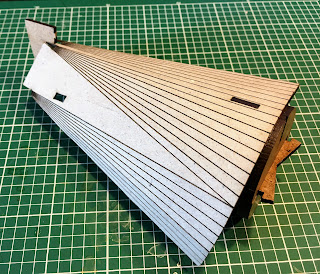
I then applied glue to all the ribs and any point where the skin would come into contact with a piece of MDF. I wrapped it around quickly, added the rubber bands and then adjusted it making sure all the lines were straight and that the skin was as tight to the ribs (without kinks) as I could. There is a cardboard score line right down the middle of the windows that wanted to kink quite badly (and you can see it in the pictures). I found that with the main fuselage and the tail that gently pre-wrapping (or dry wrapping or dry fitting) the cardboard around the ribs was more effective than trying to do it "freeform". Again be careful when you are getting the cardboard into shape. I think I managed to get it all quite smooth in the end. Now the issue I have is that the cardboard skin should stick out beyond the ends of the fuselage, and when I was finished it certainly did. However its not long enough to fully cover the gaps between the cockpit and tail assemblies. I'm not sure if I did something wrong or not. Near as I can tell everything is fitting exactly where it should be but there is an obvious gap. I think painting it will go along way to hiding it and in the end its a piece of very cool scenery and the players are unlikely to notice.
 |
| Make sure you have removed an excess glue from the ends or the tail and cockpit assemblies won't fit or you may accidentally glue them together! |
 |
| A quick look at how the fuselage looks. Note the gaps between sections. Those shouldn't be there but I'm not convinced that I didn't do anything wrong, yet everything lines up with the various tabs. |
From a build standpoint this model definitely has its challenges. MDF is not the best structural material and there are a couple places where the connection points are pretty small and easily broken. I found the skin tricky, but not terribly difficult as long as I went slowly. I think this kit would be better if it was cut from thin plywood rather than MDF. I'm not sure about the cost but some of those small junction points on the rudder/tailplane, the main wheel carriage and the spars on the wings would certainly benefit from a stronger material. Oh! And I found the last two pieces for the main wheels, They are cardboard so they were on the cardboard sprue with the cockpit and fuselage skin.
Which brings up another point. The instructions need to be gone over again and edited. There are numerous errors in part numbers and if you are going to use part numbers on the instructions you should be putting them on the sprues as well for quick identification. While the sprues conform pretty closely to the instructions some of the parts are definitely in odd spots. I also need to make a decision about how I'm going to use this on the table. What you don't see is the main wheel carriage. Without doing any research, I assume that this would be jettisoned after takeoff but what I'm not sure of is if the front wheel is jettisoned as well. I have left it on for the moment just to make sure I can change my mind.
 |
| Its a bit to big to fit into my combination airbrush/photo booth. |


