I realize that I covered tools a bit in Part 1, however, I reminded myself that the potential audience for this blog series is not my usual bunch of wargamers and mini-painters. I'm really trying to reach out to the model railroaders who, I suspect, are the minority of my subscribers but may stumble in here from some form of internet search. Which brings me to how little information is shared across hobbies that actually share quite a bit with each other; armor modeling, miniature painting and model railroading. It has fascinated me that a couple of techniques in say a miniature painters toolbox are unheard of in the other hobbies and vice versa. If these groups could come together they could really teach each other a lot and all three hobbies would benefit from the combined pooling of knowledge. But I digress, let's move on the the purpose of Part 2; tools and prepping.
Most of the tools we use are pretty familiar to everyone with the exception of brushes. In Part 1 I specifically mentioned that I'll be using a #1 DaVinci, kolinsky sable brush for detail work. That doesn't mean it will be the only brush that I use, in fact it is likely to be the last brush I use, the vast majority of the paintwork can be done with fairly inexpensive brushes (inexpensive being a relative term). So let's talk about brushes for a moment.
Brushes are defined by shape and bristle. There are three shapes that I typically used; round (most of the time), flat (also referred to as "chip") and filbert (which is flat but with rounded corners). Bristles can by synthetic (typically nylon) or literally almost any natural hair; sable, kolinsky sable and badger just to start off the list. The key to natural hair brushes is the "spring" or "snap", basically the way the bristles come back into their natural shape after pressure from a painting stroke has been released. Its why mini-painters tend towards the kolinsky sable because of that snap, it allows a smooth paint stroke. Many cheap sable brushes have almost no snap, they tend to be "mushy" and don't hold their point. Other natural hairs have "snap" but are coarse and don't leave a smooth stroke of paint behind. Synthetic brushes are much the same, you are looking for a good "snap". The problem with synthetic is that they tend to deform quickly and the round type may develop a "hook" at the tip.
Most detail painting is done with a round brush while chip and filberts are good for larger areas. A good filbert brush can even do double duty as a round brush (or detail) depending on its size. Now let's talk a bit more about size. Size is really dealing with the length and width of the bristles, not necessarily the tip. Much like clothing size is not always consistent between brands. While I have brushes as small as 000 most my brushes are 0s, #1s and even #2s. A good #1 can paint any detail you can see, this allows the brush to carry paint from the palette to the surface you intend to paint, touch that surface with the tip of the brush to leave a spot or to start a full stroke or line of paint. The smaller the brush the less paint it carries to the surface, the less paint is carried the more often you have to reload the brush. A #1 with a good tip and a full belly (fatter looking as opposed to skinny) can probably carry enough paint to cover the entire intended surface without reloading the brush at the palette. The 000 is as small as I will go, living in a dry, high altitude environment means anything smaller will have paint dry on the tip before I even get it back to the miniature.
 |
| From left to right: Chip, Filbert and Round |
So a round brush for detail work, lines and smaller areas of coverage, this would probably be the bulk of the work on an HO figure. Those larger surface areas I would probably pull out an old workhorse brush that has seen better days as precision (neatness is very helpful to reduce touch ups though) is not as necessary for that role. Chip brushes I usually just use for dry brushing, I still prefer a sable with snap but nylon brushes do just as well. I will use a filbert as a general purpose brush but I avoid dry brushing with them, dry brushing can really beat up a brush.
 |
| Workhorse brushes, older brushes well past their prime but still good enough for the initial paint work. In this case 3 rounds and 1 chip brush. My small filbert seems to be missing (or hiding). |
 |
| The big boys, these are the brushes that I do all my detail work with. Notice how sharp the tips are on these. All of these are at least 5 years old. |
 |
| Let's interpret a bit. There are 3 different DaVinci brushes - a #2 Restauro (5506), a #1 and a #2 Maestro (#10) and a #1 Maestro (#35). The Maestro #35 has longer bristles and a fuller belly. It will hold more paint and. The #10 are skinnier and the #2 in that series has bristles as long as the #35. The Restauro is a bit shorter in the bristles than the #10s. All of these are long handle and my two go to brushes are the #1 Maestro #35 and the #2 Maestro #10. All the DaVinci brush handles are wide at the gripping point and triangular in shape which makes them easy to hold. I like the Raphael 8404s a lot. They have long bristles and full bellies so they hold a lot of paint. Wide at the gripping point but still circular which I find makes my hand cramp during a long session. |
Just a couple more points, I promise. If you have the choice between a long handle and a short handle, go with a long handle. I find that short handles tend to cramp my hand. A handle about as long as an unsharpened pencil or a mechanical pencil is about right for me. Micro Mark and some others offer ranges of super tiny brushes, often with short handles. These should be avoided like the plague. They are not worth the money and will cause nothing but frustration. Anything you think will need a 10/0 brush I can paint with a #1. While I have one 000 brush I have four or five #1s and #2s. I personal prefer DaVinci brushes, although there are a couple of different types. I have a couple of Raphaels that I also like but I prefer the DaVinci over them. I have tried Winsor Newton brushes, and there are many mini painters out there that swear by them, I have never had much luck with the quality. There are a lot of brush brands out there DickBlick is one of the better online resources for brushes. I have really never been able to find the right brushes at any local art stores, Michaels o Hobby Lobby. The brushes we use are not normally used by artists.
Other than the brushes the only tools used were a hobby knife, a sprue clipper and a twist drill with a #77 bit. I removed all the flash, mold lines and injection marks with the hobby knife.
In Part 1 I stated that I wanted to be able to paint these 30 miniatures pretty quickly and have something that looks good from a distance of 12 - 18" (let's keep in mind that my poor eyesight typically means I'm painting very up close and personal to the miniatures. Yes, I know wear an OptiVisor or something similar, someday I'll break down and do that). But miniatures of any kind need to be prepped before we can start painting and that still takes time that we can't really short cut.
I use clippers to remove the figures from the sprue, a sharp hobby knife works just fine but I find that clippers make a cleaner cut. Once they are removed the sprue the mold lines need to be removed, for these I use a hobby knife with a relatively new blade and scrape the mold lines off. I pay particular attention to those areas around the head and scalp where these lines can be particularly hard to remove. This particular batch of Preiser figures have significant injection marks on the upper back and lower leg which also have to cleaned up.
 |
| Figures in process. Ones at the top are finished and the ones at the bottom are clipped off the sprue but still need to be cleaned up. The clipper is from Micro Mark but you can find them elsewhere if you look. |
 |
| I won't say that this part of the process isn't tedious, it is definitely tedious. |
It took about an hour and a half to clean up these 30 miniatures. I have to admit at this point that I'm not impressed with the quality of the detail on these. For the next batch I'll have to find something that's been produced more recently and see if things have improved over the years.
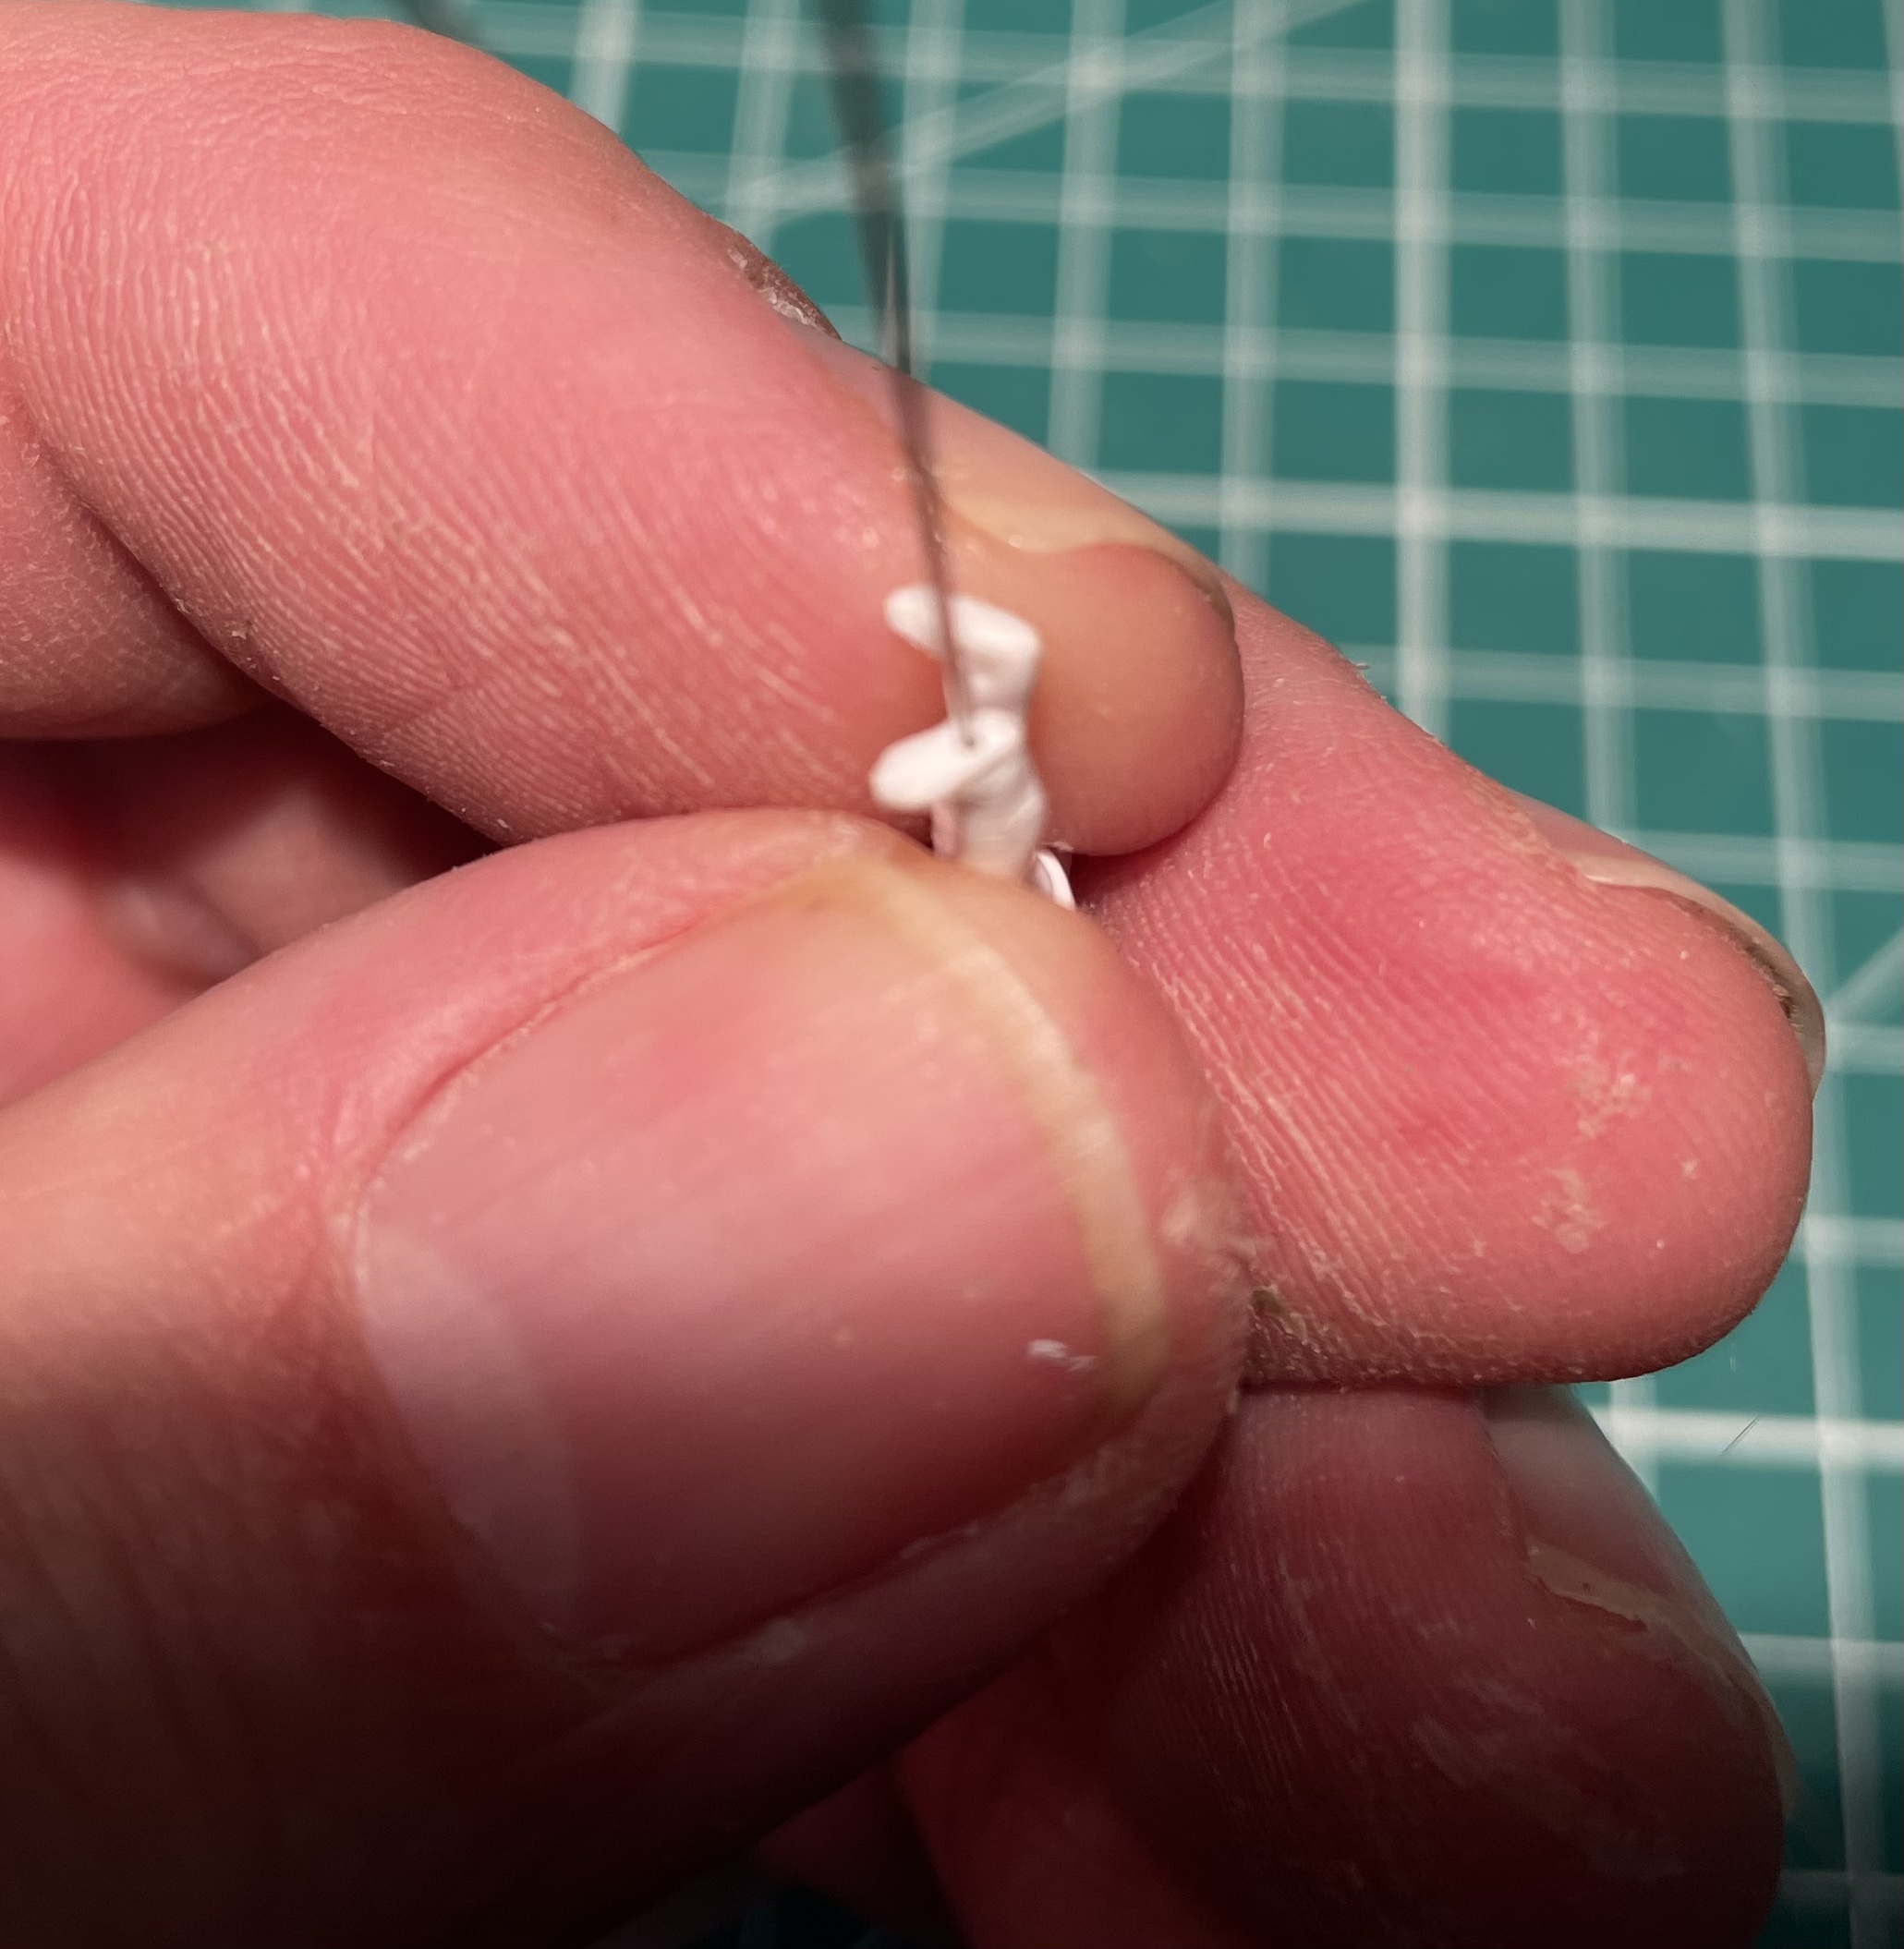
We are now at a decision point. These figures do not have an integral or molded base. That's a plus because we don't have to remove it. It makes things a tad more difficult to mount the figure to any kind of handle. There are a couple of different methods to do this, however, thinking about how these might be mounted on the layout we can consider adding a "pin" to one of the feet on each of the standing figures so it will double duty. You need a fine pin and a fine drill to pull this off but it has a couple of pluses. It allows you to place a figure on the layout just by drilling a fine hole in the proper location and the figure doesn't need any glue to hold it there. If you are using bottle caps then the pin can be used to hold it on the cap, you might need a spot of glue under the unpinned foot if the pin becomes a pivot! The pins don't prevent you from using popsicle sticks either. I glue two together and drill holes in them so I can still use a relatively long pin. A spot of glue or tape or blue tac under the other foot (again if necessary) and you are good to go. However, double sided tape, blue tac (also called poster tac) and PVA glue will work. I would avoid using super glue, that leads to a lot of broken ankles.
 |
| Drilled a hole in the heel (so the pin can go up the leg). I did this with a #77 bit. Since these are plastic rather than my usual metal it was a pretty quick and easy process |
 |
| The tube of wire, definitely a life time supply. For some reason I indicated that I needed to use a #78 bit but that is incorrect, #77 is the way to go. You should be able to get brass wire in this gauge. |
 |
| Pin inserted and super glued in. I always remove the excess super glue from the bottom of the foot. Otherwise it causes problems later. |
 |
| All the standing figures have been pinned. Now I just need to cut the pins down to about 3/16" and they are ready to be mounted on popsicle sticks (double up) for priming. |
I figure that your average model railroader is going to have small drill bits and pins. I have access to some really fine wire for pins, otherwise most hobby shops should have something usable, fine brass rod from K&S would work just fine.
Once the figures are mounted up on their "handles" they are ready for the final prep step; priming. I have decided to break these up into a couple of different groups for priming to better show how the primer affects our colors and, hopefully, the pros and cons of each type. I'll be airbrushing
 |
| Note the double upped jumbo popsicle sticks. It makes them a bit easier to hold. |

 |
| Here are the four groups primed and ready for paint |
Group #1: Black Primer

Group #2: White Primer

Group #3: Grey Primer

Group #4: Zenithal - This is a two tone primer. First black primer is applied over the entire figure. Then white primer is sprayed straight down over the top of the figure (or from the angle that your "sun" will be at).


While I won't do it this time, I should try a dark brown primer in place of black and see I can use it as a replacement for black. I used Badger Stynylrez primer
Once our primer is dried its time to dive in and get to painting. Your primer must be dry! I have found that Vallejo and Badger acrylic primers dry very quickly here 15 to 20 minutes and I can move on to painting. I live in a high altitude, dry environment getting paint to dry is not an issue for me. Lower altitude more humid environments will take longer. If you are impatient with the drying time you can try a hair dryer.