Quotes

Life is short, break the rules. Forgive quickly, kiss slowly. Love truly, laugh uncontrollably and never regret anything that makes you smile. - Samuel Longhorne Clemens (Mark Twain)

Saturday, April 29, 2017

World War II Project - Buildings - Sally 4th Arrives

I received a medium sized, heavy package the other day. Just picking it up without looking at the label I know it had to be filled with MDF kits. Sure enough there they were a veritable cornucopia of MDF kits from Sally 4th. This was a big order and Sally 4th came through with flying colors. Its quite possibly the fastest delivery of a package from the UK that I have ever received.

I have seen a lot of MDF kits at this point and I have to say that I am seriously impressed with these kits. I had already received the download links for the various textures that will be applied and after taking a closer look I realized that they have already picked up on the fact that a little 3D work is necessary to really make this work.

There are both MDF, perspex (clear plastic) and thick cardboard parts in the kit. The thick card parts are actually pre-painted so that will save a little time in the long run. I'm looking forward to getting stuck in on one of these kits, I just have to decide which one to start with as I purchased every kit they had available in the Normandy series. I basically recreated one of their reward sets from the Kickstarter last year and ran with it. I replaced the church with a second set of corner shops though. Between the kits I received from Sally 4th, Charlie Foxtrot Models and Sarissa Precision I should be all set on the building front for Normandy.

Here's a sampling of what I purchased:


Three buildings; Detached House, Corner Shops and Left End Terrace.
Internal details; ruined 1st floor (2nd floor for us Yanks, I admit that this confused me for a moment or two) and a pair of internal staircases.

The backside of the Detached House

Detached House components, there was a lot more here than I was expecting.

The main MDF components for the Detached House

The Instruction book, I love a good instruction book we will see how this one measures up.

Components for the Corner Shop

The main MDF components
In the end I purchased 3 Mid Terrace, 2 Left End Terrace, 2 Right End Terrace, 1 Detached House, 2 Corner Shops, 1 Deadman's Corner House and 10 pairs of internal staircases. The four ruined first floors that I received were part of the Salute deal that Sally 4th was running when I made the order. I have a lot of stuff to assemble and paint at this point!

Friday, April 28, 2017

World War II Project - Buildings - Photo Realism Concept II

I have been playing around with the Dormer House 2 from Charlie Foxtrot models getting a feel for how the whole photo realism thing will work on an actual model. I just dry fitted everything together to develop my plan of attack on this model. The textures I'm working with here are the ones from Clever Model, TO-321 Virginia City Brick, and TO-352 Wood Planks 4". I purchased both of these in O scale and then printed them at a reduced size to get them down to approximately 1/56th.

At this point I'm just trying to figure out a build and painting sequence that makes sense.


The first floor of the Charlie Foxtrot Model dry fitted together.

Adding the second floor, again just dry fitted

The Clever Model 4" planks cut to fit the first floor. Still just dryfitting at this point. I suspect that it would be better to cut a little oversize and then trim to fit after the glue has dried.

Same planks on the second floor

Checking out how the brick might look. Its hard to get a good feel for it at this point. I could apply this brick as the first layer and then cover it with a second layer and make cutouts in the top layer to expose some of the brick.

Some brick cut to fit two sides of the first floor. I would apply this and ignore the doors and window openings. I would cut those out after the glue has dried to get a better fit.

What it might look like with the second floor in place.

Thursday, April 27, 2017

World War II Project - Buildings - Photo Realism Concept

I mentioned the photo realism concept in an earlier blogpost and I'm definitely going to move forward with that idea. I have buildings on hand from Charlie Foxtrot Models and Sarissa Precission with more buildings on the way from Sally 4th.

I have never really built up terrain at this scale so I decided starting with buildings, which is at least a familiar task, and would be a good place to start. The biggest issue with lasercut MDF or plywood buildings is that there is no effort made to really add depth to the surface. There are some nice ones out there that do (the stone barn from Charlie Foxtrot for example), but for the most part its just scored lines in a flat surface, no texture or depth. This has always bothered me and its one reason that I eventually decided that I would scratch build all the buildings for Calamity (also rethinking that).

Sally 4th created a kickstarter featuring their Normandy buildings and billed them as photo realistic, a concept that they really have pioneered in the gaming world for the lasercut buildings. Basically you have a flat shell and you glue a "picture" of the siding you want to use to the building. They have  been doing this in the model railroad hobby for a long time now with Lance Mindheim is one of the biggest proponents of this type of model. Its pretty fast and by cutting out the windows and doors and then adding even a little bit of 3D detail, as it were, they can look very convincing. 

Now Sally 4th could have taken this one step farther but they did enough to get the idea light lit and for me to contemplate how to approach this. As an example I have two models from the order from Sarissa that are good candidates for this. One is the railroad station and the other is the Norman church. The opportunity that Sally 4th really missed here is the possibility of layering the paper. If you take the top layer or final layer you can always cut through it to a lower layer to reveal a different kind of texture. Now some companies have sort of, kind of, done this with their laser designs but they really never pull it off very well. Now you can control exactly where and how much of the lower layer of paper you want to expose. While I haven't tried it yet, the only real obstacle I see is that you do need to plan your cutouts before you glue paper to model. 

I think step 1 will be to glue the base texture on (which would allow my to fold excess around edges and get rid of one of the other faults of a lasercut building those ugly edges) and into door and window openings, thereby covering a lot more surface. In step 2 I would take the final or top layer and cut out where I want to expose the bottom layer and glue that into place. It should be pretty simple and relatively fast.

Following that I could take it a step further and take scrap wood or plastic to be used for window and door sills. Wrap the appropriate paper around those pieces and glue them directly to the building to further enhance the 3D effect. With this in mind I went to my favorite paper model website (also for model railroads) and purchased some of my favorite textures. Yes, you can certainly find photo textures on your own for free but I'm willing to pay a little money for the convenience here: Clever Models

I will probably start off with the Charlie Foxtrot models since the pieces are already popped out and they are smaller making them easier to work with.

So let's take a look at some pictures and that might better help describe better what I plan to do.


When you purchase a Sally 4th  building you receive a link to download the various textures available for a building. This is for their House at Deadman's Corner. This would be the top or final layer in my process. I could also use one of my own textures.

This is a texture I purchased from Clever Models. I purchased these textures in O Scale and then reduced them down to 1/56th for use on the various WWII buildings in the project. Its much better to reduce than to try and enlarge. I printed this at 85% of the original size. It should be close enough for my purposes.

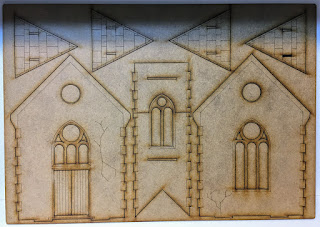
The Sarissa Norman Church. I would may not do this one in two layers but I could apply any of the textures I already have over this smooth surface. Then were the windows are located I could "pop out" with a little 3D detail by cutting plastic siding to match and wrapping that in the appropriate texture and apply it to the building.

I can do the same thing with the Sarissa railroad station. In this case I would probably apply a brick under layer and then a stucco top layer with some cut outs to expose the brick. I would use plastic or wood for the exposed brick portions, to pop them out from the side of the building, wrap a brick or stone texture and glue them in place. And there you have a photo realistic building with enough 3D to make it pop and it shouldn't be to difficult to pull off!

Wednesday, April 26, 2017

Brigade Games for Calamity

I think I suffer from sever shiny syndrome. The World War II project is underway so that was a sure way to get me thinking about Calamity again. I was wandering around the Brigade Games site and decided to pick up a few cowboy packs that I was missing from them. Another package on the step and the bin of Calamity figures gets fuller.

Just three packs from Brigade at this point. Nice minis will look really nice when I get around to painting them up.


A very small package from Brigade


A few rifles are going to need some gentle straightening


Tuesday, April 25, 2017

Knuckleduster for Calamity

I have some of Knuckledusters 28mm digital sculpts in my collection for Calamity from summer of last year. Of course those haven't been painted yet, but that's pretty typical. Last week I decided to try out their new 32mm line. In theory these will be closer in size to Reaper and Black Scorpion. Plus there is certainly nothing wrong with a little variety in size amongst the various citizens of Calamity.

I was really intrigued by the poker player and faro player sets so those are what really drew me in. The final order included the two packs of wounded gunfighters from the 28mm line, nothing special there they are just going to be markers, the Faro Game, the Poker Players, Saloon Gal in Cowboy's Lap, Mounted Cowboys (I'm really quite behind on mounted figures) and the pack of Longhorn Steers.

I'm quite pleased with the quality. The older sculpts in the 28mm line can vary considerably in quality, these new 32mm are very nice. I might start to pick up some more of these. I don't really need more gunfighters though, I need a lot more innocent bystanders!

The Loot

Love the detail on the table. I think I need to talk to Knuckleduster since one of the minis is duplicated. I'm pretty sure that's not how its supposed to be packaged.

The poker players, all different! Again lovely detail on the tables.

A little vignette for the bar

Cowboys! Lots of Cowboys and horses!


I see a tail I need to fix


The longhorns. These are pretty beefy, I think they will work in with my herd of ERTL longhorns quite nicely!

Sunday, April 23, 2017

World War II Project - Return to Mad Bobs German Armor

I had a little time to actually pull out paints last night so I continued on with the armor I got from Mad Bob's kickstarter. I went back in and applied another pin wish then I tried to highlight the camo a little bit and followed that with the first glaze of dirt. I really need to install the new LED light I purchased for the workdesk though as I'm not sure you can see the difference from start to finish in the photos.

Here is where things were left at the end of the last session:


After I applied another pin wash:


Then I faded the camo on the upper surfaces a bit:


And then the first glaze of dirt:


I think they look good on the workbench but I don't think the camera is picking up the differences because of the lighting or that the effect is just to subtle right now.

Friday, April 21, 2017

World War II Project - Tank Crews - Company B

I have been slowly collecting tank crews for the tanks and SPs that I have been working on. While I don't have any US Armor finished I figured I could at least pick up some crews for the models that I do have. I decided on Company B for these and picked up some packs of 1/4 torso and 1/2 torso crews for the Shermans and a crew for my Trenchworx Hellcat.


Five bags from Company B. They came in a very small but well padded envelope.

1/4 torso crew

1/2 torso crew

Hellcat (M-18) or LVT crew

Thursday, April 20, 2017

World War II Project - Books - 4th Armored Division

This is my last book purchase to satisfy my curiosity about the US 4th Armored Division. The plan is that all my US forces will be based on units that made up this division, regardless of what the actual scenario is or what forces were involved. The first book I acquired, Patton's Vanguard, is a very good overall history of the division, but is focused primarily on the division's actions as a whole, with a long down to the battalion level and sometimes the company level. The second book, The Fourth Armored Divison from the Beach to Bavaria, is a reprint of the divisional history written in 1946. As such it has references to numerous small unit actions and dovetails quite nicely with Patton's Vanguard. Yesterday I finally received a copy of Spearhead's 4th Armored Division in WWII. This fills in a lot of detail that is missing from the others. It has a great chapter on the divisional organization and the equipment that was on the official roster. It has a good overall strategic look at the division as well as a good nice pieces on smaller actions. The three books together really will give you and excellent and useful history of the US 4th Armored Division as part of Patton's Third Army.


I managed to get new copies of this book, however, it is out of print and I saw some pretty outrageous prices for used copies.


Wednesday, April 19, 2017

World War II Project - Terrain - Buildings

As can be seen from previous posts I'm currently focused on the WWII project. I have no idea how long that will last as I also managed to order some more western miniatures from Knuckleduster and Brigade Games, and there is a Black Scorpion Kickstarter out there for their Tombstone game. In the meantime I remain distracted with WWII. Since I have no buildings I decided that I would need something a little bit more modern and European than my collection of western stuff.

I spent a lot of time going over websites and trying to decide what I wanted. I made lists and agonized over each selection for this project. I wanted a good sized town plus some more rural buildings for a farm like setting. Of course nobody has all of that covered or at least not with buildings that I wanted to make. I ended up with orders going to Charlie Foxtrot Models, Sarissa Precision and Sally 4th. The Sally 4th buildings intrigued me because of the use of the photo realistic paper to cover the outside. This is not a unique idea by any means, model railroaders have been doing it for years. It is a quick way to get a very good looking building on the table though and that's what I'm really after. I have "textures" for exterior brick and stone already from Clever Models which specialize in paper models.

I decided that I would apply the same concept to buildings from the other manufacturers. Charlie Foxtrot buildings were selected primarily because they have a nice solid look and feel to them and they have a very wide range of out buildings for the more rural settings including a nice stone barn. I bought two different houses from them along with barns, stables, tool sheds and those arrived over the weekend.

At the same time the order from Sarissa Precision arrived. This is more in town buildings, a railroad station, a church, a chateau and I decided to try some of their railroad stuff as well. Track for the railway station and a passenger car to go on the track. Nothing to elaborate, unlike Calamity's railroad (which still needs at least one 2-8-0 locomotive).

The buildings from Sally 4th have shipped but its hard to say how long that will take from the UK via courier.

So here is what the first three boxes yielded:
First up is are the buildings from Charlie Foxtrot Models
The houses. Note that all the kits from Charlie Foxtrot are already punched out of their sprues. The disadvantage to me is that I don't really know what is an actual part and what is just fallout from the windows and other openings.


I didn't actually order the Pigsty and Pen, I think they were just kind enough to toss that in the box for me.

Here is the contents of one of the two Dormer houses. Lots of pieces! The ones at the bottom of the picture, I think, are window and door cutouts.
The order from Sarissa Precision came in two boxes because of the different sizes of the buildings.


The larger Norman church, probably not appropriate for France but I like it, so I'm going to use it. As you can see from the packaging Sarissa Precision packs their kits still on the sprue or frame. I had some bad kits from Sarissa for some small houses that I was going to use for Calamity. The MDF they were using at the time wasn't always the same width which meant that sometimes tabs wouldn't fit into the designated slots. I'll dry fit all of these before gluing them together.

The Chateau and the Railway station. 

A look at the tracks and passenger car. I took a look at the tracks from the back and I'm not thrilled with them. I'll have to measure but I'm fairly certain that the rails are to far apart and the rails are definitely to "light" for mainline or even branchline operation.