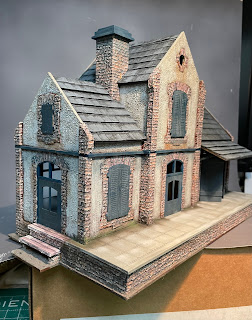
I added a burnt umber wash to all the shutters and doors to try and make things pop a little bit and then with more Pan Pastel to fade the blues a bit. Then I glued everything into place. Leaving some shutters open and others closed. Freight doors were left open just a bit and the doors were just glued into place.
 |
| An initial closeup of the exterior steps with the paper wood combined with the bumpy brick. |
 |
| Rail side. I have some of Sarissa's tracks and a carriage that I intend to use along this side. |
 |
| Note the partially open baggage/freight doors |
 |
| The road side. I opted for open shutters on this side. The baggage doors are also slightly open. |
Overall I think Sarissa kits are pretty darn good. To make them better takes a little work, which is true of just about any laser cut kit out there. I intend to do groundwork along the edges and I'm to decide if this should be mounted to another larger base, which really goes back to how I want to approach the whole village build. Here are some of my thoughts and things I would do and how to make sure my next build goes smoother.
1) I have issues with MDF and its quality. Sarissa is not the only company effected by this lack of quality control. These are laser cut kits which translates to really accurate cuts. Unfortunately MDF itself is not made as precisely as the kits. I have found MDF pieces just a bit thicker or a bit thinner than they should be. The latter not much of an issue the first causes problems. Always, always dry fit the pieces before you try to glue things together. Forcing a tab that is to wide for the slot into place can easily result in a broken piece, typically the tab itself gives way and at worst the part it self snaps in half from the pressure being applied or the piece with slot snaps in half. A file or sandpaper will correct the issue really quick. Just be aware that if a piece is to thick that it can force the rest of the building out of alignment.
2) Specific to this kit, the station platform is a big piece and when you combine this with a big foundation piece and a lot of cross pieces you have to pay attention. Make sure that all the tabs come up through the platform deck correctly or you will have gaps in the foundation. I made this mistake (because I didn't dry fit first) when one of the cross pieces was to thick and I didn't notice the bulge created by this when I clamped everything down and the tabs didn't come through the slots correctly.
3) I love the look that the bumpy brick paper that I used gives the building, but working on the window arches was tedious beyond belief (hence the 2-3 years it took me to finish this thing). I would do it again, what I would not do is use the self adhesive version of this paper. The company makes both self adhesive paper and non-adhesive paper. At the time I thought the non-adhesive paper would be great. However it is thicker and the self adhesive backing can, and will, separate from the paper on a regular basis. Spreading glue is messy but a better choice in the end.
4) Keep anything you do on the inside as simple as possible. I have one kit by Charlie Foxtrot Models that I went whole hog on the inside. It wasn't worth the effort. Its a gaming piece not a display piece. I printed a floorboard pattern and applied it as one piece to the appropriate sections as opposed to individual boards. Painted the walls an off white color, with the airbrush, and left it at that. The last thing I did was apply the brick paper to the chimney and that took a lot of modification to the floor pieces for the second floor and two roof sections that the chimney came up through. So think things all the way through before you start to build to anticipate all the things that you will have to change and plan for it.


That’s very nice!
ReplyDeleteI'm pretty pleased with the end result even if it took way to long to finish.
Delete