Quotes

Life is short, break the rules. Forgive quickly, kiss slowly. Love truly, laugh uncontrollably and never regret anything that makes you smile. - Samuel Longhorne Clemens (Mark Twain)

Tuesday, March 21, 2023

A Brick Building from the ground up - Part 4

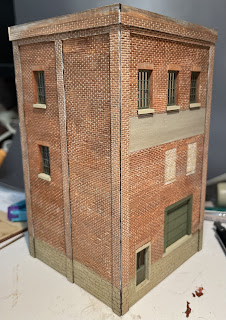
I think I have completed all the major brickwork at this stage. There are a couple of cap strips that I need to add, but I haven't quite figure out where they actually go. The only thing I'm unhappy with at this point is the corners. I tried to hide the edges when viewed directly from the front and back but, at the moment, I find them quite visible. I'll have to go in with some paint and at least cover up the dark laser edge which should help disguise it to a certain degree. Overall, I'm please with how things are looking at this point. I'm trying to decide if I want to try and light this one and how to go about doing it. I would definitely need to add some interior partitions and floors.

I found building up the cornice a bit tedious, but Titebond sets pretty quick, but you have to get it right the first time!

Gluing on the edge and center pilasters


Two parts of the cornice are in place. The first layer that goes between the edge pilasters and the layer that goes on above it.


Gluing on the third piece, which extends to the top edge. I have a fourth, very narrow, piece but I'm not quite sure how it fits in. 


Here’s the building as it exists now. Even if I don't add lighting I'm going to have to do something to the interior to block the view a bit through the windows.


Monday, March 20, 2023

Keeping Busy - Shop Furniture

Along with everything else I have been trying to do I have spent some serious amount of time in the wood shop building some new tool stand. I build these from plans and I'm pretty pleased with the way they came out.

I made two modifications to them. I wanted them on wheels and the wheels I purchased were 2 1/2" bottom of wheel to top of the mounting plate. Because of that I reduced the height of everything else by 2 1/2" something I had to continually keep in mind as I cut the pieces. I also decided to use 2 pieces of 3/4" plywood instead of 2 pieces of MDF, just my preference.

I learned a lot about laminating two large pieces of wood together and just how many clamps that really takes! I also made my own veneer from some scrap walnut, I need to get much better making that but it came out okay in the end. Gluing the veneer on took even more clamps than the lamination. In the end it came out pretty good, could be better but it was definitely a learning experience. I also pulled out the trim router for the first time and did a nice round over on the edges of the top. That was a lot easier than I was expecting.

I built both of these basically at the same time. The one thing that I wasn't happy with was with the instructions. The peg board on the sides was meant to serve as a way to create an adjustable shelf. It wasn't mentioned earlier enough in the instructions for me to make sure that the pegboard on the end panels actually matched. So that shelf is definitely not adjustable at this point without a bit of work with a drill.

I moved both lathes into their respective benches and we are ready to roll! I also acquired a bunch of scrap 2x4s now when I took apart the original stand for the Jet lathe.


Monday, March 6, 2023

A Brick Building from the Ground Up - Part 3

More progress on the building and miniatures are staring at me accusingly. I have made a start on the skin tones and picking out anything I missed. Not enough to show you at this point and, of course, I have a couple of other projects in the wood shop going on that are sucking up time. There has been on going research on the first building that I hope to make drawings of for the D&RGW switching layout.

On the ITLA buildings I figured out that I need to cut out the sills first, then install the window or door from so that its flush with the back (inside) side of the building. I was definitely happy that I painted everything before I started assembly on this one, especially that brick work. You might notice that I have repainted two of the bricked up windows with a "blonde" brick color. This color of brick is pretty common in the Denver area. The Morey Mercantile building which will anchor the left side of the layout is built from this brick, at least on the visible sides.

One of the things that I have picked out for these buildings is that just about any face that has a main entrance will be built from bricks that match in color, you won't find visibly darker or lighter colored brick on these faces. The other sides will feature bricks in multiple colors. The color pictures of the south side of the Spratlen-Anderson building really show this off to good effect. That adds another interesting element to most of the buildings that I hope to be modeling.


Everything laid out with the doors and windows in place.

Getting out the clamps and gluing the sides together. One set of my corner clamps is bad so I had to pull out 1-2-3 blocks.

And with a set of clamps missing I had to resort to gluing the remaining corners together one at a time.


Front side

Right side, the windows are towards the front side of the building. I'm thinking this would be a good side for a fire escape.

The back side with the bricked up windows.

Left side, again the windows are towards the front of the building. I'm thinking its a good side for some exterior details of some type.


The next step is to glue the brick "pillars" on the corners and in the middle of each side wall. Hopefully that will soften the contrast between the two side panels.