Quotes

Life is short, break the rules. Forgive quickly, kiss slowly. Love truly, laugh uncontrollably and never regret anything that makes you smile. - Samuel Longhorne Clemens (Mark Twain)

Thursday, June 29, 2023

World War II Project - Return to the Railroad Station - Pt 4

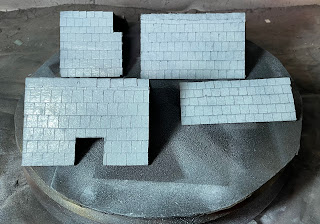
I have been avoiding the roof, but in an effort to finish the darn thing I needed to stop avoiding it. I had originally covered the mdf with shingle strips cut from cardboard. I should have sealed the cardboard with something first as it started to suck up paint like there was no tomorrow.

I back tracked a bit and re-primed the roof sections in black and then went over it with a light grey with a bit of light blue added to get a more bluish gray look. Its not bad, not perfect but at least the roof is now ready for weathering. In fact the only big piece remaining is the tile (?) floor on the inside of the main passenger section and the platform. Seems pretty fancy for a small station but that's how it was engraved on their laser. Once that has all been painted up I can start weathering, which is really the fun part.

Black Stynylrez Primer from Badger


Light grey plus a bit of light blue, a couple of colors from Reaper I think they are both out of production now.


And looking pretty good, the strong light is washing the colors out a bit,


Tuesday, June 27, 2023

World War II Project - Return of the Railroad Station - Part 3

After that kind of weird first paint color went on, I followed it up with kind of darker tan and did a heavy dry brush of a greyish white. Everything seems to blending together pretty well at this point.


There are two different layers of base color on this side and I think I did a pretty good job of blending everything together and you can't really tell. I fell like I made a bad choice with the brick color and should have gone with the other shade which has quite a bit more red/orange to it.


Its hard to see but there is a gap between the top of the platform and that first layer of brick. A significant gap. This is because I made not one but two mistakes in the assembly. The first was not dry fitting first and making sure everything was actually going where it was supposed to. Second I didn't clamp the top of the platform down and apparently didn't make sure that all the tabs had engaged and it was flat against the top of the brick wall. My thought is to just glue a couple of courses of brick paper strips along this and hiding it.


Monday, June 26, 2023

World War II Project - Return of the Railroad Station - part 2

All the interior walls were painted with an airbrush before I assembled the building, that made life much easier. In fact there are a lot of areas at this point that I would have preferred to have finished with everything flat on the work bench. Just a lesson to be carried forward.

I started the exterior walls of with a burnt sienna and then decided that was just a  bit to much red so I painted back over it with a "light" umber. Things would always be easier if I would remember to write down what color I started with. This resulted in a much redder look to all the other walls that I needed to finish. That's as far as I got over the weekend.


Thursday, June 22, 2023

World War II Project - Return of the Railroad Station

This has been one of those "forever" projects, but I am determined to finish it this time. I have had some extra long meetings over the last couple of weeks so I pulled this out and re-started the tedious process of adding the bumpy brick paper over the arches of the windows and doors. We won't even talk about the decorative brick work at the top of the building.

In order to keep myself moving forward I went ahead and started working on the texture for the out side wall. I'm using some textured gel with "natural sand", I'll take a pic of the container in the next installment, I think its from Liquitex. I used a brush and stippled it on. Then I applied a dark brown first, followed by a light grey and the pure white. This little exercise is what has kept me going this week and moving forward to finishing this structure off.


Hard to see but I have applied the sand texture to the ground floor walls. It dries really clear, if you see white its not ready,
At this point I had applied the texture to the whole structure. I also used periscope blue from Vallejo Tanker series for the trim on the windows and doors.

And here we go three layers of paint and I think I like how its going to look.


The "beauty" shot, such as it is. I feel like I'm finally seeing the end of the tunnel on this one.


Friday, June 9, 2023

The Wood Logic Puzzle Project - Cubes

Off and on I have managed to find some short stretches of time to get into the wood shop and keep working on all of those cubes. These are all 1" square cubes in both oak and walnut. The next step was to cut the edges down a bit.

I made a jig for this next step just to try and be consistent with how much wood I was going to take off the edge. Once that was done I clamped it down to the small table for the disc sander and spent a lot of time (at least it seemed like it) sanding down every edge of every cube. I then moved to the belt part of the sander and sanded down every face, just little, I didn't want to remove to much material.

I think I'm almost recovered from this part and I just need to build a small jig for the gluing up process.

Boxes of cubes, all ready for the next step. I have enough cubes to make three puzzles in Oak and three in Walnut along with some extras that, hopefully, will replace any defects that I find along the way.

Edges cut down and faces sanded. Some of these will still need a little more sanding.

The "Z" piece, I like the look of the cut down edges.


Thursday, June 8, 2023

Acquisitions - 8 Track Plans for Modern Era Switching Layouts - Lance Mindheim


As most of you know I'm a big Lance Mindheim fan and to this point if it had his name on it I bought it. I didn't jump all over his latest release, "8 Track Plans for Modern Era Switching Layouts", though. As expected I already own his two other track plan books: "8 Realistic Track Plans for Small Switching Layouts" and "8 Realistic Track Plans for a Spare Room". Those two books are excellent but they are very focused on track plans with a bit of description, very much like what you would find in a magazine track plan article. Being a completist I broke down and ordered it expecting a book very similar to his first two. I was happily surprised that this track plan book is a different beast entirely!

First off this book is about twice as big as the prior two efforts. All three have plenty of prototype pictures and just about every plan in all three is based on a prototype. There are four cities featured in the Modern Era book; Los Angeles, Brooklyn, Baltimore and Miami and six railroads; BNSF, UP, CXS, Florida East Coast (FEC), the Canton Railroad and the New York New Jersey Rail. A little something for everyone in this book.

The introduction is really a chapter by itself. Its 20 pages long and goes into the how, why and the philosophy behind track plan design. How to wrangle realistic operations in our typically limited spaces and still represent the prototype in a manner that we can model and capture the look and feel of the setting we have selected. Maybe the most important bit in this section is how to modify a design you like but doesn't quite fit your space.

Then we get into the meat of the book, track plans! There is an introduction to each track plan going into a history and description of the area, key design elements along with construction and design notes. There are color photos of key areas that are included in the design, an overall map of the area along with the track plan itself.

This are pretty typical Mindheim designs. You will find that the plans are kept pretty simple, only the needed amount of trackage is included. The existing track for the given area is evaluated, condensed and reduced. Extra track to add complexity is never added, if its not on the prototype then it doesn't appear in the plan. The prototype keeps things as simply as possible and we should too, that's what reflected in Lance's designs. These are all urban layouts, benchwork is simple and kept relatively narrow, making for designs that can be up and operating relatively quickly.

I appreciate Lance's designs a lot. I'm not particularly interested in nor have the space for an immense layout that fits in with the Koester philosophy of operations. Small spaces don't lend themselves to operations that are oriented around how many trains can be run in a given period and how many operators can be accommodated. I like to think that I have managed to absorb and use some of Lance's philosophy for my own D&RGW Warehouse Row layout.  My interest is in the end result, the final delivery of a freight car to its destination and then the reverse getting that, now empty, car back to the yard to be assigned to its next job.

If you are interested in track plans then this is a must have for the book shelf. I think everyone can take something away from this book when contemplating the space you have and what might fit, especially if you are interested in switching operations.

Monday, June 5, 2023

A Brick Building from the Ground Up - Part 11

We were on a stay vacation last week getting our yard all cleaned up and ready for summer activities (that is if it ever stops raining around here). So I did very little on the modeling front, except managing to finish the weathering on the DV Ross building.

This was done with a combination of oils, in the form of Ammo's Oilbrushers (primarily Starship Bay Sludge [more brown] and Starship Filth [more gray]) and Pan Pastel Chalks (at this point exclusively Raw Umber Shade). The Oilbrushers went on first providing the darker streaks and lining. After they had dried I went back with a soft brush  and added the Raw Umber Shade. I also applied the Raw Umber Shade to the roof and air vent on top of the building and, generally, any place where I wanted to dirty things up a bit. Another area where I went heavier with the Raw Umber Shade was in the zone where the building sides and stairs met the concrete. It may have gotten a little heavy in a couple of spots but overall I think it came out pretty good, it also helped blend some of those colors and edges together that I had already painted the concrete with.

At this point I'm calling the series done. It certainly could use some other things to dress it up but that will likely have to wait for a while. Things like:

1) Brick liner for the interior roof edges. I bought some printed brick paper that claimed to be HO Scale but was in fact much closer to S and far to large for my purposes.

2) Roof clutter. There really needs to be a lot more going on the roof than that single air vent up there.

3) Fire Escape. either on the side or even on the front, it would add a lot of character.

4) Advertising. Its a brick building with a fair amount of blank space which certainly could use a little dressing up. Since this is a practice piece this is definitely a future project for this kit.

5) Graffiti. Not a huge fan of graffiti but from an artistic standpoint it is a challenge and at least in a small amount would help break up all that brick and stone work.

6) External details. Things like a light over the backdoor, a dumpster and other similar details would bring some life to it. I'll just have to keep my eye out for the appropriate parts.

7) Internal walls. Just to break up the see through effect and maybe see if I can go back and add some glazing to the windows. The roof is not attached so its still possible. I might even be able to go back and add some lighting effects of I felt really motivated about it.

There were definitely some pros and cons to the way I went about working on this. I have to remind myself that this wasn't a complete kit. It was a shallow background structure that I added two side kits and one back kit to. The instructions are okay but I can't really judge them based on what I was actually doing. The components, however, were excellent. Everything fit together the way it should. Some of the pieces, like the security gates and handrails, were pretty delicate so go slow then trying to cut them out.

In the end that building will serve its purpose as a photo backdrop for HO Scale miniatures and vehicles. I may even find away to incorporate it into the Warehouse Row layout.