Quotes

Life is short, break the rules. Forgive quickly, kiss slowly. Love truly, laugh uncontrollably and never regret anything that makes you smile. - Samuel Longhorne Clemens (Mark Twain)

Friday, February 24, 2023

A Brick Building from the Ground Up - Part 2

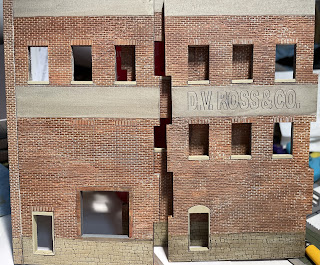
Just thought I would show that I am making progress on this little project. Since I managed to lose the instruction booklet from ITLA I have been going slow trying to figure out how some of this should be going together.

First real mistake was cutting away the tabs on the door frame on the back of the building. That really should stay in place and I should have just cut the brick/stone center piece. I managed to get the frame back into place but I damaged it and it took a little TLC to get it back into place and looking whole again.

At this point I think all I have managed to do is glue in a door and get some of the trim painted up. I'm trying to do everything I can while the walls are flat. I have cut out some windows and figured out that the window sills should be removed so the window itself can be glued flat against the back of the wall and then glue the sill back into place so it protrudes out from the wall the width of the window part.
In progress, a chaotic mess

I think this really shows the variation in the brick colors with the mortar in place. I have handled these a lot and the ink is really hold up well.

Pick out the window sills in more of sandy stone color. I used Vallejo "Highlight US Tanker" #322 in the Panzer Aces line.


Experimenting with how the corner brick strips should fit.

Trying to figure out how the window treatments are supposed to work.

And an actual success. One wall done.


Thursday, February 23, 2023

Painting HO Scale Miniatures - Step 6 - Almost There

Well, I was hoping to be done with these, but they aren't quite ready yet. The few extra details have been painted up; hats, hair, gloves and what not. In addition to that I have added some lining but I'm not completely finished with that step, however, its been a while and I wanted to show the progress.

My issue with them now, as we reach these final steps, is the skin has ended up being to dark on most of them. So my next step will be to finish up the lining, pick out any details I missed and then go back with the bronze skin mid tone (or perhaps something else) and lighten up the skin.

Overall I'm fairly please with how these came out. I think the are significantly better than what you typically see on most model railroads. Overall I figure I have spent about 2 hours of painting on these 30 miniatures. Its hard to calculate the prep time but place that at an hour which means I'm spending roughly about 6 minutes per miniature. I got there by painting in mass (something wargamers are quite familiar with). Pick the number of miniatures you are comfortable with and prep and paint them all at once. I do admit that I basically skipped the two guys in suits though. You can a lot of time by keeping your color palette small and moving from one figure to the next with that color. You lose time by constantly changing colors as you move from one figure to the next.

I'm going to purchase some better sculpted HO folks and see what I can do with something that is well sculpted and produced using these same basic techniques. And in regards to these Preiser miniatures apparently steering wheels are huge on German vehicles? All the ones that have arms set like they are holding a steering wheel look like they are driving an 18 wheeler.

Group 1 Black Primer

Group 2 White Primer

Group 3 Grey Primer

Group 4 Zenithal

Group 1 Black Primer

Group 2 White Primer

Group 3 Grey Primer

Group 4 Zenithal


Acquisitions - Narrow Gauge Pictorial (4 Volumes)

To be cleared at the start my favorite narrow gauge railroad is the Colorado & Northwestern out of Boulder to Ward and Eldora. When I have the space and finally manage to acquire some On30 2-8-0s that will be the road I model.

Its still nice to have books on the other narrow gauge railroads in Colorado not the least of which is the D&RG. Back in the '80s and '90s Robert Grandt published a 10 volume series on the D&RG narrow gauge and I recently spotted an auction for 4 of these books; Vols II - V and I managed to get them for a great price, about $12 book. So a few more books for the railroad collection have arrived!


Tuesday, February 21, 2023

Kickstarter Loot - Gamelyn Games - Tiny Epic Vikings Deluxe

My copy of Tiny Epic Vikings arrived over the weekend. I have been looking forward to getting this one and I think it might even have hit a little early. Since this is the "Deluxe" version from the kickstarter it also included the first expansion "Ragnarok". Since its one of my favorite subjects I pretty much went all in with this one. I picked up the player mats and the main game mat which are just beautiful. The only other one I did this with was the Tiny Epic Western and I think I just bought the mat for that. 

Here are some pics, a feast for your eyes:


They hit all the goals I think, the first which is a box upgrade to some pretty thick cardstock.

There is a lot packed into this tiny box
Everything laid out, board is a nice thick cardstock, pieces were upgraded to wood. Gamelyn does a superb job with their game components.

The extras that I don't normally purchase; Game mat and Player mats


And the expansion, maybe not quite as jam packed as the main box, but pretty close!
Everything laid out. I know I didn't open anything that was shrinkwrapped so you will just have to use your imagination.


Saturday, February 18, 2023

A Brick Building from the Ground Up - Part 1

I actually started testing the brick painting on a piece of brick wall from ITLA Scale Models. I have had one of their kits plus a couple of modules for it laying around for a number of years now. It was another one of my purchases for a layout that will not come to pass at this point so its a "spare". That being said it will have a purpose as a backdrop building for photography, same as the brick store.

Here are the two pieces that I experimented with colors on before moving on the brick store. The one on the right also has a coating of Pan Pastel Raw Sienna on it, the one on the left doesn't

I had already primed this building with a grey primer, specifically Badgers' Stynylrez grey. ITLA are laser cut wood models so you definitely need a primer of some kind on this for the ink techniques to work. If the surface isn't primer or at least sealed it really sucks up the ink. That wood is thirsty!

Step 1
I coated all the pieces with Titanium White from the Liquitex Acrylic Ink line (well, except the two pieces that were essentially finished). I wasn't going for particularly even coats of color, just wanted to be sure there was white in the mortar lines (I did add a drop or so of raw sienna to this mix, mostly to get a more off white color). Let it dry, longer than you think, its possible to "re-activate" ink if its not completely dry for the next step.

An example of the white ink just basically being smeared across everything. I have decided to paint the sidewalk separately from the rest I want to try an oil technique on it.

Step 2
With a "dry" brush of Raw Sienna ink dragged it across the surface after the white had dried surface. You don't want a full brush full of ink, if its really wet you can potentially re-activate the ink underneath and you are trying to stay out of the mortar lines. You are going to get some in the mortar lines (maybe even most of the mortar lines) and that's okay. Cover 90 - 100% of the surface at this point. Let it dry, but not crucial for the next step. Yes, I forgot to take pictures.

Step 3
Here we are going to repeat the process with the raw umber this will give us some darker areas, and if the first layer isn't completely dry then it will just blend together. I aimed for about 50% of the total surface are, but its up to you.


Looks a little rough now, but I think everything will tie together as I go along, much like it did with the brick store.


This finishes, the painting part of the operation. Pretty quick, relatively easy and gives a good initial look to the brick surface with mortar lines showing all the way through in some areas, which is what you would expect for an older brick building.

After all this I painted the rough stone at the bottom and the concrete bands. The rough stone received a similar treatment to the brick while the concrete bands just received a quick wash of a grimy black (I didn't right it down, better check to see what I used for this. Again, missed taking pictures, just to much going on.

From here its on to assembly.

Friday, February 17, 2023

Painting an HO Scale Brick Building - Part 3

As I was trying to wrap up this simple brick storefront, which was just supposed to serve as a backdrop for the HO scale miniatures I have been working on. It struck me that I really should try and get some white or off white into the mortar lines. I have never been particularly successful with this technique in the past and I was trying to avoid it on this one. However, there is a lot of brick buildings coming down the line and its a technique that I need to master.

I have been looking at different techniques for a while now on various platforms and I just didn't like what I was seeing. There must be another way to go about this that would be relatively quick and yet still look good from a reasonable viewing distance. My eyes were wandering across my shelf of paint supplies when I spotted the box of Liquitex Acrylic Inks. Now that had possibilities.

I grabbed the titanium white, raw sienna, raw umber and burnt umber bottles to see what I could do. I took the white and put a few drops on the palette and then added just a bit of raw sienna to get something not quite white. I didn't thin it at all and just painted across a brick segment that I had from ITLA Scale Models. This is the same piece that I had used to practice the brick painting technique that I used on the small brick store. I wiped off the ink right away and it looked pretty good. Anytime you add white or something almost white to a surface and wipe it away you are, essentially, creating faded look and that's what I got. It looked pretty good. I then took the raw sienna and painted it lightly across the top of the surface to kill a bit of the faded look and that restored the color and didn't seep down in to the mortar lines. I did the same with a bit of raw umber just to see how it looked and the effect was looking pretty good.

To help blend things back together I took some Pan Pastel Burnt Sienna and Burnt Sienna Shade and lightly rubbed it down the surface and it worked as I had hoped, blending the colors together but it did fill in some of the mortar lines as well. Pretty quick and dirty.

I tried the ink on the brick store and was less successful there, the enamel wash came back to haunt me at this point. The Dark Track wash from Ammo dries fairly glossy and the ink ended up being pretty hydrophobic, pretty much staying on the surface or beading in the mortar lines. I cleaned it up with the same raw sienna and raw umber ink and it cleaned it up pretty good, restoring some color and still keeping a bit of that faded look.

So time to try it on something from "scratch". The rest of the ITLA kit (+a module or two I think) was sitting there. It was primed and ready to go. But more on that in another post.

Here is where the brick store has ended up at this point. I have probably missed some steps but its looking pretty good. I have started redoing the roof, it wasn't coming along the way I had hoped so I washed again with the Dark Track wash and that has been drying for a couple of days now. I'm going to back over it with an oil technique and see how that goes.


From the front, you can pick out some of the white mortar lines and see some of the peeling paint in the windows and door.

I'm liking the variation in color that I'm seeing now. After the white ink mortar lines went on and I "refreshed" some of the fading it caused it gives a more natural look to the building.

Quite pleased with the chipping on the white, not so much the door and window.

And the blank wall with the missing door. I think that's actually supposed to be an iron bean not a stone block supporting the bricks above the door. Oh well.,


Thursday, February 16, 2023

Painting HO Scale Miniatures - Step 5 - Getting to the details

The basic painting has been completed at this point. Now its time to go into the details. Again, I try to continue follow my process of painting from the inside out. Now, I'm going after things like, belts, shoes, jackets, purses and the like. We are closing in on the finish line.

At this point the process is pretty much the same. I have kept the number of colors way down at this point just to try and speed things along a bit. You will probably notice my penchant for green. One of the things I have tried to experiment with a this point is lining. You can think of this as a tightly controlled wash. Instead of paint this time around I tried my Liquitex Acrylic inks, in this case Burnt Umber. 

The idea is to paint a "shadow" at each color junction. So places where skin meets cloth or a piece of clothing meeting another piece of clothing. I realized after I took the pictures that I hadn't really managed to follow through with this on all of the miniatures but you can see the difference on the ones I did. 

At this stage you can really see how the different primer colors affect the colors you are applying. I'm still leaning towards my favorite of a neutral gray primer, both black, white and the zenithal style have coverage problems, often requiring 2 or more coats of thinned paint to get good coverage. You can also see the color shifts when the neutral grey background is more in the picture and the camera adjusts for the light better, all the standing figures are shifted a bit more towards yellow because of the light.

Group 1 Standing, Black Primer
Group 2 Standing, White Primer

Group 3 Standing, Grey Primer

Group 4 Standing, Zenithal


Group 1 Sitting, Black Primer

Group 2 Sitting, White Primer

Group 3 Sitting, Grey Primer

Group 4 Sitting, White Primer

Things are coming along, its been hard to find the time to paint so this is going slower than I had hoped. I should dig around and see if I can find some more miniatures and do one just in the grey primer in one session and time it.


Thursday, February 9, 2023

Painting an HO Scale Brick Building - Part 2

Time to move on to the roof. The cast wood shingles have a pretty rough look, so I approached these much the same way as the brick. I started with a lighter brown that I applied over the entire roof. I followed that up with a mid tone brown again applied over most of the roof, but not all. The third darker brown was applied a bit more randomly and quite frankly probably over did it. I applied the same wash I did on the bricks, Ammo's Track Wash, and that helped tie things together a bit more.

This is the lightest of the three colors. I also took the opportunity to paint the back side of the brick façade and the brick "tiles" on the top of the façade. 


This is the roof so far, just needs to be weathered which, hopefully, will blend those colors together a bit better. Note that I went with a lighter brown to represent the flagstone lintels for the windows and doors.

After all this, and with the chipping fluid nice and dry, I applied a mid-tone green on all the wooden window and door sills and used an yellow on the "panels" under the windows and on the doors. 

Here we go with the whole failure to take pictures again. The green is on, the yellow is not but the roof is almost finished and I have worked some white into the mortar lines. We are just going to ignore that for the moment.

You can see that, overall, the brick has a bit more of a faded look to it at this point, that's the result of trying to get some off white into the mortar lines. 

About this time it hit me that something was missing. While the darker mortar lines were nice, I thought it would be better if there was at least a hint of white in there. Time to experiment!